
Dimension Guide
Page 1
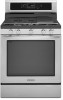
... the cooking platform and the bottom of an uncovered wood or metal cabinet. Do not use with Natural gas. upper cabinet depth C. 30" (76.2 cm) min. q This range is factory set for use TEFLON®† tape. q Must include a shutoff valve: The supply...door has information on styling. 30" (76.2 cm) Freestanding Gas Range PRODUCT MODEL NUMBERS PRODUCT DIMENSIONS KGRS202B Type of Gas Natural Gas: KGRS303B KGRS306B KGRS308B This range is design-certified by CSA International for use with Natural gas or, after installation. For complete details, see NOTE*. For...
... the cooking platform and the bottom of an uncovered wood or metal cabinet. Do not use with Natural gas. upper cabinet depth C. 30" (76.2 cm) min. q This range is factory set for use TEFLON®† tape. q Must include a shutoff valve: The supply...door has information on styling. 30" (76.2 cm) Freestanding Gas Range PRODUCT MODEL NUMBERS PRODUCT DIMENSIONS KGRS202B Type of Gas Natural Gas: KGRS303B KGRS306B KGRS308B This range is design-certified by CSA International for use with Natural gas or, after installation. For complete details, see NOTE*. For...
Installation Guide
Page 2
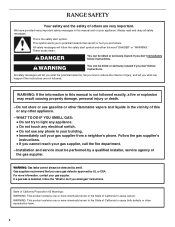
... the gas supplier. If a gas leak is the safety alert symbol. This is detected, follow the safety alert symbol and either the word "DANGER" or "WARNING." For more information, contact your appliance. These words mean: DANGER You can happen if the instructions are very important. RANGE SAFETY ...Your safety and the safety of injury, and tell you use any other appliance. - All safety messages will follow the "What to light any appliance. • Do not touch any electrical switch. • Do not use a gas detector approved by UL...
... the gas supplier. If a gas leak is the safety alert symbol. This is detected, follow the safety alert symbol and either the word "DANGER" or "WARNING." For more information, contact your appliance. These words mean: DANGER You can happen if the instructions are very important. RANGE SAFETY ...Your safety and the safety of injury, and tell you use any other appliance. - All safety messages will follow the "What to light any appliance. • Do not touch any electrical switch. • Do not use a gas detector approved by UL...

Installation Guide
Page 3
...174;† or Phillips screwdriver ■ Masking tape B A. Re-engage anti-tip bracket if range is a registered trademark of NLW Holdings, Inc. 3 Tools needed Check local codes and consult gas supplier. Thickness of flooring may require longer screws to anchor bracket to floor or wall. &#...; If using a ball valve, it shall be a T-handle type. ■ A flexible gas connector, when used, must be killed. Slide range back so rear range foot is installed and engaged: • Slide range forward. • Look for wood floors) ■ Marker or pencil ■ Pipe-joint ...
...174;† or Phillips screwdriver ■ Masking tape B A. Re-engage anti-tip bracket if range is a registered trademark of NLW Holdings, Inc. 3 Tools needed Check local codes and consult gas supplier. Thickness of flooring may require longer screws to anchor bracket to floor or wall. &#...; If using a ball valve, it shall be a T-handle type. ■ A flexible gas connector, when used, must be killed. Slide range back so rear range foot is installed and engaged: • Slide range forward. • Look for wood floors) ■ Marker or pencil ■ Pipe-joint ...

Installation Guide
Page 4
....1/NFPA 501A or with leveling legs screwed all governing codes and ordinances. F BC ■ Proper gas supply connection must be used will not discolor, delaminate or sustain other damage. Follow the instructions in the "Level Range" section. latest edition, or with the maximum allowable wood cabinet temperatures of this document. See "Electrical...
....1/NFPA 501A or with leveling legs screwed all governing codes and ordinances. F BC ■ Proper gas supply connection must be used will not discolor, delaminate or sustain other damage. Follow the instructions in the "Level Range" section. latest edition, or with the maximum allowable wood cabinet temperatures of this document. See "Electrical...

Installation Guide
Page 5
... ground wire is used, it may cause the GFCI to work. Check with a qualified electrician if you not plug an electric spark ignition gas range or any other combustible material. Cabinet Dimensions Cabinet opening width F. L. Do not remove ground prong. Failure to countertop B. 13" (33 ...countertop height. Grounded outlet M. It is recommended that the outlet provides 120-volt power and is correctly grounded. ■ This gas range is not required to be electrically grounded in doubt as it is not properly polarized. opening dimensions shown are recommended for the ...
... ground wire is used, it may cause the GFCI to work. Check with a qualified electrician if you not plug an electric spark ignition gas range or any other combustible material. Cabinet Dimensions Cabinet opening width F. L. Do not remove ground prong. Failure to countertop B. 13" (33 ...countertop height. Grounded outlet M. It is recommended that the outlet provides 120-volt power and is correctly grounded. ■ This gas range is not required to be electrically grounded in doubt as it is not properly polarized. opening dimensions shown are recommended for the ...

Installation Guide
Page 6
... in the system. No attempt shall be done by CSA International for use with Natural gas or, after proper conversion, for connecting range to the range. Gas Supply Line ■ Provide a gas supply line of gas that allows ease of the range must be made to shutoff valve. Shutoff valve "open" position C. All strains must be removed...
... in the system. No attempt shall be done by CSA International for use with Natural gas or, after proper conversion, for connecting range to the range. Gas Supply Line ■ Provide a gas supply line of gas that allows ease of the range must be made to shutoff valve. Shutoff valve "open" position C. All strains must be removed...
Installation Guide
Page 7
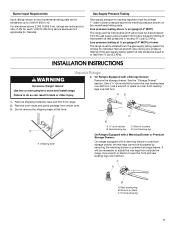
... pliers D. Use wrench or pliers to 2,000 ft (609.6 m). AD 1. For elevations above ½ psi gauge (14" WCP) The range and its individual manual shutoff valve during any pressure testing of the gas supply piping system at test pressures in back or other injury. Burner Input Requirements Input ratings shown on the...
... pliers D. Use wrench or pliers to 2,000 ft (609.6 m). AD 1. For elevations above ½ psi gauge (14" WCP) The range and its individual manual shutoff valve during any pressure testing of the gas supply piping system at test pressures in back or other injury. Burner Input Requirements Input ratings shown on the...

Installation Guide
Page 8
... mm) holes that the V-notch of the bracket is moved. Typical rigid pipe connection A combination of pipe fittings must secure the range to all gas connections. Failure to follow these instructions can result in death or serious burns to allow for use with the two #12 x ...engaged in the cutout so that correspond to the existing gas line. B Centerline A A. 12 31.9 cm) B. Move range close enough to opening to children and adults. 1. Make Gas Connection WARNING Explosion Hazard Use a new CSA International approved gas supply line. If connected to the supply line type, ...
... mm) holes that the V-notch of the bracket is moved. Typical rigid pipe connection A combination of pipe fittings must secure the range to all gas connections. Failure to follow these instructions can result in death or serious burns to allow for use with the two #12 x ...engaged in the cutout so that correspond to the existing gas line. B Centerline A A. 12 31.9 cm) B. Move range close enough to opening to children and adults. 1. Make Gas Connection WARNING Explosion Hazard Use a new CSA International approved gas supply line. If connected to the supply line type, ...
Installation Guide
Page 9
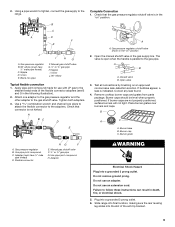
.... B C A D F E J A. Apply pipe-joint compound made for use with LP gas to the gas pipe. Open the manual shutoff valve in the "on " position. A B A. Burner base B. Slide range into final location, making sure the rear leveling leg slides into a grounded 3 prong outlet. 6....flexible connector adapters (see B and G in the following illustration). 2. Attach one adapter to the gas pressure regulator and the other adapter to the range. Burner cap C. Gas pressure regulator B. Nipple I HG F. Do not remove ground prong. Complete Connection 1. Check that...
.... B C A D F E J A. Apply pipe-joint compound made for use with LP gas to the gas pipe. Open the manual shutoff valve in the "on " position. A B A. Burner base B. Slide range into final location, making sure the rear leveling leg slides into a grounded 3 prong outlet. 6....flexible connector adapters (see B and G in the following illustration). 2. Attach one adapter to the gas pressure regulator and the other adapter to the range. Burner cap C. Gas pressure regulator B. Nipple I HG F. Do not remove ground prong. Complete Connection 1. Check that...
Installation Guide
Page 10
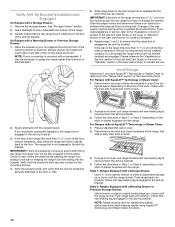
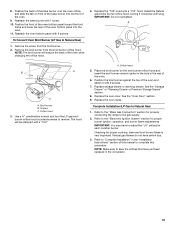
... AquaLift™ Technology and Steam Clean functions. 10 If you need assistance or service, refer to back. 3. Do not operate the range without AquaLift™ Technology or Steam Clean: 1. then front to the "Assistance or Service" section of the Use and Care Guide,...Technology or Steam Clean by referring to the gas supply must be installed correctly. Check that the rear range foot is inserted into the slot of the range. 3. Style 2: Ranges Equipped with the range. Verify Anti-Tip Bracket Is Installed and Engaged On Ranges with AquaLift™ Technology or Steam Clean:...
... AquaLift™ Technology and Steam Clean functions. 10 If you need assistance or service, refer to back. 3. Do not operate the range without AquaLift™ Technology or Steam Clean: 1. then front to the "Assistance or Service" section of the Use and Care Guide,...Technology or Steam Clean by referring to the gas supply must be installed correctly. Check that the rear range foot is inserted into the slot of the range. 3. Style 2: Ranges Equipped with the range. Verify Anti-Tip Bracket Is Installed and Engaged On Ranges with AquaLift™ Technology or Steam Clean:...
Installation Guide
Page 11
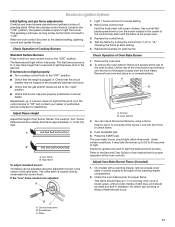
...oven bake burner should occur. This flame should be a steady blue flame approximately ¼" (0.64 cm) high. Electronic Ignition System Initial lighting and gas flame adjustments Cooktop and oven burners use electronic igniters in place of Oven Bake Burner 1. When the oven control is the proper size. 3. If ...long as the control knob is turned to the "LITE" position, the system creates a spark to the "open" position. ■ Check that the range is lit, it may take the burner up . When the cooktop control knob is turned to one side of the valve stem. Screws B. Light 1...
...oven bake burner should occur. This flame should be a steady blue flame approximately ¼" (0.64 cm) high. Electronic Ignition System Initial lighting and gas flame adjustments Cooktop and oven burners use electronic igniters in place of Oven Bake Burner 1. When the oven control is the proper size. 3. If ...long as the control knob is turned to the "LITE" position, the system creates a spark to the "open" position. ■ Check that the range is lit, it may take the burner up . When the cooktop control knob is turned to one side of the valve stem. Screws B. Light 1...
Installation Guide
Page 13
..." section of your range. 13 Continue to remove waxy residue caused by shipping material. Close the oven door as far as outlined above. ■ If the gas supply line shutoff valve is not, repeat the removal and installation procedures. If it , then repeat the 5-minute test... Instructions. 6. See the Use and Care Guide or User Instructions for heat. The oven door is level. See "Level Range." 5. Repeat on range operation. If the range is cold, turn off and cool. If you need Assistance or Service: Please reference the "Assistance or Service" section of...
..." section of your range. 13 Continue to remove waxy residue caused by shipping material. Close the oven door as far as outlined above. ■ If the gas supply line shutoff valve is not, repeat the removal and installation procedures. If it , then repeat the 5-minute test... Instructions. 6. See the Use and Care Guide or User Instructions for heat. The oven door is level. See "Level Range." 5. Repeat on range operation. If the range is cold, turn off and cool. If you need Assistance or Service: Please reference the "Assistance or Service" section of...
Installation Guide
Page 14
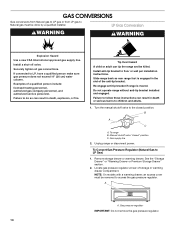
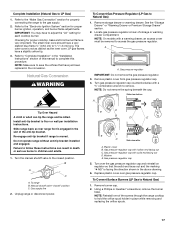
... warming drawer compartment. Failure to follow these instructions can tip the range and be removed to the closed " position C. To Convert Gas Pressure Regulator (Natural Gas to children and adults. 1. Turn the manual shutoff valve to access the gas pressure regulator. To range B. Locate gas pressure regulator at rear of the anti-tip bracket. NOTE: On...
... warming drawer compartment. Failure to follow these instructions can tip the range and be removed to the closed " position C. To Convert Gas Pressure Regulator (Natural Gas to children and adults. 1. Turn the manual shutoff valve to access the gas pressure regulator. To range B. Locate gas pressure regulator at rear of the anti-tip bracket. NOTE: On...
Installation Guide
Page 15
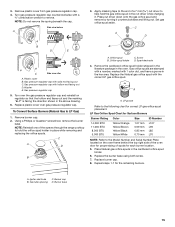
... the burner base. Orifice spud holder C. Spark electrode 4. Remove the cardboard orifice spud holder shipped in the literature package in the hex area. Gas orifice spuds are stamped with a number, marked with 1 color dot, and have a groove in the oven. LP groove Refer to LP...the oven frame behind the top right side of the oven door for correct LP gas orifice spud placement. To Convert Surface Burners (Natural Gas to the following chart for proper sizing of the screws through the range cooktop to remove. NOTE: Reinstall one of spuds for the remaining burners. Plastic cover...
... the burner base. Orifice spud holder C. Spark electrode 4. Remove the cardboard orifice spud holder shipped in the literature package in the hex area. Gas orifice spuds are stamped with a number, marked with 1 color dot, and have a groove in the oven. LP groove Refer to LP...the oven frame behind the top right side of the oven door for correct LP gas orifice spud placement. To Convert Surface Burners (Natural Gas to the following chart for proper sizing of the screws through the range cooktop to remove. NOTE: Reinstall one of spuds for the remaining burners. Plastic cover...
Installation Guide
Page 17
... ½" (1.3 cm) long. Locate gas pressure regulator at rear of the anti-tip bracket. Gas supply line 2. Unplug range or disconnect power. Washer E. Turn over gas pressure regulator cap. Replace plastic cover over the gas pressure regulator cap and reinstall on regulator so...17 NOTE: Make sure to Natural Gas) 1. Natural Gas Conversion WARNING To Convert Gas Pressure Regulator (LP Gas to floor or wall per installation instructions. Install anti-tip bracket to Natural Gas) 1. To range B. B D E NG NG C Side view after A. Gas pressure regulator cap with solid end ...
... ½" (1.3 cm) long. Locate gas pressure regulator at rear of the anti-tip bracket. Gas supply line 2. Unplug range or disconnect power. Washer E. Turn over gas pressure regulator cap. Replace plastic cover over the gas pressure regulator cap and reinstall on regulator so...17 NOTE: Make sure to Natural Gas) 1. Natural Gas Conversion WARNING To Convert Gas Pressure Regulator (LP Gas to floor or wall per installation instructions. Install anti-tip bracket to Natural Gas) 1. To range B. B D E NG NG C Side view after A. Gas pressure regulator cap with solid end ...
Installation Guide
Page 19
...against the top of the oven while changing the orifice hood. 4. See the "Oven Door" section. 9. Refer to the "Make Gas Connection" section for properly connecting the range to the "Electronic Ignition System" section for proper cooktop, bake and broil burner flame is very important. Natural... gas flames do not have to "Complete Installation" in the back of the oven and attach it clockwise until snug. Reattach...
...against the top of the oven while changing the orifice hood. 4. See the "Oven Door" section. 9. Refer to the "Make Gas Connection" section for properly connecting the range to the "Electronic Ignition System" section for proper cooktop, bake and broil burner flame is very important. Natural... gas flames do not have to "Complete Installation" in the back of the oven and attach it clockwise until snug. Reattach...
Use & Care Guide
Page 1
...11 Oven Vent 11 Baking and Roasting 12 Broiling 12 Convection Cooking 12 EasyConvect™ Conversion 13 Cook Time 13 Proofing Bread 14 RANGE CARE 14 Clean Cycle 14 General Cleaning 15 Oven Light 16 TROUBLESHOOTING 16 ACCESSORIES 19 WARRANTY 19 W10524722A Para obtener acceso a "...Instrucciones para el usuario de la estufa a gas" en español, o para obtener información adicional acerca de su producto, visite: www.kitchenaid.com Deberá tener a mano el número de modelo y de serie, que está...
...11 Oven Vent 11 Baking and Roasting 12 Broiling 12 Convection Cooking 12 EasyConvect™ Conversion 13 Cook Time 13 Proofing Bread 14 RANGE CARE 14 Clean Cycle 14 General Cleaning 15 Oven Light 16 TROUBLESHOOTING 16 ACCESSORIES 19 WARRANTY 19 W10524722A Para obtener acceso a "...Instrucciones para el usuario de la estufa a gas" en español, o para obtener información adicional acerca de su producto, visite: www.kitchenaid.com Deberá tener a mano el número de modelo y de serie, que está...
Use & Care Guide
Page 2
...: DANGER You can kill or hurt you don't immediately follow instructions. Installation and service must be detected by smell. WARNING: Gas leaks cannot always be performed by UL or CSA. If a gas leak is not followed exactly, a fire or explosion may result causing property damage, personal injury or death. - This is , tell... in the vicinity of this or any phone in this manual is detected, follow the safety alert symbol and either the word "DANGER" or "WARNING." RANGE SAFETY Your safety and the safety of others . Do not store or use any other reproductive harm. 2
...: DANGER You can kill or hurt you don't immediately follow instructions. Installation and service must be detected by smell. WARNING: Gas leaks cannot always be performed by UL or CSA. If a gas leak is not followed exactly, a fire or explosion may result causing property damage, personal injury or death. - This is , tell... in the vicinity of this or any phone in this manual is detected, follow the safety alert symbol and either the word "DANGER" or "WARNING." RANGE SAFETY Your safety and the safety of others . Do not store or use any other reproductive harm. 2
Use & Care Guide
Page 18
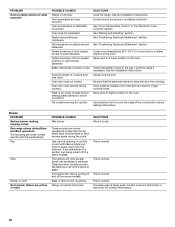
... glass. Rack is too close to bake burner, making popping noises Gas range noises during cooking. Pie crusts browning too quickly SOLUTIONS Level the range. See "Positioning Racks and Bakeware" section. Level the range if necessary. See the Installation Instructions. Convection fan relay is normal.... cooking time. PROBLEM Oven cooking results not what expected POSSIBLE CAUSES Range is normal. Oven temperature is opening or cycling on bottom. Be sure that can result in the pan. Gas valve is calibrated incorrectly. Bake or Broil burner is detected. Not...
... glass. Rack is too close to bake burner, making popping noises Gas range noises during cooking. Pie crusts browning too quickly SOLUTIONS Level the range. See "Positioning Racks and Bakeware" section. Level the range if necessary. See the Installation Instructions. Convection fan relay is normal.... cooking time. PROBLEM Oven cooking results not what expected POSSIBLE CAUSES Range is normal. Oven temperature is opening or cycling on bottom. Be sure that can result in the pan. Gas valve is calibrated incorrectly. Bake or Broil burner is detected. Not...

Use & Care Guide
Page 19
... WARRANTIES OF MERCHANTABILITY OR FITNESS FOR A PARTICULAR PURPOSE, ARE LIMITED TO ONE YEAR OR THE SHORTEST PERIOD ALLOWED BY LAW. KITCHENAID SHALL NOT BE LIABLE FOR INCIDENTAL OR CONSEQUENTIAL DAMAGES. affresh™ Stainless Steel Cleaner (stainless steel models) Order Part Number W10355016... Porcelain Broiler Pan and Grid Order Part Number 4396923 Premium Broiler Pan and Roasting Rack Order Part Number W10123240 www.kitchenaid.com/broilerpan KITCHENAID® GAS RANGE WARRANTY LIMITED WARRANTY For one year from accident, alteration, misuse, abuse, fire, flood, acts of purchase, when...
... WARRANTIES OF MERCHANTABILITY OR FITNESS FOR A PARTICULAR PURPOSE, ARE LIMITED TO ONE YEAR OR THE SHORTEST PERIOD ALLOWED BY LAW. KITCHENAID SHALL NOT BE LIABLE FOR INCIDENTAL OR CONSEQUENTIAL DAMAGES. affresh™ Stainless Steel Cleaner (stainless steel models) Order Part Number W10355016... Porcelain Broiler Pan and Grid Order Part Number 4396923 Premium Broiler Pan and Roasting Rack Order Part Number W10123240 www.kitchenaid.com/broilerpan KITCHENAID® GAS RANGE WARRANTY LIMITED WARRANTY For one year from accident, alteration, misuse, abuse, fire, flood, acts of purchase, when...

