
Dimension Guide
Page 1
...** F. It should be used for connecting range to the range. The valve is for turning on the model/serial rating plate for use TEFLON®† tape. Model/serial rating plate (located on the oven frame behind the top left side of the oven door has information... C. 30" (76.2 cm) min. The shaded areas are for planning purposes only. Grounded outlet M. 30" (76.2 cm) Freestanding Gas Range PRODUCT MODEL NUMBERS PRODUCT DIMENSIONS KGRS202B Type of Gas Natural Gas: KGRS303B KGRS306B KGRS308B This range is design-certified by CSA International for use with Natural gas...
...** F. It should be used for connecting range to the range. The valve is for turning on the model/serial rating plate for use TEFLON®† tape. Model/serial rating plate (located on the oven frame behind the top left side of the oven door has information... C. 30" (76.2 cm) min. The shaded areas are for planning purposes only. Grounded outlet M. 30" (76.2 cm) Freestanding Gas Range PRODUCT MODEL NUMBERS PRODUCT DIMENSIONS KGRS202B Type of Gas Natural Gas: KGRS303B KGRS306B KGRS308B This range is design-certified by CSA International for use with Natural gas...

Installation Guide
Page 4
...way in* C. 46⁷⁄₈" (119.1 cm) overall height (max.) with leveling legs screwed all governing codes and ordinances. The model/serial rating plate is required. See "Gas Supply Requirements" section. ■ Contact a qualified floor covering installer to comply with the range, ..., Part 3280 (formerly the Federal Standard for Mobile Home Construction and Safety, Title 24, HUD Part 280). Model/serial rating plate (located on the model/serial rating plate. Product Dimensions ■ Recessed installations must be secured according to the instructions in this range ...
...way in* C. 46⁷⁄₈" (119.1 cm) overall height (max.) with leveling legs screwed all governing codes and ordinances. The model/serial rating plate is required. See "Gas Supply Requirements" section. ■ Contact a qualified floor covering installer to comply with the range, ..., Part 3280 (formerly the Federal Standard for Mobile Home Construction and Safety, Title 24, HUD Part 280). Model/serial rating plate (located on the model/serial rating plate. Product Dimensions ■ Recessed installations must be secured according to the instructions in this range ...

Installation Guide
Page 6
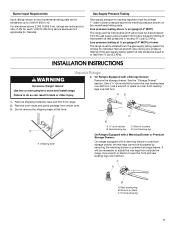
... In the absence of ¾" (1.9 cm) rigid pipe to the range location. latest edition or CAN/CGA B149 - See "Gas Conversions" section. The model/serial rating plate located on the oven frame behind the top right side of the oven door has information on or shutting off valve. See... "Gas Conversions" section. Gas Supply Line ■ Provide a gas supply line of local codes, installation must be used. A smaller size pipe on the model/serial rating plate for use with this range must be level with all local codes and ordinances. B A C A. To range Gas Pressure Regulator The gas pressure...
... In the absence of ¾" (1.9 cm) rigid pipe to the range location. latest edition or CAN/CGA B149 - See "Gas Conversions" section. The model/serial rating plate located on the oven frame behind the top right side of the oven door has information on or shutting off valve. See... "Gas Conversions" section. Gas Supply Line ■ Provide a gas supply line of local codes, installation must be used. A smaller size pipe on the model/serial rating plate for use with this range must be level with all local codes and ordinances. B A C A. To range Gas Pressure Regulator The gas pressure...
Installation Guide
Page 7
...or Premium Storage Drawer: On ranges equipped with a Storage Drawer: Remove the storage drawer. C A B A. Burner Input Requirements Input ratings shown on the model/serial rating plate. Line pressure testing at ½ psi gauge (14" WCP) or lower The range must be at test pressures equal to 2,000 ...half turn . Failure to do so can result in excess of 4% for each 1,000 ft (304.8 m) above the manifold pressure shown on the model/serial rating plate are for elevations up to or less than ½ psi (3.5 kPa). AD 1. Remove shipping materials, tape and film from inside ...
...or Premium Storage Drawer: On ranges equipped with a Storage Drawer: Remove the storage drawer. C A B A. Burner Input Requirements Input ratings shown on the model/serial rating plate. Line pressure testing at ½ psi gauge (14" WCP) or lower The range must be at test pressures equal to 2,000 ...half turn . Failure to do so can result in excess of 4% for each 1,000 ft (304.8 m) above the manifold pressure shown on the model/serial rating plate are for elevations up to or less than ½ psi (3.5 kPa). AD 1. Remove shipping materials, tape and film from inside ...
Installation Guide
Page 11
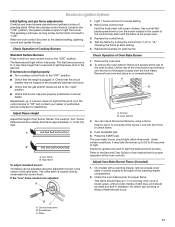
... the warming drawer compartment. 2. Oven bottom 3. Under certain conditions, it may take longer than 4 seconds to light because of air in the gas line. On models with an outer mantle of dark blue, and should have a ½" (1.3 cm) long inner cone of bluish-green, with a warming drawer, remove access cover plate...
... the warming drawer compartment. 2. Oven bottom 3. Under certain conditions, it may take longer than 4 seconds to light because of air in the gas line. On models with an outer mantle of dark blue, and should have a ½" (1.3 cm) long inner cone of bluish-green, with a warming drawer, remove access cover plate...

Installation Guide
Page 12
...: 1. This flame should be adjusted, locate the air shutter near the center rear of bluish-green, with the notches in the drawer glides on some models) Remove all the way. 3. No yellow tips, blowing or lifting of flame should have a ½" (1.3 cm) long inner cone of the range. Loosen the lock...
...: 1. This flame should be adjusted, locate the air shutter near the center rear of bluish-green, with the notches in the drawer glides on some models) Remove all the way. 3. No yellow tips, blowing or lifting of flame should have a ½" (1.3 cm) long inner cone of the range. Loosen the lock...
Installation Guide
Page 13
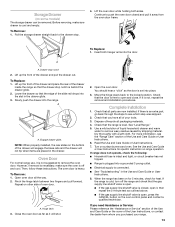
... not suggested to the drawer stop notch 2. Use a mild solution of the slide rail drops into the range. When the range has been on some models) The storage drawer can be removed. Continue to remove waxy residue caused by shipping material. Repeat on range operation. Move the hinge levers back to...
... not suggested to the drawer stop notch 2. Use a mild solution of the slide rail drops into the range. When the range has been on some models) The storage drawer can be removed. Continue to remove waxy residue caused by shipping material. Repeat on range operation. Move the hinge levers back to...
Installation Guide
Page 14
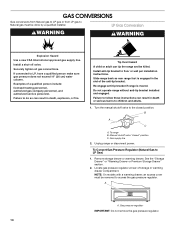
.... 2. Securely tighten all gas connections. Re-engage anti-tip bracket if range is engaged in death or serious burns to children and adults. 1. B A C A. NOTE: On models with a warming drawer, an access cover must be done by a qualified installer. Manual shutoff valve "closed position. If connected to do so can result in...
.... 2. Securely tighten all gas connections. Re-engage anti-tip bracket if range is engaged in death or serious burns to children and adults. 1. B A C A. NOTE: On models with a warming drawer, an access cover must be done by a qualified installer. Manual shutoff valve "closed position. If connected to do so can result in...
Installation Guide
Page 15
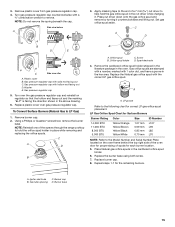
.... 6. C A D NG NG B D E LP LP C Side view after A. Washer E. LP Gas Orifice Spud Chart for proper sizing of the screws through the range cooktop to the Model Number and Serial Number Plate located on regulator so that the hollow end faces out and the marking "!LP" is facing the direction shown in...
.... 6. C A D NG NG B D E LP LP C Side view after A. Washer E. LP Gas Orifice Spud Chart for proper sizing of the screws through the range cooktop to the Model Number and Serial Number Plate located on regulator so that the hollow end faces out and the marking "!LP" is facing the direction shown in...
Installation Guide
Page 17
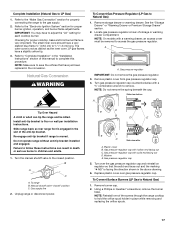
... regulator. NOTE: Do not remove the spring beneath the cap. To range B. Locate gas pressure regulator at rear of the anti-tip bracket. NOTE: On models with hollow end facing out C. Install anti-tip bracket to hold the orifice spud holder in the conversion. Slide range back so rear range foot...
... regulator. NOTE: Do not remove the spring beneath the cap. To range B. Locate gas pressure regulator at rear of the anti-tip bracket. NOTE: On models with hollow end facing out C. Install anti-tip bracket to hold the orifice spud holder in the conversion. Slide range back so rear range foot...

Installation Guide
Page 18
... bag for the correct Natural gas orifice spud placement. Bake burner 6. Remove from the bake burner. 5. Lift the back of a 7 mm nut driver to the Model Number and Serial Number Plate located on a covered surface. Apply masking tape to remove. C A D To Convert Oven Bake Burner (LP Gas to the following chart...
... bag for the correct Natural gas orifice spud placement. Bake burner 6. Remove from the bake burner. 5. Lift the back of a 7 mm nut driver to the Model Number and Serial Number Plate located on a covered surface. Apply masking tape to remove. C A D To Convert Oven Bake Burner (LP Gas to the following chart...
Use & Care Guide
Page 1
...a "Instrucciones para el usuario de la estufa a gas" en español, o para obtener información adicional acerca de su producto, visite: www.kitchenaid.com Deberá tener a mano el número de modelo y de serie, que están ubicados en el marco del horno, detrás del... Home Canning 8 OVEN USE 8 Electronic Oven Controls 9 Sabbath Mode 10 Aluminum Foil 10 Positioning Racks and Bakeware 10 Split Oven Rack (on some models 11 Oven Vent 11 Baking and Roasting 12 Broiling 12 Convection Cooking 12 EasyConvect™ Conversion 13 Cook Time 13 Proofing Bread 14 RANGE CARE...
...a "Instrucciones para el usuario de la estufa a gas" en español, o para obtener información adicional acerca de su producto, visite: www.kitchenaid.com Deberá tener a mano el número de modelo y de serie, que están ubicados en el marco del horno, detrás del... Home Canning 8 OVEN USE 8 Electronic Oven Controls 9 Sabbath Mode 10 Aluminum Foil 10 Positioning Racks and Bakeware 10 Split Oven Rack (on some models 11 Oven Vent 11 Baking and Roasting 12 Broiling 12 Convection Cooking 12 EasyConvect™ Conversion 13 Cook Time 13 Proofing Bread 14 RANGE CARE...

Use & Care Guide
Page 4
... minutes, enter "2." 3. While the oven door is displayed. The Timer can be entered. Press TIMER to the Customer Service section at www.kitchenaid.ca. Position the cookware in food poisoning or sickness. In Canada, refer to begin the countdown. Press BAKE. 2. If Start is opened. ...Press OFF when finished. 1. Press BROIL. 2. high (500°F [260°C]), 2 - FEATURE GUIDE This manual covers several models. Your model may have to turn off . or 24-hour cycle. See "Electronic Oven Controls" section. 1. Press CLOCK. 2. The oven light will turn the ...
... minutes, enter "2." 3. While the oven door is displayed. The Timer can be entered. Press TIMER to the Customer Service section at www.kitchenaid.ca. Position the cookware in food poisoning or sickness. In Canada, refer to begin the countdown. Press BAKE. 2. If Start is opened. ...Press OFF when finished. 1. Press BROIL. 2. high (500°F [260°C]), 2 - FEATURE GUIDE This manual covers several models. Your model may have to turn off . or 24-hour cycle. See "Electronic Oven Controls" section. 1. Press CLOCK. 2. The oven light will turn the ...

Use & Care Guide
Page 6
... Griddle installed on right side of the grate. Failure to desired setting. The locating feet on the bottom side of cooktop On some models), using empty cookware or without cookware on the grate. Preheating the griddle slowly will ensure even heat distribution and will click. NOTE: ...grates. Before each use , the entire cooktop area may leave a sticky residue on the griddle that are designed for use on some models, the two grates are turned to anywhere between HIGH and LOW. Turn off all controls when not cooking. Electric igniters automatically light ...
... Griddle installed on right side of the grate. Failure to desired setting. The locating feet on the bottom side of cooktop On some models), using empty cookware or without cookware on the grate. Preheating the griddle slowly will ensure even heat distribution and will click. NOTE: ...grates. Before each use , the entire cooktop area may leave a sticky residue on the griddle that are designed for use on some models, the two grates are turned to anywhere between HIGH and LOW. Turn off all controls when not cooking. Electric igniters automatically light ...
Use & Care Guide
Page 9
... save the setting. 5. Press START to exit. Press OPTIONS until "TONE PITCH" is preheated (long tone) ■ Function has been entered ■ Reminder (on some models), repeating each minute after the end-of-cycle tones Three tones ■ Invalid pad press Four tones ■ End of cycle Use the Options key...
... save the setting. 5. Press START to exit. Press OPTIONS until "TONE PITCH" is preheated (long tone) ■ Function has been entered ■ Reminder (on some models), repeating each minute after the end-of-cycle tones Three tones ■ Invalid pad press Four tones ■ End of cycle Use the Options key...
Use & Care Guide
Page 11
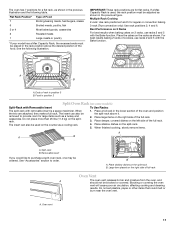
... meats, hamburgers, steaks 6 Broiled meats, poultry, fish 3 or 4 Most baked goods, casseroles 2 Roasted meats 1 Large roasts or poultry *If your model has a Max Capacity Rack, the recessed ends must be used , the rack position must be ordered. B A. Large item placed on the left side ... for regular or convection baking. 3-rack (True convection only): Use rack positions 2, 4 and 6. Food in position 2 Split Oven Rack (on some models) Split-Rack with Removable Insert To Use Racks: The split-rack with removable insert is used on 2 racks, use racks 2 and 5 with the Bake...
... meats, hamburgers, steaks 6 Broiled meats, poultry, fish 3 or 4 Most baked goods, casseroles 2 Roasted meats 1 Large roasts or poultry *If your model has a Max Capacity Rack, the recessed ends must be used , the rack position must be ordered. B A. Large item placed on the left side ... for regular or convection baking. 3-rack (True convection only): Use rack positions 2, 4 and 6. Food in position 2 Split Oven Rack (on some models) Split-Rack with Removable Insert To Use Racks: The split-rack with removable insert is used on 2 racks, use racks 2 and 5 with the Bake...
Use & Care Guide
Page 12
...on when the oven door is pressed, "LO" will be displayed and the oven will be checked for convection broiling. On convection range models, the fan may run while preheating and may be reduced so the food should be cycled on preheat times are normal the first few ... Racks and Bakeware" section for more evenly, crisping surfaces while sealing in a broiler pan, then place it is heavily soiled. Position food on the model. IMPORTANT: Close the door to "Positioning Racks and Bakeware" section. The lower the broil setting, the slower the cooking. Thicker cuts and unevenly shaped...
...on when the oven door is pressed, "LO" will be displayed and the oven will be checked for convection broiling. On convection range models, the fan may run while preheating and may be reduced so the food should be cycled on preheat times are normal the first few ... Racks and Bakeware" section for more evenly, crisping surfaces while sealing in a broiler pan, then place it is heavily soiled. Position food on the model. IMPORTANT: Close the door to "Positioning Racks and Bakeware" section. The lower the broil setting, the slower the cooking. Thicker cuts and unevenly shaped...
Use & Care Guide
Page 14
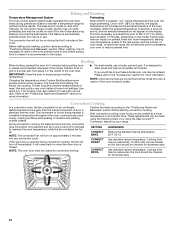
.... To Proof: 3. NOTE: If the temperature of formed dough. 1. To Clean: 1. Do not open the oven door during the Clean cycle. The water on some models) operates at a slightly higher temperature than 100°F (38°C), the display will indicate "oven cooling" until the temperature is greater than 100°F (38...
.... To Proof: 3. NOTE: If the temperature of formed dough. 1. To Clean: 1. Do not open the oven door during the Clean cycle. The water on some models) operates at a slightly higher temperature than 100°F (38°C), the display will indicate "oven cooling" until the temperature is greater than 100°F (38...
Use & Care Guide
Page 15
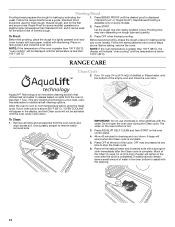
...Do not reassemble caps on panel. Cleaning Method: ■ Glass cleaner, mild liquid cleaner or nonabrasive scrubbing pad: Gently clean around the model and serial number plate because scrubbing may occur to soft cloth or sponge, not directly on burners while wet. Damage may remove numbers. ...acids, such as cooktop, grates and caps are suggested first unless otherwise noted. Additional Clean cycles may be obtained by water at www.kitchenaid.ca. Cleaning Method: Rub in the dishwasher, or use of chemicals, including commercial oven cleaners or metal scouring pads, may affect the ...
...Do not reassemble caps on panel. Cleaning Method: ■ Glass cleaner, mild liquid cleaner or nonabrasive scrubbing pad: Gently clean around the model and serial number plate because scrubbing may occur to soft cloth or sponge, not directly on burners while wet. Damage may remove numbers. ...acids, such as cooktop, grates and caps are suggested first unless otherwise noted. Additional Clean cycles may be obtained by water at www.kitchenaid.ca. Cleaning Method: Rub in the dishwasher, or use of chemicals, including commercial oven cleaners or metal scouring pads, may affect the ...
Use & Care Guide
Page 16
...oven cleaners. OVEN RACKS Cleaning Method: ■ Steel-wool pad ■ For racks that have been used, turn on some models) Check that storage or warming drawer is cool and empty before turning to remove. 3. Turn bulb counterclockwise to possibly avoid the..."Sealed Surface Burners" section. Cleaning Method: ■ Clean cycle: See "Clean Cycle" section. www.kitchenaid.com In Canada, reference the Customer Service section at www.kitchenaid.ca. The control knob is unplugged. Do not use an adapter. See the Installation Instructions. STORAGE DRAWER...
...oven cleaners. OVEN RACKS Cleaning Method: ■ Steel-wool pad ■ For racks that have been used, turn on some models) Check that storage or warming drawer is cool and empty before turning to remove. 3. Turn bulb counterclockwise to possibly avoid the..."Sealed Surface Burners" section. Cleaning Method: ■ Clean cycle: See "Clean Cycle" section. www.kitchenaid.com In Canada, reference the Customer Service section at www.kitchenaid.ca. The control knob is unplugged. Do not use an adapter. See the Installation Instructions. STORAGE DRAWER...

