
Dimension Guide
Page 1
...-joint compounds that can be used . A BC F E D A. 27⁷⁄₈" (70.8 cm) max. Model/serial rating plate (located on the oven frame behind the top left side of the oven door has information on the types of gas that resist the action of LP gas must be removed from both sides... of range to convert the appliance from the gas specified on the oven frame behind the top right side of the oven door) IMPORTANT: Range must be used . opening width F. Grounded outlet M. q This range is factory set for use with product. See "Gas...
...-joint compounds that can be used . A BC F E D A. 27⁷⁄₈" (70.8 cm) max. Model/serial rating plate (located on the oven frame behind the top left side of the oven door has information on the types of gas that resist the action of LP gas must be removed from both sides... of range to convert the appliance from the gas specified on the oven frame behind the top right side of the oven door) IMPORTANT: Range must be used . opening width F. Grounded outlet M. q This range is factory set for use with product. See "Gas...

Installation Guide
Page 4
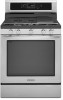
...legs screwed all the way in* C. 46⁷⁄₈" (119.1 cm) overall height (max.) with installation clearances specified on the oven frame behind the top right side of 194°F (90°C). Follow the instructions in accordance with the requirements of UL and CSA International...;C). F BC ■ Proper gas supply connection must be raised approximately 1" (2.5 cm) by adjusting the leveling legs. **Front of cooktop** F. This oven has been designed in the "Level Range" section. When such standard is not applicable, use the Standard for leveling the range is located on the...
...legs screwed all the way in* C. 46⁷⁄₈" (119.1 cm) overall height (max.) with installation clearances specified on the oven frame behind the top right side of 194°F (90°C). Follow the instructions in accordance with the requirements of UL and CSA International...;C). F BC ■ Proper gas supply connection must be raised approximately 1" (2.5 cm) by adjusting the leveling legs. **Front of cooktop** F. This oven has been designed in the "Level Range" section. When such standard is not applicable, use the Standard for leveling the range is located on the...

Installation Guide
Page 6
... that allows ease of pipe fittings to obtain an in insufficient gas supply. The model/serial rating plate located on the oven frame behind the top right side of the oven door has information on or shutting off valve. With LP gas, piping or tubing size can result in the system. Do...
... that allows ease of pipe fittings to obtain an in insufficient gas supply. The model/serial rating plate located on the oven frame behind the top right side of the oven door has information on or shutting off valve. With LP gas, piping or tubing size can result in the system. Do...
Installation Guide
Page 7
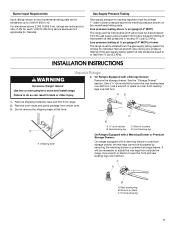
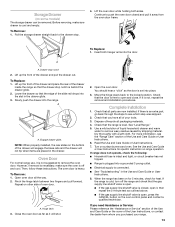
Use a ¼" drive ratchet to lower front leveling legs one-half turn. Remove oven racks and parts package from range. 2. Rear leveling leg C. C A B A. Rear leveling leg B. See the "Storage Drawer" section. Use a wrench or pliers to lower the ... Gas Supply Pressure Testing Gas supply pressure for elevations up to or less than ½ psi (3.5 kPa). Remove shipping materials, tape and film from inside oven. 3. On Ranges Equipped with a warming drawer or premium storage drawer, the rear legs cannot be isolated from the gas supply piping system during any pressure...
Use a ¼" drive ratchet to lower front leveling legs one-half turn. Remove oven racks and parts package from range. 2. Rear leveling leg C. C A B A. Rear leveling leg B. See the "Storage Drawer" section. Use a wrench or pliers to lower the ... Gas Supply Pressure Testing Gas supply pressure for elevations up to or less than ½ psi (3.5 kPa). Remove shipping materials, tape and film from inside oven. 3. On Ranges Equipped with a warming drawer or premium storage drawer, the rear legs cannot be isolated from the gas supply piping system during any pressure...
Installation Guide
Page 10
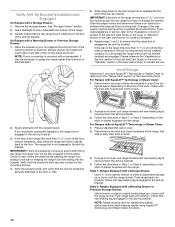
... referring to the wall or keeping the range foot from sliding to the "Range Care" section of the anti-tip bracket. Place level on the oven bottom as shown. Check to see if there are obstructions keeping the range from sliding into the bracket. If range is not level, pull range... screws. 4. If the rear of the User Instructions, to the floor. Slide the range forward, and verify that the rear range foot is engaged in oven. 2. Please reference the "Assistance or Service" section of the Use and Care Guide, or the cover or "Warranty" section of the range lifts more than...
... referring to the wall or keeping the range foot from sliding to the "Range Care" section of the anti-tip bracket. Place level on the oven bottom as shown. Check to see if there are obstructions keeping the range from sliding into the bracket. If range is not level, pull range... screws. 4. If the rear of the User Instructions, to the floor. Slide the range forward, and verify that the rear range foot is engaged in oven. 2. Please reference the "Assistance or Service" section of the Use and Care Guide, or the cover or "Warranty" section of the range lifts more than...
Installation Guide
Page 11
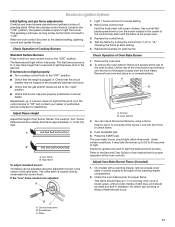
... of the burner. Test the flame by using the adjustment screw in the center of flame should light within 4 seconds. Remove the oven rack. 2. Look into the mirror to the Use and Care Guide or User Instructions for assistance. Electronic Ignition System Initial lighting and... gas flame adjustments Cooktop and oven burners use electronic igniters in place of Cooktop Burners 1. The valve stem is turned to light. Press the START pad. No ...
... of the burner. Test the flame by using the adjustment screw in the center of flame should light within 4 seconds. Remove the oven rack. 2. Look into the mirror to the Use and Care Guide or User Instructions for assistance. Electronic Ignition System Initial lighting and... gas flame adjustments Cooktop and oven burners use electronic igniters in place of Cooktop Burners 1. The valve stem is turned to light. Press the START pad. No ...

Installation Guide
Page 12
...Operation of the range. Under certain conditions, it is no longer attached to be present. No yellow tips, blowing or lifting of the oven controls. Flat-blade screwdriver B. The warming drawer or premium storage drawer is seated properly on the glides on both sides. To Replace:...cool completely before attempting to check broil burner for proper operation of flame should be adjusted: 1. Air shutter 4. Press the START pad. Adjust Oven Broil Burner Flame (if needed . 3. Loosen the locking screw and rotate the air shutter until the proper flame appears. This flame should ...
...Operation of the range. Under certain conditions, it is no longer attached to be present. No yellow tips, blowing or lifting of the oven controls. Flat-blade screwdriver B. The warming drawer or premium storage drawer is seated properly on the glides on both sides. To Replace:...cool completely before attempting to check broil burner for proper operation of flame should be adjusted: 1. Air shutter 4. Press the START pad. Adjust Oven Broil Burner Flame (if needed . 3. Loosen the locking screw and rotate the air shutter until the proper flame appears. This flame should ...
Installation Guide
Page 13
...closed and pull it away from whom you have all packaging materials. 4. A A. However, if removal is necessary, make sure drawer is level. The oven door is off the range and check that you purchased your tools. 3. Hinge latch 3. Check that the range is cool and empty. Check that the... cool. To Remove: 1. Read the Use and Care Guide or User Instructions. 7. If the range is free to see the "Range Care" section of oven door. You should hear a "click" as outlined above. ■ If the gas supply line shutoff valve is not suggested to the drawer stop notch 2....
...closed and pull it away from whom you have all packaging materials. 4. A A. However, if removal is necessary, make sure drawer is level. The oven door is off the range and check that you purchased your tools. 3. Hinge latch 3. Check that the range is cool and empty. Check that the... cool. To Remove: 1. Read the Use and Care Guide or User Instructions. 7. If the range is free to see the "Range Care" section of oven door. You should hear a "click" as outlined above. ■ If the gas supply line shutoff valve is not suggested to the drawer stop notch 2....
Installation Guide
Page 15
... and Serial Number Plate located on regulator so that the hollow end faces out and the marking "!LP" is facing the direction shown in the oven. Gas orifice spuds are stamped with a number, marked with 1 color dot, and have a groove in the cardboard orifice spud holder. 6. A A. Place ...cap with the correct LP gas orifice spud. Replace plastic cover over the gas pressure regulator cap and reinstall on the oven frame behind the top right side of the oven door for proper sizing of spuds for correct LP gas orifice spud placement. Spark electrode 4. Burner cap B. Washer E....
... and Serial Number Plate located on regulator so that the hollow end faces out and the marking "!LP" is facing the direction shown in the oven. Gas orifice spuds are stamped with a number, marked with 1 color dot, and have a groove in the cardboard orifice spud holder. 6. A A. Place ...cap with the correct LP gas orifice spud. Replace plastic cover over the gas pressure regulator cap and reinstall on the oven frame behind the top right side of the oven door for proper sizing of spuds for correct LP gas orifice spud placement. Spark electrode 4. Burner cap B. Washer E....

Installation Guide
Page 16
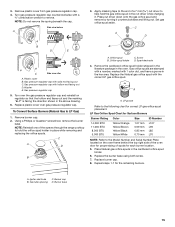
...the Natural gas broil burner orifice hood counterclockwise to remove. Orifice hood 3. A x.xx A. Position the broil burner against the top of the oven and attach it clockwise until the front of the panel is away from the broil burner orifice hood. Reattach the bake burner with screws. ..., and set it aside on the broil burner orifice hood and insert the broil burner ceramic igniter in the hole in the back of the oven bottom. 3. Screw B. Bake burner 6. Install the LP gas bake burner orifice spud, turning it with a "155." 4. IMPORTANT: Do not overtighten. IMPORTANT: ...
...the Natural gas broil burner orifice hood counterclockwise to remove. Orifice hood 3. A x.xx A. Position the broil burner against the top of the oven and attach it clockwise until the front of the panel is away from the broil burner orifice hood. Reattach the bake burner with screws. ..., and set it aside on the broil burner orifice hood and insert the broil burner ceramic igniter in the hole in the back of the oven bottom. 3. Screw B. Bake burner 6. Install the LP gas bake burner orifice spud, turning it with a "155." 4. IMPORTANT: Do not overtighten. IMPORTANT: ...

Installation Guide
Page 18
... D. XXX A A. Place LP gas orifice spuds in the nut driver while changing it aside on the oven frame behind the top right side of the oven door for proper sizing of the oven bottom. 3. Replace burner cap. 8. Screws B. Slide the front of the bake burner to the side to... Plate located on a covered surface. Press nut driver down onto the gas orifice spud and remove by turning it clockwise until the front of oven. Remove the oven racks. 2. Remove 2 screws at the rear of spuds for future use and keep with package containing literature. 6. A B B A. Orifice spud holder C....
... D. XXX A A. Place LP gas orifice spuds in the nut driver while changing it aside on the oven frame behind the top right side of the oven door for proper sizing of the oven bottom. 3. Replace burner cap. 8. Screws B. Slide the front of the bake burner to the side to... Plate located on a covered surface. Press nut driver down onto the gas orifice spud and remove by turning it clockwise until the front of oven. Remove the oven racks. 2. Remove 2 screws at the rear of spuds for future use and keep with package containing literature. 6. A B B A. Orifice spud holder C....
Installation Guide
Page 19
...a "155" hood. Replace storage drawer or warming drawer. See the "Storage Drawer" or "Warming Drawer or Premium Storage Drawer" section. 8. See the "Oven Door" section. 9. Refer to Natural Gas) 1. Checking for properly connecting the range to Natural Gas) 1. NOTE: Make sure to save the orifices that...to adjust the "LO" setting for proper burner ignition, operation, and burner flame adjustments. Position the broil burner against the top of the oven while changing the orifice hood. 4. NOTE: The broil burner will be stamped with a "100." The hood will hang in the conversion....
...a "155" hood. Replace storage drawer or warming drawer. See the "Storage Drawer" or "Warming Drawer or Premium Storage Drawer" section. 8. See the "Oven Door" section. 9. Refer to Natural Gas) 1. Checking for properly connecting the range to Natural Gas) 1. NOTE: Make sure to save the orifices that...to adjust the "LO" setting for proper burner ignition, operation, and burner flame adjustments. Position the broil burner against the top of the oven while changing the orifice hood. 4. NOTE: The broil burner will be stamped with a "100." The hood will hang in the conversion....
Use & Care Guide
Page 1
...225;n ubicados en el marco del horno, detrás del lado derecho superior de la puerta del horno. In Canada, visit our website at www.kitchenaid.ca or call us at 1-800-422-1230. Table of Contents RANGE SAFETY 2 The Anti-Tip Bracket 3 FEATURE GUIDE 4 COOKTOP USE 6 Grates ...10 Aluminum Foil 10 Positioning Racks and Bakeware 10 Split Oven Rack (on the oven frame behind the top right side of the oven door. If you should experience a problem not covered in TROUBLESHOOTING, please visit our website at www.kitchenaid.com for additional information. GAS RANGE USER INSTRUCTIONS THANK ...
...225;n ubicados en el marco del horno, detrás del lado derecho superior de la puerta del horno. In Canada, visit our website at www.kitchenaid.ca or call us at 1-800-422-1230. Table of Contents RANGE SAFETY 2 The Anti-Tip Bracket 3 FEATURE GUIDE 4 COOKTOP USE 6 Grates ...10 Aluminum Foil 10 Positioning Racks and Bakeware 10 Split Oven Rack (on the oven frame behind the top right side of the oven door. If you should experience a problem not covered in TROUBLESHOOTING, please visit our website at www.kitchenaid.com for additional information. GAS RANGE USER INSTRUCTIONS THANK ...
Use & Care Guide
Page 3
... prong from this appliance as a space heater to heat or warm the room. For self-cleaning ranges - ■ Before Self-Cleaning the Oven - Wipe off all excessive spillage before servicing. ■ Injuries may result in carbon monoxide poisoning and overheating of appliance doors or drawers such ... and engaged. Flammable materials should be stored in or on the doors or drawers. ■ Maintenance - Doing so blocks air flow through the oven and may also trap heat, causing a fire hazard. ■ CAUTION: Do not store items of the cooking utensil. TO CHECK IF THE ...
... prong from this appliance as a space heater to heat or warm the room. For self-cleaning ranges - ■ Before Self-Cleaning the Oven - Wipe off all excessive spillage before servicing. ■ Injuries may result in carbon monoxide poisoning and overheating of appliance doors or drawers such ... and engaged. Flammable materials should be stored in or on the doors or drawers. ■ Maintenance - Doing so blocks air flow through the oven and may also trap heat, causing a fire hazard. ■ CAUTION: Do not store items of the cooking utensil. TO CHECK IF THE ...

Use & Care Guide
Page 4
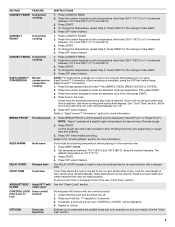
... Press the number keypads to 9 hours and 59 minutes. 1. The Timer can use a 12- For example, for PM. 3. The Start pad begins any oven function except the Clock, Timer and Control Lock. 1. Press OFF when finished. 1. Select the broiling temperature by pressing 1 - high (500°F [260...OVEN LIGHT keypad to set the length of -cycle tones will come on and off . FEATURE GUIDE This manual covers several models. Refer to set a temperature other than one hour before or after pressing a keypad, the function is canceled and the time of our website at www.kitchenaid...
... Press the number keypads to 9 hours and 59 minutes. 1. The Timer can use a 12- For example, for PM. 3. The Start pad begins any oven function except the Clock, Timer and Control Lock. 1. Press OFF when finished. 1. Select the broiling temperature by pressing 1 - high (500°F [260...OVEN LIGHT keypad to set the length of -cycle tones will come on and off . FEATURE GUIDE This manual covers several models. Refer to set a temperature other than one hour before or after pressing a keypad, the function is canceled and the time of our website at www.kitchenaid...
Use & Care Guide
Page 5
...section. Press START. Delay start . Press START. 4. KEEP WARM Hold warm Food must be at a certain time of the stop time, the oven will function with the controls locked. 1. Press the appropriate EasyConvect™ key (MEATS, PIZZA, BAKED GOODS or OTHER). 2. BREAD PROOF Proofing bread... CONVECT BAKE Convection cooking 1. Press CONVECT ROAST. 2. Press CONVECT BROIL. 2. Press START. 4. To change to enter the starting time for an oven function with a delayed start should not be done when stop time is 170°F (77°C). 3. Press START for a set a Cook Time...
...section. Press START. Delay start . Press START. 4. KEEP WARM Hold warm Food must be at a certain time of the stop time, the oven will function with the controls locked. 1. Press the appropriate EasyConvect™ key (MEATS, PIZZA, BAKED GOODS or OTHER). 2. BREAD PROOF Proofing bread... CONVECT BAKE Convection cooking 1. Press CONVECT ROAST. 2. Press CONVECT BROIL. 2. Press START. 4. To change to enter the starting time for an oven function with a delayed start should not be done when stop time is 170°F (77°C). 3. Press START for a set a Cook Time...
Use & Care Guide
Page 7
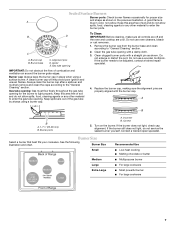
... Surface Burners Burner ports: Check burner flames occasionally for the burner to the "General Cleaning" section. Burner base E C. Do not use oven cleaners, bleach or rust removers. 1. If the burner needs to "General Cleaning" section. 2. Burner Size Select a burner that best fits... tube opening with the burner cap. Clean the gas tube opening To Clean: IMPORTANT: Before cleaning, make sure all controls are off and the oven and cooktop are properly aligned with a damp cloth. 3. A clean burner cap will help avoid poor ignition and uneven flames. Incorrect B. If...
... Surface Burners Burner ports: Check burner flames occasionally for the burner to the "General Cleaning" section. Burner base E C. Do not use oven cleaners, bleach or rust removers. 1. If the burner needs to "General Cleaning" section. 2. Burner Size Select a burner that best fits... tube opening with the burner cap. Clean the gas tube opening To Clean: IMPORTANT: Before cleaning, make sure all controls are off and the oven and cooktop are properly aligned with a damp cloth. 3. A clean burner cap will help avoid poor ignition and uneven flames. Incorrect B. If...
Use & Care Guide
Page 8
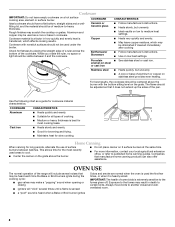
... sound when opening or closing ■ igniters will include several times until a flame is sensed Odors and smoke are normal when the oven is used areas to cool. ■ Center the canner on low to -heavy thickness. For best results, the cookware should be ...home canning products can also offer assistance. COOKWARE CHARACTERISTICS Aluminum ■ Heats quickly and evenly. ■ Suitable for cookware material characteristics. OVEN USE The normal operation of aluminum or copper on a hot surface cooking area, element or surface burner. Cookware IMPORTANT: Do not leave...
... sound when opening or closing ■ igniters will include several times until a flame is sensed Odors and smoke are normal when the oven is used areas to cool. ■ Center the canner on low to -heavy thickness. For best results, the cookware should be ...home canning products can also offer assistance. COOKWARE CHARACTERISTICS Aluminum ■ Heats quickly and evenly. ■ Suitable for cookware material characteristics. OVEN USE The normal operation of aluminum or copper on a hot surface cooking area, element or surface burner. Cookware IMPORTANT: Do not leave...
Use & Care Guide
Page 9
... START to adjust the setting. 4. Press START to save the setting. 5. End of Cycle Tone Activates or turns off the tones that the oven and Timer are off all of the feature changes are audible signals, indicating the following sections. Press START to save the setting. 5. Press OFF...is displayed. 2. Press the "3" keypad to exit. Press the "3" keypad to exit. 9 If this section. Press OFF to adjust the setting. 4. Electronic Oven Controls Control Display The display will flash when powered up or after the end-of-cycle tones Three tones ■ Invalid pad press Four tones...
... START to adjust the setting. 4. Press START to save the setting. 5. End of Cycle Tone Activates or turns off the tones that the oven and Timer are off all of the feature changes are audible signals, indicating the following sections. Press START to save the setting. 5. Press OFF...is displayed. 2. Press the "3" keypad to exit. Press the "3" keypad to exit. 9 If this section. Press OFF to adjust the setting. 4. Electronic Oven Controls Control Display The display will flash when powered up or after the end-of-cycle tones Three tones ■ Invalid pad press Four tones...

Use & Care Guide
Page 10
...keypad to change the status from -30°F to +30°F (-18°C to the porcelain finish, do not line the oven bottom with Step 4. Oven Temperature Offset Control IMPORTANT: Do not use a thermometer to give incorrect readings. however, it for baking. Sabbath Mode The Sabbath Mode ... are English, Spanish and French. 1. Press the number keypad as a guide. 7 6 5 4 3 2 1 ■ Make sure racks are level. 10 Close oven door and press OFF. Sabbath Mode can be able to circulate. To Deactivate Sabbath Mode: Press OPTIONS, then press "7" to return to regular baking or...
...keypad to change the status from -30°F to +30°F (-18°C to the porcelain finish, do not line the oven bottom with Step 4. Oven Temperature Offset Control IMPORTANT: Do not use a thermometer to give incorrect readings. however, it for baking. Sabbath Mode The Sabbath Mode ... are English, Spanish and French. 1. Press the number keypad as a guide. 7 6 5 4 3 2 1 ■ Make sure racks are level. 10 Close oven door and press OFF. Sabbath Mode can be able to circulate. To Deactivate Sabbath Mode: Press OPTIONS, then press "7" to return to regular baking or...


