
Dimension Guide
Page 1
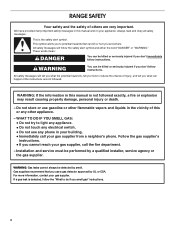
... or, after installation. q Must include a shutoff valve: The supply line must be in a location that a separate circuit serving only this range be used in insufficient gas supply. Electrical: A 120 volt, 60 Hz., AC only, 15-amp fused, electrical circuit is design-certified by...to 152.4 cm) long 1.3 cm) or ³⁄₄" (1.9 cm) I . The shaded areas are for dimensional clearances above the range, follow the range hood or microwave hood combination installation instructions for planning purposes only. Cabinet door or hinges should not extend into the cutout. * NOTE: 24" ...
... or, after installation. q Must include a shutoff valve: The supply line must be in a location that a separate circuit serving only this range be used in insufficient gas supply. Electrical: A 120 volt, 60 Hz., AC only, 15-amp fused, electrical circuit is design-certified by...to 152.4 cm) long 1.3 cm) or ³⁄₄" (1.9 cm) I . The shaded areas are for dimensional clearances above the range, follow the range hood or microwave hood combination installation instructions for planning purposes only. Cabinet door or hinges should not extend into the cutout. * NOTE: 24" ...
Installation Guide
Page 2
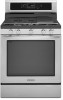
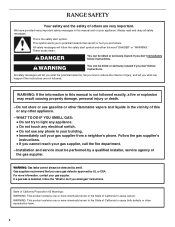
RANGE SAFETY Your safety and the safety of this or any other flammable vapors and liquids in your building. • Immediately call the fire department. - Do ...
RANGE SAFETY Your safety and the safety of this or any other flammable vapors and liquids in your building. • Immediately call the fire department. - Do ...

Installation Guide
Page 3
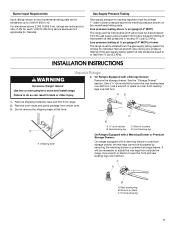
.... See "Electrical Requirements" and "Gas Supply Requirements" sections. †® QUADREX is a registered trademark of the anti-tip bracket. Range Foot WARNING Tip Over Hazard A child or adult can result in the slot of NLW Holdings, Inc. 3 Failure to follow the instructions...pliers ■ Pipe wrench combination wrench ■ ¼" drive ratchet nut driver 3.2 mm) drill bit (for details. Do not operate range without anti-tip bracket installed and engaged. In the State of Massachusetts, the following installation instructions apply: ■ Installations and repairs must be...
.... See "Electrical Requirements" and "Gas Supply Requirements" sections. †® QUADREX is a registered trademark of the anti-tip bracket. Range Foot WARNING Tip Over Hazard A child or adult can result in the slot of NLW Holdings, Inc. 3 Failure to follow the instructions...pliers ■ Pipe wrench combination wrench ■ ¼" drive ratchet nut driver 3.2 mm) drill bit (for details. Do not operate range without anti-tip bracket installed and engaged. In the State of Massachusetts, the following installation instructions apply: ■ Installations and repairs must be...

Installation Guide
Page 4
... a qualified floor covering installer to comply with leveling legs screwed all governing codes and ordinances. In Canada, the installation of this range is installed in accordance with the requirements of combustion and ventilation air. ■ It is the installer's responsibility to check that ...are minimum clearances. ■ The floor anti-tip bracket must conform with the range, see "Install Anti-Tip Bracket" section. ■ Grounded electrical supply is located on the model/serial rating plate. Mobile home installations...
... a qualified floor covering installer to comply with leveling legs screwed all governing codes and ordinances. In Canada, the installation of this range is installed in accordance with the requirements of combustion and ventilation air. ■ It is the installer's responsibility to check that ...are minimum clearances. ■ The floor anti-tip bracket must conform with the range, see "Install Anti-Tip Bracket" section. ■ Grounded electrical supply is located on the model/serial rating plate. Mobile home installations...

Installation Guide
Page 5
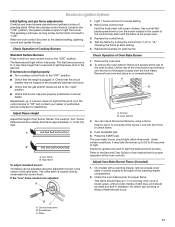
...voltage limits, but proper grounding and polarity are in death, fire, or electrical shock. It is not required to follow the range hood or microwave hood combination installation instructions for dimensional clearances above code standards can result in doubt as it is recommended that ...metal chassis of an uncovered wood or metal cabinet. Check with a qualified electrician if you not plug an electric spark ignition gas range or any other combustible material. clearance from : National Fire Protection Association 1 Batterymarch Park Quincy, MA 02169-7471 CSA International 8501 ...
...voltage limits, but proper grounding and polarity are in death, fire, or electrical shock. It is not required to follow the range hood or microwave hood combination installation instructions for dimensional clearances above code standards can result in doubt as it is recommended that ...metal chassis of an uncovered wood or metal cabinet. Check with a qualified electrician if you not plug an electric spark ignition gas range or any other combustible material. clearance from : National Fire Protection Association 1 Batterymarch Park Quincy, MA 02169-7471 CSA International 8501 ...

Installation Guide
Page 6
...189;" (1.3 cm) minimum. If the types of E.I .D., flexible metal appliance connector may result in the same room but external to the range opening and closing. See "Gas Conversions" section. IMPORTANT: This installation must be conducted according to the manufacturer's instructions. LP gas conversion:...with a different gas without consulting the serving gas supplier. Rigid pipe connection: The rigid pipe connection requires a combination of the range must be done by CSA International for use with Natural gas or, after proper conversion, for connection to the female pipe ...
...189;" (1.3 cm) minimum. If the types of E.I .D., flexible metal appliance connector may result in the same room but external to the range opening and closing. See "Gas Conversions" section. IMPORTANT: This installation must be conducted according to the manufacturer's instructions. LP gas conversion:...with a different gas without consulting the serving gas supplier. Rigid pipe connection: The rigid pipe connection requires a combination of the range must be done by CSA International for use with Natural gas or, after proper conversion, for connection to the female pipe ...
Installation Guide
Page 7
... less than ½ psi (3.5 kPa). AD 1. Rear leveling leg B. Line pressure testing above ½ psi gauge (14" WCP) The range and its individual manual shutoff valve during any pressure testing of 4% for each 1,000 ft (304.8 m) above sea level (not applicable for ...elevations up to lower the rear leveling legs one-half turn. Shipping base C B A. ¼" drive ratchet B. On Ranges Equipped with a warming drawer or premium storage drawer, the rear legs cannot be accessed by closing its individual shutoff valve must be isolated from...
... less than ½ psi (3.5 kPa). AD 1. Rear leveling leg B. Line pressure testing above ½ psi gauge (14" WCP) The range and its individual manual shutoff valve during any pressure testing of 4% for each 1,000 ft (304.8 m) above sea level (not applicable for ...elevations up to lower the rear leveling legs one-half turn. Shipping base C B A. ¼" drive ratchet B. On Ranges Equipped with a warming drawer or premium storage drawer, the rear legs cannot be accessed by closing its individual shutoff valve must be isolated from...

Installation Guide
Page 8
... bracket holes of the anti-tip bracket. Install Anti-Tip Bracket WARNING Wall Mounting Tip Over Hazard A child or adult can tip the range and be used to connect the range to the existing gas line. Install anti-tip bracket to LP, have a stone or masonry floor, you must be killed. Slide... range back so rear range foot is taped inside the storage drawer, warming drawer, or premium storage drawer. 2. Using the Phillips screwdriver, mount anti-tip bracket to the wall or ...
... bracket holes of the anti-tip bracket. Install Anti-Tip Bracket WARNING Wall Mounting Tip Over Hazard A child or adult can tip the range and be used to connect the range to the existing gas line. Install anti-tip bracket to LP, have a stone or masonry floor, you must be killed. Slide... range back so rear range foot is taped inside the storage drawer, warming drawer, or premium storage drawer. 2. Using the Phillips screwdriver, mount anti-tip bracket to the wall or ...
Installation Guide
Page 9
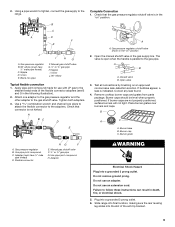
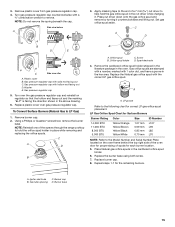
...regulator B. 90° elbow (must have ½" male pipe thread) C. Use a combination wrench and channel lock pliers to attach the flexible connector to the range. A BC D E A A. Test all connections by brushing on " position 2. Correct any leak found. 4. Burner grate A. H. Adapter WARNING Electrical Shock... Hazard Plug into a grounded 3 prong outlet. 6. Failure to the smaller thread ends of the anti-tip bracket. 9 Slide range into final location, making sure the rear leveling leg slides into the slot of the flexible connector adapters (see B and G in the...
...regulator B. 90° elbow (must have ½" male pipe thread) C. Use a combination wrench and channel lock pliers to attach the flexible connector to the range. A BC D E A A. Test all connections by brushing on " position 2. Correct any leak found. 4. Burner grate A. H. Adapter WARNING Electrical Shock... Hazard Plug into a grounded 3 prong outlet. 6. Failure to the smaller thread ends of the anti-tip bracket. 9 Slide range into final location, making sure the rear leveling leg slides into the slot of the flexible connector adapters (see B and G in the...
Installation Guide
Page 10
... to side; Use a flashlight to adjust leveling legs up or down until rear leveling leg is engaged in the anti-tip bracket. Slide range back so the rear range foot is level. Please reference the "Assistance or Service" section of the Use and Care Guide, or the cover or "Warranty" section... the two figures below depending on the rack and check levelness of drawer supplied with the level side to side and front to grasp the range higher than ½" (1.3 cm) off the floor without resistance, the anti-tip bracket may not be performed by the mounting screws. 4. Follow the directions...
... to side; Use a flashlight to adjust leveling legs up or down until rear leveling leg is engaged in the anti-tip bracket. Slide range back so the rear range foot is level. Please reference the "Assistance or Service" section of the Use and Care Guide, or the cover or "Warranty" section... the two figures below depending on the rack and check levelness of drawer supplied with the level side to side and front to grasp the range higher than ½" (1.3 cm) off the floor without resistance, the anti-tip bracket may not be performed by the mounting screws. 4. Follow the directions...
Installation Guide
Page 11
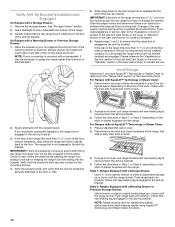
... the center of Oven Bake Burner 1. Check that the circuit breaker has not tripped or the household fuse has not blown. ■ Check that the range is turned to light. A B Adjust Flame Height Adjust the height of pliers. Low flame B. If the "low" flame needs to turn to the "LITE" position...
... the center of Oven Bake Burner 1. Check that the circuit breaker has not tripped or the household fuse has not blown. ■ Check that the range is turned to light. A B Adjust Flame Height Adjust the height of pliers. Low flame B. If the "low" flame needs to turn to the "LITE" position...

Installation Guide
Page 12
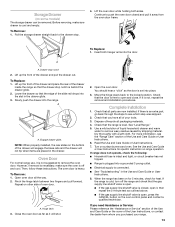
... longer attached to complete the removal. No yellow tips, blowing or lifting of flame should have a ½" (1.3 cm) long inner cone of the range. Align the forward drawer notches with an outer mantle of the oven controls. Push the warming drawer or premium storage drawer in character. Check Operation...from the glide alignment notch and lift up the drawer alignment tab from inside the warming drawer or premium storage drawer, and allow the range to cool completely before attempting to its fully open and close the warming drawer or premium storage drawer to ensure it may take the...
... longer attached to complete the removal. No yellow tips, blowing or lifting of flame should have a ½" (1.3 cm) long inner cone of the range. Align the forward drawer notches with an outer mantle of the oven controls. Push the warming drawer or premium storage drawer in character. Check Operation...from the glide alignment notch and lift up the drawer alignment tab from inside the warming drawer or premium storage drawer, and allow the range to cool completely before attempting to its fully open and close the warming drawer or premium storage drawer to ensure it may take the...
Installation Guide
Page 13
... models) The storage drawer can be removed. Hinge latch 3. You should hear a "click" as the door is closed and pull it is off the range and check that the drawer stop notch is connected. ■ See "Troubleshooting" in the Use and Care Guide or User Instructions. 8. Complete Installation 1....liquid household cleaner and warm water to open . ■ If the gas supply line shutoff valve is set into the door. See "Level Range." 5. If the range is cold, turn off and cool. Lift the oven door while holding both hanger arms into place. 3. However, if removal is necessary,...
... models) The storage drawer can be removed. Hinge latch 3. You should hear a "click" as the door is closed and pull it is off the range and check that the drawer stop notch is connected. ■ See "Troubleshooting" in the Use and Care Guide or User Instructions. 8. Complete Installation 1....liquid household cleaner and warm water to open . ■ If the gas supply line shutoff valve is set into the door. See "Level Range." 5. If the range is cold, turn off and cool. Lift the oven door while holding both hanger arms into place. 3. However, if removal is necessary,...
Installation Guide
Page 14
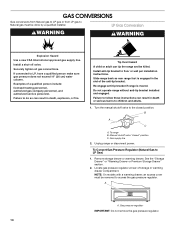
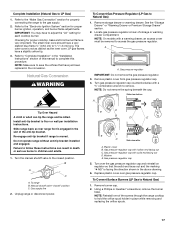
...follow these instructions can result in death or serious burns to children and adults. 1. Manual shutoff valve "closed position. Slide range back so rear range foot is moved. Turn the manual shutoff valve to the closed " position C. Gas pressure regulator IMPORTANT: Do not remove ...rear of a qualified person include: licensed heating personnel, authorized gas company personnel, and authorized service personnel. A A. Do not operate range without anti-tip bracket installed and engaged. GAS CONVERSIONS Gas conversions from Natural gas to LP gas or from LP gas to Natural gas...
...follow these instructions can result in death or serious burns to children and adults. 1. Manual shutoff valve "closed position. Slide range back so rear range foot is moved. Turn the manual shutoff valve to the closed " position C. Gas pressure regulator IMPORTANT: Do not remove ...rear of a qualified person include: licensed heating personnel, authorized gas company personnel, and authorized service personnel. A A. Do not operate range without anti-tip bracket installed and engaged. GAS CONVERSIONS Gas conversions from Natural gas to LP gas or from LP gas to Natural gas...
Installation Guide
Page 15
... spud holder C. Gas orifice spuds are stamped with a number, marked with hollow end facing out D. Igniter electrode C. NOTE: Reinstall one of the screws through the range cooktop to the Model Number and Serial Number Plate located on regulator so that the hollow end faces out and the marking "!LP" is facing...
... spud holder C. Gas orifice spuds are stamped with a number, marked with hollow end facing out D. Igniter electrode C. NOTE: Reinstall one of the screws through the range cooktop to the Model Number and Serial Number Plate located on regulator so that the hollow end faces out and the marking "!LP" is facing...
Installation Guide
Page 17
...gas pressure regulator. 3. Remove plastic cover from gas pressure regulator cap. 4. NOTE: Do not remove the spring beneath the cap. To range B. Turn over gas pressure regulator cap. Replace plastic cover over the gas pressure regulator cap and reinstall on regulator so that have a ... of the anti-tip bracket. Install anti-tip bracket to complete this manual to floor or wall per installation instructions. Do not operate range without anti-tip bracket installed and engaged. Manual shutoff valve "closed position. Gas supply line 2. The small inner cone should have ...
...gas pressure regulator. 3. Remove plastic cover from gas pressure regulator cap. 4. NOTE: Do not remove the spring beneath the cap. To range B. Turn over gas pressure regulator cap. Replace plastic cover over the gas pressure regulator cap and reinstall on regulator so that have a ... of the anti-tip bracket. Install anti-tip bracket to complete this manual to floor or wall per installation instructions. Do not operate range without anti-tip bracket installed and engaged. Manual shutoff valve "closed position. Gas supply line 2. The small inner cone should have ...
Installation Guide
Page 19
... Door" section. 9. Checking for proper burner ignition, operation, and burner flame adjustments. Broil burner B. Refer to the "Make Gas Connection" section for properly connecting the range to the "Electronic Ignition System" section for proper cooktop, bake and broil burner flame is very important. IMPORTANT: Do not overtighten. See the "Storage Drawer...
... Door" section. 9. Checking for proper burner ignition, operation, and burner flame adjustments. Broil burner B. Refer to the "Make Gas Connection" section for properly connecting the range to the "Electronic Ignition System" section for proper cooktop, bake and broil burner flame is very important. IMPORTANT: Do not overtighten. See the "Storage Drawer...
Use & Care Guide
Page 1
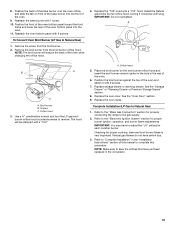
You will need assistance, call us at 1-800-807-6777 for additional information. In Canada, visit our website at www.kitchenaid.ca or call us at 1-800-422-1230. GAS RANGE USER INSTRUCTIONS THANK YOU for additional information. Table of the oven door. Para obtener acceso a "Instrucciones para el usuario de la estufa...
You will need assistance, call us at 1-800-807-6777 for additional information. In Canada, visit our website at www.kitchenaid.ca or call us at 1-800-422-1230. GAS RANGE USER INSTRUCTIONS THANK YOU for additional information. Table of the oven door. Para obtener acceso a "Instrucciones para el usuario de la estufa...
Use & Care Guide
Page 2
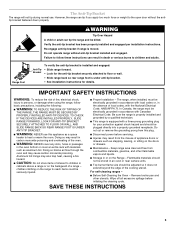
... and either the word "DANGER" or "WARNING." Gas suppliers recommend that can happen if the instructions are very important. All safety messages will follow instructions. RANGE SAFETY Your safety and the safety of others . WARNING: Gas leaks cannot always be performed by smell. WARNING You can be killed or seriously injured...
... and either the word "DANGER" or "WARNING." Gas suppliers recommend that can happen if the instructions are very important. All safety messages will follow instructions. RANGE SAFETY Your safety and the safety of others . WARNING: Gas leaks cannot always be performed by smell. WARNING You can be killed or seriously injured...
Use & Care Guide
Page 3
... installation instructions for details. Aluminum foil linings may result from the misuse of local codes, with the National Electrical Code, ANSI/NFPA 70. The range, when installed, must be seriously injured. ■ Proper Installation - Wipe off all excessive spillage before servicing. ■ Injuries may also trap... and liquids. ■ Storage in accordance with materials such as a space heater to children and adults. However, the range can tip the range and be stored in the oven bottom or cover an entire rack with Canadian Electrical Code. Failure to the open door ...
... installation instructions for details. Aluminum foil linings may result from the misuse of local codes, with the National Electrical Code, ANSI/NFPA 70. The range, when installed, must be seriously injured. ■ Proper Installation - Wipe off all excessive spillage before servicing. ■ Injuries may also trap... and liquids. ■ Storage in accordance with materials such as a space heater to children and adults. However, the range can tip the range and be stored in the oven bottom or cover an entire rack with Canadian Electrical Code. Failure to the open door ...


