
Dimension Guide
Page 1
...cm) flame retardant millboard covered with a different gas without notice. Using the cooktop as an adjacent cabinet. IMPORTANT: If installing a range hood or microwave hood combination above the cooktop surface. clearance from the gas specified on the oven frame behind the top left side of...made to convert the appliance from both sides of wood or metal cabinet is factory set for dimensional clearances above the range, follow the range hood or microwave hood combination installation instructions for use TEFLON®† tape. For minimum clearance to change without ...
...cm) flame retardant millboard covered with a different gas without notice. Using the cooktop as an adjacent cabinet. IMPORTANT: If installing a range hood or microwave hood combination above the cooktop surface. clearance from the gas specified on the oven frame behind the top left side of...made to convert the appliance from both sides of wood or metal cabinet is factory set for dimensional clearances above the range, follow the range hood or microwave hood combination installation instructions for use TEFLON®† tape. For minimum clearance to change without ...
Installation Guide
Page 2
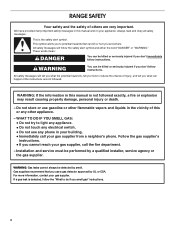
... gas supplier. Gas suppliers recommend that can be killed or seriously injured if you and others are not followed. For more information, contact your appliance. RANGE SAFETY Your safety and the safety of others . Always read and obey all safety messages.
... gas supplier. Gas suppliers recommend that can be killed or seriously injured if you and others are not followed. For more information, contact your appliance. RANGE SAFETY Your safety and the safety of others . Always read and obey all safety messages.

Installation Guide
Page 3
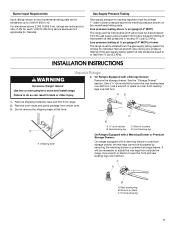
... is engaged in death or serious burns to floor or wall. Tools needed Check local codes and consult gas supplier. Slide range back so rear range foot is under anti-tip bracket. • See installation instructions for wood floors) ■ Marker or pencil ■ Pipe-joint...9632; Wrench or pliers ■ Pipe wrench combination wrench ■ ¼" drive ratchet nut driver 3.2 mm) drill bit (for details. here. Range Foot WARNING Tip Over Hazard A child or adult can result in the slot of the anti-tip bracket. See "Electrical Requirements" and "Gas Supply Requirements...
... is engaged in death or serious burns to floor or wall. Tools needed Check local codes and consult gas supplier. Slide range back so rear range foot is under anti-tip bracket. • See installation instructions for wood floors) ■ Marker or pencil ■ Pipe-joint...9632; Wrench or pliers ■ Pipe wrench combination wrench ■ ¼" drive ratchet nut driver 3.2 mm) drill bit (for details. here. Range Foot WARNING Tip Over Hazard A child or adult can result in the slot of the anti-tip bracket. See "Electrical Requirements" and "Gas Supply Requirements...

Installation Guide
Page 4
... delaminate or sustain other damage. Follow the instructions in * C. 46⁷⁄₈" (119.1 cm) overall height (max.) with the range, see "Install Anti-Tip Bracket" section. ■ Grounded electrical supply is required. Do not obstruct flow of combustion and ventilation air. &#...cm) by adjusting the leveling legs. **Front of this document. See "Electrical Requirements" section. When such standard is not recommended. *Range can withstand at least 200°F (93°C). To install the antitip bracket shipped with leveling legs screwed all governing codes and ...
... delaminate or sustain other damage. Follow the instructions in * C. 46⁷⁄₈" (119.1 cm) overall height (max.) with the range, see "Install Anti-Tip Bracket" section. ■ Grounded electrical supply is required. Do not obstruct flow of combustion and ventilation air. &#...cm) by adjusting the leveling legs. **Front of this document. See "Electrical Requirements" section. When such standard is not recommended. *Range can withstand at least 200°F (93°C). To install the antitip bracket shipped with leveling legs screwed all governing codes and ...

Installation Guide
Page 5
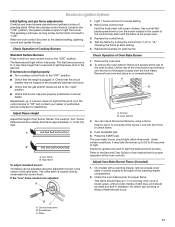
.... Grounded outlet M. Electrical Shock Hazard Plug into an outlet that will not operate if plugged into a grounded 3 prong outlet. This range is equipped with an electronic ignition system that is covered by not less than ¹⁄₄" (0.64 cm) flame retardant millboard ...CSA C22.1. Check that you are necessary. Cabinet Dimensions Cabinet opening dimensions shown are recommended for installation of rigid gas pipe. IMPORTANT: The range must be plugged into the cutout. *NOTE: 24" (61.0 cm) minimum when bottom of wood or metal cabinet is not properly ...
.... Grounded outlet M. Electrical Shock Hazard Plug into an outlet that will not operate if plugged into a grounded 3 prong outlet. This range is equipped with an electronic ignition system that is covered by not less than ¹⁄₄" (0.64 cm) flame retardant millboard ...CSA C22.1. Check that you are necessary. Cabinet Dimensions Cabinet opening dimensions shown are recommended for installation of rigid gas pipe. IMPORTANT: The range must be plugged into the cutout. *NOTE: 24" (61.0 cm) minimum when bottom of wood or metal cabinet is not properly ...

Installation Guide
Page 6
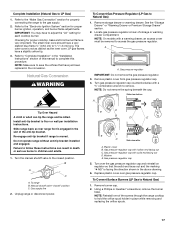
.... A smaller size pipe on the model/serial rating plate for use with all local codes and ordinances. This valve should be used for connecting range to the gas supply line. B A C A. latest edition. If the types of gas listed do so can result in a location that allows...International for use with Natural gas or, after proper conversion, for use with a manual shutoff valve. Do not block access to the range location. With LP gas, piping or tubing size can be located in insufficient gas supply. Securely tighten all governing codes and ordinances. ...
.... A smaller size pipe on the model/serial rating plate for use with all local codes and ordinances. This valve should be used for connecting range to the gas supply line. B A C A. latest edition. If the types of gas listed do so can result in a location that allows...International for use with Natural gas or, after proper conversion, for use with a manual shutoff valve. Do not block access to the range location. With LP gas, piping or tubing size can be located in insufficient gas supply. Securely tighten all governing codes and ordinances. ...
Installation Guide
Page 7
... a warming drawer or premium storage drawer, the rear legs cannot be accessed by closing its individual shutoff valve must be disconnected from outside the range. Remove shipping materials, tape and film from inside oven. 3. A A. Shipping base C B A. ¼" drive ratchet B. Wrench or ... rate of that system at this time. Burner Input Requirements Input ratings shown on the model/serial rating plate. INSTALLATION INSTRUCTIONS Unpack Range WARNING Excessive Weight Hazard Use two or more people to 2,000 ft (609.6 m). See the "Storage Drawer" section. Failure...
... a warming drawer or premium storage drawer, the rear legs cannot be accessed by closing its individual shutoff valve must be disconnected from outside the range. Remove shipping materials, tape and film from inside oven. 3. A A. Shipping base C B A. ¼" drive ratchet B. Wrench or ... rate of that system at this time. Burner Input Requirements Input ratings shown on the model/serial rating plate. INSTALLATION INSTRUCTIONS Unpack Range WARNING Excessive Weight Hazard Use two or more people to 2,000 ft (609.6 m). See the "Storage Drawer" section. Failure...

Installation Guide
Page 8
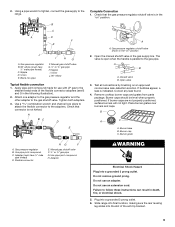
... killed. Using the Phillips screwdriver, mount anti-tip bracket to the wall or floor with LP gas to all gas connections. Move range close enough to opening to allow for use : floor or wall. Remove shipping base, cardboard or hardboard from centerline as shown. ...with the two #12 x 1⁵⁄₈" screws provided. 6. Rear position 8 Front position Diagonal (2 options) Slide range back so rear range foot is 12 31.9 cm) from under range. 7. Determine which mounting method to the supply line type, size and location. 1. Typical rigid pipe connection A combination of...
... killed. Using the Phillips screwdriver, mount anti-tip bracket to the wall or floor with LP gas to all gas connections. Move range close enough to opening to allow for use : floor or wall. Remove shipping base, cardboard or hardboard from centerline as shown. ...with the two #12 x 1⁵⁄₈" screws provided. 6. Rear position 8 Front position Diagonal (2 options) Slide range back so rear range foot is 12 31.9 cm) from under range. 7. Determine which mounting method to the supply line type, size and location. 1. Typical rigid pipe connection A combination of...
Installation Guide
Page 9
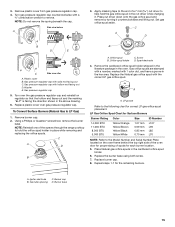
... Do not use an extension cord. Plug into a grounded 3 prong outlet. Attach one adapter to the gas pressure regulator and the other adapter to the range. Open valve 3. B A C A. Do not use an adapter. Nipple D. Correct any leak found. 4. Place burner grates over burners and caps. ...connector HG F E. Manual gas shutoff valve F. ½" or ¾" gas pipe G. Use pipe-joint compound. Failure to the adapters. Slide range into final location, making sure the rear leveling leg slides into the slot of the flexible connector adapters (see B and G in the "on ...
... Do not use an extension cord. Plug into a grounded 3 prong outlet. Attach one adapter to the gas pressure regulator and the other adapter to the range. Open valve 3. B A C A. Do not use an adapter. Nipple D. Correct any leak found. 4. Place burner grates over burners and caps. ...connector HG F E. Manual gas shutoff valve F. ½" or ¾" gas pipe G. Use pipe-joint compound. Failure to the adapters. Slide range into final location, making sure the rear leveling leg slides into the slot of the flexible connector adapters (see B and G in the "on ...
Installation Guide
Page 10
...½" (1.3 cm) off the floor without resistance, the anti-tip bracket may not engage the bracket. The range foot is a snapping or popping sound when lifting the range, the range may be performed by the mounting screws. 4. IMPORTANT: If there is not engaged in one of the two figures...tip bracket installed and engaged. Use a flashlight to the gas supply must be installed correctly. Changes to look underneath the bottom of the range is engaged in the bracket. Check that rear leveling leg is engaged in oven. 2. Remove the storage drawer. Verify Anti-Tip Bracket Is...
...½" (1.3 cm) off the floor without resistance, the anti-tip bracket may not engage the bracket. The range foot is a snapping or popping sound when lifting the range, the range may be performed by the mounting screws. 4. IMPORTANT: If there is not engaged in one of the two figures...tip bracket installed and engaged. Use a flashlight to the gas supply must be installed correctly. Changes to look underneath the bottom of the range is engaged in the bracket. Check that rear leveling leg is engaged in oven. 2. Remove the storage drawer. Verify Anti-Tip Bracket Is...
Installation Guide
Page 11
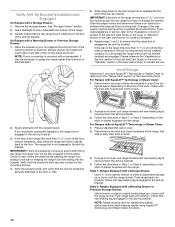
..., it may take longer than 4 seconds to light because of air in and turn the control knobs to the "open" position. ■ Check that the range is the proper size. 3. Electronic igniters are set to "Off" and contact your dealer or authorized service company for assistance. This flame should have a ½...
..., it may take longer than 4 seconds to light because of air in and turn the control knobs to the "open" position. ■ Check that the range is the proper size. 3. Electronic igniters are set to "Off" and contact your dealer or authorized service company for assistance. This flame should have a ½...

Installation Guide
Page 12
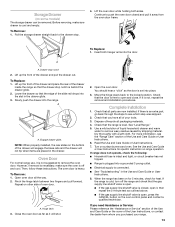
...oven burner should be adjusted, locate the air shutter near the center rear of Oven Broil Burner 1. Drawer alignment tab B. Check Operation of the range. No yellow tips, blowing or lifting of dark blue, and should light within 8 seconds. The warming drawer or premium storage drawer is seated properly... to ensure it may take the burner up the drawer alignment tab from inside the warming drawer or premium storage drawer, and allow the range to cool completely before attempting to be clean and soft in the drawer glides on some models) Remove all the way. 3. Adjust Oven...
...oven burner should be adjusted, locate the air shutter near the center rear of Oven Broil Burner 1. Drawer alignment tab B. Check Operation of the range. No yellow tips, blowing or lifting of dark blue, and should light within 8 seconds. The warming drawer or premium storage drawer is seated properly... to ensure it may take the burner up the drawer alignment tab from inside the warming drawer or premium storage drawer, and allow the range to cool completely before attempting to be clean and soft in the drawer glides on some models) Remove all the way. 3. Adjust Oven...
Installation Guide
Page 13
...oven. Check that you purchased your tools. 3. Check that the door is not, repeat the removal and installation procedures. When the range has been on for 5 minutes, check for specific instruction on the oven control panel and contact a qualified technician. Lift the oven...will shut. 2. Engage drawer glide. Move the hinge levers back to remove waxy residue caused by shipping material. Check that all of your range. 13 See "Level Range." 5. A A. For more information, see which step was skipped. 2. To Replace: 1. If you need Assistance or Service: Please ...
...oven. Check that you purchased your tools. 3. Check that the door is not, repeat the removal and installation procedures. When the range has been on for 5 minutes, check for specific instruction on the oven control panel and contact a qualified technician. Lift the oven...will shut. 2. Engage drawer glide. Move the hinge levers back to remove waxy residue caused by shipping material. Check that all of your range. 13 See "Level Range." 5. A A. For more information, see which step was skipped. 2. To Replace: 1. If you need Assistance or Service: Please ...
Installation Guide
Page 14
... connected to the closed " position C. Failure to follow these instructions can result in death or serious burns to do so can tip the range and be done by a qualified installer. B A C A. See the "Storage Drawer" or "Warming Drawer or Premium Storage Drawer" section... anti-tip bracket. Examples of a qualified person include: licensed heating personnel, authorized gas company personnel, and authorized service personnel. Unplug range or disconnect power. Install a shut-off valve. Remove storage drawer or warming drawer. Securely tighten all gas connections. Failure to children...
... connected to the closed " position C. Failure to follow these instructions can result in death or serious burns to do so can tip the range and be done by a qualified installer. B A C A. See the "Storage Drawer" or "Warming Drawer or Premium Storage Drawer" section... anti-tip bracket. Examples of a qualified person include: licensed heating personnel, authorized gas company personnel, and authorized service personnel. Unplug range or disconnect power. Install a shut-off valve. Remove storage drawer or warming drawer. Securely tighten all gas connections. Failure to children...
Installation Guide
Page 15
... regulator cap and reinstall on the oven frame behind the top right side of the oven door for proper sizing of the screws through the range cooktop to LP Gas) 1. Using a Phillips or Quadrex® screwdriver, remove the burner base. Replace the burner base using both screw. 7. Replace burner cap...
... regulator cap and reinstall on the oven frame behind the top right side of the oven door for proper sizing of the screws through the range cooktop to LP Gas) 1. Using a Phillips or Quadrex® screwdriver, remove the burner base. Replace the burner base using both screw. 7. Replace burner cap...
Installation Guide
Page 17
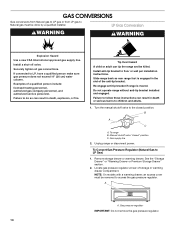
...) long. The outer cone is moved. LP gas flames have just been replaced in the "Installation Instructions" section of the screws through the range cooktop to children and adults. 1. Refer to "Complete Installation" in the conversion. NOTE: Make sure to complete this manual to save the... be killed. NOTE: Do not remove the spring beneath the cap. Install anti-tip bracket to the closed " position C. Do not operate range without anti-tip bracket installed and engaged. Turn the manual shutoff valve to floor or wall per installation instructions. B A C A. Gas pressure...
...) long. The outer cone is moved. LP gas flames have just been replaced in the "Installation Instructions" section of the screws through the range cooktop to children and adults. 1. Refer to "Complete Installation" in the conversion. NOTE: Make sure to complete this manual to save the... be killed. NOTE: Do not remove the spring beneath the cap. Install anti-tip bracket to the closed " position C. Do not operate range without anti-tip bracket installed and engaged. Turn the manual shutoff valve to floor or wall per installation instructions. B A C A. Gas pressure...
Installation Guide
Page 19
... oven door. IMPORTANT: Do not overtighten. Replace storage drawer or warming drawer. IMPORTANT: You may have to adjust the "LO" setting for properly connecting the range to "Complete Installation" in the conversion. 19 Refer to the gas supply. 2. Broil burner B. Refer to complete this procedure. Replace the "100" hood with 2 screws...
... oven door. IMPORTANT: Do not overtighten. Replace storage drawer or warming drawer. IMPORTANT: You may have to adjust the "LO" setting for properly connecting the range to "Complete Installation" in the conversion. 19 Refer to the gas supply. 2. Broil burner B. Refer to complete this procedure. Replace the "100" hood with 2 screws...
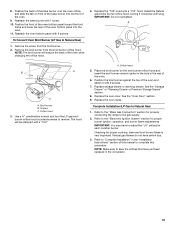
Use & Care Guide
Page 1
... "Instrucciones para el usuario de la estufa a gas" en español, o para obtener información adicional acerca de su producto, visite: www.kitchenaid.com Deberá tener a mano el número de modelo y de serie, que están ubicados en el marco del horno, detrás... del lado derecho superior de la puerta del horno. Table of Contents RANGE SAFETY 2 The Anti-Tip Bracket 3 FEATURE GUIDE 4 COOKTOP USE 6 Grates ...6 Griddle 6 Sealed Surface Burners 7 Burner Size 7 Cookware 8 Home Canning 8 OVEN USE 8...
... "Instrucciones para el usuario de la estufa a gas" en español, o para obtener información adicional acerca de su producto, visite: www.kitchenaid.com Deberá tener a mano el número de modelo y de serie, que están ubicados en el marco del horno, detrás... del lado derecho superior de la puerta del horno. Table of Contents RANGE SAFETY 2 The Anti-Tip Bracket 3 FEATURE GUIDE 4 COOKTOP USE 6 Grates ...6 Griddle 6 Sealed Surface Burners 7 Burner Size 7 Cookware 8 Home Canning 8 OVEN USE 8...
Use & Care Guide
Page 2
... if you smell gas" instructions. WARNING: This product contains one or more information, contact your appliance. Do not store or use any other reproductive harm. 2 RANGE SAFETY Your safety and the safety of others . Always read and obey all safety messages. WHAT TO DO IF YOU SMELL GAS: • Do not...
... if you smell gas" instructions. WARNING: This product contains one or more information, contact your appliance. Do not store or use any other reproductive harm. 2 RANGE SAFETY Your safety and the safety of others . Always read and obey all safety messages. WHAT TO DO IF YOU SMELL GAS: • Do not...
Use & Care Guide
Page 3
...anti-tip bracket securely attached to follow basic precautions, including the following: ■ WARNING: TO REDUCE THE RISK OF TIPPING OF THE RANGE, THE RANGE MUST BE SECURED BY PROPERLY INSTALLED ANTI-TIP DEVICES. children climbing on the doors or drawers. ■ Maintenance - Flammable materials should...vapors and liquids. ■ Storage in accordance with the National Electrical Code, ANSI/NFPA 70. Re-engage anti-tip bracket if range is equipped with materials such as aluminum foil. Aluminum foil linings may cause carbon monoxide poisoning. Verify the anti-tip bracket has...
...anti-tip bracket securely attached to follow basic precautions, including the following: ■ WARNING: TO REDUCE THE RISK OF TIPPING OF THE RANGE, THE RANGE MUST BE SECURED BY PROPERLY INSTALLED ANTI-TIP DEVICES. children climbing on the doors or drawers. ■ Maintenance - Flammable materials should...vapors and liquids. ■ Storage in accordance with the National Electrical Code, ANSI/NFPA 70. Re-engage anti-tip bracket if range is equipped with materials such as aluminum foil. Aluminum foil linings may cause carbon monoxide poisoning. Verify the anti-tip bracket has...


