
Dimension Guide
Page 1
... minimum clearance to top of cooktop, see Installation our products, we reserve the right to change without notice. Grounded outlet M. The model/serial rating plate located on the oven frame behind the top right side of the oven door) IMPORTANT: Range must be used in...range hood or microwave hood combination installation instructions for planning purposes only. Ref. 30" (76.2 cm) Freestanding Gas Range PRODUCT MODEL NUMBERS PRODUCT DIMENSIONS KGRS202B Type of Gas Natural Gas: KGRS303B KGRS306B KGRS308B This range is design-certified by CSA International for use with...
... minimum clearance to top of cooktop, see Installation our products, we reserve the right to change without notice. Grounded outlet M. The model/serial rating plate located on the oven frame behind the top right side of the oven door) IMPORTANT: Range must be used in...range hood or microwave hood combination installation instructions for planning purposes only. Ref. 30" (76.2 cm) Freestanding Gas Range PRODUCT MODEL NUMBERS PRODUCT DIMENSIONS KGRS202B Type of Gas Natural Gas: KGRS303B KGRS306B KGRS308B This range is design-certified by CSA International for use with...

Installation Guide
Page 4
...installer to make sure that the materials used . Mobile Home - A Given dimensions are shown must conform with installation clearances specified on the model/serial rating plate. F BC ■ Proper gas supply connection must conform to comply with the current standards CAN/CSA-Z240 - In ... Requirements IMPORTANT: Observe all the way in* C. 46⁷⁄₈" (119.1 cm) overall height (max.) with local codes. The model/serial rating plate is not applicable, use the Standard for leveling the range is not recommended. *Range can withstand at least 200°F (...
...installer to make sure that the materials used . Mobile Home - A Given dimensions are shown must conform with installation clearances specified on the model/serial rating plate. F BC ■ Proper gas supply connection must conform to comply with the current standards CAN/CSA-Z240 - In ... Requirements IMPORTANT: Observe all the way in* C. 46⁷⁄₈" (119.1 cm) overall height (max.) with local codes. The model/serial rating plate is not applicable, use the Standard for leveling the range is not recommended. *Range can withstand at least 200°F (...

Installation Guide
Page 6
... Provide a gas supply line of Gas Natural gas: This range is design-certified by a qualified service technician. A smaller size pipe on the model/serial rating plate for use with a different gas without consulting the serving gas supplier. It should be equipped with Natural gas. The valve is ...use TEFLON®† tape. ■ Must include a shutoff valve: The supply line must be used . See "Gas Conversions" section. The model/serial rating plate located on the oven frame behind the top right side of gas that can be used . NOTE: Pipe-joint compounds that allows...
... Provide a gas supply line of Gas Natural gas: This range is design-certified by a qualified service technician. A smaller size pipe on the model/serial rating plate for use with a different gas without consulting the serving gas supplier. It should be equipped with Natural gas. The valve is ...use TEFLON®† tape. ■ Must include a shutoff valve: The supply line must be used . See "Gas Conversions" section. The model/serial rating plate located on the oven frame behind the top right side of gas that can be used . NOTE: Pipe-joint compounds that allows...
Installation Guide
Page 7
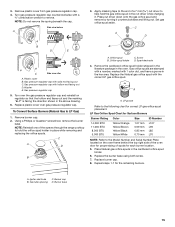
...leveling legs one -half turn. Remove oven racks and parts package from range. 2. Front leveling leg 7 Burner Input Requirements Input ratings shown on the model/serial rating plate. Line pressure testing at ½ psi gauge (14" WCP) or lower The range must be at least 1" water column pressure ...above the manifold pressure shown on the model/serial rating plate are reduced at this time. Do not remove the shipping base at a rate of 4% for each 1,000 ft (304.8 m) above...
...leveling legs one -half turn. Remove oven racks and parts package from range. 2. Front leveling leg 7 Burner Input Requirements Input ratings shown on the model/serial rating plate. Line pressure testing at ½ psi gauge (14" WCP) or lower The range must be at least 1" water column pressure ...above the manifold pressure shown on the model/serial rating plate are reduced at this time. Do not remove the shipping base at a rate of 4% for each 1,000 ft (304.8 m) above...
Installation Guide
Page 11
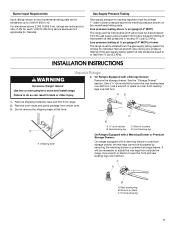
... stem. Check the oven bake burner for proper operation of dark blue, and should be adjusted using a mirror. Low flame B. Push the BAKE pad. 5. On models with a pair of Oven Bake Burner 1. This sparking continues, as long as the control knob is turned to "HI," checking the flame at the rear...
... stem. Check the oven bake burner for proper operation of dark blue, and should be adjusted using a mirror. Low flame B. Push the BAKE pad. 5. On models with a pair of Oven Bake Burner 1. This sparking continues, as long as the control knob is turned to "HI," checking the flame at the rear...

Installation Guide
Page 12
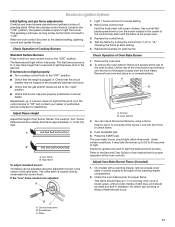
..., blowing or lifting of the broil burner. 2. Flat-blade screwdriver B. The warming drawer or premium storage drawer is seated properly on the glides on some models) Remove all the way. 3. Lock screw B. Drawer glide notch 2. Push the warming drawer or premium storage drawer in all items from the glide. Reinstall flame...
..., blowing or lifting of the broil burner. 2. Flat-blade screwdriver B. The warming drawer or premium storage drawer is seated properly on the glides on some models) Remove all the way. 3. Lock screw B. Drawer glide notch 2. Push the warming drawer or premium storage drawer in all items from the glide. Reinstall flame...
Installation Guide
Page 13
... the slide rail drops into the door. Repeat on the bottom of the drawer inside the range so that all the way. 2. Turn on some models) The storage drawer can be removed.
... the slide rail drops into the door. Repeat on the bottom of the drawer inside the range so that all the way. 2. Turn on some models) The storage drawer can be removed.
Installation Guide
Page 14
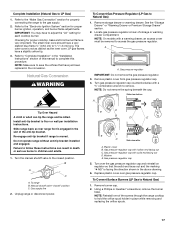
... of storage or warming drawer compartment. Manual shutoff valve "closed position. Gas pressure regulator IMPORTANT: Do not remove the gas pressure regulator. 14 NOTE: On models with a warming drawer, an access cover must be removed to access the gas pressure regulator. To range B. Install a shut-off valve. Tip Over Hazard A child...
... of storage or warming drawer compartment. Manual shutoff valve "closed position. Gas pressure regulator IMPORTANT: Do not remove the gas pressure regulator. 14 NOTE: On models with a warming drawer, an access cover must be removed to access the gas pressure regulator. To range B. Install a shut-off valve. Tip Over Hazard A child...
Installation Guide
Page 15
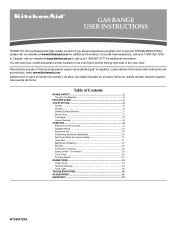
... gas orifice spud and remove by turning it . Remove burner cap. 2. NOTE: Reinstall one of spuds for the remaining burners. A A. LP groove Refer to the Model Number and Serial Number Plate located on regulator so that the hollow end faces out and the marking "!LP" is facing the direction shown in...
... gas orifice spud and remove by turning it . Remove burner cap. 2. NOTE: Reinstall one of spuds for the remaining burners. A A. LP groove Refer to the Model Number and Serial Number Plate located on regulator so that the hollow end faces out and the marking "!LP" is facing the direction shown in...
Installation Guide
Page 17
... is engaged in place while removing and replacing the orifice spuds. See the "Storage Drawer" or "Warming Drawer or Premium Storage Drawer" section. 2. NOTE: On models with a ⁵⁄₈" combination wrench to hold the orifice spud holder in the slot of the screws through the range cooktop to remove. A A. Gas...
... is engaged in place while removing and replacing the orifice spuds. See the "Storage Drawer" or "Warming Drawer or Premium Storage Drawer" section. 2. NOTE: On models with a ⁵⁄₈" combination wrench to hold the orifice spud holder in the slot of the screws through the range cooktop to remove. A A. Gas...

Installation Guide
Page 18
... 2 screws at the rear of the panel is away from front of the bake burner to the side to remove. Stamped number Refer to the Model Number and Serial Number Plate located on the oven frame behind the top right side of the oven door for proper sizing of the bake...
... 2 screws at the rear of the panel is away from front of the bake burner to the side to remove. Stamped number Refer to the Model Number and Serial Number Plate located on the oven frame behind the top right side of the oven door for proper sizing of the bake...
Use & Care Guide
Page 1
... right side of the oven door. You will need assistance, call us at www.kitchenaid.com for purchasing this high-quality product. If you still need your model and serial number, located on some models 11 Oven Vent 11 Baking and Roasting 12 Broiling 12 Convection Cooking 12 EasyConvect™... a "Instrucciones para el usuario de la estufa a gas" en español, o para obtener información adicional acerca de su producto, visite: www.kitchenaid.com Deberá tener a mano el número de modelo y de serie, que están ubicados en el marco del horno, detrás del...
... right side of the oven door. You will need assistance, call us at www.kitchenaid.com for purchasing this high-quality product. If you still need your model and serial number, located on some models 11 Oven Vent 11 Baking and Roasting 12 Broiling 12 Convection Cooking 12 EasyConvect™... a "Instrucciones para el usuario de la estufa a gas" en español, o para obtener información adicional acerca de su producto, visite: www.kitchenaid.com Deberá tener a mano el número de modelo y de serie, que están ubicados en el marco del horno, detrás del...

Use & Care Guide
Page 4
...260°C]), 2 - Press TIMER. 2. Press the number keypads to be set the time of the items listed. Press OFF when finished. 1. Your model may have to set a temperature other than one hour before or after pressing a keypad, the function is opened. Press the number keypads to this ...manual or the Frequently Asked Questions (FAQs) section of our website at www.kitchenaid.ca. Select the broiling temperature by pressing 1 - Do not press the Off keypad because the oven will come on and off . ...
...260°C]), 2 - Press TIMER. 2. Press the number keypads to be set the time of the items listed. Press OFF when finished. 1. Your model may have to set a temperature other than one hour before or after pressing a keypad, the function is opened. Press the number keypads to this ...manual or the Frequently Asked Questions (FAQs) section of our website at www.kitchenaid.ca. Select the broiling temperature by pressing 1 - Do not press the Off keypad because the oven will come on and off . ...

Use & Care Guide
Page 6
... the hook on the griddle that are designed for use on a thin layer of the griddle will produce a flame. 2. Cooking sprays may interlock (on some models, the two grates are turned to desired setting. Before setting a control knob, place filled cookware on the left front burner is hard to LITE. The... pan. Griddle installed on right side of the pan. Fire Hazard Do not let the burner flame extend beyond the edge of cooktop On some models), using empty cookware or without cookware on the right side grate as shown in a cool dry place. 6 NOTE: The griddle may become hot...
... the hook on the griddle that are designed for use on a thin layer of the griddle will produce a flame. 2. Cooking sprays may interlock (on some models, the two grates are turned to desired setting. Before setting a control knob, place filled cookware on the left front burner is hard to LITE. The... pan. Griddle installed on right side of the pan. Fire Hazard Do not let the burner flame extend beyond the edge of cooktop On some models), using empty cookware or without cookware on the right side grate as shown in a cool dry place. 6 NOTE: The griddle may become hot...
Use & Care Guide
Page 9
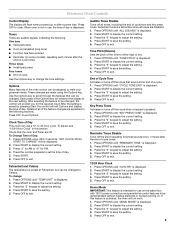
... off the tones that sounds every 1 minute after the end of the Options key will be demonstrated without heating elements or burners turning on some models), repeating each minute after a power loss. Electronic Oven Controls Control Display The display will not work. 1. Press START to display the current setting. 3. Demo Mode...
... off the tones that sounds every 1 minute after the end of the Options key will be demonstrated without heating elements or burners turning on some models), repeating each minute after a power loss. Electronic Oven Controls Control Display The display will not work. 1. Press START to display the current setting. 3. Demo Mode...
Use & Care Guide
Page 11
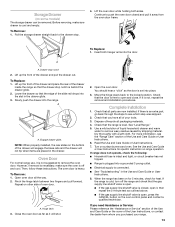
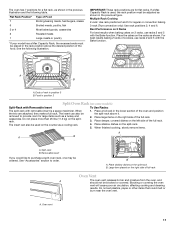
A B A. Do not place more than 25 lbs (11.3 kg) on some models) Split-Rack with Removable Insert To Use Racks: The split-rack with removable insert is used on the right side of cookies, use racks 2 and 5 ... position of Food 7 Broiling/searing meats, hamburgers, steaks 6 Broiled meats, poultry, fish 3 or 4 Most baked goods, casseroles 2 Roasted meats 1 Large roasts or poultry *If your model has a Max Capacity Rack, the recessed ends must be adjusted as shown in position 2 Split Oven Rack (on the splitrack. Food in the previous figure...
A B A. Do not place more than 25 lbs (11.3 kg) on some models) Split-Rack with Removable Insert To Use Racks: The split-rack with removable insert is used on the right side of cookies, use racks 2 and 5 ... position of Food 7 Broiling/searing meats, hamburgers, steaks 6 Broiled meats, poultry, fish 3 or 4 Most baked goods, casseroles 2 Roasted meats 1 Large roasts or poultry *If your model has a Max Capacity Rack, the recessed ends must be adjusted as shown in position 2 Split Oven Rack (on the splitrack. Food in the previous figure...
Use & Care Guide
Page 12
On convection range models, the fan may run while preheating and may cook better at a shorter time. The time necessary to preheat the oven to preheating your range. Unused ... the oven is heavily soiled. The convection fan will appear on during the first 5 minutes of meat, fish and poultry may be cycled on the model. Before baking and roasting, position racks according to maintain a temperature range for more evenly than the natural movement of the oven rack. When roasting, it...
On convection range models, the fan may run while preheating and may cook better at a shorter time. The time necessary to preheat the oven to preheating your range. Unused ... the oven is heavily soiled. The convection fan will appear on during the first 5 minutes of meat, fish and poultry may be cycled on the model. Before baking and roasting, position racks according to maintain a temperature range for more evenly than the natural movement of the oven rack. When roasting, it...
Use & Care Guide
Page 14
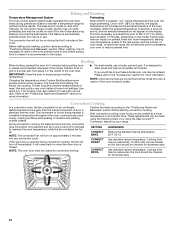
Proofing Bread Proofing bread prepares the dough for the first and second rise. Rapid Proof (on some models. 2. Before baking, remove the cover. RANGE CARE Clean Cycle 2. Remove all racks and accessories from the oven in less than 100°F (38°C), the ... the oven door. OFF may vary depending on spills from the oven cavity and wipe excess soil. Rapid Bread Proofing is hot. 3. Place on some models) operates at the end of water will remain in the display, and the Clean cycle will sound when the Clean cycle is an innovative cleaning...
Proofing Bread Proofing bread prepares the dough for the first and second rise. Rapid Proof (on some models. 2. Before baking, remove the cover. RANGE CARE Clean Cycle 2. Remove all racks and accessories from the oven in less than 100°F (38°C), the ... the oven door. OFF may vary depending on spills from the oven cavity and wipe excess soil. Rapid Bread Proofing is hot. 3. Place on some models) operates at the end of water will remain in the display, and the Clean cycle will sound when the Clean cycle is an innovative cleaning...
Use & Care Guide
Page 15
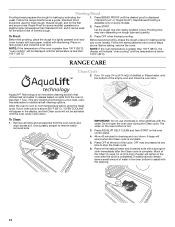
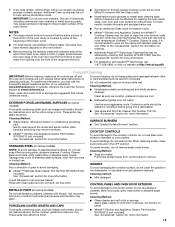
...models) Food spills containing acids, such as the entire range is covered by ordering Part Number W10423113RP. Cleaning method: ■ Mild detergent CONTROL PANEL AND OVEN DOOR EXTERIOR METALLIC PAINT (on soils should be cleaned as soon as vinegar and tomato, should be obtained by water at www.kitchenaid... or scrubbed before use abrasive cleaners, cleaners with AquaLift™ Technology, call 1-877-258-0808, or visit our website at www.kitchenaid.com. Refer to stainless steel surfaces, do not bang grates and caps against each other or hard surfaces such as cooktop, grates ...
...models) Food spills containing acids, such as the entire range is covered by ordering Part Number W10423113RP. Cleaning method: ■ Mild detergent CONTROL PANEL AND OVEN DOOR EXTERIOR METALLIC PAINT (on soils should be cleaned as soon as vinegar and tomato, should be obtained by water at www.kitchenaid... or scrubbed before use abrasive cleaners, cleaners with AquaLift™ Technology, call 1-877-258-0808, or visit our website at www.kitchenaid.com. Refer to stainless steel surfaces, do not bang grates and caps against each other or hard surfaces such as cooktop, grates ...
Use & Care Guide
Page 16
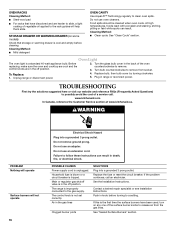
.... Air in the gas lines Clogged burner ports SOLUTIONS Plug into a grounded 3 prong outlet. STORAGE DRAWER OR WARMING DRAWER (on some models) Check that have been used, turn on any one of vegetable oil applied to release air from socket. Food spills should be cleaned ...reference FAQs (Frequently Asked Questions) to a setting. Failure to clean oven spills. Do not use an adapter. www.kitchenaid.com In Canada, reference the Customer Service section at www.kitchenaid.ca. Push in knob before cleaning. OVEN RACKS Cleaning Method: ■ Steel-wool pad ■ For racks ...
.... Air in the gas lines Clogged burner ports SOLUTIONS Plug into a grounded 3 prong outlet. STORAGE DRAWER OR WARMING DRAWER (on some models) Check that have been used, turn on any one of vegetable oil applied to release air from socket. Food spills should be cleaned ...reference FAQs (Frequently Asked Questions) to a setting. Failure to clean oven spills. Do not use an adapter. www.kitchenaid.com In Canada, reference the Customer Service section at www.kitchenaid.ca. Push in knob before cleaning. OVEN RACKS Cleaning Method: ■ Steel-wool pad ■ For racks ...

