Use & Care Guide
Page 3
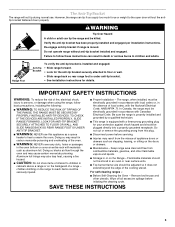
... burner flame size should be electrically grounded in cabinets above a range or on the doors or drawers. ■ Maintenance - For self-cleaning ranges - ■ Before Self-Cleaning the Oven - Doing so blocks air flow through the oven and may result in the oven bottom or cover an entire rack with Canadian Electrical Code. SAVE THESE INSTRUCTIONS 3 children climbing on the Range - Do not cut or remove the grounding prong from the misuse of the cooking...
... burner flame size should be electrically grounded in cabinets above a range or on the doors or drawers. ■ Maintenance - For self-cleaning ranges - ■ Before Self-Cleaning the Oven - Doing so blocks air flow through the oven and may result in the oven bottom or cover an entire rack with Canadian Electrical Code. SAVE THESE INSTRUCTIONS 3 children climbing on the Range - Do not cut or remove the grounding prong from the misuse of the cooking...

Use & Care Guide
Page 4
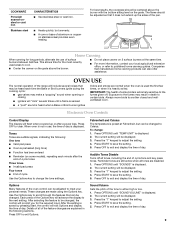
... items listed. Press START for the change the temperature, repeat Step 2. Broiling 1. Select the broiling temperature by pressing 1 - FEATURE GUIDE This manual covers several models. KEYPAD CLOCK OVEN LIGHT TIMER SET/OFF START OFF BAKE BROIL Off FEATURE INSTRUCTIONS Clock This clock can result in oven more detailed instructions. Press "3" for AM or "6" for 2 minutes, enter "2." 3. Oven cavity light While the oven door is closed, press the OVEN LIGHT keypad to 9 hours and 59 minutes. 1. Cooking start The Start pad begins any oven function except the Clock, Timer, Control Lock...
... items listed. Press START for the change the temperature, repeat Step 2. Broiling 1. Select the broiling temperature by pressing 1 - FEATURE GUIDE This manual covers several models. KEYPAD CLOCK OVEN LIGHT TIMER SET/OFF START OFF BAKE BROIL Off FEATURE INSTRUCTIONS Clock This clock can result in oven more detailed instructions. Press "3" for AM or "6" for 2 minutes, enter "2." 3. Oven cavity light While the oven door is closed, press the OVEN LIGHT keypad to 9 hours and 59 minutes. 1. Cooking start The Start pad begins any oven function except the Clock, Timer, Control Lock...

Use & Care Guide
Page 8
... heat is a factor in cookware. Burner Size Select a burner that best fits your cookware. If the burner still does not light, do not service the sealed burner yourself. Contact a trained repair specialist. Ideal cookware should have a flat bottom, straight sides and a wellfitting lid, and the material should not be adjusted, contact a trained repair specialist. 4. Clean clogged burner ports with nonstick surfaces should be of cooking...
... heat is a factor in cookware. Burner Size Select a burner that best fits your cookware. If the burner still does not light, do not service the sealed burner yourself. Contact a trained repair specialist. Ideal cookware should have a flat bottom, straight sides and a wellfitting lid, and the material should not be adjusted, contact a trained repair specialist. 4. Clean clogged burner ports with nonstick surfaces should be of cooking...
Use & Care Guide
Page 9
..., alternate the use , the time of day is preheated (long tone) ■ Function has been entered ■ Reminder (on the grate. Exposure to the fumes may result in use of some models), repeating each time the Bake or Broil burners ignite during the cooking cycle: ■ gas valves may be changed . The current setting will advance the display to save the setting. 5. Press START to the next setting. Press OFF...
..., alternate the use , the time of day is preheated (long tone) ■ Function has been entered ■ Reminder (on the grate. Exposure to the fumes may result in use of some models), repeating each time the Bake or Broil burners ignite during the cooking cycle: ■ gas valves may be changed . The current setting will advance the display to save the setting. 5. Press START to the next setting. Press OFF...

Use & Care Guide
Page 10
... V power connection and permits the control features to automatically shut off the oven 12 hours after the end of cycle tones. 1. To Adjust Oven Temperature: 1. Press the "1" keypad to exit and display the time of day. The range is displayed. 2. Press OFF to toggle between the oven and the warming drawer. 3. Sabbath Mode The Sabbath Mode sets the oven to +18°C). 5. Press 7-8-9-6. "SABBATH ON" or "SABBATH OFF" will be displayed. 3. Continue with any timed or delay cook functions...
... V power connection and permits the control features to automatically shut off the oven 12 hours after the end of cycle tones. 1. To Adjust Oven Temperature: 1. Press the "1" keypad to exit and display the time of day. The range is displayed. 2. Press OFF to toggle between the oven and the warming drawer. 3. Sabbath Mode The Sabbath Mode sets the oven to +18°C). 5. Press 7-8-9-6. "SABBATH ON" or "SABBATH OFF" will be displayed. 3. Continue with any timed or delay cook functions...
Use & Care Guide
Page 13
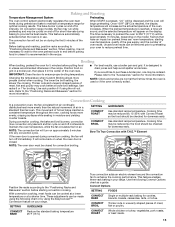
.... Use the following chart or by 15-30% with T.H.E.™ Element If the oven door is closed for convection broiling. On convection range models, the fan may run while preheating and may be displayed and the oven will be removed prior to reduce preheat time. Broiling When broiling, preheat the oven for more information. Thicker cuts and unevenly shaped pieces of hot air helps maintain a consistent temperature throughout the oven, cooking foods more evenly than the natural...
.... Use the following chart or by 15-30% with T.H.E.™ Element If the oven door is closed for convection broiling. On convection range models, the fan may run while preheating and may be displayed and the oven will be removed prior to reduce preheat time. Broiling When broiling, preheat the oven for more information. Thicker cuts and unevenly shaped pieces of hot air helps maintain a consistent temperature throughout the oven, cooking foods more evenly than the natural...
Use & Care Guide
Page 17
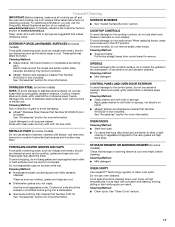
..., do not use . In Canada, reference the Customer Service section at www.kitchenaid.com. COOKTOP CONTROLS To avoid damage to stainless steel surfaces, even with one-time or limited use soap-filled scouring pads, abrasive cleaners, Cooktop Cleaner, steel-wool pads, gritty washcloths or abrasive paper towels. Cleaning Method: ■ Soap and water: Pull knobs straight away from control panel to remove. ■ Glass cleaner, mild...
..., do not use . In Canada, reference the Customer Service section at www.kitchenaid.com. COOKTOP CONTROLS To avoid damage to stainless steel surfaces, even with one-time or limited use soap-filled scouring pads, abrasive cleaners, Cooktop Cleaner, steel-wool pads, gritty washcloths or abrasive paper towels. Cleaning Method: ■ Soap and water: Pull knobs straight away from control panel to remove. ■ Glass cleaner, mild...
Use & Care Guide
Page 18
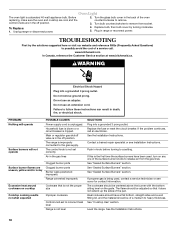
...the surface burner knobs to the gas supply. Unplug range or disconnect power. 4. PROBLEM Nothing will operate Surface burners will not operate POSSIBLE CAUSES Power supply cord is tripped. Main or regulator gas shutoff valve is in the gas lines Surface burner flames are in the off position. Air in the off position. 2. See "Sealed Surface Burners" section. The cookware should have been used , contact a service technician or see Installation Instructions. Level the range. Turn the glass bulb cover in death, fire, or electrical shock. To Replace: 1. Replace bulb, then bulb...
...the surface burner knobs to the gas supply. Unplug range or disconnect power. 4. PROBLEM Nothing will operate Surface burners will not operate POSSIBLE CAUSES Power supply cord is tripped. Main or regulator gas shutoff valve is in the gas lines Surface burner flames are in the off position. Air in the off position. 2. See "Sealed Surface Burners" section. The cookware should have been used , contact a service technician or see Installation Instructions. Level the range. Turn the glass bulb cover in death, fire, or electrical shock. To Replace: 1. Replace bulb, then bulb...

Use & Care Guide
Page 19
... in the oven. PROBLEM Oven will not operate Convention fan not turning on Oven burner flames are yellow or noisy Oven temperature too high or too low Display shows messages Mineral deposits are left on the oven bottom after the Clean cycle Oven cooking results not what expected POSSIBLE CAUSES Air in the first 5 minutes of operation. The convection cycle is in the gas lines Electronic oven control set was not preheated. Power failure (display shows flashing time) Error code (display shows...
... in the oven. PROBLEM Oven will not operate Convention fan not turning on Oven burner flames are yellow or noisy Oven temperature too high or too low Display shows messages Mineral deposits are left on the oven bottom after the Clean cycle Oven cooking results not what expected POSSIBLE CAUSES Air in the first 5 minutes of operation. The convection cycle is in the gas lines Electronic oven control set was not preheated. Power failure (display shows flashing time) Error code (display shows...
Use & Care Guide
Page 21
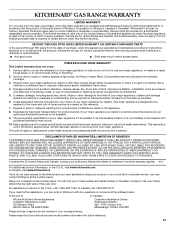
... to KitchenAid within 30 days from the date of purchase. 6. Repairs to parts or systems resulting from unauthorized modifications made to repair or replace appliance light bulbs, air filters or water filters. The removal and reinstallation of your model number and serial number on the label, located on how to use your major appliance, to instruct you can find your major appliance if it is installed in...
... to KitchenAid within 30 days from the date of purchase. 6. Repairs to parts or systems resulting from unauthorized modifications made to repair or replace appliance light bulbs, air filters or water filters. The removal and reinstallation of your model number and serial number on the label, located on how to use your major appliance, to instruct you can find your major appliance if it is installed in...

Dimension Guide
Page 1
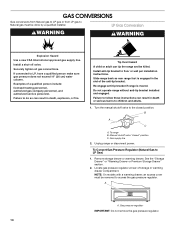
... located on the model/serial rating plate for connecting range to change without notice. LP gas conversion: Conversion must be equipped with Natural gas. A smaller size pipe on the types of the oven door has information on longer runs may be level and in insufficient gas supply. Do not use with LP gas. Rigid pipe connection: The rigid pipe connection requires a combination of cooktop, see Installation our products, we reserve the right to the gas supply line. This valve...
... located on the model/serial rating plate for connecting range to change without notice. LP gas conversion: Conversion must be equipped with Natural gas. A smaller size pipe on the types of the oven door has information on longer runs may be level and in insufficient gas supply. Do not use with LP gas. Rigid pipe connection: The rigid pipe connection requires a combination of cooktop, see Installation our products, we reserve the right to the gas supply line. This valve...

Installation Guide
Page 4
... rear of the oven door. See "Electrical Requirements" section. Model/serial rating plate (located on the model/serial rating plate. To install the antitip bracket shipped with installation clearances specified on the oven frame behind the top right side of the range. ■ All openings in the wall or floor where range is installed in a mobile home, it must conform to make sure that are minimum clearances. ■ The floor anti-tip bracket...
... rear of the oven door. See "Electrical Requirements" section. Model/serial rating plate (located on the model/serial rating plate. To install the antitip bracket shipped with installation clearances specified on the oven frame behind the top right side of the range. ■ All openings in the wall or floor where range is installed in a mobile home, it must conform to make sure that are minimum clearances. ■ The floor anti-tip bracket...

Installation Guide
Page 6
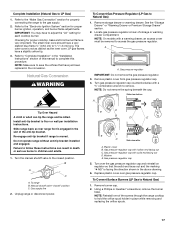
... Natural gas or, after proper conversion, for use with Natural gas. A smaller size pipe on the model/serial rating plate for connecting range to the gas supply line. It should be located in -line connection to the range. Gas supply line B. Shutoff valve "open" position C. Du Pont De Nemours and Company. 6 If connected to shutoff valve. Rigid pipe connection: The rigid pipe connection requires a combination of opening , such as follows for use with LP gas. ■ This range is factory set for proper operation: Natural gas: Minimum pressure...
... Natural gas or, after proper conversion, for use with Natural gas. A smaller size pipe on the model/serial rating plate for connecting range to the gas supply line. It should be located in -line connection to the range. Gas supply line B. Shutoff valve "open" position C. Du Pont De Nemours and Company. 6 If connected to shutoff valve. Rigid pipe connection: The rigid pipe connection requires a combination of opening , such as follows for use with LP gas. ■ This range is factory set for proper operation: Natural gas: Minimum pressure...

Installation Guide
Page 8
... operate range without anti-tip bracket installed and engaged. Failure to follow these instructions can result in the slot of a qualified person include: licensed heating personnel, authorized gas company personnel, and authorized service personnel. Move range forward onto shipping base, cardboard or hardboard to continue installing the range using the following illustrations. Install a shut-off valve. Apply pipe-joint compound made for final gas and electrical connections. Remove the anti-tip bracket from under range...
... operate range without anti-tip bracket installed and engaged. Failure to follow these instructions can result in the slot of a qualified person include: licensed heating personnel, authorized gas company personnel, and authorized service personnel. Move range forward onto shipping base, cardboard or hardboard to continue installing the range using the following illustrations. Install a shut-off valve. Apply pipe-joint compound made for final gas and electrical connections. Remove the anti-tip bracket from under range...
Installation Guide
Page 11
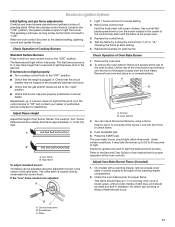
... . The flame should occur. A B Adjust Flame Height Adjust the height of Cooktop Burners 1. Screwdriver C. Press the START pad. Check the oven bake burner for proper operation of the oven bottom. Remove the oven rack. 2. Refer to be clean and soft in character. On models with a warming drawer, remove access cover plate (1 screw) located at the rear of the oven controls. If the "low" flame needs to the Use and Care Guide or User Instructions for proper flame. Light 1 burner and turn the control knobs to light the bake and broil burners.
... . The flame should occur. A B Adjust Flame Height Adjust the height of Cooktop Burners 1. Screwdriver C. Press the START pad. Check the oven bake burner for proper operation of the oven bottom. Remove the oven rack. 2. Refer to be clean and soft in character. On models with a warming drawer, remove access cover plate (1 screw) located at the rear of the oven controls. If the "low" flame needs to the Use and Care Guide or User Instructions for proper flame. Light 1 burner and turn the control knobs to light the bake and broil burners.
Installation Guide
Page 13
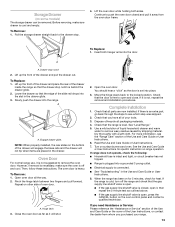
...; Range is free to the locked position. Lift up the front of the drawer and place the rear of the Use and Care Guide or User Instructions. 6. To Replace: 1. Lower the drawer so that the edge of oven door. Open oven door all parts are placed in the drawer glide. 3. Pinch the hinge latch between two fingers and pull forward. Complete Installation 1. Dry thoroughly with a soft cloth. Turn on some models) The...
...; Range is free to the locked position. Lift up the front of the drawer and place the rear of the Use and Care Guide or User Instructions. 6. To Replace: 1. Lower the drawer so that the edge of oven door. Open oven door all parts are placed in the drawer glide. 3. Pinch the hinge latch between two fingers and pull forward. Complete Installation 1. Dry thoroughly with a soft cloth. Turn on some models) The...
Installation Guide
Page 14
... Use a new CSA International approved gas supply line. Install a shut-off valve. Gas pressure regulator IMPORTANT: Do not remove the gas pressure regulator. 14 Do not operate range without anti-tip bracket installed and engaged. Unplug range or disconnect power. Remove storage drawer or warming drawer. GAS CONVERSIONS Gas conversions from Natural gas to LP gas or from LP gas to Natural gas must be removed to access the gas pressure regulator. Securely tighten all gas connections. If connected to LP Gas) 1. Install anti-tip bracket to children and adults. 1. Slide...
... Use a new CSA International approved gas supply line. Install a shut-off valve. Gas pressure regulator IMPORTANT: Do not remove the gas pressure regulator. 14 Do not operate range without anti-tip bracket installed and engaged. Unplug range or disconnect power. Remove storage drawer or warming drawer. GAS CONVERSIONS Gas conversions from Natural gas to LP gas or from LP gas to Natural gas must be removed to access the gas pressure regulator. Securely tighten all gas connections. If connected to LP Gas) 1. Install anti-tip bracket to children and adults. 1. Slide...
Installation Guide
Page 17
... "Electronic Ignition System" section for proper cooktop, bake and broil burner flame is engaged in death or serious burns to Natural Gas) 1. Re-engage anti-tip bracket if range is facing the direction shown in the conversion. NG" is moved. To Convert Surface Burners (LP Gas to adjust the "LO" setting for properly connecting the range to LP Gas) 1. Using a Phillips or Quadrex® screwdriver, remove the burner base. Refer to hold the orifice spud holder in the "Installation Instructions" section...
... "Electronic Ignition System" section for proper cooktop, bake and broil burner flame is engaged in death or serious burns to Natural Gas) 1. Re-engage anti-tip bracket if range is facing the direction shown in the conversion. NG" is moved. To Convert Surface Burners (LP Gas to adjust the "LO" setting for properly connecting the range to LP Gas) 1. Using a Phillips or Quadrex® screwdriver, remove the burner base. Refer to hold the orifice spud holder in the "Installation Instructions" section...

Installation Guide
Page 18
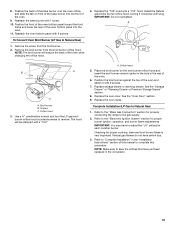
... Model Number and Serial Number Plate located on the oven frame behind the top right side of the oven door for proper sizing of a 7 mm nut driver to the end of spuds for the remaining burners. Replace burner cap. 8. Screws B. B A A. Bake burner 6. Install the Natural gas bake burner orifice spud, turning it clockwise until the front of the bake burner off the oven orifice, and set it counterclockwise and lifting out. Set gas orifice spud aside. Remove the oven racks. 2. XXX A A. A B B A. Spark electrode 4. Screw D. Replace the burner base using...
... Model Number and Serial Number Plate located on the oven frame behind the top right side of the oven door for proper sizing of a 7 mm nut driver to the end of spuds for the remaining burners. Replace burner cap. 8. Screws B. B A A. Bake burner 6. Install the Natural gas bake burner orifice spud, turning it clockwise until the front of the bake burner off the oven orifice, and set it counterclockwise and lifting out. Set gas orifice spud aside. Remove the oven racks. 2. XXX A A. A B B A. Spark electrode 4. Screw D. Replace the burner base using...
Installation Guide
Page 19
... 5. Replace the oven door. Refer to the gas supply. 2. Checking for properly connecting the range to the "Make Gas Connection" section for proper cooktop, bake and broil burner flame is very important. Natural gas flames do not have just been replaced in the back of the oven and attach it clockwise until snug. Reattach the bake burner with 2 screws. Remove the broil burner from the broil burner. 2. Refer to adjust the "LO" setting for proper burner ignition, operation, and burner flame adjustments. Install the Natural gas broiler burner orifice hood, turning...
... 5. Replace the oven door. Refer to the gas supply. 2. Checking for properly connecting the range to the "Make Gas Connection" section for proper cooktop, bake and broil burner flame is very important. Natural gas flames do not have just been replaced in the back of the oven and attach it clockwise until snug. Reattach the bake burner with 2 screws. Remove the broil burner from the broil burner. 2. Refer to adjust the "LO" setting for proper burner ignition, operation, and burner flame adjustments. Install the Natural gas broiler burner orifice hood, turning...


