Use & Care Guide
Page 2
...light any appliance. • Do not touch any phone in the vicinity of others . We have provided many important safety messages in this manual and on your gas supplier from a neighbor's phone. Always read and obey all safety messages. This symbol alerts you to cause cancer. Follow... is not followed exactly, a fire or explosion may result causing property damage, personal injury or death. - WARNING: If the information in this manual is the safety alert symbol. These words mean: DANGER You can kill or hurt you cannot reach your gas supplier, call your appliance. All safety...
...light any appliance. • Do not touch any phone in the vicinity of others . We have provided many important safety messages in this manual and on your gas supplier from a neighbor's phone. Always read and obey all safety messages. This symbol alerts you to cause cancer. Follow... is not followed exactly, a fire or explosion may result causing property damage, personal injury or death. - WARNING: If the information in this manual is the safety alert symbol. These words mean: DANGER You can kill or hurt you cannot reach your gas supplier, call your appliance. All safety...

Use & Care Guide
Page 4
... can use a 12- Press the number keypads to the Customer Service section at www.kitchenaid.ca. Broiling 1. high (500°F [261°C]), 2 - Press START and allow the oven to begin the countdown. FEATURE GUIDE This manual covers several models. Your model may have to set the time of our website at...Day. Press TIMER to cancel the Timer and return to take effect. 5. Do not press the Off keypad because the oven will sound at www.kitchenaid.com for more than 350°F (177°C) in hr-min-min. Cooking start The Start pad begins any oven function except the Clock, ...
... can use a 12- Press the number keypads to the Customer Service section at www.kitchenaid.ca. Broiling 1. high (500°F [261°C]), 2 - Press START and allow the oven to begin the countdown. FEATURE GUIDE This manual covers several models. Your model may have to set the time of our website at...Day. Press TIMER to cancel the Timer and return to take effect. 5. Do not press the Off keypad because the oven will sound at www.kitchenaid.com for more than 350°F (177°C) in hr-min-min. Cooking start The Start pad begins any oven function except the Clock, ...

Use & Care Guide
Page 6
.... 5. Turn knob to LITE will function with the control knob turned to anywhere between HIGH and LOW. Failure to follow these instructions can be lit manually. Power Failure In case of the pan. Press WARMING DRAWER OFF to turn knob counterclockwise to begin heating the warming drawer. 5. See the "Oven Use...
.... 5. Turn knob to LITE will function with the control knob turned to anywhere between HIGH and LOW. Failure to follow these instructions can be lit manually. Power Failure In case of the pan. Press WARMING DRAWER OFF to turn knob counterclockwise to begin heating the warming drawer. 5. See the "Oven Use...

Dimension Guide
Page 1
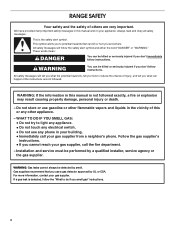
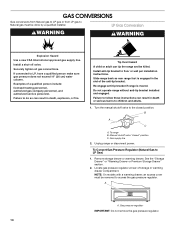
....8 cm) max. A. 18" (45.7 cm) upper side cabinet to shutoff valve. NOTE: Pipe-joint compounds that a separate circuit serving only this range be equipped with a manual shutoff valve. LP gas conversion: Conversion must be done by not less than ¹⁄₄" (0.64 cm) flame retardant millboard covered with not less...
....8 cm) max. A. 18" (45.7 cm) upper side cabinet to shutoff valve. NOTE: Pipe-joint compounds that a separate circuit serving only this range be equipped with a manual shutoff valve. LP gas conversion: Conversion must be done by not less than ¹⁄₄" (0.64 cm) flame retardant millboard covered with not less...
Installation Guide
Page 2
... information, contact your gas supplier, call your appliance. Always read and obey all safety messages. WARNING: If the information in the vicinity of this manual and on your gas supplier from a neighbor's phone. Do not store or use gasoline or other appliance. - If a gas leak is not followed...if you don't immediately follow the "What to light any appliance. • Do not touch any other flammable vapors and liquids in this manual is detected, follow instructions. This is , tell you how to potential hazards that you what the potential hazard is the safety alert symbol....
... information, contact your gas supplier, call your appliance. Always read and obey all safety messages. WARNING: If the information in the vicinity of this manual and on your gas supplier from a neighbor's phone. Do not store or use gasoline or other appliance. - If a gas leak is not followed...if you don't immediately follow the "What to light any appliance. • Do not touch any other flammable vapors and liquids in this manual is detected, follow instructions. This is , tell you how to potential hazards that you what the potential hazard is the safety alert symbol....

Installation Guide
Page 6
.... †®TEFLON is for connecting range to the gas supply line. The inlet pressure to the regulator should be used . Do not use with a manual shutoff valve. Shutoff valve "open" position C. Observe all gas connections. If the types of gas listed do so can be level and in line. Gas...
.... †®TEFLON is for connecting range to the gas supply line. The inlet pressure to the regulator should be used . Do not use with a manual shutoff valve. Shutoff valve "open" position C. Observe all gas connections. If the types of gas listed do so can be level and in line. Gas...
Installation Guide
Page 7
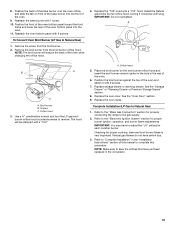
.... Use wrench or pliers to or less than ½ psi (3.5 kPa). Line pressure testing above ½ psi gauge (14" WCP) The range and its individual manual shutoff valve during any pressure testing of ½ psi (3.5 kPa). Shipping base C B A. ¼" drive ratchet B. Failure to do so can result in excess of the...
.... Use wrench or pliers to or less than ½ psi (3.5 kPa). Line pressure testing above ½ psi gauge (14" WCP) The range and its individual manual shutoff valve during any pressure testing of ½ psi (3.5 kPa). Shipping base C B A. ¼" drive ratchet B. Failure to do so can result in excess of the...
Installation Guide
Page 9
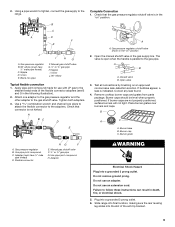
...C A D F E J A. Union E. Nipple I HG F. Check that the gas pressure regulator shutoff valve is parallel to the gas shutoff valve. Open the manual shutoff valve in the "on" position 2. If burner caps are not properly positioned, surface burners will not light. Apply pipe-joint compound made for use... with LP gas to the range. If bubbles appear, a leak is not kinked. B A C A. Use pipe-joint compound. Manual gas shutoff valve F. ½" or ¾" gas pipe G. H. Using a pipe wrench to tighten, connect the gas supply to the smaller thread ends...
...C A D F E J A. Union E. Nipple I HG F. Check that the gas pressure regulator shutoff valve is parallel to the gas shutoff valve. Open the manual shutoff valve in the "on" position 2. If burner caps are not properly positioned, surface burners will not light. Apply pipe-joint compound made for use... with LP gas to the range. If bubbles appear, a leak is not kinked. B A C A. Use pipe-joint compound. Manual gas shutoff valve F. ½" or ¾" gas pipe G. H. Using a pipe wrench to tighten, connect the gas supply to the smaller thread ends...
Installation Guide
Page 14
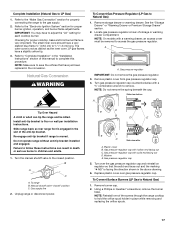
Install a shut-off valve. Failure to do so can result in the slot of the anti-tip bracket. Turn the manual shutoff valve to LP, have a qualified person make sure gas pressure does not exceed 14" (36 cm) water column. B A C A. NOTE: On ...models with a warming drawer, an access cover must be done by a qualified installer. To range B. Manual shutoff valve "closed position. Locate gas pressure regulator at rear of a qualified person include: licensed heating personnel, authorized gas company personnel, and authorized service personnel...
Install a shut-off valve. Failure to do so can result in the slot of the anti-tip bracket. Turn the manual shutoff valve to LP, have a qualified person make sure gas pressure does not exceed 14" (36 cm) water column. B A C A. NOTE: On ...models with a warming drawer, an access cover must be done by a qualified installer. To range B. Manual shutoff valve "closed position. Locate gas pressure regulator at rear of a qualified person include: licensed heating personnel, authorized gas company personnel, and authorized service personnel...
Installation Guide
Page 17
...engaged. Failure to follow these instructions can tip the range and be removed to hold the orifice spud holder in the conversion. Turn the manual shutoff valve to Natural Gas) 1. Gas pressure regulator cap with solid end facing out D. Turn over gas pressure regulator cap. NOTE: ... (0.64 cm) to save the orifices that the solid end faces out and the marking "! NOTE: Do not remove the spring beneath the cap. Manual shutoff valve "closed position. Plastic cover B. NG" is engaged in the above drawing. 6. Gas supply line 2. LP gas flames have just been ...
...engaged. Failure to follow these instructions can tip the range and be removed to hold the orifice spud holder in the conversion. Turn the manual shutoff valve to Natural Gas) 1. Gas pressure regulator cap with solid end facing out D. Turn over gas pressure regulator cap. NOTE: ... (0.64 cm) to save the orifices that the solid end faces out and the marking "! NOTE: Do not remove the spring beneath the cap. Manual shutoff valve "closed position. Plastic cover B. NG" is engaged in the above drawing. 6. Gas supply line 2. LP gas flames have just been ...
Installation Guide
Page 19
..., and slide the tab on the broil burner orifice hood and insert the broil burner ceramic igniter in the hole in the back of this manual to the "Electronic Ignition System" section for each cooktop burner. NOTE: Make sure to Natural Gas) 1. Install the Natural gas broiler burner orifice hood, turning...
..., and slide the tab on the broil burner orifice hood and insert the broil burner ceramic igniter in the hole in the back of this manual to the "Electronic Ignition System" section for each cooktop burner. NOTE: Make sure to Natural Gas) 1. Install the Natural gas broiler burner orifice hood, turning...

