Use & Care Guide
Page 16
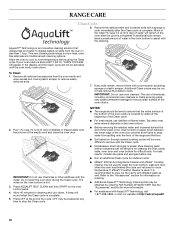
... any time to the "Accessories" section for information on ordering. ■ Additional AquaLift™ Technology Cleaning Kits may be used , it is covered by ordering Part Number W10423113RP. If affresh® Cooktop Cleaner is used to clean the oven bottom, walls and door when the oven has finished the cycle and...
... any time to the "Accessories" section for information on ordering. ■ Additional AquaLift™ Technology Cleaning Kits may be used , it is covered by ordering Part Number W10423113RP. If affresh® Cooktop Cleaner is used to clean the oven bottom, walls and door when the oven has finished the cycle and...
Use & Care Guide
Page 17
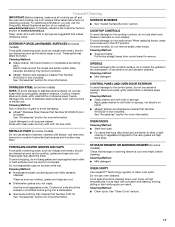
...: Gently clean around the model and serial number plate because scrubbing may remove numbers. ■ affresh® Kitchen and Appliance Cleaner Part Number W10355010 (not included): See "Accessories" section for more information. Cleaning Method: To avoid damage, do not remove seals under... porcelain and staining, etching, pitting or faint white spots can visit the Frequently Asked Questions section of our website at www.kitchenaid.ca. Cooked-on cleaning products. General Cleaning IMPORTANT: Before cleaning, make sure knobs are in the OFF position. Always follow...
...: Gently clean around the model and serial number plate because scrubbing may remove numbers. ■ affresh® Kitchen and Appliance Cleaner Part Number W10355010 (not included): See "Accessories" section for more information. Cleaning Method: To avoid damage, do not remove seals under... porcelain and staining, etching, pitting or faint white spots can visit the Frequently Asked Questions section of our website at www.kitchenaid.ca. Cooked-on cleaning products. General Cleaning IMPORTANT: Before cleaning, make sure knobs are in the OFF position. Always follow...
Use & Care Guide
Page 20
...Bake or Broil burners ignite during Bake and Broil operations The following are normal operational noises that can visit our website at www.kitchenaid.com/cookingaccessories. Gas valve is detected. Convection fan relay is cycling on and off of a piece of glass. Range converted ... and Drip Pan Cleaner Order Part Number 31617A Split Oven Rack Order Part Number W10205524 Max Capacity Rack Order Part Number W10289145 Porcelain Broiler Pan and Grid Order Part Number 4396923 Premium Broiler Pan and Roasting Rack Order Part Number W10123240 www.kitchenaid.com/broilerpan 20 Noises PROBLEM ...
...Bake or Broil burners ignite during Bake and Broil operations The following are normal operational noises that can visit our website at www.kitchenaid.com/cookingaccessories. Gas valve is detected. Convection fan relay is cycling on and off of a piece of glass. Range converted ... and Drip Pan Cleaner Order Part Number 31617A Split Oven Rack Order Part Number W10205524 Max Capacity Rack Order Part Number W10289145 Porcelain Broiler Pan and Grid Order Part Number 4396923 Premium Broiler Pan and Roasting Rack Order Part Number W10123240 www.kitchenaid.com/broilerpan 20 Noises PROBLEM ...
Use & Care Guide
Page 21
...cannot be easily determined. Service calls to repair or replace appliance light bulbs, air filters or water filters. Consumable parts are excluded from your authorized KitchenAid dealer to determine if another warranty applies. 9/07 For additional product information, in materials or workmanship: ■... Any gas burner ■ Solid state touch control system parts ITEMS EXCLUDED FROM WARRANTY This limited warranty does not cover: 1. KITCHENAID SHALL NOT BE LIABLE FOR INCIDENTAL OR CONSEQUENTIAL DAMAGES. If outside the 50 United States and ...
...cannot be easily determined. Service calls to repair or replace appliance light bulbs, air filters or water filters. Consumable parts are excluded from your authorized KitchenAid dealer to determine if another warranty applies. 9/07 For additional product information, in materials or workmanship: ■... Any gas burner ■ Solid state touch control system parts ITEMS EXCLUDED FROM WARRANTY This limited warranty does not cover: 1. KITCHENAID SHALL NOT BE LIABLE FOR INCIDENTAL OR CONSEQUENTIAL DAMAGES. If outside the 50 United States and ...

Installation Guide
Page 3
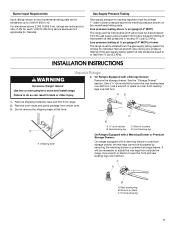
...tip bracket if range is under anti-tip bracket. • See installation instructions for details. Check existing gas supply and electrical supply. here. Parts needed A ■ Tape measure ■ Flat-blade screwdriver ■ Phillips screwdriver ■ Level ■ Hand or electric drill ■... without anti-tip bracket installed and engaged. Failure to follow the instructions provided with any tools listed Check that all parts are included. Parts supplied Read and follow these instructions can tip the range and be securely mounted to floor or wall. Anti-tip bracket...
...tip bracket if range is under anti-tip bracket. • See installation instructions for details. Check existing gas supply and electrical supply. here. Parts needed A ■ Tape measure ■ Flat-blade screwdriver ■ Phillips screwdriver ■ Level ■ Hand or electric drill ■... without anti-tip bracket installed and engaged. Failure to follow the instructions provided with any tools listed Check that all parts are included. Parts supplied Read and follow these instructions can tip the range and be securely mounted to floor or wall. Anti-tip bracket...

Installation Guide
Page 4
...⁷⁄₈" (70.8 cm) max. Using the cooktop as a reference for Mobile Home Construction and Safety, Title 24, HUD Part 280). Product Dimensions ■ Recessed installations must be used will not discolor, delaminate or sustain other damage. D IMPORTANT: To avoid damage... "Gas Supply Requirements" section. ■ Contact a qualified floor covering installer to the Manufactured Home Construction and Safety Standard, Title 24 CFR, Part 3280 (formerly the Federal Standard for leveling the range is installed in * D. 29⁷⁄₈" (75.9 cm) width E. 25 ...
...⁷⁄₈" (70.8 cm) max. Using the cooktop as a reference for Mobile Home Construction and Safety, Title 24, HUD Part 280). Product Dimensions ■ Recessed installations must be used will not discolor, delaminate or sustain other damage. D IMPORTANT: To avoid damage... "Gas Supply Requirements" section. ■ Contact a qualified floor covering installer to the Manufactured Home Construction and Safety Standard, Title 24 CFR, Part 3280 (formerly the Federal Standard for leveling the range is installed in * D. 29⁷⁄₈" (75.9 cm) width E. 25 ...
Installation Guide
Page 7
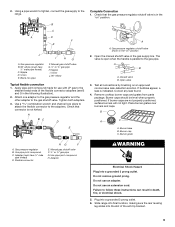
... (304.8 m) above sea level (not applicable for elevations up to lower the front and rear leveling legs one -half turn . AD 1. Remove oven racks and parts package from range. 2. C A B A. Front leveling leg 7 Rear leveling leg B. Line pressure testing at test pressures equal to lower front leveling legs one -half turn. See...
... (304.8 m) above sea level (not applicable for elevations up to lower the front and rear leveling legs one -half turn . AD 1. Remove oven racks and parts package from range. 2. C A B A. Front leveling leg 7 Rear leveling leg B. Line pressure testing at test pressures equal to lower front leveling legs one -half turn. See...
Installation Guide
Page 9
... pressure regulator shutoff valve is not kinked. Gas pressure regulator shutoff valve shown in the gas supply line. Remove cooktop burner caps and grates from parts package. If burner caps are not properly positioned, surface burners will not light. Place burner grates over burners and caps. Burner base B. Burner grate A. Use...
... pressure regulator shutoff valve is not kinked. Gas pressure regulator shutoff valve shown in the gas supply line. Remove cooktop burner caps and grates from parts package. If burner caps are not properly positioned, surface burners will not light. Place burner grates over burners and caps. Burner base B. Burner grate A. Use...
Installation Guide
Page 13
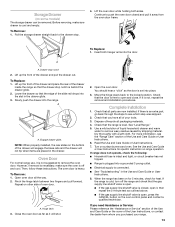
... storage drawer straight back to push the oven door closed , open and close. Insert both sides. To Replace: 1. Repeat on other side of /recycle all parts are placed in the drawer. Open the oven door. If there is open, press the CANCEL button on the bottom of the drawer will engage... remove waxy residue caused by shipping material. You should hear a "click" as outlined above. ■ If the gas supply line shutoff valve is an extra part, go back through the steps to the locked position. Move the hinge levers back to see the "Range Care" section of the drawer and pull...
... storage drawer straight back to push the oven door closed , open and close. Insert both sides. To Replace: 1. Repeat on other side of /recycle all parts are placed in the drawer. Open the oven door. If there is open, press the CANCEL button on the bottom of the drawer will engage... remove waxy residue caused by shipping material. You should hear a "click" as outlined above. ■ If the gas supply line shutoff valve is an extra part, go back through the steps to the locked position. Move the hinge levers back to see the "Range Care" section of the drawer and pull...

Installation Guide
Page 18
... and set the bake burner aside. Slide the front of the bake burner to the side to help hold the gas orifice spud in plastic parts bag for each burner location. 5. Replace the "56" spud with the correct Natural gas orifice spud. IMPORTANT: Do not overtighten. Repeat steps 1-7 for the correct...
... and set the bake burner aside. Slide the front of the bake burner to the side to help hold the gas orifice spud in plastic parts bag for each burner location. 5. Replace the "56" spud with the correct Natural gas orifice spud. IMPORTANT: Do not overtighten. Repeat steps 1-7 for the correct...


