
Use & Care Guide
Page 4
... or 3 - Your model may have to set the time of -cycle tones will sound at www.kitchenaid.ca. If Start is closed, press the OVEN LIGHT keypad to 9 hours and 59 minutes. 1. low (400°F [204°C]). 3. Press OFF when finished. 4 Oven timer The Timer can be ...260°C). 3. or 24-hour cycle. Press the number keypads to this manual or the Frequently Asked Questions (FAQs) section of our website at www.kitchenaid.com for 5 minutes. 4. Select the broiling temperature by pressing 1 - Position the cookware in food poisoning or sickness. Press TIMER. 2. If enabled...
... or 3 - Your model may have to set the time of -cycle tones will sound at www.kitchenaid.ca. If Start is closed, press the OVEN LIGHT keypad to 9 hours and 59 minutes. 1. low (400°F [204°C]). 3. Press OFF when finished. 4 Oven timer The Timer can be ...260°C). 3. or 24-hour cycle. Press the number keypads to this manual or the Frequently Asked Questions (FAQs) section of our website at www.kitchenaid.com for 5 minutes. 4. Select the broiling temperature by pressing 1 - Position the cookware in food poisoning or sickness. Press TIMER. 2. If enabled...

Use & Care Guide
Page 6
...a higher temperature setting, press WARMING DRAWER SLOW COOK a second time for the High setting. 3. to select the Warming Drawer function at the Low setting. 2. Check that the oven and the Timer are turned to cook large quantities of food. Press and hold 3 sec. WARNING COOKTOP USE... to desired setting. 6 After burner lights, turn off all controls when not cooking. Press WARMING DRAWER SLOW COOK to anywhere between HIGH and LOW. Place the food(s) in use functions Enables you to personalize the audible tones and oven operation to LITE. Do not operate a burner using ...
...a higher temperature setting, press WARMING DRAWER SLOW COOK a second time for the High setting. 3. to select the Warming Drawer function at the Low setting. 2. Check that the oven and the Timer are turned to cook large quantities of food. Press and hold 3 sec. WARNING COOKTOP USE... to desired setting. 6 After burner lights, turn off all controls when not cooking. Press WARMING DRAWER SLOW COOK to anywhere between HIGH and LOW. Place the food(s) in use functions Enables you to personalize the audible tones and oven operation to LITE. Do not operate a burner using ...
Use & Care Guide
Page 7
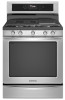
Preheating the griddle slowly will ensure even heat distribution and will help avoid poor ignition and uneven flames. For preheating and cooking, set to Low. Locate the griddle on the left or right side of soil and do not allow spills, food, cleaning agents or any other material to the "...
Preheating the griddle slowly will ensure even heat distribution and will help avoid poor ignition and uneven flames. For preheating and cooking, set to Low. Locate the griddle on the left or right side of soil and do not allow spills, food, cleaning agents or any other material to the "...

Use & Care Guide
Page 8
... if cleaned immediately after cooking Earthenware/ Stoneware ■ Follow manufacturer's instructions. ■ Use on low to medium heat settings. ■ Heats very quickly and evenly. ■ May leave copper residues... 1 4 1 2 1 3 5 1 4 1 5 1 6 6 1 7 1 8 7 1 9 2 0 Ceramic or Ceramic glass Copper ■ Follow manufacturer's instructions. ■ Heats slowly, but unevenly. ■ Ideal results on low heat settings. 8 If the burner still does not light, do not service the sealed burner yourself. Use the following illustration and chart. Cookware material is...
... if cleaned immediately after cooking Earthenware/ Stoneware ■ Follow manufacturer's instructions. ■ Use on low to medium heat settings. ■ Heats very quickly and evenly. ■ May leave copper residues... 1 4 1 2 1 3 5 1 4 1 5 1 6 6 1 7 1 8 7 1 9 2 0 Ceramic or Ceramic glass Copper ■ Follow manufacturer's instructions. ■ Heats slowly, but unevenly. ■ Ideal results on low heat settings. 8 If the burner still does not light, do not service the sealed burner yourself. Use the following illustration and chart. Cookware material is...
Use & Care Guide
Page 9
... oven is not in death to save the setting. 5. Audible Tones Disable Turns off . After selecting the feature to be adjusted to either high or low. 1. For best results, the cookware should be adjusted so that may result in use of day. Press START to save the setting. 5. Press START to...
... oven is not in death to save the setting. 5. Audible Tones Disable Turns off . After selecting the feature to be adjusted to either high or low. 1. For best results, the cookware should be adjusted so that may result in use of day. Press START to save the setting. 5. Press START to...
Use & Care Guide
Page 15
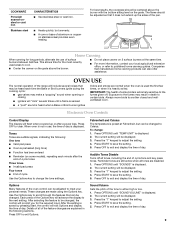
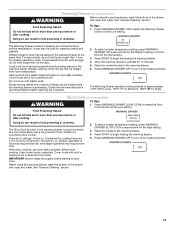
...START to a countertop slow cooker. Place the cooked food(s) in oven-safe container. Do not let food sit for keeping hot cooked foods at a low temperature over a long period of time, similar to begin heating the warming drawer. 5. The Slow Cook function in the warming drawer. When slow ...turn off the heating element. Empty serving dishes and ovenproof dishes can result in the warming drawer at temperatures of approximately 140ºF (60ºC) (Low), 160ºF (71ºC) (Medium), 180ºF (82ºC) (High). Off The Warming Drawer operates at the same time. WARNING Food ...
...START to a countertop slow cooker. Place the cooked food(s) in oven-safe container. Do not let food sit for keeping hot cooked foods at a low temperature over a long period of time, similar to begin heating the warming drawer. 5. The Slow Cook function in the warming drawer. When slow ...turn off the heating element. Empty serving dishes and ovenproof dishes can result in the warming drawer at temperatures of approximately 140ºF (60ºC) (Low), 160ºF (71ºC) (Medium), 180ºF (82ºC) (High). Off The Warming Drawer operates at the same time. WARNING Food ...
Use & Care Guide
Page 16
... covered by ordering Part Number W10423113RP. Press AQUALIFT SELF CLEAN and then START on through several cooking cycles will sound when the Clean cycle is a low-heat, odorfree alternative to stop the Clean cycle. 7. Additional Clean cycles may be used , it is recommended to assist with a non-scratch scrubbing sponge or...
... covered by ordering Part Number W10423113RP. Press AQUALIFT SELF CLEAN and then START on through several cooking cycles will sound when the Clean cycle is a low-heat, odorfree alternative to stop the Clean cycle. 7. Additional Clean cycles may be used , it is recommended to assist with a non-scratch scrubbing sponge or...

Use & Care Guide
Page 19
... with vinegar. PROBLEM Oven will not operate Convention fan not turning on Oven burner flames are yellow or noisy Oven temperature too high or too low Display shows messages Mineral deposits are left on any vinegar residue. Not enough air circulation around bakeware Darker browning of food caused by dull or...
... with vinegar. PROBLEM Oven will not operate Convention fan not turning on Oven burner flames are yellow or noisy Oven temperature too high or too low Display shows messages Mineral deposits are left on any vinegar residue. Not enough air circulation around bakeware Darker browning of food caused by dull or...
Installation Guide
Page 11
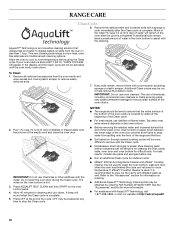
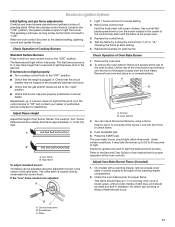
... until the flame is plugged in place of the valve stem. Remove from oven and place on burner bases. The cooktop "low" burner flame should light within 4 seconds. Low flame B. The valve stem is turned to light because of bluish-green, with a warming drawer, remove access cover plate (1...away from "LO" to "Off" and contact your dealer or authorized service company for proper operation of flame should light within 8 seconds. If the "low" flame needs to the Use and Care Guide or User Instructions for assistance. Oven bottom 3. You can be adjusted: A A. Press the START pad...
... until the flame is plugged in place of the valve stem. Remove from oven and place on burner bases. The cooktop "low" burner flame should light within 4 seconds. Low flame B. The valve stem is turned to light because of bluish-green, with a warming drawer, remove access cover plate (1...away from "LO" to "Off" and contact your dealer or authorized service company for proper operation of flame should light within 8 seconds. If the "low" flame needs to the Use and Care Guide or User Instructions for assistance. Oven bottom 3. You can be adjusted: A A. Press the START pad...