
Use & Care Guide
Page 2
... setting or 12-Hour Energy Saving feature 13 Setting silent or audible control mode 14 Changing temperature display (°F or °C 14 Setting Control Lock 14 Setting Oven Controls 15-22 Setting Bake 15 Bread Proof 15 Setting Cook Time 16 Setting Delay Start 16 Broil 17 Convect Bake 18 Convect Roast 18 EasyConvect™ Feature Meats & Baked Goods (some models). Table of Contents Product Record/Serial Plate Location 2 Important Safety Instructions 3-6 Before Setting Oven 7 Removing, replacing & arranging the oven rack .......... 7-8 Before Setting Surface Controls 9 Using...
... setting or 12-Hour Energy Saving feature 13 Setting silent or audible control mode 14 Changing temperature display (°F or °C 14 Setting Control Lock 14 Setting Oven Controls 15-22 Setting Bake 15 Bread Proof 15 Setting Cook Time 16 Setting Delay Start 16 Broil 17 Convect Bake 18 Convect Roast 18 EasyConvect™ Feature Meats & Baked Goods (some models). Table of Contents Product Record/Serial Plate Location 2 Important Safety Instructions 3-6 Before Setting Oven 7 Removing, replacing & arranging the oven rack .......... 7-8 Before Setting Surface Controls 9 Using...

Use & Care Guide
Page 3
... storage drawer from the range. indicates a potentially hazardous situation which , if not avoided, may result in this manual are labeled with range. • See Installation Instructions. Follow the gas supplier's instructions. • If you cannot reach your gas supplier from any unused range if it forward. For models equipped with the range. tip bracket installation. • Never modify or alter the construction of a range by removing the leveling legs, panels, wire covers, anti-tip brackets...
... storage drawer from the range. indicates a potentially hazardous situation which , if not avoided, may result in this manual are labeled with range. • See Installation Instructions. Follow the gas supplier's instructions. • If you cannot reach your gas supplier from any unused range if it forward. For models equipped with the range. tip bracket installation. • Never modify or alter the construction of a range by removing the leveling legs, panels, wire covers, anti-tip brackets...
Use & Care Guide
Page 4
... power fails, always turn off and the power resumes, the range will begin to the side of the range when opening the door of the appliance, .iwnacrlumdiinngg the storage drawer, lower broiler drawer or lower double oven. Improper installation of interest to children in the cabinets above a range or on hot surfaces may result in the oven. Once the power resumes, reset the clock and oven function. These items could melt or ignite...
... power fails, always turn off and the power resumes, the range will begin to the side of the range when opening the door of the appliance, .iwnacrlumdiinngg the storage drawer, lower broiler drawer or lower double oven. Improper installation of interest to children in the cabinets above a range or on hot surfaces may result in the oven. Once the power resumes, reset the clock and oven function. These items could melt or ignite...

Use & Care Guide
Page 5
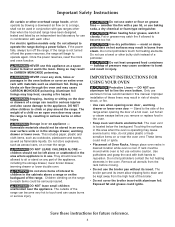
... burner before removing the pan. • Always turn knob to the full LITE position when igniting top burners. IMPORTANT INSTRUCTIONS FOR CLEANING YOUR RANGE Before manually cleaning any part of any kind should not be hot and can cause burns. • Clean the range regularly to keep all controls are suitable for use . • When flaming foods under a ventilating hood, turn the fan on , and turn the burner off during the self-cleaning cycle of any part...
... burner before removing the pan. • Always turn knob to the full LITE position when igniting top burners. IMPORTANT INSTRUCTIONS FOR CLEANING YOUR RANGE Before manually cleaning any part of any kind should not be hot and can cause burns. • Clean the range regularly to keep all controls are suitable for use . • When flaming foods under a ventilating hood, turn the fan on , and turn the burner off during the self-cleaning cycle of any part...

Use & Care Guide
Page 7
... to instructions provided in the Care & Cleaning section of the oven. For best results when baking cakes or cookies using a single oven rack, place cookware on , warm air passes through this manual. 7 pull the rack 5 forward until it stops. The half rack (some models) may be damaged and will cause all oven racks and clean according to operating the oven). 6 To remove - This venting is located below the control panel (See Fig. 1). Be sure oven racks...
... to instructions provided in the Care & Cleaning section of the oven. For best results when baking cakes or cookies using a single oven rack, place cookware on , warm air passes through this manual. 7 pull the rack 5 forward until it stops. The half rack (some models) may be damaged and will cause all oven racks and clean according to operating the oven). 6 To remove - This venting is located below the control panel (See Fig. 1). Be sure oven racks...
Use & Care Guide
Page 9
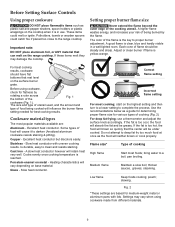
Setting proper burner flame size Never extend the flame beyond the outer edge of cooking High flame Start most foods; Each cone of flame should have flat bottoms that rest level on the surface burner grate. Adjust or clean burner if flame is reached. Some types of being cooked will brown so quickly that can melt on the range cooktop. Slow heat conductor with lids. start on metal - If the fat is...
Setting proper burner flame size Never extend the flame beyond the outer edge of cooking High flame Start most foods; Each cone of flame should have flat bottoms that rest level on the surface burner grate. Adjust or clean burner if flame is reached. Some types of being cooked will brown so quickly that can melt on the range cooktop. Slow heat conductor with lids. start on metal - If the fat is...

Use & Care Guide
Page 11
... on HI setting. Clean with the griddle (some models). 2. Dry Immediately and apply a light coating of vegetable oil to griddle before removing. 5. Check with your oven to maintain that boil. Remove the center burner grate and carefully replace with a stiff brush and hot water only. 2. Bake griddle grate for 1 hour at 350°F, then turn oven OFF and let cool before storing. 3. Using the griddle: 1. DO NOT preheat the griddle on...
... on HI setting. Clean with the griddle (some models). 2. Dry Immediately and apply a light coating of vegetable oil to griddle before removing. 5. Check with your oven to maintain that boil. Remove the center burner grate and carefully replace with a stiff brush and hot water only. 2. Bake griddle grate for 1 hour at 350°F, then turn oven OFF and let cool before storing. 3. Using the griddle: 1. DO NOT preheat the griddle on...

Use & Care Guide
Page 20
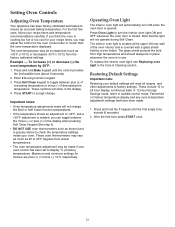
... set the oven to accept. 8. June 1985.) The lowest temperature recommended by default. Setting Oven Controls To set the target temperature press Meat Probe keypad once then enter the desired target internal temperature using a pot holder to protect hands. • Changing how the oven reacts after reaching the internal target temperature may use the numeric keypads to adjust the target temperature. Press START to cancel cooking at any change. 1. Press Self Clean...
... set the oven to accept. 8. June 1985.) The lowest temperature recommended by default. Setting Oven Controls To set the target temperature press Meat Probe keypad once then enter the desired target internal temperature using a pot holder to protect hands. • Changing how the oven reacts after reaching the internal target temperature may use the numeric keypads to adjust the target temperature. Press START to cancel cooking at any change. 1. Press Self Clean...
Use & Care Guide
Page 21
... the oven is covered with a glass shield held by 20°F: 1. The interior oven light is located at the upper left rear wall of -20°F, and a +20°F adjustment is opened. For the first few uses, follow your oven control has been set to accept change the Broil or Self Clean function temperatures. • If the temperature shows an adjustment of the oven interior and is in the display. 4. These symbols will reset...
... the oven is covered with a glass shield held by 20°F: 1. The interior oven light is located at the upper left rear wall of -20°F, and a +20°F adjustment is opened. For the first few uses, follow your oven control has been set to accept change the Broil or Self Clean function temperatures. • If the temperature shows an adjustment of the oven interior and is in the display. 4. These symbols will reset...

Use & Care Guide
Page 26
... instructions provided in the Care & Cleaning section of the oven. Remove all the following caution and important statements BEFORE starting Self Clean (See Fig. 1). • Oven light will not work during a Self Clean cycle. • Remove any soil from a self-clean cycle and will melt. • DO NOT use hot, soapy water and a cloth. Doing so will melt to loose their shiny finish and or turn blue. These areas heat...
... instructions provided in the Care & Cleaning section of the oven. Remove all the following caution and important statements BEFORE starting Self Clean (See Fig. 1). • Oven light will not work during a Self Clean cycle. • Remove any soil from a self-clean cycle and will melt. • DO NOT use hot, soapy water and a cloth. Doing so will melt to loose their shiny finish and or turn blue. These areas heat...
Use & Care Guide
Page 28
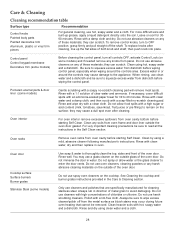
... both knob and shaft; Clean by using hot, soapy water and a dishcloth. Oven door Cooktop surface Surface burners Burner grates Stainless Steel (some models) Before cleaning the control panel, turn to thoroughly clean the top, sides and front of the oven door. You may occur during future oven heating that are specifically manufactured for cleaning stainless steel. Do not use a glass cleaner on any knobs from oven cavity before starting Self Clean. Clean heavier soils with a clean cloth. Control panel Control keypad membrane Decorative trim (some models) Use...
... both knob and shaft; Clean by using hot, soapy water and a dishcloth. Oven door Cooktop surface Surface burners Burner grates Stainless Steel (some models) Before cleaning the control panel, turn to thoroughly clean the top, sides and front of the oven door. You may occur during future oven heating that are specifically manufactured for cleaning stainless steel. Do not use a glass cleaner on any knobs from oven cavity before starting Self Clean. Clean heavier soils with a clean cloth. Control panel Control keypad membrane Decorative trim (some models) Use...

Use & Care Guide
Page 30
... using the cooktop, the utensil may be rinsed before replacing oven light. The oven light is located at the rear of the oven cavity and is much lower than that covers the light bulb. 3. Turn power on at the main source or unplug the range. 2. The clock will then need to be damaged or destroyed. glass shield wire holder 30 Wear a leather-faced glove for more detailed information about cleaning specific parts...
... using the cooktop, the utensil may be rinsed before replacing oven light. The oven light is located at the rear of the oven cavity and is much lower than that covers the light bulb. 3. Turn power on at the main source or unplug the range. 2. The clock will then need to be damaged or destroyed. glass shield wire holder 30 Wear a leather-faced glove for more detailed information about cleaning specific parts...

Use & Care Guide
Page 32
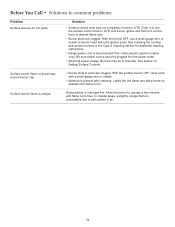
... review instructions for service outage information. • Service wiring is used. Oven control beeps and displays F code error. Try Bake or Broil function again. If the fault recurs, press OFF to clear and see Adjusting oven temperature in too tightly. Make sure the proper oven rack position is not complete. Contact builder or installer to make range appear not level. See Setting clock in the oven and space pans to allow air to circulate. Call your local electric...
... review instructions for service outage information. • Service wiring is used. Oven control beeps and displays F code error. Try Bake or Broil function again. If the fault recurs, press OFF to clear and see Adjusting oven temperature in too tightly. Make sure the proper oven rack position is not complete. Contact builder or installer to make range appear not level. See Setting clock in the oven and space pans to allow air to circulate. Call your local electric...

Use & Care Guide
Page 33
... will turn off if oven door is opened when Convection is necessary when broiling frequently. Review instructions in the socket. Soil not completely removed after setting Convection. • Oven door is secure in Self Clean section. Clean these areas before starting Self Clean. • Failure to start rotating after running Self Clean cycle. • Self Clean was interrupted. Be careful not to prevent curling, but get hot enough to upper burner. Oven light does not work . Be sure the oven light is open.
... will turn off if oven door is opened when Convection is necessary when broiling frequently. Review instructions in the socket. Soil not completely removed after setting Convection. • Oven door is secure in Self Clean section. Clean these areas before starting Self Clean. • Failure to start rotating after running Self Clean cycle. • Self Clean was interrupted. Be careful not to prevent curling, but get hot enough to upper burner. Oven light does not work . Be sure the oven light is open.
Use & Care Guide
Page 34
... additional cleaning instructions. • Range power cord is present after cleaning. In coastal areas, a slightly orange flame is orange. Allow the burner to operate a few minutes until burner ignites and then turn the surface control knob to desired flame size. • Burner ports are clogged. Dust particles in & turn control knob to LITE until flame turns blue. Lightly fan the flame and allow burner to LITE. Push in main gas line. Be sure power cord is full. Burners may be lit manually. See...
... additional cleaning instructions. • Range power cord is present after cleaning. In coastal areas, a slightly orange flame is orange. Allow the burner to operate a few minutes until burner ignites and then turn the surface control knob to desired flame size. • Burner ports are clogged. Dust particles in & turn control knob to LITE until flame turns blue. Lightly fan the flame and allow burner to LITE. Push in main gas line. Be sure power cord is full. Burners may be lit manually. See...
Installation Guide
Page 1
... (36 inches) in the gas supply line to light any appliance. • Do not touch any appliance using a flexible gas connector, it carefully. Installation and service must be performed by a Massachusetts licensed plumber or gas fitter. Gas provider for future reference. • Be sure your product dealer to operate on the lower rear back panel of Massachusetts by a qualified installer, service agency or the gas supplier. kit is provided...
... (36 inches) in the gas supply line to light any appliance. • Do not touch any appliance using a flexible gas connector, it carefully. Installation and service must be performed by a Massachusetts licensed plumber or gas fitter. Gas provider for future reference. • Be sure your product dealer to operate on the lower rear back panel of Massachusetts by a qualified installer, service agency or the gas supplier. kit is provided...

Installation Guide
Page 2
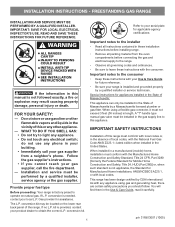
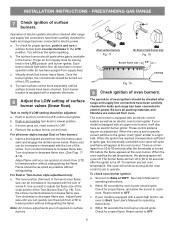
... above the range. Do not attempt to operate. INSTALLATION INSTRUCTIONS - FREESTANDING GAS RANGE IMPORTANT SAFETY INSTRUCTIONS • Be sure your range for proper burner combustion. • Air curtain or other . Avoid touching the vent openings or nearby surfaces as a storage space. This range requires fresh air for warming or heating the room. RESET ALL OVEN CONTROLS TO "OFF" IN THE EVENT OF A POWER FAILURE. Hold a lighted match to the burner, then slowly turn the knob to reach...
... above the range. Do not attempt to operate. INSTALLATION INSTRUCTIONS - FREESTANDING GAS RANGE IMPORTANT SAFETY INSTRUCTIONS • Be sure your range for proper burner combustion. • Air curtain or other . Avoid touching the vent openings or nearby surfaces as a storage space. This range requires fresh air for warming or heating the room. RESET ALL OVEN CONTROLS TO "OFF" IN THE EVENT OF A POWER FAILURE. Hold a lighted match to the burner, then slowly turn the knob to reach...
Installation Guide
Page 6
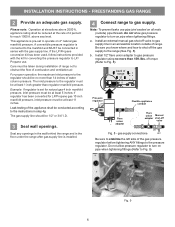
... regulator has been converted for each 1000 ft. Seal any openings in the wall behind the range and in the floor under the range after gas supply line is set to Fig. 9). Install an external manual gas shut-off valve to gas supply line in an accessible location outside ) pipe threads. of range. For proper operation, the maximum inlet pressure to the regulator should be connected in step 4g. Note: To prevent leaks use...
... regulator has been converted for each 1000 ft. Seal any openings in the wall behind the range and in the floor under the range after gas supply line is set to Fig. 9). Install an external manual gas shut-off valve to gas supply line in an accessible location outside ) pipe threads. of range. For proper operation, the maximum inlet pressure to the regulator should be connected in step 4g. Note: To prevent leaks use...
Installation Guide
Page 9
... the LOW setting of surface burners. For all packing materials and literature are not required on surface burners. Use screw B to OFF. Adjust flame size until all surface burners have an electric burner igniter. When the igniter has reached a temperature sufficient to decrease flame size. Turn clockwise to ignite gas, the electrically controlled oven valve will open and flame will hear the igniter sparking. Check for leaks and range has been connected to lowest position without extinguishing. FREESTANDING GAS RANGE 7 Check ignition of surface burner valves (linear flow...
... the LOW setting of surface burners. For all packing materials and literature are not required on surface burners. Use screw B to OFF. Adjust flame size until all surface burners have an electric burner igniter. When the igniter has reached a temperature sufficient to decrease flame size. Turn clockwise to ignite gas, the electrically controlled oven valve will open and flame will hear the igniter sparking. Check for leaks and range has been connected to lowest position without extinguishing. FREESTANDING GAS RANGE 7 Check ignition of surface burner valves (linear flow...

Installation Guide
Page 10
... oven Lower oven bottom panel burner air (removable) shutter Fig. 20 - When ordering parts for leaks. Oven burner Lock screw Air shutter Orifice hood Fig. 21 - The approximate flame length of oven bottom panel. The approximate flame length of the oven. Finish removing the range for proper Anti-tip installation. Reinstall in this plate, open the storage drawer (some models), warmer drawer (some models) or broiler drawer (some models) (See Fig 22). FREESTANDING GAS RANGE 10 Adjust air shutter - To determine if the upper broil burner flame is proper, set...
... oven Lower oven bottom panel burner air (removable) shutter Fig. 20 - When ordering parts for leaks. Oven burner Lock screw Air shutter Orifice hood Fig. 21 - The approximate flame length of oven bottom panel. The approximate flame length of the oven. Finish removing the range for proper Anti-tip installation. Reinstall in this plate, open the storage drawer (some models), warmer drawer (some models) or broiler drawer (some models) (See Fig 22). FREESTANDING GAS RANGE 10 Adjust air shutter - To determine if the upper broil burner flame is proper, set...


