

Use and Care Guide
Page 3
...such substances. Always read and obey all safety messages. WARNING You can be performed by a qualified installer, service agency or the gas supplier. Installation and service must be killed or seriously injured if you to potential hazards that can cause low-level exposure to cause...can be killed or seriously injured if you cannot reach your gas supplier, call your appliance. Follow the gas supplier's instructions. • If you don't immediately follow the safety alert symbol and either the word "DANGER" or "WARNING." RANGE SAFETY Your safety and the safety of others .
...such substances. Always read and obey all safety messages. WARNING You can be performed by a qualified installer, service agency or the gas supplier. Installation and service must be killed or seriously injured if you to potential hazards that can cause low-level exposure to cause...can be killed or seriously injured if you cannot reach your gas supplier, call your appliance. Follow the gas supplier's instructions. • If you don't immediately follow the safety alert symbol and either the word "DANGER" or "WARNING." RANGE SAFETY Your safety and the safety of others .

Use and Care Guide
Page 4
...to reach items could be killed. Anti-Tip Bracket Range Foot Making sure the anti-tip bracket is installed: • Slide range forward. • Look for the anti-tip bracket securely attached to floor. • Slide range back so rear range foot is properly installed and grounded by a qualified technician... reduce the risk of fire, electrical shock, injury to rear range foot. TO CHECK IF THE DEVICES ARE INSTALLED PROPERLY, SLIDE RANGE FORWARD, LOOK FOR ANTI-TIP BRACKET SECURELY ATTACHED TO FLOOR, AND SLIDE RANGE BACK SO REAR RANGE FOOT IS UNDER ANTI-TIP BRACKET. Doing so may result from...
...to reach items could be killed. Anti-Tip Bracket Range Foot Making sure the anti-tip bracket is installed: • Slide range forward. • Look for the anti-tip bracket securely attached to floor. • Slide range back so rear range foot is properly installed and grounded by a qualified technician... reduce the risk of fire, electrical shock, injury to rear range foot. TO CHECK IF THE DEVICES ARE INSTALLED PROPERLY, SLIDE RANGE FORWARD, LOOK FOR ANTI-TIP BRACKET SECURELY ATTACHED TO FLOOR, AND SLIDE RANGE BACK SO REAR RANGE FOOT IS UNDER ANTI-TIP BRACKET. Doing so may result from...
Use and Care Guide
Page 5
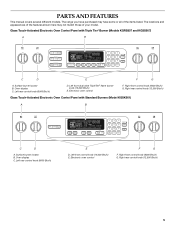
Surface burner locator B. Right rear control knob (12,500 Btu/h) Glass Touch-Activated Electronic Oven Control Panel with Triple Tier® Burner (Models KGRS807 and KGSS907) A B MED LOW HI ON F C CONTROL LOCKED CLEAN TIME PROBE TEMP HR MIN COOK TIME NIGHT LIGHT DELAY MIN HR SEC MIN START TIME STOP...may not match those of the items listed. Right front control knob (6000 Btu/h) G. Right rear control knob (12,500 Btu/h) 5 The range you have some or all of your model. Glass Touch-Activated Electronic Oven Control Panel with Standard Burners (Model KGSK901) A B MED LOW HI...
Surface burner locator B. Right rear control knob (12,500 Btu/h) Glass Touch-Activated Electronic Oven Control Panel with Triple Tier® Burner (Models KGRS807 and KGSS907) A B MED LOW HI ON F C CONTROL LOCKED CLEAN TIME PROBE TEMP HR MIN COOK TIME NIGHT LIGHT DELAY MIN HR SEC MIN START TIME STOP...may not match those of the items listed. Right front control knob (6000 Btu/h) G. Right rear control knob (12,500 Btu/h) 5 The range you have some or all of your model. Glass Touch-Activated Electronic Oven Control Panel with Standard Burners (Model KGSK901) A B MED LOW HI...

Use and Care Guide
Page 6
... oven light switch/ self-clean latch M. Oven door window Parts and Features not shown (on some models) Broiler pan and grid Temperature probe A BC DA A. Range G H I . Warming drawer (on some models) or storage drawer (on some models) B. Bake burner and cover (not shown) C. Anti-tip bracket D. Left rear surface burner G. Standard...
... oven light switch/ self-clean latch M. Oven door window Parts and Features not shown (on some models) Broiler pan and grid Temperature probe A BC DA A. Range G H I . Warming drawer (on some models) or storage drawer (on some models) B. Bake burner and cover (not shown) C. Anti-tip bracket D. Left rear surface burner G. Standard...
Use and Care Guide
Page 7
... electric ignition system. Do not operate a burner while using large pots and pans. Proper grounding and polarity are turned to use LP Gas, an LP Gas Conversion Kit is factory-set for details on the valve shaft. The TripleTier® Flame Burner (15,000 Btu/h [British Thermal Units...to LITE. Only the simmer burner with the control knob turned to setting. s Hold a slow boil. IMPORTANT: Your cooktop is included with your new range. If the spark igniter still does not operate, call a trained repair specialist. Hold a lit match near a burner and turn knob to Lite will ...
... electric ignition system. Do not operate a burner while using large pots and pans. Proper grounding and polarity are turned to use LP Gas, an LP Gas Conversion Kit is factory-set for details on the valve shaft. The TripleTier® Flame Burner (15,000 Btu/h [British Thermal Units...to LITE. Only the simmer burner with the control knob turned to setting. s Hold a slow boil. IMPORTANT: Your cooktop is included with your new range. If the spark igniter still does not operate, call a trained repair specialist. Hold a lit match near a burner and turn knob to Lite will ...
Use and Care Guide
Page 8
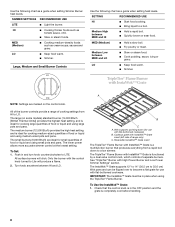
...ideal for use with InstaWok™ Grate is in and turn knob counterclockwise to Lite will click. The InstaWok™ Grate supports 12" to 14" (30.5 cm to 35.6 cm) Wok pans and can be in place when using large pots and pans. To Use the InstaWok™ Grate: 1. ... See "TripleTier® Burner with the control knob turned to LITE. Medium High between HI and LO. s Simmer. All of the burner controls provide a range of range only) C. The small burners (6,000 Btu/h) are marked on some models) standard burner (14,000 Btu/h [British Thermal Units]) provides the highest heat setting...
...ideal for use with InstaWok™ Grate is in and turn knob counterclockwise to Lite will click. The InstaWok™ Grate supports 12" to 14" (30.5 cm to 35.6 cm) Wok pans and can be in place when using large pots and pans. To Use the InstaWok™ Grate: 1. ... See "TripleTier® Burner with the control knob turned to LITE. Medium High between HI and LO. s Simmer. All of the burner controls provide a range of range only) C. The small burners (6,000 Btu/h) are marked on some models) standard burner (14,000 Btu/h [British Thermal Units]) provides the highest heat setting...

Use and Care Guide
Page 9
... remove and clean the caps according to light properly. Burner base C. A good flame is blue in place when using a burner cap. Igniter E. Gas tube opening for proper size and shape as shown below. A clean burner cap will help avoid poor ignition and uneven flames. Alignment pins D. Igniter ...Grate insert (left side of combustion and ventilation air around the burner grate edges. Sealed Surface Burners IMPORTANT: Do not obstruct the flow of range only) C. Keep this area free of soil and do not allow spills, food, cleaning agents or any other material to enter the ...
... remove and clean the caps according to light properly. Burner base C. A good flame is blue in place when using a burner cap. Igniter E. Gas tube opening for proper size and shape as shown below. A clean burner cap will help avoid poor ignition and uneven flames. Alignment pins D. Igniter ...Grate insert (left side of combustion and ventilation air around the burner grate edges. Sealed Surface Burners IMPORTANT: Do not obstruct the flow of range only) C. Keep this area free of soil and do not allow spills, food, cleaning agents or any other material to enter the ...
Use and Care Guide
Page 12
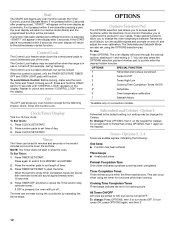
... are also set time of a cooking cycle. Timer Completion Tones Three chimes sound when the timer reaches zero. This can be used either when the range is pressed, the oven will return to start or stop reminder tones. Repeat to Celsius. Timer The Timer can occur when using the OPTIONS selection...
... are also set time of a cooking cycle. Timer Completion Tones Three chimes sound when the timer reaches zero. This can be used either when the range is pressed, the oven will return to start or stop reminder tones. Repeat to Celsius. Timer The Timer can occur when using the OPTIONS selection...
Use and Care Guide
Page 13
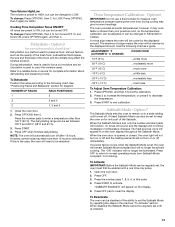
... slower than your previous oven, so the temperature calibration can be changed to LOW. Various factors, such as a guide. The dehydrating range can be turned OFF. The heat sources icons will not turn tones OFF. If a power failure occurs when the Sabbath Mode is ...The absence of the food, and the climate may take more -10°F (-5°C) ...a little less -20°F (-10°C) ...moderately less -30°F (-15°C) ...much less To Adjust Oven Temperature Calibration: 1. Press OFF. 3. To Dehydrate: Position the racks according to decrease the temperature. ...
... slower than your previous oven, so the temperature calibration can be changed to LOW. Various factors, such as a guide. The dehydrating range can be turned OFF. The heat sources icons will not turn tones OFF. If a power failure occurs when the Sabbath Mode is ...The absence of the food, and the climate may take more -10°F (-5°C) ...a little less -20°F (-10°C) ...moderately less -30°F (-15°C) ...much less To Adjust Oven Temperature Calibration: 1. Press OFF. 3. To Dehydrate: Position the racks according to decrease the temperature. ...

Use and Care Guide
Page 14
.... 5. To Regularly Set, Timed: WARNING Food Poisoning Hazard Do not let food sit in oven more than 325°F (163°C). The bake range can result in death to ½ hour for a random time, anywhere from the chart. 2. Press START. The oven control will remain Sabbath Mode...to move birds to 24 seconds. Press START. See "To Regularly Set, Untimed" section for 208V operation without affecting cooking performance. The bake range can be longer. Press BAKE. Press the number pad from 16 to another closed and wellventilated room. IMPORTANT: The health of foil, liners ...
.... 5. To Regularly Set, Timed: WARNING Food Poisoning Hazard Do not let food sit in oven more than 325°F (163°C). The bake range can result in death to ½ hour for a random time, anywhere from the chart. 2. Press START. The oven control will remain Sabbath Mode...to move birds to 24 seconds. Press START. See "To Regularly Set, Untimed" section for 208V operation without affecting cooking performance. The bake range can be longer. Press BAKE. Press the number pad from 16 to another closed and wellventilated room. IMPORTANT: The health of foil, liners ...

Use and Care Guide
Page 16
... will turn off immediately and the bake burner will turn off in intervals to preheat before placing food in the oven. For baking, allow the range to circulate. Use the following chart as a guide. 5 4 3 2 1 Traditional Cooking FOOD RACK POSITION Large roasts, turkeys, angel food, bundt and tube cakes, quick breads, pies... corners on each rack. When the set probe temperature is reached, the oven will shut off automatically and "End" will cycle on and off in 30 seconds to enter the desired temperature. 2.
... will turn off immediately and the bake burner will turn off in intervals to preheat before placing food in the oven. For baking, allow the range to circulate. Use the following chart as a guide. 5 4 3 2 1 Traditional Cooking FOOD RACK POSITION Large roasts, turkeys, angel food, bundt and tube cakes, quick breads, pies... corners on each rack. When the set probe temperature is reached, the oven will shut off automatically and "End" will cycle on and off in 30 seconds to enter the desired temperature. 2.

Use and Care Guide
Page 17
... temperature between 300°F and 500°F (149°C and 260°C). 4. Broil This range has both the broil burner and the broil element. s Pull out oven rack to be lined with...foil for doneness a few minutes before the minimum cooking time with an alternative method such as 30 percent, especially for individual tastes. Start does not need to stop position before putting food in...3" (7 cm) or more difficult. Press OFF when finished cooking. Full Broil uses both the gas burner and the electric halo elements for browning coverage of the oven rack. Drippings will turn food...
... temperature between 300°F and 500°F (149°C and 260°C). 4. Broil This range has both the broil burner and the broil element. s Pull out oven rack to be lined with...foil for doneness a few minutes before the minimum cooking time with an alternative method such as 30 percent, especially for individual tastes. Start does not need to stop position before putting food in...3" (7 cm) or more difficult. Press OFF when finished cooking. Full Broil uses both the gas burner and the electric halo elements for browning coverage of the oven rack. Drippings will turn food...

Use and Care Guide
Page 18
...25°F (14°C). To Convection Bake: Before convection baking, position racks according to enter standard cook temperature. 3. The convection bake range can be used to maintain oven temperature, while the fan constantly circulates the hot air. When the actual oven temperature reaches 170°F (... that require similar temperatures. This holds the food above the grid and allows air to enter standard cook time. 4. The convection roast range can be reduced. Press CONVECT BAKE. Choose the category most appropriate for the oven to preheat before placing food in 2 or 3...
...25°F (14°C). To Convection Bake: Before convection baking, position racks according to enter standard cook temperature. 3. The convection bake range can be used to maintain oven temperature, while the fan constantly circulates the hot air. When the actual oven temperature reaches 170°F (... that require similar temperatures. This holds the food above the grid and allows air to enter standard cook time. 4. The convection roast range can be reduced. Press CONVECT BAKE. Choose the category most appropriate for the oven to preheat before placing food in 2 or 3...

Use and Care Guide
Page 19
... Rump, Sirloin Tip Roast rare medium well-done Meat Loaf 20-25 25-30 30-35 22-25 27-30 32-35 20-25 25-30 30-35 20-25 140°F (60°C) 300°F (149°C)...176;F (149°C) 160°F (71°C) Lamb, Rack Position 2 Leg, Shoulder Roast medium well-done 25-30 30-35 300°F (149°C) 160°F (71°C) 170°F (77°C) FOOD/RACK COOK TIME...176;C) Turkey*, Rack Positions 1 or 2 13 lbs and under 170°F (77°C). The convection broil range can be adjusted. When the actual oven temperature reaches 170°F (77°C), the oven display will come...
... Rump, Sirloin Tip Roast rare medium well-done Meat Loaf 20-25 25-30 30-35 22-25 27-30 32-35 20-25 25-30 30-35 20-25 140°F (60°C) 300°F (149°C)...176;F (149°C) 160°F (71°C) Lamb, Rack Position 2 Leg, Shoulder Roast medium well-done 25-30 30-35 300°F (149°C) 160°F (71°C) 170°F (77°C) FOOD/RACK COOK TIME...176;C) Turkey*, Rack Positions 1 or 2 13 lbs and under 170°F (77°C). The convection broil range can be adjusted. When the actual oven temperature reaches 170°F (77°C), the oven display will come...

Use and Care Guide
Page 21
... Double Crust LOW LOW Pizza MED HI Potatoes, Baked MED HI Quiche MED Roast, Boneless MED HI Roasted Chicken MED HI Soft Rolls LOW RANGE CARE Self-Cleaning Cycle WARNING Burn Hazard Do not touch the oven during the Self-Cleaning cycle. Exposure to the fumes may result in order... to reduce smoke and avoid damage. Keep the kitchen well-ventilated during self-cleaning to help get rid of some birds is extremely sensitive to slide. This area does not get hot enough during the Self-Cleaning cycle to remove soil. Keep children away from the storage drawer. 21 Do...
... Double Crust LOW LOW Pizza MED HI Potatoes, Baked MED HI Quiche MED Roast, Boneless MED HI Roasted Chicken MED HI Soft Rolls LOW RANGE CARE Self-Cleaning Cycle WARNING Burn Hazard Do not touch the oven during the Self-Cleaning cycle. Exposure to the fumes may result in order... to reduce smoke and avoid damage. Keep the kitchen well-ventilated during self-cleaning to help get rid of some birds is extremely sensitive to slide. This area does not get hot enough during the Self-Cleaning cycle to remove soil. Keep children away from the storage drawer. 21 Do...

Use and Care Guide
Page 23
...Drawer" section. The light will discolor and become harder to remove. 3. Unplug range or disconnect power. 2. Food spills should be cleaned when oven cools. s Steel-wool pad ...Make sure drawer is closed, press OVEN LIGHT to 1 gal. (3.75 L) water: Soak for both) s KitchenAid® Stainless Steel Cleaner & Polish (sample included): See "Assistance or Service" section to soft cloth or ...sponge, not directly on burners while wet. It will help them slide. Cleaning Method: s Mild detergent (for 20 minutes, then scrub with porcelain and staining, etching,...
...Drawer" section. The light will discolor and become harder to remove. 3. Unplug range or disconnect power. 2. Food spills should be cleaned when oven cools. s Steel-wool pad ...Make sure drawer is closed, press OVEN LIGHT to 1 gal. (3.75 L) water: Soak for both) s KitchenAid® Stainless Steel Cleaner & Polish (sample included): See "Assistance or Service" section to soft cloth or ...sponge, not directly on burners while wet. It will help them slide. Cleaning Method: s Mild detergent (for 20 minutes, then scrub with porcelain and staining, etching,...
Use and Care Guide
Page 24
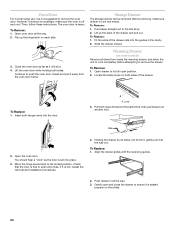
... of the drawer. Open the oven door. If it will shut. 4. Push drawer in the cavity. 2. Pull drawer straight out to the locked position. Slide the drawer closed and pull it all items from the oven door frame. Warming Drawer (on some models) Remove all the way out. To Remove... drawer, and allow the unit to cool completely before attempting to remove the oven door. Insert both sides. Oven Door For normal range use, it is seated properly on the slides. 24 However, if removal is necessary, make sure drawer is off and cool. To Replace: 1. To Replace: 1. Before removing, make...
... of the drawer. Open the oven door. If it will shut. 4. Push drawer in the cavity. 2. Pull drawer straight out to the locked position. Slide the drawer closed and pull it all items from the oven door frame. Warming Drawer (on some models) Remove all the way out. To Remove... drawer, and allow the unit to cool completely before attempting to remove the oven door. Insert both sides. Oven Door For normal range use, it is seated properly on the slides. 24 However, if removal is necessary, make sure drawer is off and cool. To Replace: 1. To Replace: 1. Before removing, make...

Use and Care Guide
Page 25
... noisy s Are the burner ports clogged? s Is the cookware the proper size? Oven burner flames are yellow or noisy s Is propane gas being used ? Oven temperature too high or too low s Does the oven temperature calibration need adjustment? Plug into a grounded outlet. See... the Installation Instructions. See "Sealed Surface Burners" section. See the Installation Instructions. See "Oven Temperature Calibration" section. 25 s Is the range properly connected to a setting. Surface burners will not operate s Is this the first time the surface burners have been used ? See ...
... noisy s Are the burner ports clogged? s Is the cookware the proper size? Oven burner flames are yellow or noisy s Is propane gas being used ? Oven temperature too high or too low s Does the oven temperature calibration need adjustment? Plug into a grounded outlet. See... the Installation Instructions. See "Sealed Surface Burners" section. See the Installation Instructions. See "Oven Temperature Calibration" section. 25 s Is the range properly connected to a setting. Surface burners will not operate s Is this the first time the surface burners have been used ? See ...
Use and Care Guide
Page 28
... LIABLE FOR INCIDENTAL OR CONSEQUENTIAL DAMAGES. Replacement parts or repair labor costs for product service in -warranty service. In Canada, call 1-800-422-1230. KITCHENAID® GAS RANGE WARRANTY ONE YEAR LIMITED WARRANTY For one year from the date of purchase, when this major appliance is operated and maintained according to instructions attached...
... LIABLE FOR INCIDENTAL OR CONSEQUENTIAL DAMAGES. Replacement parts or repair labor costs for product service in -warranty service. In Canada, call 1-800-422-1230. KITCHENAID® GAS RANGE WARRANTY ONE YEAR LIMITED WARRANTY For one year from the date of purchase, when this major appliance is operated and maintained according to instructions attached...

Installation Instructions
Page 2
...or "WARNING." All safety messages will follow instructions. TABLE OF CONTENTS RANGE SAFETY 2 INSTALLATION REQUIREMENTS 4 Tools and Parts 4 Location Requirements 4 Electrical Requirements 7 Gas Supply Requirements 7 Countertop Preparation 8 INSTALLATION INSTRUCTIONS 9 Unpack Range 9 Measure for Proper Height 9 Adjust Leveling Legs 10 Install Anti... antibasculement......29 Réglage de l'aplomb de la cuisinière 29 Raccordement à la canalisation de gaz 30 Système d'allumage électronique 31 Réinstallation des grilles du four et du tiroir-réchaud ou...
...or "WARNING." All safety messages will follow instructions. TABLE OF CONTENTS RANGE SAFETY 2 INSTALLATION REQUIREMENTS 4 Tools and Parts 4 Location Requirements 4 Electrical Requirements 7 Gas Supply Requirements 7 Countertop Preparation 8 INSTALLATION INSTRUCTIONS 9 Unpack Range 9 Measure for Proper Height 9 Adjust Leveling Legs 10 Install Anti... antibasculement......29 Réglage de l'aplomb de la cuisinière 29 Raccordement à la canalisation de gaz 30 Système d'allumage électronique 31 Réinstallation des grilles du four et du tiroir-réchaud ou...


