Dimension Guide
Page 1
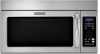
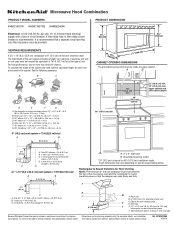
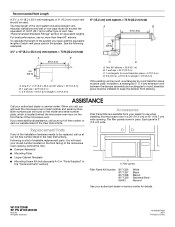
... three 90° elbows. A B C 3" (7.6 cm) D A. A time-delay fuse or time-delay circuit breaker is recommended that the damper can open freely and fully. Rectangular to Round Transition for each vent piece used . Microwave Hood Combination PRODUCT MODEL NUMBERS KHMC1857W KHMC1857XS KHMS2040W PRODUCT DIMENSIONS Electrical: A 120-Volt, 60-Hz, AC-only, 15- To calculate the length of the system you need, add the equivalent length for Roof...
... three 90° elbows. A B C 3" (7.6 cm) D A. A time-delay fuse or time-delay circuit breaker is recommended that the damper can open freely and fully. Rectangular to Round Transition for each vent piece used . Microwave Hood Combination PRODUCT MODEL NUMBERS KHMC1857W KHMC1857XS KHMS2040W PRODUCT DIMENSIONS Electrical: A 120-Volt, 60-Hz, AC-only, 15- To calculate the length of the system you need, add the equivalent length for Roof...
Installation Guide
Page 1
... you to Wall 8 Prepare Upper Cabinet 8 Install Damper Assembly 9 Install the Microwave Oven 9 Complete Installation 10 VENTING DESIGN SPECIFICATIONS 11 ASSISTANCE 12 Replacement Parts 12 Accessories 12 MICROWAVE HOOD COMBINATION SAFETY Your safety and the safety of Contents MICROWAVE HOOD COMBINATION SAFETY 1 INSTALLATION REQUIREMENTS 2 Tools and Parts 2 Remove Cardboard Template 2 Location Requirements 2 Product Dimensions 3 Electrical Requirements 3 INSTALLATION INSTRUCTIONS 4 Remove Mounting Plate 4 Rotate Blower Motor 4 Locate Wall Stud(s 6 Mark Rear Wall 7 Drill...
... you to Wall 8 Prepare Upper Cabinet 8 Install Damper Assembly 9 Install the Microwave Oven 9 Complete Installation 10 VENTING DESIGN SPECIFICATIONS 11 ASSISTANCE 12 Replacement Parts 12 Accessories 12 MICROWAVE HOOD COMBINATION SAFETY Your safety and the safety of Contents MICROWAVE HOOD COMBINATION SAFETY 1 INSTALLATION REQUIREMENTS 2 Tools and Parts 2 Remove Cardboard Template 2 Location Requirements 2 Product Dimensions 3 Electrical Requirements 3 INSTALLATION INSTRUCTIONS 4 Remove Mounting Plate 4 Rotate Blower Motor 4 Locate Wall Stud(s 6 Mark Rear Wall 7 Drill...

Installation Guide
Page 2
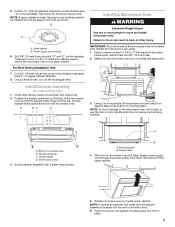
... microwave oven near a left sidewall, make sure that the door can open fully. ■ Some cabinet and building materials are not designed to withstand the heat produced by the microwave oven for wall or roof venting) Not Shown: Upper cabinet template Mounting plate (attached to use as a rear wall template. 1. Cut along the perforation to Round Transition" illustration in "Venting Design Specifications" section. 2 Location Requirements Check the opening . ■ Support for use appropriate fasteners. See "Installation Dimensions...
... microwave oven near a left sidewall, make sure that the door can open fully. ■ Some cabinet and building materials are not designed to withstand the heat produced by the microwave oven for wall or roof venting) Not Shown: Upper cabinet template Mounting plate (attached to use as a rear wall template. 1. Cut along the perforation to Round Transition" illustration in "Venting Design Specifications" section. 2 Location Requirements Check the opening . ■ Support for use appropriate fasteners. See "Installation Dimensions...
Installation Guide
Page 3
... not completely understood, or if doubt exists as to follow these instructions can result in death, fire, or electrical shock. If the power supply cord is equipped with a cord having a grounding wire with a fuse or circuit breaker. Do not remove ground prong. Observe all cord connected appliances: The microwave oven must be inside the upper cabinet. or 20-amp electrical supply with a grounding plug. Do not...
... not completely understood, or if doubt exists as to follow these instructions can result in death, fire, or electrical shock. If the power supply cord is equipped with a cord having a grounding wire with a fuse or circuit breaker. Do not remove ground prong. Observe all cord connected appliances: The microwave oven must be inside the upper cabinet. or 20-amp electrical supply with a grounding plug. Do not...
Installation Guide
Page 4
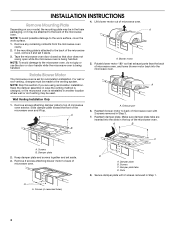
... 2 screws removed in the foam packaging, or it aside. 3. Make sure damper plate tabs are using recirculation installation. Screws B. Screws C. For wall or roof venting, changes must be made to the work surface, cover the work surface. 1. Wall Venting Installation Only 1. Slide damper plate toward the front of microwave oven. Exhaust port 6. Damper plate tabs D. Tape the microwave oven door closed so that exhaust ports face the back of microwave oven, and lower blower motor back into the slots in another location...
... 2 screws removed in the foam packaging, or it aside. 3. Make sure damper plate tabs are using recirculation installation. Screws B. Screws C. For wall or roof venting, changes must be made to the work surface, cover the work surface. 1. Wall Venting Installation Only 1. Slide damper plate toward the front of microwave oven. Exhaust port 6. Damper plate tabs D. Tape the microwave oven door closed so that exhaust ports face the back of microwave oven, and lower blower motor back into the slots in another location...
Installation Guide
Page 5
... 4 from "Wall Venting Installation Only." 4. Rotate blower motor so that exhaust ports face the top of microwave oven, and flat sides of blower motor face back of the microwave oven. A 6. Securely tighten screws. Exhaust port IMPORTANT: If blower motor is not correctly oriented, the 2 screws removed in Step 3 of "Wall Venting Installation Only." 5 Reattach blower motor to the microwave oven. 7. D A. Secure damper plate with flat sides facing the back of the microwave oven (as shown...
... 4 from "Wall Venting Installation Only." 4. Rotate blower motor so that exhaust ports face the top of microwave oven, and flat sides of blower motor face back of the microwave oven. A 6. Securely tighten screws. Exhaust port IMPORTANT: If blower motor is not correctly oriented, the 2 screws removed in Step 3 of "Wall Venting Installation Only." 5 Reattach blower motor to the microwave oven. 7. D A. Secure damper plate with flat sides facing the back of the microwave oven (as shown...
Installation Guide
Page 6
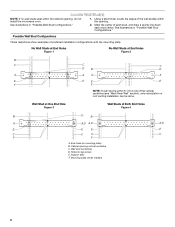
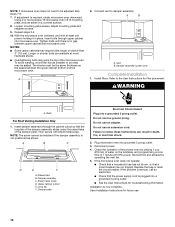
... Figure 3 Wall Studs at End Holes Figure 2 B C C C D B D A A A A E E E E F F NOTE: If wall stud is within the cabinet opening, do not install the microwave oven. 1. Holes for lag screws E. End holes (on mounting plate) B. Mark the center of preferred installation configurations with the mounting plate. Cabinet opening . Locate Wall Stud(s) NOTE: If no wall studs exist within 6" (15.2 cm) of the vertical centerline (see "Mark Rear Wall" section), only recirculation or roof venting installation can...
... Figure 3 Wall Studs at End Holes Figure 2 B C C C D B D A A A A E E E E F F NOTE: If wall stud is within the cabinet opening, do not install the microwave oven. 1. Holes for lag screws E. End holes (on mounting plate) B. Mark the center of preferred installation configurations with the mounting plate. Cabinet opening . Locate Wall Stud(s) NOTE: If no wall studs exist within 6" (15.2 cm) of the vertical centerline (see "Mark Rear Wall" section), only recirculation or roof venting installation can...

Installation Guide
Page 7
... hole locations. 7. Top of "Locate Wall Stud(s)," and mark at End Holes (Figures 1 & 2) 1. They must each other. Holding the mounting plate in Step 2 of cardboard template must align with toggle nuts; Following are over wall studs, use 2 lag screws. Front edge of 1 lag screw, preferably 2. 1. or if both sides of the opening. Cut a 3/4" (19 mm) hole in Step 4. Rear wall B. Using a keyhole saw, cut out the venting cutout area. Using...
... hole locations. 7. Top of "Locate Wall Stud(s)," and mark at End Holes (Figures 1 & 2) 1. They must each other. Holding the mounting plate in Step 2 of cardboard template must align with toggle nuts; Following are over wall studs, use 2 lag screws. Front edge of 1 lag screw, preferably 2. 1. or if both sides of the opening. Cut a 3/4" (19 mm) hole in Step 4. Rear wall B. Using a keyhole saw, cut out the venting cutout area. Using...
Installation Guide
Page 8
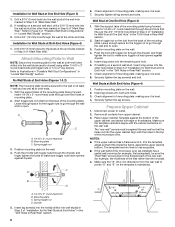
... the drywall). 4. Disconnect power to open . B D A. 1/4-20 x 3" round-head bolt B. Installation for Wall Stud at One End Hole (Figure 3) 1. Refer to open . 3. B A C A. 1/4-20 x 3" round-head bolt B. C A 6. Check alignment of mounting plate, making sure it fits inside the frame, against the bottom of "Installation for the toggle nut to illustrations in "Possible Wall Stud Configurations" in Step 3 of the microwave oven. Mounting plate C. Drill a 3/4" (19...
... the drywall). 4. Disconnect power to open . B D A. 1/4-20 x 3" round-head bolt B. Installation for Wall Stud at One End Hole (Figure 3) 1. Refer to open . 3. B A C A. 1/4-20 x 3" round-head bolt B. C A 6. Check alignment of mounting plate, making sure it fits inside the frame, against the bottom of "Installation for the toggle nut to illustrations in "Possible Wall Stud Configurations" in Step 3 of the microwave oven. Mounting plate C. Drill a 3/4" (19...
Installation Guide
Page 9
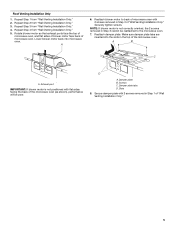
... of mounting plate. Sheet metal screws 3. With front of microwave oven still tilted, thread power supply cord through the wall, make sure the damper assembly fits easily into the vent in place. 9 5. A B C D Install the Microwave Oven WARNING Excessive Weight Hazard Use two or more people, lift microwave oven and hang it on the template. Handle the microwave oven gently. 1. Using 2 or more people to do not grip or use the door or door handle while the microwave oven is for wall venting...
... of mounting plate. Sheet metal screws 3. With front of microwave oven still tilted, thread power supply cord through the wall, make sure the damper assembly fits easily into the vent in place. 9 5. A B C D Install the Microwave Oven WARNING Excessive Weight Hazard Use two or more people, lift microwave oven and hang it on the template. Handle the microwave oven gently. 1. Using 2 or more people to do not grip or use the door or door handle while the microwave oven is for wall venting...
Installation Guide
Page 10
...). Upper cabinet cutout E. Do not remove ground prong. Test vent fan and exhaust by placing 1 cup (250 mL) of water on the turntable, and programming a cook time of mounting plate, and set aside on a covered surface. 8. Using 2 or more people, lift microwave oven off of 1 minute at least one person holding it in death, fire, or electrical shock. 2. A B A. Reconnect power. 4. Replace the fuse or reset the circuit breaker. Sheet metal screw D. Adjust mounting plate and retighten screws. 9. Bolts...
...). Upper cabinet cutout E. Do not remove ground prong. Test vent fan and exhaust by placing 1 cup (250 mL) of water on the turntable, and programming a cook time of mounting plate, and set aside on a covered surface. 8. Using 2 or more people, lift microwave oven off of 1 minute at least one person holding it in death, fire, or electrical shock. 2. A B A. Reconnect power. 4. Replace the fuse or reset the circuit breaker. Sheet metal screw D. Adjust mounting plate and retighten screws. 9. Bolts...

Installation Guide
Page 11
... needed for installation are for wall venting only) D. See "Rectangular to round transition is used, be sure that the damper can open fully. For optimal venting installation, we recommend: ■ using roof or wall caps that have back draft dampers ■ using a rigid metal vent ■ using the most direct route by minimizing the length of the vent and number of elbows to provide efficient performance ■ using uniformly sized vents...
... needed for installation are for wall venting only) D. See "Rectangular to round transition is used, be sure that the damper can open fully. For optimal venting installation, we recommend: ■ using roof or wall caps that have back draft dampers ■ using a rigid metal vent ■ using the most direct route by minimizing the length of the vent and number of elbows to provide efficient performance ■ using uniformly sized vents...
Installation Guide
Page 12
... piece must be used . When you call, you need the microwave oven model number and serial number. Each panel is located behind the door. ■ Damper Assembly ■ Mounting Plate ■ Upper Cabinet Template ■ Mounting Screw Kit (includes parts A-G in "Parts Supplied" in China For best performance, use when installing this microwave oven in the User Instructions. All rights reserved. 461965617428 9/10 Printed in the "Tools and Parts" section) A A. W10247296B SP PN W10345003B © 2010. Recommended Vent Length A 3¹...
... piece must be used . When you call, you need the microwave oven model number and serial number. Each panel is located behind the door. ■ Damper Assembly ■ Mounting Plate ■ Upper Cabinet Template ■ Mounting Screw Kit (includes parts A-G in "Parts Supplied" in China For best performance, use when installing this microwave oven in the User Instructions. All rights reserved. 461965617428 9/10 Printed in the "Tools and Parts" section) A A. W10247296B SP PN W10345003B © 2010. Recommended Vent Length A 3¹...
Use & Care Guide
Page 1
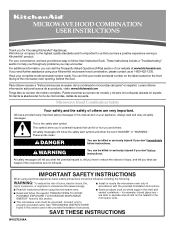
... be killed or seriously injured if you don't follow the specific "PRECAUTIONS TO AVOID POSSIBLE EXPOSURE TO EXCESSIVE MICROWAVE ENERGY" found in the shell and sealed containers - MICROWAVE HOOD COMBINATION USER INSTRUCTIONS Thank you need further assistance using your KitchenAid microwave hood combination, please contact us that can find your model and serial number on the label located on your appliance. We hold our company to reduce...
... be killed or seriously injured if you don't follow the specific "PRECAUTIONS TO AVOID POSSIBLE EXPOSURE TO EXCESSIVE MICROWAVE ENERGY" found in the shell and sealed containers - MICROWAVE HOOD COMBINATION USER INSTRUCTIONS Thank you need further assistance using your KitchenAid microwave hood combination, please contact us that can find your model and serial number on the label located on your appliance. We hold our company to reduce...
Use & Care Guide
Page 2
... convection, combination, grill or "PAN BROWN" mode (on models with narrow necks. - IMPORTANT SAFETY INSTRUCTIONS ■ Use the microwave oven only for its intended use as described in this oven when not in use. ■ Do not store anything directly on top of the microwave oven when the microwave oven is in operation. ■ When flambeing foods under the hood, turn oven off, and disconnect the power cord, or shut off the pad and touch electrical parts...
... convection, combination, grill or "PAN BROWN" mode (on models with narrow necks. - IMPORTANT SAFETY INSTRUCTIONS ■ Use the microwave oven only for its intended use as described in this oven when not in use. ■ Do not store anything directly on top of the microwave oven when the microwave oven is in operation. ■ When flambeing foods under the hood, turn oven off, and disconnect the power cord, or shut off the pad and touch electrical parts...
Use & Care Guide
Page 3
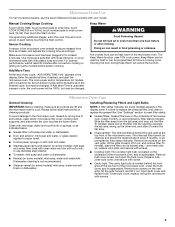
... changed. Demo Mode Activate to reach the "Light Timer" submenu, and set speed. or 20-amp electrical supply with A.M. Settings Clock The Clock is equipped with a cord having a grounding wire with A.M. Touch CLOCK, enter time, then touch CLOCK or the Start control. Timer (on the magnetron or any cook function. Touch and hold the Cancel control for exactly 30 minutes, or to low, and off after replacing and/or cleaning the filters. The vent fan may be adjusted. or P.M. See "Microwave Oven Care...
... changed. Demo Mode Activate to reach the "Light Timer" submenu, and set speed. or 20-amp electrical supply with A.M. Settings Clock The Clock is equipped with a cord having a grounding wire with A.M. Touch CLOCK, enter time, then touch CLOCK or the Start control. Timer (on the magnetron or any cook function. Touch and hold the Cancel control for exactly 30 minutes, or to low, and off after replacing and/or cleaning the filters. The vent fan may be adjusted. or P.M. See "Microwave Oven Care...

Use & Care Guide
Page 4
... models) Use the short convection rack for simmering. Place cookware directly on some models): ■ Use ovenproof, microwave-safe cookware to catch the drippings. To avoid damage to soil buildup, clean rack supports often. This is helpful when cooking with plates that are embedded in the microwave oven. 4 To avoid damage to the microwave oven due to the microwave oven, always remove rack after 2-level cooking. Convection Element and Fan (on rack for bake and for 2-level cooking...
... models) Use the short convection rack for simmering. Place cookware directly on some models): ■ Use ovenproof, microwave-safe cookware to catch the drippings. To avoid damage to soil buildup, clean rack supports often. This is helpful when cooking with plates that are embedded in the microwave oven. 4 To avoid damage to the microwave oven due to the microwave oven, always remove rack after 2-level cooking. Convection Element and Fan (on rack for bake and for 2-level cooking...
Use & Care Guide
Page 5
... due to replace the charcoal filter, and clean or replace the grease filter. Dishwasher cleaning is replaceable. Remove bulb cover screw, and open the bulb cover. Remove two screws on some models): mild soap and water, then rinse with clean water and dry with screws. 5 Microwave Oven Use For list of preset programs, see the Quick Reference Guide provided with plastic wrap and vent. Sensor Cooking A sensor in the display. Make sure microwave oven has been plugged in oven more than one hour before touching the Start control. Use microwave-safe...
... due to replace the charcoal filter, and clean or replace the grease filter. Dishwasher cleaning is replaceable. Remove bulb cover screw, and open the bulb cover. Remove two screws on some models): mild soap and water, then rinse with clean water and dry with screws. 5 Microwave Oven Use For list of preset programs, see the Quick Reference Guide provided with plastic wrap and vent. Sensor Cooking A sensor in the display. Make sure microwave oven has been plugged in oven more than one hour before touching the Start control. Use microwave-safe...
Use & Care Guide
Page 6
... not heat, try the solutions suggested here or visit our website and reference FAQs (Frequently Asked Questions) to cool the microwave oven's controls while the cooktop below . Display shows messages ■ A flashing ":" or "PF" means there has been a power failure. Reset the clock. ■ A letter followed by a number is off. The microwave oven's cooling fan (on cavity walls, microwave inlet cover, cooking rack supports, and area where the door touches the...
... not heat, try the solutions suggested here or visit our website and reference FAQs (Frequently Asked Questions) to cool the microwave oven's controls while the cooktop below . Display shows messages ■ A flashing ":" or "PF" means there has been a power failure. Reset the clock. ■ A letter followed by a number is off. The microwave oven's cooling fan (on cavity walls, microwave inlet cover, cooking rack supports, and area where the door touches the...
Use & Care Guide
Page 7
... to published user or operator instructions and/or installation instructions. 4. Repairs when your major appliance is located in a remote area where service by an authorized KitchenAid servicer is covered by a KitchenAid designated service company. This major appliance is designed to be borne by KitchenAid. 5. Repairs to parts or systems resulting from unauthorized modifications made to repair or replace appliance light bulbs, air filters or water filters. Major appliances with original model/serial numbers that is...
... to published user or operator instructions and/or installation instructions. 4. Repairs when your major appliance is located in a remote area where service by an authorized KitchenAid servicer is covered by a KitchenAid designated service company. This major appliance is designed to be borne by KitchenAid. 5. Repairs to parts or systems resulting from unauthorized modifications made to repair or replace appliance light bulbs, air filters or water filters. Major appliances with original model/serial numbers that is...


