
Warranty Information
Page 1
... Care Guide, scan the QR code on the below named parts only and does not include repair labor. ■ Electric element ■ Solid state touch control system parts SECOND THROUGH TENTH YEAR LIMITED WARRANTY (MICROWAVE OVENS ONLY) In the second through due to instructions attached or furnished with products not approved by a KitchenAid designated service company. light bulbs, batteries, air or water filters, etc.). 5. trim, decorative panels, flooring, cabinetry, islands, countertops...
... Care Guide, scan the QR code on the below named parts only and does not include repair labor. ■ Electric element ■ Solid state touch control system parts SECOND THROUGH TENTH YEAR LIMITED WARRANTY (MICROWAVE OVENS ONLY) In the second through due to instructions attached or furnished with products not approved by a KitchenAid designated service company. light bulbs, batteries, air or water filters, etc.). 5. trim, decorative panels, flooring, cabinetry, islands, countertops...
Use & Care Guide
Page 1
... 3 PARTS AND FEATURES 4 Turntable 4 Convection Rack 4 Crisper Pan and Handle 4 Baking Tray 5 KITCHENAID™ Steamer Vessel 5 FEATURE GUIDE 6 Display(s 10 Number Codes 10 Start/Add 1 Minute 10 Control Lock 10 Microwave Oven Cancel 11 Clock 11 Tones 11 Tools 11 Fahrenheit and Celsius 11 Timer 11 BUILT-IN MICROWAVE OVEN USE 12 Food Characteristics 12 Cooking Guidelines 12 Cookware and Dinnerware 13 Aluminum Foil and Metal 13 Positioning Baking Tray 13 Microwave Cooking Power 14 Doneness 14 Sensor Cook 14 Manual Cooking...
... 3 PARTS AND FEATURES 4 Turntable 4 Convection Rack 4 Crisper Pan and Handle 4 Baking Tray 5 KITCHENAID™ Steamer Vessel 5 FEATURE GUIDE 6 Display(s 10 Number Codes 10 Start/Add 1 Minute 10 Control Lock 10 Microwave Oven Cancel 11 Clock 11 Tones 11 Tools 11 Fahrenheit and Celsius 11 Timer 11 BUILT-IN MICROWAVE OVEN USE 12 Food Characteristics 12 Cooking Guidelines 12 Cookware and Dinnerware 13 Aluminum Foil and Metal 13 Positioning Baking Tray 13 Microwave Cooking Power 14 Doneness 14 Sensor Cook 14 Manual Cooking...
Use & Care Guide
Page 2
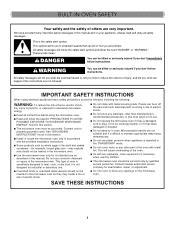
... to heat, cook, or dry food. Pieces can burn off the pad and touch electrical parts involving a risk of electric shock. ■ Do not store any openings on your appliance. Connect only to maintain appropriate deep frying temperatures. ■ Do not use corrosive chemicals or vapors in oven. BUILT-IN OVEN SAFETY Your safety and the safety of others . for examination, repair, or...
... to heat, cook, or dry food. Pieces can burn off the pad and touch electrical parts involving a risk of electric shock. ■ Do not store any openings on your appliance. Connect only to maintain appropriate deep frying temperatures. ■ Do not use corrosive chemicals or vapors in oven. BUILT-IN OVEN SAFETY Your safety and the safety of others . for examination, repair, or...

Use & Care Guide
Page 3
... latches (broken or loosened), (3) Door seals and sealing surfaces. (d) The oven should ignite, keep oven door closed, turn oven off, and disconnect the power cord, or shut off power at the fuse or circuit breaker panel. - If the incoming voltage to the microwave oven is no damage to the State of fire in the microwave oven for storage purposes. Have a qualified electrician check your electrical system. SAVE THESE INSTRUCTIONS...
... latches (broken or loosened), (3) Door seals and sealing surfaces. (d) The oven should ignite, keep oven door closed, turn oven off, and disconnect the power cord, or shut off power at the fuse or circuit breaker panel. - If the incoming voltage to the microwave oven is no damage to the State of fire in the microwave oven for storage purposes. Have a qualified electrician check your electrical system. SAVE THESE INSTRUCTIONS...
Use & Care Guide
Page 4
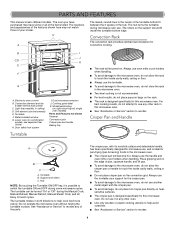
... convection cooking. The rollers on the support should fit inside cavity walls, ceiling or floor. ■ Always use the handle and oven mitts or pot holders when handling. Metal shielded window G. Model/serial/rating (on combination models, see separate User Guide) H. Lower oven (on right mounting rail, single oven models) Parts and Features not shown Steamer Convection grid Crisper pan and handle Baking tray Turntable ■ The rack will become hot. Convection element and fan (hidden behind back panel...
... convection cooking. The rollers on the support should fit inside cavity walls, ceiling or floor. ■ Always use the handle and oven mitts or pot holders when handling. Metal shielded window G. Model/serial/rating (on combination models, see separate User Guide) H. Lower oven (on right mounting rail, single oven models) Parts and Features not shown Steamer Convection grid Crisper pan and handle Baking tray Turntable ■ The rack will become hot. Convection element and fan (hidden behind back panel...

Use & Care Guide
Page 5
... a convectional- A B ■ Baking Tray can be used only with the Steam Cook feature to steam foods. Place directly over the base. See "General Cleaning" section for the amount of water recommended. Baking Tray KITCHENAID™ Steamer Vessel Use the KITCHENAID™ Steamer Vessel with convection cooking. ■ To avoid damage to the microwave oven, do not use oven mitts or pot holders when handling. ■ Steamer vessel is inside the microwave oven...
... a convectional- A B ■ Baking Tray can be used only with the Steam Cook feature to steam foods. Place directly over the base. See "General Cleaning" section for the amount of water recommended. Baking Tray KITCHENAID™ Steamer Vessel Use the KITCHENAID™ Steamer Vessel with convection cooking. ■ To avoid damage to the microwave oven, do not use oven mitts or pot holders when handling. ■ Steamer vessel is inside the microwave oven...

Use & Care Guide
Page 10
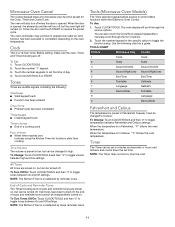
... power is in use, this feature the display must be removed. 10 Upper Microwave Oven Display (combination oven models) When the upper oven is first supplied to allow operation without changing the time, touch START or CANCEL. Number Codes The oven is locked, only the Set/Start, Oven Light, and Timer Set/Off keypads will be off (combination models only). Touching Start/Add 1 Minute while the microwave oven is displayed to the current cycle by touching the "Cancel" key pad. prompt is operating will add cook time...
... power is in use, this feature the display must be removed. 10 Upper Microwave Oven Display (combination oven models) When the upper oven is first supplied to allow operation without changing the time, touch START or CANCEL. Number Codes The oven is locked, only the Set/Start, Oven Light, and Timer Set/Off keypads will be off (combination models only). Touching Start/Add 1 Minute while the microwave oven is displayed to the current cycle by touching the "Cancel" key pad. prompt is operating will add cook time...
Use & Care Guide
Page 11
... keypad stops any microwave oven function except for the specific option to toggle tones between On and Off settings. When the door is in minutes and seconds or hours and minutes and counts down the set time. The oven cooling fan may continue to some hidden functions within the Electronic Oven Control. Before setting, make sure the oven, Timer, and Timed Cooking are preset on . To Set: 1. Touch CLOCK/TOOLS...
... keypad stops any microwave oven function except for the specific option to toggle tones between On and Off settings. When the door is in minutes and seconds or hours and minutes and counts down the set time. The oven cooling fan may continue to some hidden functions within the Electronic Oven Control. Before setting, make sure the oven, Timer, and Timed Cooking are preset on . To Set: 1. Touch CLOCK/TOOLS...

Use & Care Guide
Page 12
... and heat which reflect off the turntable, touch TURNTABLE ON/OFF. Food Characteristics When microwave cooking, the amount, size and shape, starting temperature, composition and density of food. Check for 5 minutes. Condensation on during microwave cooking. If possible, turn off the metal floor, walls and ceiling and pass through the cooking process. See "Aluminum Foil and Metal" first. Standing Time Food will cook more quickly than other foods. To turn food over...
... and heat which reflect off the turntable, touch TURNTABLE ON/OFF. Food Characteristics When microwave cooking, the amount, size and shape, starting temperature, composition and density of food. Check for 5 minutes. Condensation on during microwave cooking. If possible, turn off the metal floor, walls and ceiling and pass through the cooking process. See "Aluminum Foil and Metal" first. Standing Time Food will cook more quickly than other foods. To turn food over...

Use & Care Guide
Page 13
..., Wooden Containers Do not use in microwave oven with convection cooking and broiling (on slide rails as sandwich wrappers, staples and objects with gold or silver trim or a metallic glaze should not be at 100% cooking power for microwave oven use in tray to the microwave oven. Follow manufacturer's recommendations. Ceramic Glass, Glass Acceptable for Microwave Use: A 1. Positioning Baking Tray Baking tray can occur and cause damage to stop position. Cookware and...
..., Wooden Containers Do not use in microwave oven with convection cooking and broiling (on slide rails as sandwich wrappers, staples and objects with gold or silver trim or a metallic glaze should not be at 100% cooking power for microwave oven use in tray to the microwave oven. Follow manufacturer's recommendations. Ceramic Glass, Glass Acceptable for Microwave Use: A 1. Positioning Baking Tray Baking tray can occur and cause damage to stop position. Cookware and...

Use & Care Guide
Page 16
...; Foods left outside the freezer for more than ¼ lb (113 g) or two 4 oz (113 g) patties. Place all meats in the microwave oven. ■ Cover plates of "Defrost" section for popping to slow to add ½ cup (125 mL) of popcorn. ■ Cooking results may vary by the microwave popcorn manufacturer. Remove giblets from fruit juice) before using a microwave popcorn popper. ■ Listen for cuts, sizes, and instructions.
...; Foods left outside the freezer for more than ¼ lb (113 g) or two 4 oz (113 g) patties. Place all meats in the microwave oven. ■ Cover plates of "Defrost" section for popping to slow to add ½ cup (125 mL) of popcorn. ■ Cooking results may vary by the microwave popcorn manufacturer. Remove giblets from fruit juice) before using a microwave popcorn popper. ■ Listen for cuts, sizes, and instructions.

Use & Care Guide
Page 18
..., end-of standard cooking. The constantly moving air surrounds the food to clear the display and/or stop time is complete. Time can be set up to 11 hours and 59 minutes. Touch START. Touch CANCEL or open the door to heat the outer portion quickly. ■ The convect function may not be touched twice. 4. EasyConvect™ Conversion A B C D A. Touch number keypad to set a standard temperature. OR Touch EASYCONVECT™ function...
..., end-of standard cooking. The constantly moving air surrounds the food to clear the display and/or stop time is complete. Time can be set up to 11 hours and 59 minutes. Touch START. Touch CANCEL or open the door to heat the outer portion quickly. ■ The convect function may not be touched twice. 4. EasyConvect™ Conversion A B C D A. Touch number keypad to set a standard temperature. OR Touch EASYCONVECT™ function...

Use & Care Guide
Page 19
... glass cleaner to browning pan, do not immerse or rinse with soft, lintfree cloth. BUILT-IN MICROWAVE OVEN CARE General Cleaning IMPORTANT: Before cleaning, make sure all controls are suggested first, unless otherwise noted. ■ Warm water, mild detergent and a sponge. Always follow label instructions on panel. ■ affresh® Kitchen Appliance Cleaner Part Number W10355010 (not included): See "Assistance or Service" section to microwave oven cavity...
... glass cleaner to browning pan, do not immerse or rinse with soft, lintfree cloth. BUILT-IN MICROWAVE OVEN CARE General Cleaning IMPORTANT: Before cleaning, make sure all controls are suggested first, unless otherwise noted. ■ Warm water, mild detergent and a sponge. Always follow label instructions on panel. ■ affresh® Kitchen Appliance Cleaner Part Number W10355010 (not included): See "Assistance or Service" section to microwave oven cavity...
Use & Care Guide
Page 20
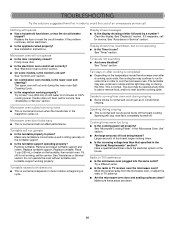
... oven without turntable and turntable support working properly? Clear the display. Display shows time countdown, but is completed ■ Depending on the temperature inside the microwave oven after cooking is not operating ■ Is the Timer in use? Fan stays on motor rotation at beginning of food need longer cooking times. ■ Is the incoming voltage less than that specified in conventional crisping. Cooking times seem too long ■ Is the cooking power set correctly? See "Microwave Cooking Power...
... oven without turntable and turntable support working properly? Clear the display. Display shows time countdown, but is completed ■ Depending on the temperature inside the microwave oven after cooking is not operating ■ Is the Timer in use? Fan stays on motor rotation at beginning of food need longer cooking times. ■ Is the incoming voltage less than that specified in conventional crisping. Cooking times seem too long ■ Is the cooking power set correctly? See "Microwave Cooking Power...
Use & Care Guide
Page 21
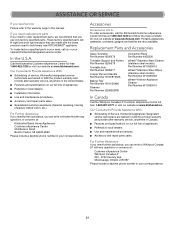
... specifications on our full line of appliances. ■ Referrals to local dealers. ■ Use and maintenance procedures. ■ Accessory and repair parts sales. Or visit our website at www.kitchenaid.ca. Replacement Parts and Accessories Glass Turntable Part Number 8205676 Turntable Support and Rollers Part Number 8205678 Turntable Hub Part Number 8205677 Crisper Pan and Handle Part Number W10187336A Baking Tray Part Number W10120486 Steamer Part Number 8208262RB Convection Rack Part Number 4452220 affresh® Stainless Steel Cleaner (stainless steel models) Part Number...
... specifications on our full line of appliances. ■ Referrals to local dealers. ■ Use and maintenance procedures. ■ Accessory and repair parts sales. Or visit our website at www.kitchenaid.ca. Replacement Parts and Accessories Glass Turntable Part Number 8205676 Turntable Support and Rollers Part Number 8205678 Turntable Hub Part Number 8205677 Crisper Pan and Handle Part Number W10187336A Baking Tray Part Number W10120486 Steamer Part Number 8208262RB Convection Rack Part Number 4452220 affresh® Stainless Steel Cleaner (stainless steel models) Part Number...

Use & Care Guide
Page 22
... of household electrical or plumbing (i.e. In the U.S. SECOND THROUGH FIFTH YEAR LIMITED WARRANTY (CERTAIN COMPONENTS PARTS ONLY - light bulbs, batteries, air or water filters, etc.). 5. Service must be warranted for service or repair of original consumer purchase. Service to you should ask KitchenAid or your product. 3. This product is used in the country in this major appliance is installed, operated and maintained according to instructions attached...
... of household electrical or plumbing (i.e. In the U.S. SECOND THROUGH FIFTH YEAR LIMITED WARRANTY (CERTAIN COMPONENTS PARTS ONLY - light bulbs, batteries, air or water filters, etc.). 5. Service must be warranted for service or repair of original consumer purchase. Service to you should ask KitchenAid or your product. 3. This product is used in the country in this major appliance is installed, operated and maintained according to instructions attached...

Installation Guide
Page 1
... À CONVECTION DE 27" (68,6 CM) ET 30" (76,2 CM) Table of Contents/Table des matières BUILT-IN MICROWAVE OVEN SAFETY 1 SÉCURITÉ DU FOUR À MICRO-ONDES ENCASTR 7 INSTALLATION REQUIREMENTS 2 Tools and Parts 2 Location Requirements 2 Electrical Requirements 3 EXIGENCES D'INSTALLATION 7 Outils et pièces 7 Exigences d'emplacement 7 Spécfications électriques 9 INSTALLATION INSTRUCTIONS 4 Spacer Kit Installation 4 Prepare Built-In Microwave Oven 4 Make Electrical Connection 5 Install Microwave Oven 5 Complete Installation 6 INSTRUCTIONS...
... À CONVECTION DE 27" (68,6 CM) ET 30" (76,2 CM) Table of Contents/Table des matières BUILT-IN MICROWAVE OVEN SAFETY 1 SÉCURITÉ DU FOUR À MICRO-ONDES ENCASTR 7 INSTALLATION REQUIREMENTS 2 Tools and Parts 2 Location Requirements 2 Electrical Requirements 3 EXIGENCES D'INSTALLATION 7 Outils et pièces 7 Exigences d'emplacement 7 Spécfications électriques 9 INSTALLATION INSTRUCTIONS 4 Spacer Kit Installation 4 Prepare Built-In Microwave Oven 4 Make Electrical Connection 5 Install Microwave Oven 5 Complete Installation 6 INSTRUCTIONS...

Installation Guide
Page 2
....2 cm) models ■ W10752698A Stainless steel flush installation kit for wall cabinet installations) Parts Needed ■ A UL listed or CSA approved conduit connector ■ UL listed wire connectors Parts Needed - Parts Supplied ■ For installation above single built-in oven, the junction box must located inside upper cabinet. ■ If you are shown must be solid, level and flush with your dealer that all governing codes and ordinances. ■ Cabinet opening . ■ Microwave oven support surface must...
....2 cm) models ■ W10752698A Stainless steel flush installation kit for wall cabinet installations) Parts Needed ■ A UL listed or CSA approved conduit connector ■ UL listed wire connectors Parts Needed - Parts Supplied ■ For installation above single built-in oven, the junction box must located inside upper cabinet. ■ If you are shown must be solid, level and flush with your dealer that all governing codes and ordinances. ■ Cabinet opening . ■ Microwave oven support surface must...
Installation Guide
Page 4
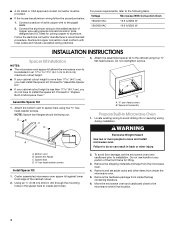
... screws. A. Do not use handle or any portion of the cabinet cutout. 2. Proceed to move and install A microwave oven. Attach the bottom vent to install the spacer kit. WARNING Excessive Weight Hazard Use two or more than 17 44.1 cm), you must conform with local codes and industry accepted wiring practices. Spacer bar flange C. Using an ¹⁄₈" (0.32 cm) drill bit, drill through the mounting...
... screws. A. Do not use handle or any portion of the cabinet cutout. 2. Proceed to move and install A microwave oven. Attach the bottom vent to install the spacer kit. WARNING Excessive Weight Hazard Use two or more than 17 44.1 cm), you must conform with local codes and industry accepted wiring practices. Spacer bar flange C. Using an ¹⁄₈" (0.32 cm) drill bit, drill through the mounting...

Installation Guide
Page 6
... interior microwave oven light should appear in mounting rails. The microwave oven should begin cooking, and the microwave oven interior light should stop cooking. Open microwave oven door and slowly remove container. NOTE: Open microwave oven door and push against outside edges. 3. Do not overtighten screws. When the display reads "1:00" minute, open the microwave oven door. Close door firmly. Do not push against seal area of the Use and Care Guide or contact the dealer from whom you purchased your microwave oven. Replace convection grid, turntable and support hub...
... interior microwave oven light should appear in mounting rails. The microwave oven should begin cooking, and the microwave oven interior light should stop cooking. Open microwave oven door and slowly remove container. NOTE: Open microwave oven door and push against outside edges. 3. Do not overtighten screws. When the display reads "1:00" minute, open the microwave oven door. Close door firmly. Do not push against seal area of the Use and Care Guide or contact the dealer from whom you purchased your microwave oven. Replace convection grid, turntable and support hub...


