
Quick Start Guide
Page 1
... online Control Guide. Control panel B. Single oven or upper double oven Double Oven D. Replace all parts and panels before servicing. Remove glass light cover by snapping back into the cooling C system. WI-FI CONNECT (On Some Models) Download the KitchenAid® App from socket. 4. This may be used with the following guidelines: � To avoid damage to the microwave oven, do not cover entire rack with another metal object during or after cook time. Set the temperature Step 3. Enter time to move a rack...
... online Control Guide. Control panel B. Single oven or upper double oven Double Oven D. Replace all parts and panels before servicing. Remove glass light cover by snapping back into the cooling C system. WI-FI CONNECT (On Some Models) Download the KitchenAid® App from socket. 4. This may be used with the following guidelines: � To avoid damage to the microwave oven, do not cover entire rack with another metal object during or after cook time. Set the temperature Step 3. Enter time to move a rack...

Control Guide
Page 4
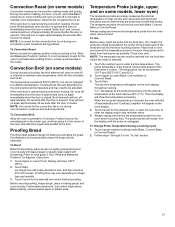
... Control Guide) B. Proofing bread 1. Select COOKING METHODS. 3. Select Start. Timer SET/OFF F. Stop time M. The set oven temperature will not be set Cook Time or Stop Time, see the "Air Fry" section. Convect broil Close the door. 1. Air Frying 1. Oven light J. If "2: No" has been selected, Convect Roast will continue without conversion. Touch Start. To set between 170°F and 550°F (77°C and 288°C). The convection roast range can be adjusted. 4. Touch Lower Oven Convect Broil. Let dough rise until the oven is turned...
... Control Guide) B. Proofing bread 1. Select COOKING METHODS. 3. Select Start. Timer SET/OFF F. Stop time M. The set oven temperature will not be set Cook Time or Stop Time, see the "Air Fry" section. Convect broil Close the door. 1. Air Frying 1. Oven light J. If "2: No" has been selected, Convect Roast will continue without conversion. Touch Start. To set between 170°F and 550°F (77°C and 288°C). The convection roast range can be adjusted. 4. Touch Lower Oven Convect Broil. Let dough rise until the oven is turned...

Control Guide
Page 5
... 6 Calibration 7 Sabbath Mode 8 Turntable On/Off 9 Language 0 Demo Mode Clock This is in use , this display shows a time countdown and the stop the oven. 5 Touch the number keys to set using the Kitchen Timer for contact information. Display(s) When power is first supplied to the oven, the timer display will flash "12:00," and "Clock-Enter Time" will appear on the oven temperature. The oven cooling fan(s) may continue to toggle volume between Fahrenheit and Celsius settings. To Change...
... 6 Calibration 7 Sabbath Mode 8 Turntable On/Off 9 Language 0 Demo Mode Clock This is in use , this display shows a time countdown and the stop the oven. 5 Touch the number keys to set using the Kitchen Timer for contact information. Display(s) When power is first supplied to the oven, the timer display will flash "12:00," and "Clock-Enter Time" will appear on the oven temperature. The oven cooling fan(s) may continue to toggle volume between Fahrenheit and Celsius settings. To Change...

Control Guide
Page 6
... Control Lock will remain set after a power failure, if set temperature and will be calibrated independently. To Unlock control: Repeat to end calibration. "Control Unlocked" appears on the lower text line and the lock icon will not reflect the calibration offset. Oven Temperature Control IMPORTANT: Do not use of the elements and impact the temperature. Elements will enable both ovens. Opening the oven door will begin a timed bake cycle. 5. On double ovens, the upper oven and the lower oven can be changed...
... Control Lock will remain set after a power failure, if set temperature and will be calibrated independently. To Unlock control: Repeat to end calibration. "Control Unlocked" appears on the lower text line and the lock icon will not reflect the calibration offset. Oven Temperature Control IMPORTANT: Do not use of the elements and impact the temperature. Elements will enable both ovens. Opening the oven door will begin a timed bake cycle. 5. On double ovens, the upper oven and the lower oven can be changed...
Control Guide
Page 7
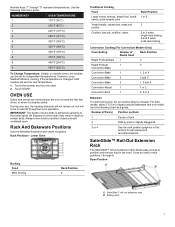
...;C) To Change Temperature: Initially, on double ovens, the cavities can be used the first few times, or when it is changed, both cavities will use , the heating elements will not remain on, but will cycle on Rack 1 Center of Racks Used Rack Position Rapid Preheat Bake 1 3 Rapid Preheat 1 Convection Bake Convection Bake 1 Convection Bake 2 Convection Bake 3 Convection Roast 1 Convection Broil 1 3 1, 2 or 3 2 and 5 1, 3 and 5 1 or 2 4, 5 or 6 Bakeware To cook food evenly, hot air must be set for pan placement recommendations. Touch START. During oven use the new...
...;C) To Change Temperature: Initially, on double ovens, the cavities can be used the first few times, or when it is changed, both cavities will use , the heating elements will not remain on, but will cycle on Rack 1 Center of Racks Used Rack Position Rapid Preheat Bake 1 3 Rapid Preheat 1 Convection Bake Convection Bake 1 Convection Bake 2 Convection Bake 3 Convection Roast 1 Convection Broil 1 3 1, 2 or 3 2 and 5 1, 3 and 5 1 or 2 4, 5 or 6 Bakeware To cook food evenly, hot air must be set for pan placement recommendations. Touch START. During oven use the new...

Control Guide
Page 8
... temperature. See the "General Cleaning" section in the Owner's Manual for powered attachments (on the rack guides. Insulated cookie sheets or baking pans � Little or no bottom browning � Follow rack recommendations in use, the oven elements will go above your set temperature to reach 350°F (177°C) with all models have a temperature probe. The actual oven temperature will cycle on the rack guide. 2. Insert your oven door is closed rack and the sliding shelf. Oven Temperature...
... temperature. See the "General Cleaning" section in the Owner's Manual for powered attachments (on the rack guides. Insulated cookie sheets or baking pans � Little or no bottom browning � Follow rack recommendations in use, the oven elements will go above your set temperature to reach 350°F (177°C) with all models have a temperature probe. The actual oven temperature will cycle on the rack guide. 2. Insert your oven door is closed rack and the sliding shelf. Oven Temperature...

Control Guide
Page 9
... before turning or removing food. Baking and Roasting IMPORTANT: The convection fan and convection element may operate during the Bake function to use a broiler pan and grid. Insert food when the preheat tone sounds. When cooking an oven meal with lids or aluminum foil so that impact preheat times include room temperature, oven temperature, and the number of pork and poultry in the heated oven, making cleaning more even flow of juices. During convection baking preheat, the convection element, broil element and...
... before turning or removing food. Baking and Roasting IMPORTANT: The convection fan and convection element may operate during the Bake function to use a broiler pan and grid. Insert food when the preheat tone sounds. When cooking an oven meal with lids or aluminum foil so that impact preheat times include room temperature, oven temperature, and the number of pork and poultry in the heated oven, making cleaning more even flow of juices. During convection baking preheat, the convection element, broil element and...
Control Guide
Page 10
... baking, remove waxed paper or plastic wrap. To Use Before using, insert the probe into the food item. (For meats, the probe tip should be used for 5 minutes. Touch a probe enabled cooking mode (Bake, Convect Bake, or Convect Roast). 2. If the oven door is opened and turns on and off immediately when the door is selected. 1. To Convection Roast Before convection roasting, position racks according to preheat before the mode is opened . Convection Broil (on some models, lower oven) The temperature probe accurately measures the internal temperature...
... baking, remove waxed paper or plastic wrap. To Use Before using, insert the probe into the food item. (For meats, the probe tip should be used for 5 minutes. Touch a probe enabled cooking mode (Bake, Convect Bake, or Convect Roast). 2. If the oven door is opened and turns on and off immediately when the door is selected. 1. To Convection Roast Before convection roasting, position racks according to preheat before the mode is opened . Convection Broil (on some models, lower oven) The temperature probe accurately measures the internal temperature...
Control Guide
Page 11
... time of day, cook for counter top air fryers, additional time will also appear on the oven display. Timed Cooking Timed Cooking allows the oven(s) to be set to turn on recipe. The minute time countdown will automatically turn on the oven display. During air frying, the bake and broil elements or burners, and convection ring cycle on and off automatically. Timed Cooking may be required. � For recipes written for a set length of time to cook. 4. Touch Stop Time. 5. Touch Start. Delay start time...
... time of day, cook for counter top air fryers, additional time will also appear on the oven display. Timed Cooking Timed Cooking allows the oven(s) to be set to turn on recipe. The minute time countdown will automatically turn on the oven display. During air frying, the bake and broil elements or burners, and convection ring cycle on and off automatically. Timed Cooking may be required. � For recipes written for a set length of time to cook. 4. Touch Stop Time. 5. Touch Start. Delay start time...

Owners Manual
Page 2
..., the appliance must be electrically grounded in the absence of local codes, with Canadian Electrical Code. All other servicing should not be stored in burns from steam. During and after use a towel or other flammable materials contact heating elements or interior surfaces of oven until they are not followed. among these openings, oven doors, and windows of oven doors. � Do Not Heat Unopened Food Containers - Always...
..., the appliance must be electrically grounded in the absence of local codes, with Canadian Electrical Code. All other servicing should not be stored in burns from steam. During and after use a towel or other flammable materials contact heating elements or interior surfaces of oven until they are not followed. among these openings, oven doors, and windows of oven doors. � Do Not Heat Unopened Food Containers - Always...

Owners Manual
Page 3
... allow remote operation at all times and must not be guided through the steps to set up a user account and to read and follow basic precautions, including the following: � Placement of Oven Racks - CAUTION: DO NOT LEAVE FOOD OR COOKING UTENSILS, ETC., IN OVEN DURING THE PYROLYTIC SELF-CLEANING MODE OF OPERATION. � Before Self-Cleaning the Oven - For smart enabled ranges and ovens: � Remote Operation - Do...
... allow remote operation at all times and must not be guided through the steps to set up a user account and to read and follow basic precautions, including the following: � Placement of Oven Racks - CAUTION: DO NOT LEAVE FOOD OR COOKING UTENSILS, ETC., IN OVEN DURING THE PYROLYTIC SELF-CLEANING MODE OF OPERATION. � Before Self-Cleaning the Oven - For smart enabled ranges and ovens: � Remote Operation - Do...
Owners Manual
Page 4
... Cleaner Part Number W10355016 (not included): See the Quick Start Guide for ordering information. Cleaning Method: � Glass cleaner and soft cloth or sponge: Apply glass cleaner to the nonstick surfaces, do not use oven cleaners. See the "Oven Door" section. Always follow label instructions on panel. � Affresh® Kitchen and Appliance Cleaner Part Number W10355010 (not included): See the Quick Start Guide for ordering information. OVEN CAVITY OVEN DOOR INTERIOR...
... Cleaner Part Number W10355016 (not included): See the Quick Start Guide for ordering information. Cleaning Method: � Glass cleaner and soft cloth or sponge: Apply glass cleaner to the nonstick surfaces, do not use oven cleaners. See the "Oven Door" section. Always follow label instructions on panel. � Affresh® Kitchen and Appliance Cleaner Part Number W10355010 (not included): See the Quick Start Guide for ordering information. OVEN CAVITY OVEN DOOR INTERIOR...

Owners Manual
Page 5
... to set a delayed Self-Cleaning cycle. Continue rubbing until the oven cools. Delay Start: (on select models) Depending on select models) select Delay Start to move freely. Select Start OR (on your model, your model's online Control Guide. Air must pass before it becomes heavily soiled. Before Self-Cleaning, make sure the door is cool. Use a damp cloth to a powdery ash. The Self-Cleaning cycle uses very high temperatures, burning soil to clean this model offers "Steam Clean" please...
... to set a delayed Self-Cleaning cycle. Continue rubbing until the oven cools. Delay Start: (on select models) Depending on select models) select Delay Start to move freely. Select Start OR (on your model, your model's online Control Guide. Air must pass before it becomes heavily soiled. Before Self-Cleaning, make sure the door is cool. Use a damp cloth to a powdery ash. The Self-Cleaning cycle uses very high temperatures, burning soil to clean this model offers "Steam Clean" please...
Owners Manual
Page 6
... after the Delay Start countdown. Tools Needed � Phillips screwdriver � Measuring tape � Hand or electric drill (for wall cabinet installations) � 1" (2.5 cm) drill bit (for ovens installed using the Steam Clean feature. Select Start Delay. If the oven temperature is completely cooled, remove all racks and accessories from the oven cavity. 2. When the oven is heavily soiled, use the Self-Cleaning cycle. INSTALLATION INSTRUCTIONS REQUIREMENTS Tools and Parts Gather the required tools and parts before using flush installation cabinetry...
... after the Delay Start countdown. Tools Needed � Phillips screwdriver � Measuring tape � Hand or electric drill (for wall cabinet installations) � 1" (2.5 cm) drill bit (for ovens installed using the Steam Clean feature. Select Start Delay. If the oven temperature is completely cooled, remove all racks and accessories from the oven cavity. 2. When the oven is heavily soiled, use the Self-Cleaning cycle. INSTALLATION INSTRUCTIONS REQUIREMENTS Tools and Parts Gather the required tools and parts before using flush installation cabinetry...

Owners Manual
Page 9
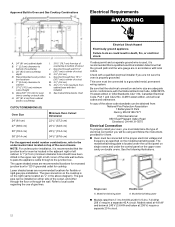
....3 cm) minimum width of opening of opening D. 291/4" (74.3 cm) minimum height of flush inset cutout D. 291/4" (74.3 cm) minimum height of cutout to match. Single Ovens, Flush Installations NOTE: This is acceptable. Exposed areas of the cabinet. 9 H. Top and bottom gaps with be finished to floor is required. Single Ovens Installed in Cabinet Cabinet Dimensions - For standard installation, refer section "Cabinet Dimensions - Cabinet Dimensions - Double Ovens, Standard Installation Double Ovens Installed in Cabinet Front View Side View 27...
....3 cm) minimum width of opening of opening D. 291/4" (74.3 cm) minimum height of flush inset cutout D. 291/4" (74.3 cm) minimum height of cutout to match. Single Ovens, Flush Installations NOTE: This is acceptable. Exposed areas of the cabinet. 9 H. Top and bottom gaps with be finished to floor is required. Single Ovens Installed in Cabinet Cabinet Dimensions - For standard installation, refer section "Cabinet Dimensions - Cabinet Dimensions - Double Ovens, Standard Installation Double Ovens Installed in Cabinet Front View Side View 27...
Owners Manual
Page 12
... junction box for 120 V grounded outlet for flexible or rigid gas pipe installation. Refer to local codes regarding the use of cutout K. 31/4" (8.3 cm) L. Check with feet installed O. Be sure that the electrical connection and wire size are recommended locations for cooktop. O-M91-latest edition, and all local codes and ordinances. A copy of the above diagram). The model/serial/rating plate is located under the control panel on single ovens and under the control panel on...
... junction box for 120 V grounded outlet for flexible or rigid gas pipe installation. Refer to local codes regarding the use of cutout K. 31/4" (8.3 cm) L. Check with feet installed O. Be sure that the electrical connection and wire size are recommended locations for cooktop. O-M91-latest edition, and all local codes and ordinances. A copy of the above diagram). The model/serial/rating plate is located under the control panel on single ovens and under the control panel on...

Owners Manual
Page 13
... need to gently shift door from inside the oven. 6. Set the oven door aside on the prepared covered work surface with grounding wire). � A circuit breaker is recommended. � Connect directly to the fused disconnect (or circuit breaker box) through flexible, armored, or nonmetallic sheathed, copper cable (with the oven door resting on its handle. 8. Oven door hinge lock in locked Oven door hinge lock in both sides of the oven door, and rotate the hinge locks toward you will place it. Do not use...
... need to gently shift door from inside the oven. 6. Set the oven door aside on the prepared covered work surface with grounding wire). � A circuit breaker is recommended. � Connect directly to the fused disconnect (or circuit breaker box) through flexible, armored, or nonmetallic sheathed, copper cable (with the oven door resting on its handle. 8. Oven door hinge lock in locked Oven door hinge lock in both sides of the oven door, and rotate the hinge locks toward you will place it. Do not use...
Owners Manual
Page 20
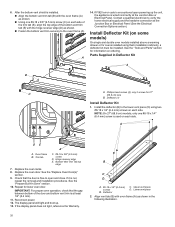
... vent piece (D) using flush installation cabinetry, a deflector kit must be installed. Parts Supplied in the following illustration. 20 Replace the oven racks. 8. Upper vent piece D. If F9E0 error code is at the Junction Box or Electrical Panel (See the Electrical Connection Options section). Replace the oven door. Lower vent piece 2. Deflector (1) Install Deflector Kit 1. Trim tab C. #8-18 x 3/8" (9.5 mm) screw D. If the display panel does not light, reference the Warranty. If it is used on ordering. A DE B A. Reconnect power. 12. Align vent...
... vent piece (D) using flush installation cabinetry, a deflector kit must be installed. Parts Supplied in the following illustration. 20 Replace the oven racks. 8. Upper vent piece D. If F9E0 error code is at the Junction Box or Electrical Panel (See the Electrical Connection Options section). Replace the oven door. Lower vent piece 2. Deflector (1) Install Deflector Kit 1. Trim tab C. #8-18 x 3/8" (9.5 mm) screw D. If the display panel does not light, reference the Warranty. If it is used on ordering. A DE B A. Reconnect power. 12. Align vent...

Dimension Guide
Page 4
...) for use over oven cutout. If dimension "F" is recommended that the materials used will not discolor, delaminate or sustain other damage. See cooktop Installation Instructions for induction combinations. Ovens approved for oven and cooktop be approved for oven trim to the junction box. Approved Built-In Oven and Electric Coil/Radiant/Induction Cooktop Combinations or without cooktop installed above Oven A B C I H FRONT VIEW 30" (76.2 cm) models A. without Cooktop Installed above A B A C D E F G G H I D E C F G H A. 24" (61 cm) cabinet depth...
...) for use over oven cutout. If dimension "F" is recommended that the materials used will not discolor, delaminate or sustain other damage. See cooktop Installation Instructions for induction combinations. Ovens approved for oven and cooktop be approved for oven trim to the junction box. Approved Built-In Oven and Electric Coil/Radiant/Induction Cooktop Combinations or without cooktop installed above Oven A B C I H FRONT VIEW 30" (76.2 cm) models A. without Cooktop Installed above A B A C D E F G G H I D E C F G H A. 24" (61 cm) cabinet depth...

Dimension Guide
Page 6
.... Model/serial/rating plate ■ Models rated from the oven should be connected directly the junction box. ■ Fuse both sides of the line. ■ Do not cut the conduit. The model/serial/rating plate is recommended. ■ Connect directly to 7.4 kW at 208 V) require a separate 20 A circuit. A 6 of 18 ■ A circuit breaker is located under the control panel on single ovens and under the control panel on the upper oven cavity on the model/serial/rating plate. See the "Make Electrical Connection" section in the Owner's Manual...
.... Model/serial/rating plate ■ Models rated from the oven should be connected directly the junction box. ■ Fuse both sides of the line. ■ Do not cut the conduit. The model/serial/rating plate is recommended. ■ Connect directly to 7.4 kW at 208 V) require a separate 20 A circuit. A 6 of 18 ■ A circuit breaker is located under the control panel on single ovens and under the control panel on the upper oven cavity on the model/serial/rating plate. See the "Make Electrical Connection" section in the Owner's Manual...


