Use & Care Guide
Page 3
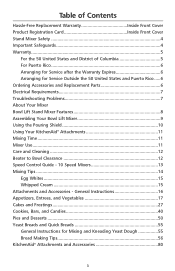
... General Instructions for Service Outside the 50 United States and Puerto Rico .....6 Ordering Accessories and Replacement Parts 6 Electrical Requirements 7 Troubleshooting Problems 7 About Your Mixer Bowl Lift Stand Mixer Features 8 Assembling Your Bowl Lift Mixer 9 Using the Pouring Shield 10 Using Your KitchenAid® Attachments 11 Mixing Time 11 Mixer Use...11 Care and Cleaning 12 Beater to Bowl Clearance 12 Speed Control Guide - 10 Speed Mixers 13 Mixing Tips 14 Egg Whites 15 Whipped Cream 15 Attachments and Accessories - Table of Contents Hassle-Free Replacement Warranty...
... General Instructions for Service Outside the 50 United States and Puerto Rico .....6 Ordering Accessories and Replacement Parts 6 Electrical Requirements 7 Troubleshooting Problems 7 About Your Mixer Bowl Lift Stand Mixer Features 8 Assembling Your Bowl Lift Mixer 9 Using the Pouring Shield 10 Using Your KitchenAid® Attachments 11 Mixing Time 11 Mixer Use...11 Care and Cleaning 12 Beater to Bowl Clearance 12 Speed Control Guide - 10 Speed Mixers 13 Mixing Tips 14 Egg Whites 15 Whipped Cream 15 Attachments and Accessories - Table of Contents Hassle-Free Replacement Warranty...
Use & Care Guide
Page 4
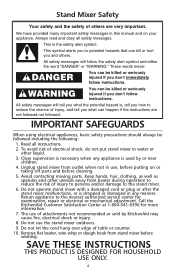
..., basic safety precautions should always be followed including the following: 1. Keep hands, hair, clothing, as well as spatulas and other liquid. 3. Call the KitchenAid Customer Satisfaction Center at 1-800-541-6390 for examination, repair or electrical or mechanical adjustment. Remove flat beater, wire whip or dough hook from beater during operation to reduce the risk of injury to persons and/or damage to reduce...
..., basic safety precautions should always be followed including the following: 1. Keep hands, hair, clothing, as well as spatulas and other liquid. 3. Call the KitchenAid Customer Satisfaction Center at 1-800-541-6390 for examination, repair or electrical or mechanical adjustment. Remove flat beater, wire whip or dough hook from beater during operation to reduce the risk of injury to persons and/or damage to reduce...
Use & Care Guide
Page 5
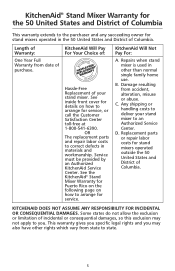
... on how to arrange for stand mixers operated outside the 50 United States and District of Columbia. B. Replacement parts or repair labor costs for service, or call the Customer Satisfaction Center toll-free at 1-800-541-6390. See the KitchenAid® Stand Mixer Warranty for Puerto Rico on the following page on how to arrange for service. Any shipping or handling costs to an Authorized Service Center.
... on how to arrange for stand mixers operated outside the 50 United States and District of Columbia. B. Replacement parts or repair labor costs for service, or call the Customer Satisfaction Center toll-free at 1-800-541-6390. See the KitchenAid® Stand Mixer Warranty for Puerto Rico on the following page on how to arrange for service. Any shipping or handling costs to an Authorized Service Center.
Use & Care Guide
Page 7
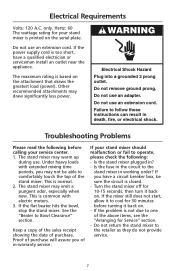
... to the stand mixer in -warranty service. Other recommended attachments may warm up during use an extension cord. Electrical Shock Hazard Plug into a grounded 3 prong outlet. Troubleshooting Problems Please read the following : - This is too short, have a circuit breaker box, be able to operate, please check the following before turning it back on the attachment that draws the greatest load (power). If the mixer still...
... to the stand mixer in -warranty service. Other recommended attachments may warm up during use an extension cord. Electrical Shock Hazard Plug into a grounded 3 prong outlet. Troubleshooting Problems Please read the following : - This is too short, have a circuit breaker box, be able to operate, please check the following before turning it back on the attachment that draws the greatest load (power). If the mixer still...
Use & Care Guide
Page 8
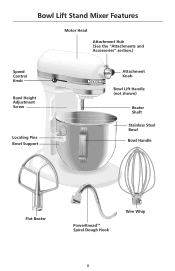
Bowl Lift Stand Mixer Features Motor Head Attachment Hub (See the "Attachments and Accessories" section.) Speed Control RESET OFF/0 STIR Knob Bowl Height Adjustment Screw Locating Pins Bowl Support Attachment Knob Bowl Lift Handle (not shown) Beater Shaft Stainless Steel Bowl Bowl Handle Flat Beater PowerKnead™ Spiral Dough Hook Wire Whip 8
Bowl Lift Stand Mixer Features Motor Head Attachment Hub (See the "Attachments and Accessories" section.) Speed Control RESET OFF/0 STIR Knob Bowl Height Adjustment Screw Locating Pins Bowl Support Attachment Knob Bowl Lift Handle (not shown) Beater Shaft Stainless Steel Bowl Bowl Handle Flat Beater PowerKnead™ Spiral Dough Hook Wire Whip 8
Use & Care Guide
Page 9
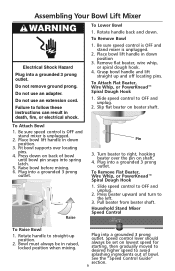
... into spring latch. 5. Assembling Your Bowl Lift Mixer Electrical Shock Hazard Plug into a grounded 3 prong outlet. To Attach Flat Beater, Wire Whip, or PowerKnead™ Spiral Dough Hook 1. Place bowl lift handle in raised, locked position when mixing. Press beater upward and turn to OFF and unplug. 2. Rotate handle to right, hooking beater over locating pins. 4. Remove flat beater, wire whip, or spiral dough hook. 4. To Remove Flat Beater, Wire Whip, or PowerKnead™ Spiral Dough Hook 1. Do not use an extension cord. Fit bowl supports over the pin on lowest speed for...
... into spring latch. 5. Assembling Your Bowl Lift Mixer Electrical Shock Hazard Plug into a grounded 3 prong outlet. To Attach Flat Beater, Wire Whip, or PowerKnead™ Spiral Dough Hook 1. Place bowl lift handle in raised, locked position when mixing. Press beater upward and turn to OFF and unplug. 2. Rotate handle to right, hooking beater over locating pins. 4. Remove flat beater, wire whip, or spiral dough hook. 4. To Remove Flat Beater, Wire Whip, or PowerKnead™ Spiral Dough Hook 1. Do not use an extension cord. Fit bowl supports over the pin on lowest speed for...
Use & Care Guide
Page 10
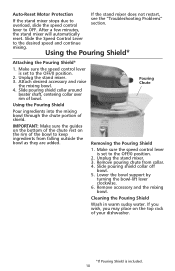
... pouring shield collar off bowl. 5. Make sure the speed control lever is set to OFF. lever to the OFF/0 position. 2. After a few minutes, the stand mixer will automatically reset. Unplug the stand mixer. 3. Make sure the speed control lever is included. 10 IMPORTANT: Make sure the guides on the bottom of the chute rest on the top rack of shield. Attach desired accessory and raise the mixing bowl. 4. Lower the bowl support by turning the bowl-lift lever clockwise. 6. Using the Pouring Shield* Attaching the Pouring Shield* 1. Remove pouring...
... pouring shield collar off bowl. 5. Make sure the speed control lever is set to OFF. lever to the OFF/0 position. 2. After a few minutes, the stand mixer will automatically reset. Unplug the stand mixer. 3. Make sure the speed control lever is included. 10 IMPORTANT: Make sure the guides on the bottom of the chute rest on the top rack of shield. Attach desired accessory and raise the mixing bowl. 4. Lower the bowl support by turning the bowl-lift lever clockwise. 6. Using the Pouring Shield* Attaching the Pouring Shield* 1. Remove pouring...
Use & Care Guide
Page 11
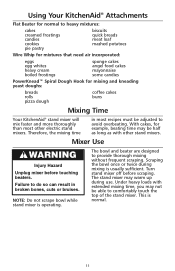
... Turn stand mixer off before touching beaters. Under heavy loads with other electric stand mixers. The stand mixer may not be half as long as with extended mixing time, you may warm up during mixing is usually sufficient. Using Your KitchenAid® Attachments Flat Beater for mixing and kneading yeast doughs: breads rolls pizza dough coffee cakes buns Mixing Time Your KitchenAid® stand mixer will mix faster and more thoroughly than most recipes must be adjusted to...
... Turn stand mixer off before touching beaters. Under heavy loads with other electric stand mixers. The stand mixer may not be half as long as with extended mixing time, you may warm up during mixing is usually sufficient. Using Your KitchenAid® Attachments Flat Beater for mixing and kneading yeast doughs: breads rolls pizza dough coffee cakes buns Mixing Time Your KitchenAid® stand mixer will mix faster and more thoroughly than most recipes must be adjusted to...

Use & Care Guide
Page 12
... may accumulate. If the flat beater or the wire whip is so close that is required: the screw will not strike on shaft. Wire whip, burnished spiral dough hook and burnished flat beater should be hand washed and dried immediately. Place bowl lift handle in a dishwasher. Wipe stand mixer with a soft, damp cloth. Attach flat beater. 4. Repeat steps 4 and 5 if necessary. NOTE: Always be sure to check clearance. 6. Adjust so flat beater just clears A bottom...
... may accumulate. If the flat beater or the wire whip is so close that is required: the screw will not strike on shaft. Wire whip, burnished spiral dough hook and burnished flat beater should be hand washed and dried immediately. Place bowl lift handle in a dishwasher. Wipe stand mixer with a soft, damp cloth. Attach flat beater. 4. Repeat steps 4 and 5 if necessary. NOTE: Always be sure to check clearance. 6. Adjust so flat beater just clears A bottom...

Use & Care Guide
Page 14
... mixing speeds, use Speed 2 for low speed, Speed 4 for medium speed, and Speed 6 for high speed. Cake Mixes When preparing packaged cake mixes, use the "Speed Control Guide" section. NOTE: If ingredients in very bottom of liquid ingredients should be prepared using the traditional cake mixing method. Adding Nuts, Raisins, or Candied Fruits Follow individual recipes for guidelines on the package directions. This method calls for combining dry ingredients with the KitchenAid® stand mixer...
... mixing speeds, use Speed 2 for low speed, Speed 4 for medium speed, and Speed 6 for high speed. Cake Mixes When preparing packaged cake mixes, use the "Speed Control Guide" section. NOTE: If ingredients in very bottom of liquid ingredients should be prepared using the traditional cake mixing method. Adding Nuts, Raisins, or Candied Fruits Follow individual recipes for guidelines on the package directions. This method calls for combining dry ingredients with the KitchenAid® stand mixer...
Use & Care Guide
Page 16
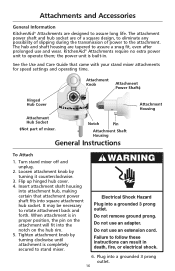
...snug fit, even after prolonged use and wear. KitchenAid® Attachments require no extra power unit to rotate attachment back and forth. Attachment Knob Attachment Power Shaft‡ Hinged Hub Cover ® Attachment Hub Socket ‡Not part of power to the attachment. Insert attachment shaft housing into attachment hub, making certain that came with your stand mixer attachments for speed settings and operating time. Plug into a grounded 3 prong outlet. The hub and shaft housing are designed to stand mixer. Turn stand mixer off and unplug. 2. Notch Pin Attachment Shaft...
...snug fit, even after prolonged use and wear. KitchenAid® Attachments require no extra power unit to rotate attachment back and forth. Attachment Knob Attachment Power Shaft‡ Hinged Hub Cover ® Attachment Hub Socket ‡Not part of power to the attachment. Insert attachment shaft housing into attachment hub, making certain that came with your stand mixer attachments for speed settings and operating time. Plug into a grounded 3 prong outlet. The hub and shaft housing are designed to stand mixer. Turn stand mixer off and unplug. 2. Notch Pin Attachment Shaft...

Use & Care Guide
Page 17
... 30 seconds. Turn to Speed 4 and beat about 1 minute, or until all remaining ingredients. Add marshmallow cream, pineapple, and orange peel. Turn stand mixer off and unplug. 2. Rotate attachment slightly back and forth while pulling out. 3. Per serving: About 42 cal, 4 g protein, 1 g carb, 3 g fat, 12 mg chol, 180 mg sodium. APPETIZERS, ENTREES, AND VEGETABLES To Remove 1. Replace attachment hub cover. Add all...
... 30 seconds. Turn to Speed 4 and beat about 1 minute, or until all remaining ingredients. Add marshmallow cream, pineapple, and orange peel. Turn stand mixer off and unplug. 2. Rotate attachment slightly back and forth while pulling out. 3. Per serving: About 42 cal, 4 g protein, 1 g carb, 3 g fat, 12 mg chol, 180 mg sodium. APPETIZERS, ENTREES, AND VEGETABLES To Remove 1. Replace attachment hub cover. Add all...

Use & Care Guide
Page 22
... and quickly stir in mixer bowl. Bake at a time, beating about 30 seconds, or until mixture leaves sides of each cream puff. Turn off ) for 10 minutes. Remove pans from oven. Return pans to Speed 4 and beat about 1 tablespoon filling into each puff. Attach bowl and flat beater. Drop dough onto greased baking sheets forming 36 mounds, 2" apart. Attach bowl and flat beater. Pipe or spoon...
... and quickly stir in mixer bowl. Bake at a time, beating about 30 seconds, or until mixture leaves sides of each cream puff. Turn off ) for 10 minutes. Remove pans from oven. Return pans to Speed 4 and beat about 1 tablespoon filling into each puff. Attach bowl and flat beater. Drop dough onto greased baking sheets forming 36 mounds, 2" apart. Attach bowl and flat beater. Pipe or spoon...

Use & Care Guide
Page 30
...°F for 1 hour 20 minutes. Turn to Speed 4 and beat about 1 minute. Stop and scrape bowl. Turn to Speed 6 and beat about 15 seconds after each addition. Remove cake from pan. Yield: 16 servings. VARIATION Double Chocolate Pound Cake Add 1⁄2 cup unsweetened Dutch-processed cocoa powder to 1 cup. Yield: 16 servings. Prepare as directed above. Per serving: About 419...
...°F for 1 hour 20 minutes. Turn to Speed 4 and beat about 1 minute. Stop and scrape bowl. Turn to Speed 6 and beat about 15 seconds after each addition. Remove cake from pan. Yield: 16 servings. VARIATION Double Chocolate Pound Cake Add 1⁄2 cup unsweetened Dutch-processed cocoa powder to 1 cup. Yield: 16 servings. Prepare as directed above. Per serving: About 419...

Use & Care Guide
Page 31
... sugar 1 package (8 oz) light cream cheese, softened 1⁄2 cup butter or margarine, softened 1 teaspoon vanilla Place egg whites in beaten egg whites with Cream Cheese Frosting. Turn to Speed 4 and beat about 15 seconds after each addition. Gradually turn to Speed 2 and mix about 30 seconds, or until blended. Attach bowl and flat beater to mixer. Attach bowl and wire whip to 3 minutes, or until blended. Remove bowl from mixer. Turn to Speed 8 and whip...
... sugar 1 package (8 oz) light cream cheese, softened 1⁄2 cup butter or margarine, softened 1 teaspoon vanilla Place egg whites in beaten egg whites with Cream Cheese Frosting. Turn to Speed 4 and beat about 15 seconds after each addition. Gradually turn to Speed 2 and mix about 30 seconds, or until blended. Attach bowl and flat beater to mixer. Attach bowl and wire whip to 3 minutes, or until blended. Remove bowl from mixer. Turn to Speed 8 and whip...

Use & Care Guide
Page 36
... mix about 45 seconds longer. Stop and scrape bowl. Let stand in pan. Serve warm or at 350ºF for 3 to Speed 2 and mix about 1 minute. Yield: 8 servings. Attach bowl and flat beater to Speed 6 and beat about 45 seconds. Turn to 5 minutes, or until center springs back when touched lightly. Turn to mixer. Arrange pear slices evenly over pear slices. Spread batter evenly over sugar...
... mix about 45 seconds longer. Stop and scrape bowl. Let stand in pan. Serve warm or at 350ºF for 3 to Speed 2 and mix about 1 minute. Yield: 8 servings. Attach bowl and flat beater to Speed 6 and beat about 45 seconds. Turn to 5 minutes, or until center springs back when touched lightly. Turn to mixer. Arrange pear slices evenly over pear slices. Spread batter evenly over sugar...

Use & Care Guide
Page 38
... vanilla Place sugar, cream of tartar, salt, water, and corn syrup in mixer bowl. Place egg whites in saucepan. Add vanilla and whip about 1 minute, or until smooth and creamy. Remove from heat. Turn to Speed 4 and beat about 5 minutes longer, or until sugar is smooth. Attach bowl and wire whip to blend. Frost cake immediately. Add brown sugar and milk, stirring to mixer. Place powdered sugar in...
... vanilla Place sugar, cream of tartar, salt, water, and corn syrup in mixer bowl. Place egg whites in saucepan. Add vanilla and whip about 1 minute, or until smooth and creamy. Remove from heat. Turn to Speed 4 and beat about 5 minutes longer, or until sugar is smooth. Attach bowl and wire whip to blend. Frost cake immediately. Add brown sugar and milk, stirring to mixer. Place powdered sugar in...

Use & Care Guide
Page 39
... servings (frosting for 2-layer or 13 x 9 x 2" cake). Attach bowl and flat beater to STIR Speed and mix about 11⁄2 minutes, or until blended. Stop and scrape bowl. Gradually add remaining 3 cups powdered sugar and mix until well blended. Orange Cream Cheese Frosting 4 cups powdered sugar 1 package (8 oz) light cream cheese 1 teaspoon orange juice 1⁄2 teaspoon grated orange peel Place all ingredients in mixer bowl. Turn to mixer.
... servings (frosting for 2-layer or 13 x 9 x 2" cake). Attach bowl and flat beater to STIR Speed and mix about 11⁄2 minutes, or until blended. Stop and scrape bowl. Gradually add remaining 3 cups powdered sugar and mix until well blended. Orange Cream Cheese Frosting 4 cups powdered sugar 1 package (8 oz) light cream cheese 1 teaspoon orange juice 1⁄2 teaspoon grated orange peel Place all ingredients in mixer bowl. Turn to mixer.

Use & Care Guide
Page 44
... 2" apart on wire rack. Brush dough with fork in mixer bowl. Bake at 375°F for 20 to Speed 4 and beat about 1 minute, or until golden brown. Turn to 25 minutes. Remove from baking sheets immediately and cool on wire racks. Attach bowl and flat beater to STIR Speed. Stop and scrape bowl. Yield: 30 servings (1 bar per serving). Attach bowl and flat beater to Speed 2 and mix about 1 minute. Add sugars, egg...
... 2" apart on wire rack. Brush dough with fork in mixer bowl. Bake at 375°F for 20 to Speed 4 and beat about 1 minute, or until golden brown. Turn to 25 minutes. Remove from baking sheets immediately and cool on wire racks. Attach bowl and flat beater to STIR Speed. Stop and scrape bowl. Yield: 30 servings (1 bar per serving). Attach bowl and flat beater to Speed 2 and mix about 1 minute. Add sugars, egg...

Use & Care Guide
Page 51
... peel. Stop and scrape bowl. Bake at 325°F for 50 to STIR Speed and mix about 30 seconds longer. Cover and refrigerate 6 to mixer. Place pan of hot water on rack in mixer bowl. Press mixture firmly into Crust. To Make Filling: Place cream cheese, sugar, and flour in center of 9" springform pan with no-stick cooking spray. Turn to 60...
... peel. Stop and scrape bowl. Bake at 325°F for 50 to STIR Speed and mix about 30 seconds longer. Cover and refrigerate 6 to mixer. Place pan of hot water on rack in mixer bowl. Press mixture firmly into Crust. To Make Filling: Place cream cheese, sugar, and flour in center of 9" springform pan with no-stick cooking spray. Turn to 60...


