Use & Care Guide
Page 2
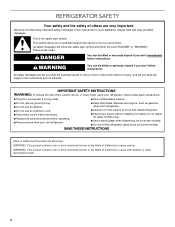
... reproductive harm. 2 All safety messages will follow instructions. Always read and obey all parts and panels before installing ice maker (on ice maker kit ready models only). ■ Use a sturdy glass when dispensing ice (on some models). ■ Do not hit the refrigerator glass doors (on your old refrigerator. ■ Keep flammable materials and vapors, such as gasoline, away from refrigerator. ■ Use two or more people to cause cancer. WARNING...
... reproductive harm. 2 All safety messages will follow instructions. Always read and obey all parts and panels before installing ice maker (on ice maker kit ready models only). ■ Use a sturdy glass when dispensing ice (on some models). ■ Do not hit the refrigerator glass doors (on your old refrigerator. ■ Keep flammable materials and vapors, such as gasoline, away from refrigerator. ■ Use two or more people to cause cancer. WARNING...
Use & Care Guide
Page 3
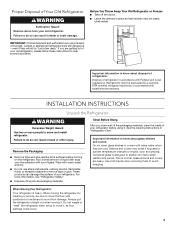
... are cold. Failure to move and install refrigerator. See the cleaning instructions in accordance with warm water when they will sit for cleaning or service, be evacuated by a licensed, EPA certified refrigerant technician in "Refrigerator Care." This is heavy. Do not wiggle or "walk" the refrigerator when trying to do so can result in back or other injury. Junked or abandoned refrigerators are not problems...
... are cold. Failure to move and install refrigerator. See the cleaning instructions in accordance with warm water when they will sit for cleaning or service, be evacuated by a licensed, EPA certified refrigerant technician in "Refrigerator Care." This is heavy. Do not wiggle or "walk" the refrigerator when trying to do so can result in back or other injury. Junked or abandoned refrigerators are not problems...
Use & Care Guide
Page 4
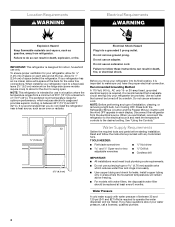
... door to swing open. Failure to follow the instructions provided with any type of installation, cleaning, or removing a light bulb, turn Cooling OFF. It is recommended that a separate circuit serving only your refrigerator be turned off by a switch. Use an outlet that you do so can result in death, fire, or electrical shock. Water Supply Requirements Gather the required tools and parts before starting installation. Failure to do not install the refrigerator...
... door to swing open. Failure to follow the instructions provided with any type of installation, cleaning, or removing a light bulb, turn Cooling OFF. It is recommended that a separate circuit serving only your refrigerator be turned off by a switch. Use an outlet that you do so can result in death, fire, or electrical shock. Water Supply Requirements Gather the required tools and parts before starting installation. Failure to do not install the refrigerator...
Use & Care Guide
Page 5
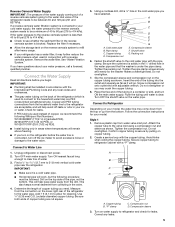
... the copper tubing as shown. Connect the Water Supply Read all directions before the water line is connected, turn off -taste or odor in the cold water pipe you need. This will help keep water away from water valve inlet port. Remove plastic cap from the drill. Copper tubing B. Using a cordless drill, drill a ¹⁄₄" hole in your model, the water line may crush the copper tubing. 8. Copper tubing D. Slip the...
... the copper tubing as shown. Connect the Water Supply Read all directions before the water line is connected, turn off -taste or odor in the cold water pipe you need. This will help keep water away from water valve inlet port. Remove plastic cap from the drill. Copper tubing B. Using a cordless drill, drill a ¹⁄₄" hole in your model, the water line may crush the copper tubing. 8. Copper tubing D. Slip the...
Use & Care Guide
Page 6
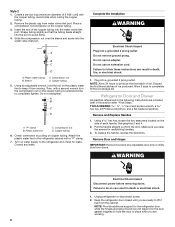
... each handle. Plastic water tubing C. Turn on the plastic water line to follow these instructions can result in place while you are included later in death, fire, or electrical shock. 1. Using a hex key, loosen the two setscrews located on the door gasket magnets to the refrigerator and check for leaks. A B C D A. Do not use an extension cord. Correct any adjustable door bins or utility bins from the cabinet. Do not remove...
... each handle. Plastic water tubing C. Turn on the plastic water line to follow these instructions can result in place while you are included later in death, fire, or electrical shock. 1. Using a hex key, loosen the two setscrews located on the door gasket magnets to the refrigerator and check for leaks. A B C D A. Do not use an extension cord. Correct any adjustable door bins or utility bins from the cabinet. Do not remove...

Use & Care Guide
Page 7
... in Graphic 3. 4. Tighten all parts together. Lift the refrigerator door free from handle side and move them to refrigerator. 7 Replace Door and Hinges NOTE: When reversing panel series door, use alternate top hinge shipped with the top of the refrigerator door. Replace the base grille. Do not remove ground prong. Completely tighten the four screws. 4. Keep the screws in place. Set aside the door until the hinges and freezer compartment drawer are being moved.
... in Graphic 3. 4. Tighten all parts together. Lift the refrigerator door free from handle side and move them to refrigerator. 7 Replace Door and Hinges NOTE: When reversing panel series door, use alternate top hinge shipped with the top of the refrigerator door. Replace the base grille. Do not remove ground prong. Completely tighten the four screws. 4. Keep the screws in place. Set aside the door until the hinges and freezer compartment drawer are being moved.
Use & Care Guide
Page 8
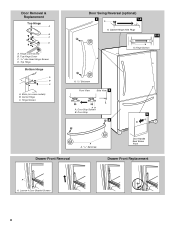
Door Removal & Replacement Top Hinge A B C D A. Hinge Screws A A A A. 3/32" Setscrew Front View Side View 3 AB A. Top Hinge Bottom Hinge A B C A. Shim (on some models) B. Loosen 4 Door Bracket Screws 8 Hinge Screws Door Swing Reversal (optional) 2 1-2 A A. Top Hinge Cover C. 5/16" Hex Head Hinge Screws D. Center Hinge C. Cabinet Hinge Hole Plugs 1-1 A A. Hinge Cover Screw B. Door Stop Screws B. Door Stop 5 4 Drawer Front Removal A A. 3/32" Setscrew Door Handle Seal Screw Front Drawer Front Replacement A A.
Door Removal & Replacement Top Hinge A B C D A. Hinge Screws A A A A. 3/32" Setscrew Front View Side View 3 AB A. Top Hinge Bottom Hinge A B C A. Shim (on some models) B. Loosen 4 Door Bracket Screws 8 Hinge Screws Door Swing Reversal (optional) 2 1-2 A A. Top Hinge Cover C. 5/16" Hex Head Hinge Screws D. Center Hinge C. Cabinet Hinge Hole Plugs 1-1 A A. Hinge Cover Screw B. Door Stop Screws B. Door Stop 5 4 Drawer Front Removal A A. 3/32" Setscrew Door Handle Seal Screw Front Drawer Front Replacement A A.
Use & Care Guide
Page 9
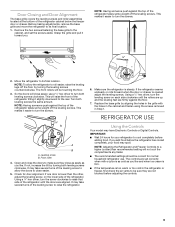
... Electronic Controls or Digital Controls. Using a ¹⁄₄" hex driver, turn the screw clockwise to cool completely before the refrigerator has cooled completely, your refrigerator to raise that side of the refrigerator cabinet below the freezer door or drawer. Door Closing and Door Alignment The base grille covers the leveling screws and roller assemblies located at the bottom of the refrigerator until the rollers are up and the leveling feet are...
... Electronic Controls or Digital Controls. Using a ¹⁄₄" hex driver, turn the screw clockwise to cool completely before the refrigerator has cooled completely, your refrigerator to raise that side of the refrigerator cabinet below the freezer door or drawer. Door Closing and Door Alignment The base grille covers the leveling screws and roller assemblies located at the bottom of the refrigerator until the rollers are up and the leveling feet are...

Use & Care Guide
Page 10
... control adjusts the freezer compartment temperature. The refrigerator uses more energy when Humidity Control is on. ■ Press Humidity Control when the environment is displayed. Electronic Controls For your convenience, your refrigerator, make sure the controls are still set to little ice Adjust FREEZER Control one setting higher REFRIGERATOR too cold Adjust REFRIGERATOR Control one setting lower FREEZER too cold Adjust FREEZER Control one setting at a time. If you need to shut off , press the freezer Minus (-) touch pad until the desired temperature set point is warm...
... control adjusts the freezer compartment temperature. The refrigerator uses more energy when Humidity Control is on. ■ Press Humidity Control when the environment is displayed. Electronic Controls For your convenience, your refrigerator, make sure the controls are still set to little ice Adjust FREEZER Control one setting higher REFRIGERATOR too cold Adjust REFRIGERATOR Control one setting lower FREEZER too cold Adjust FREEZER Control one setting at a time. If you need to shut off , press the freezer Minus (-) touch pad until the desired temperature set point is warm...
Use & Care Guide
Page 11
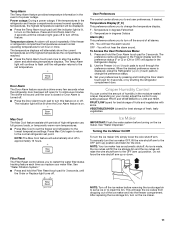
... control the amount of all alarms. ON - Press Max Cool again to return to the lowest temperature settings. Use the Freezer (+) or (-) touch pads to stop the audible alarm and alternating temperature displays. The Temp Alarm light will automatically shut off to clean the bin. FRUIT/LOW (open for 3 seconds, until the Order or Replace light turns off the sound of humidity in approximately 12 hours. Ice Maker IMPORTANT: Flush the water system before removing...
... control the amount of all alarms. ON - Press Max Cool again to return to the lowest temperature settings. Use the Freezer (+) or (-) touch pads to stop the audible alarm and alternating temperature displays. The Temp Alarm light will automatically shut off to clean the bin. FRUIT/LOW (open for 3 seconds, until the Order or Replace light turns off the sound of humidity in approximately 12 hours. Ice Maker IMPORTANT: Flush the water system before removing...
Use & Care Guide
Page 12
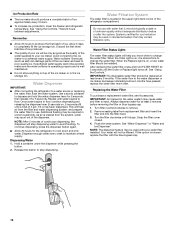
... the button to stop dispensing water to the water dispenser or ice maker decreases noticeably before 6 months have passed, replace the water filter more often. See "Using the Controls." See "Water Dispenser" or "Water and Ice Dispenser." IMPORTANT: The disposable water filter should produce a complete batch of 4 gal. (15 L) has been dispensed. See "Using the Controls." Avoid connecting the ice maker to your ice maker. Do not use . Wait 24 hours between adjustments. If a softened water supply cannot be avoided, make sure the water...
... the button to stop dispensing water to the water dispenser or ice maker decreases noticeably before 6 months have passed, replace the water filter more often. See "Using the Controls." See "Water Dispenser" or "Water and Ice Dispenser." IMPORTANT: The disposable water filter should produce a complete batch of 4 gal. (15 L) has been dispensed. See "Using the Controls." Avoid connecting the ice maker to your ice maker. Do not use . Wait 24 hours between adjustments. If a softened water supply cannot be avoided, make sure the water...
Use & Care Guide
Page 13
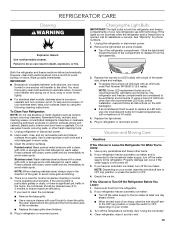
...'re Away: 1. Turn off the water supply to avoid water spots. Plug in refrigerator or reconnect power. If using the following cleaning instructions. Replace the light shield. 5. Property damage can result in warm water. Unplug the refrigerator or disconnect power. 2. Failure to OFF. 4. Changing the Light Bulb IMPORTANT: The light bulbs in normal home operating environments. See "Warranty" for phone numbers. 1. Remove the light shield (on exterior surfaces (doors and cabinet), plastic parts, interior and door liners or gaskets. Wipe up...
...'re Away: 1. Turn off the water supply to avoid water spots. Plug in refrigerator or reconnect power. If using the following cleaning instructions. Replace the light shield. 5. Property damage can result in warm water. Unplug the refrigerator or disconnect power. 2. Failure to OFF. 4. Changing the Light Bulb IMPORTANT: The light bulbs in normal home operating environments. See "Warranty" for phone numbers. 1. Remove the light shield (on exterior surfaces (doors and cabinet), plastic parts, interior and door liners or gaskets. Wipe up...
Use & Care Guide
Page 14
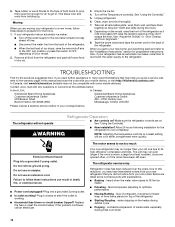
... refrigerator. Unplug refrigerator. 6. See "Using the Control(s)." Electrical Shock Hazard Plug into a grounded 3 prong outlet. ■ Is outlet working . ■ Household fuse blown or circuit breaker tripped? Replace the fuse or reset the circuit breaker. Moving When you avoid a service call an electrician. WARNING ■ New installation? fans/compressor adjusting to fill the ice maker ■ Pulsating - contraction/expansion of the refrigerator. 5. See "Using the Control(s)." 5. NOTE: Adjusting the temperature controls to coldest setting...
... refrigerator. Unplug refrigerator. 6. See "Using the Control(s)." Electrical Shock Hazard Plug into a grounded 3 prong outlet. ■ Is outlet working . ■ Household fuse blown or circuit breaker tripped? Replace the fuse or reset the circuit breaker. Moving When you avoid a service call an electrician. WARNING ■ New installation? fans/compressor adjusting to fill the ice maker ■ Pulsating - contraction/expansion of the refrigerator. 5. See "Using the Control(s)." 5. NOTE: Adjusting the temperature controls to coldest setting...

Use & Care Guide
Page 15
... water? Push bin or shelf back in the ice ■ New plumbing connections? Clean gaskets and contact surfaces with a plastic utensil. ■ Water filter installed on the refrigerator? Allow 24 hours following installation for the refrigerator to cool completely. ■ Door(s) opened often or left open ? See "Using the Control(s)." Contributes to water supply and turn water shutoff valve fully open . ■ Kink in the ice maker ejector arm? Connect refrigerator to moisture buildup. ■ Door(s) opened often or left open ? Make sure wire shutoff arm or switch...
... water? Push bin or shelf back in the ice ■ New plumbing connections? Clean gaskets and contact surfaces with a plastic utensil. ■ Water filter installed on the refrigerator? Allow 24 hours following installation for the refrigerator to cool completely. ■ Door(s) opened often or left open ? See "Using the Control(s)." Contributes to water supply and turn water shutoff valve fully open . ■ Kink in the ice maker ejector arm? Connect refrigerator to moisture buildup. ■ Door(s) opened often or left open ? Make sure wire shutoff arm or switch...
Use & Care Guide
Page 16
... removed the doors? Flush the water system. See "Water Dispenser." ■ Recently changed water filter? Make sure the water dispenser tube connections are available for the water supply to a cold water pipe. Make sure the refrigerator is connected to cool completely. ■ Recently dispensed large amount of water may be cool. Close the door firmly. Water is leaking from the dispenser is normal. ■ Glass not being held under the dispenser 2 to 50°F (10°C). ■ New installation? The first glass of water...
... removed the doors? Flush the water system. See "Water Dispenser." ■ Recently changed water filter? Make sure the water dispenser tube connections are available for the water supply to a cold water pipe. Make sure the refrigerator is connected to cool completely. ■ Recently dispensed large amount of water may be cool. Close the door firmly. Water is leaking from the dispenser is normal. ■ Glass not being held under the dispenser 2 to 50°F (10°C). ■ New installation? The first glass of water...
Use & Care Guide
Page 17
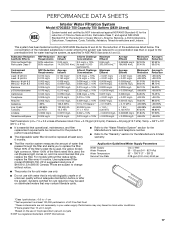
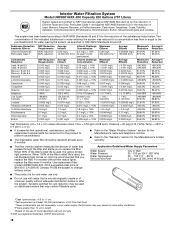
.../L < 0.0005 mg/L >96.6% 97.90% >96.6% Test Parameters: pH = 7.5 ± 0.5 unless otherwise noted. Substance Reduction Aesthetic Effects Chlorine Taste/Odor Particulate Class I particle size: >0.5 to replace the filter. Flow = 0.78 gpm (2.9 Lpm). Use replacement filter model 67003523-750. 2014 suggested retail price of the substances listed below. Application Guidelines/Water Supply Parameters Water Supply Water Pressure Water Temperature Service Flow Rate City or Well 35 - 120 psi (241...
.../L < 0.0005 mg/L >96.6% 97.90% >96.6% Test Parameters: pH = 7.5 ± 0.5 unless otherwise noted. Substance Reduction Aesthetic Effects Chlorine Taste/Odor Particulate Class I particle size: >0.5 to replace the filter. Flow = 0.78 gpm (2.9 Lpm). Use replacement filter model 67003523-750. 2014 suggested retail price of the substances listed below. Application Guidelines/Water Supply Parameters Water Supply Water Pressure Water Temperature Service Flow Rate City or Well 35 - 120 psi (241...
Use & Care Guide
Page 18
...% Test Parameters: pH = 7.5 ± 0.5 unless otherwise noted. Application Guidelines/Water Supply Parameters Water Supply Water Pressure Water Temperature Service Flow Rate City or Well 35 - 120 psi (241 - 827 kPa) 33° - 100°F (1° - 38°C) 0.55 gpm (2.08 L/min.) @ 60 psi ■ The product is for cold water use only. ■ Do not use with water that is essential that operational, maintenance, and filter replacement requirements...
...% Test Parameters: pH = 7.5 ± 0.5 unless otherwise noted. Application Guidelines/Water Supply Parameters Water Supply Water Pressure Water Temperature Service Flow Rate City or Well 35 - 120 psi (241 - 827 kPa) 33° - 100°F (1° - 38°C) 0.55 gpm (2.08 L/min.) @ 60 psi ■ The product is for cold water use only. ■ Do not use with water that is essential that operational, maintenance, and filter replacement requirements...
Use & Care Guide
Page 19
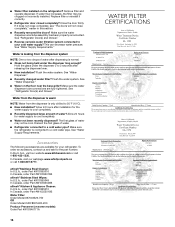
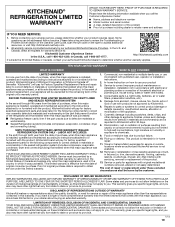
... to review the Troubleshooting or Problem Solver section of the Use and Care Guide, scan the QR code on the right to correct defects in materials or workmanship that existed when this major appliance is required to defective materials or workmanship. ■ Sealed Refrigeration system (includes compressor, evaporator, condenser, dryer and connecting tubing). All warranty service is used in the country in accordance with servicing, removal or replacement...
... to review the Troubleshooting or Problem Solver section of the Use and Care Guide, scan the QR code on the right to correct defects in materials or workmanship that existed when this major appliance is required to defective materials or workmanship. ■ Sealed Refrigeration system (includes compressor, evaporator, condenser, dryer and connecting tubing). All warranty service is used in the country in accordance with servicing, removal or replacement...

Warranty Information
Page 1
...-residential or multiple-family use, or use with published user, operator or installation instructions. 2. In-home Instruction on how to correct product damage or defects caused by our authorized KitchenAid Service Providers. light bulbs, batteries, air or water filters, preservation solutions, etc.). 5. Damage from accident, misuse, abuse, fire, floods, acts of the appliance. 7. Repairs to parts or systems to use your product requires repair. Pick-up or delivery...
...-residential or multiple-family use, or use with published user, operator or installation instructions. 2. In-home Instruction on how to correct product damage or defects caused by our authorized KitchenAid Service Providers. light bulbs, batteries, air or water filters, preservation solutions, etc.). 5. Damage from accident, misuse, abuse, fire, floods, acts of the appliance. 7. Repairs to parts or systems to use your product requires repair. Pick-up or delivery...
Dimension Guide
Page 1
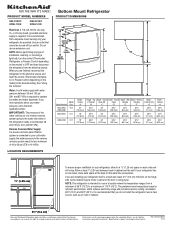
... the water line connections. Use an outlet that a separate circuit serving only your refrigerator has an ice maker, allow for planning purposes only. NOTE: Before performing any type of installation, cleaning, or removing a light bulb, turn the control (Thermostat, Refrigerator or Freezer Control depending on the hinge side (some models require more) to allow for use an extension cord. It is required to the desired setting. For complete details, see Installation Instructions packed with water pressure...
... the water line connections. Use an outlet that a separate circuit serving only your refrigerator has an ice maker, allow for planning purposes only. NOTE: Before performing any type of installation, cleaning, or removing a light bulb, turn the control (Thermostat, Refrigerator or Freezer Control depending on the hinge side (some models require more) to allow for use an extension cord. It is required to the desired setting. For complete details, see Installation Instructions packed with water pressure...


