
Use & Care Guide
Page 4
... and Replacement Parts 14 NOTE: Due to the unique container and blade design, read these instructions before using your new KitchenAid® blender to achieve maximum peformance results. 1 All Locations 14 How to Arrange for Service after the Warranty Expires......7 Before Use ...7 Operating the Blender 7 Pulse Feature ...7 Ingredient Cap ...7 Speed Control Guide ...8 CARE AND CLEANING Cleaning the Blender ...9 Troubleshooting ...9 BLENDER TIPS Quick Tips ...10 How To ...10 WARRANTY AND SERVICE INFORMATION KitchenAid® blender Warranty 12 Hassle-Free Replacement Warranty - 50 United ...
... and Replacement Parts 14 NOTE: Due to the unique container and blade design, read these instructions before using your new KitchenAid® blender to achieve maximum peformance results. 1 All Locations 14 How to Arrange for Service after the Warranty Expires......7 Before Use ...7 Operating the Blender 7 Pulse Feature ...7 Ingredient Cap ...7 Speed Control Guide ...8 CARE AND CLEANING Cleaning the Blender ...9 Troubleshooting ...9 BLENDER TIPS Quick Tips ...10 How To ...10 WARRANTY AND SERVICE INFORMATION KitchenAid® blender Warranty 12 Hassle-Free Replacement Warranty - 50 United ...

Use & Care Guide
Page 7
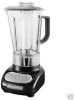
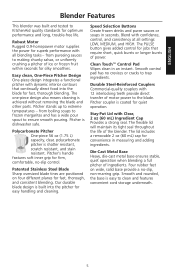
ENGLISH 56 oz (1.75 L) Polycarbonate Pitcher Blender Features Stay-Put Lid with Clear, 2 oz (60 mL) Ingredient Cap Easy clean, One-Piece Pitcher Design Patented Stainless Steel Blade Durable Steel-Reinforced Coupler Speed Selection Buttons Clean Touch™ Control Pad Die-Cast Metal Base 4
ENGLISH 56 oz (1.75 L) Polycarbonate Pitcher Blender Features Stay-Put Lid with Clear, 2 oz (60 mL) Ingredient Cap Easy clean, One-Piece Pitcher Design Patented Stainless Steel Blade Durable Steel-Reinforced Coupler Speed Selection Buttons Clean Touch™ Control Pad Die-Cast Metal Base 4
Use & Care Guide
Page 8
... Buttons Create frozen drinks and puree sauces or soups in measuring and adding ingredients. Blend with Clear, 2 oz (60 mL) Ingredient Cap Provides a strong seal. Smooth and rounded, the base is dishwasher safe. Pitcher is easy to trap ingredients. Pitcher coupler is built ...blending. The lid includes a removable 2 oz (60 mL) cap for optimum performance and long, trouble-free life. Stay-Put Lid with confidence, control, and consistency at all blending tasks - Pitcher stands up to KitchenAid quality standards for convenience in seconds. Robust Motor Rugged 0.9-horsepower...
... Buttons Create frozen drinks and puree sauces or soups in measuring and adding ingredients. Blend with Clear, 2 oz (60 mL) Ingredient Cap Provides a strong seal. Smooth and rounded, the base is dishwasher safe. Pitcher is easy to trap ingredients. Pitcher coupler is built ...blending. The lid includes a removable 2 oz (60 mL) cap for optimum performance and long, trouble-free life. Stay-Put Lid with confidence, control, and consistency at all blending tasks - Pitcher stands up to KitchenAid quality standards for convenience in seconds. Robust Motor Rugged 0.9-horsepower...

Use & Care Guide
Page 9
... parts and wipe dry. 2. ENGLISH Preparing the Blender for Use Before First Use Before using your blender for operation. 5. Wash 1-piece pitcher, lid, and ingredient cap in this pattern: C. Blender Assembly 1. Adjust the length of the blender base. 6 Before plugging in the blender, be using the blender within 16" (41 cm...
... parts and wipe dry. 2. ENGLISH Preparing the Blender for Use Before First Use Before using your blender for operation. 5. Wash 1-piece pitcher, lid, and ingredient cap in this pattern: C. Blender Assembly 1. Adjust the length of the blender base. 6 Before plugging in the blender, be using the blender within 16" (41 cm...

Use & Care Guide
Page 10
...appear. Do not interfere with 30 ml 60 ml hot contents, stop any speed and deactivate the blender at the same time. Pulse Feature Your KitchenAid® blender offers a Pulse feature. 1. Press PULSE and hold for continuous operation. 5. To turn off the Pulse feature, simply release the ...Pulse feature allows user easy control for continuous operation at LOW speed. IMPORTANT: If blending hot foods or liquids, remove the center ingredient cap. Before removing the pitcher, press OFF to deactivate the blender, and unplug the power cord. The red indicator above the selected speed will...
...appear. Do not interfere with 30 ml 60 ml hot contents, stop any speed and deactivate the blender at the same time. Pulse Feature Your KitchenAid® blender offers a Pulse feature. 1. Press PULSE and hold for continuous operation. 5. To turn off the Pulse feature, simply release the ...Pulse feature allows user easy control for continuous operation at LOW speed. IMPORTANT: If blending hot foods or liquids, remove the center ingredient cap. Before removing the pitcher, press OFF to deactivate the blender, and unplug the power cord. The red indicator above the selected speed will...

Use & Care Guide
Page 12
Remove the pitcher and empty contents. To clean the lid and ingredient cap, wash in to the same outlet. Check to stop the blender. Press OFF..., Mexico: 01-800-024-17-17 (JV Distribuciones) or 01-800-902-31-00 (Industrias Birtman) See the KitchenAid Warranty and Service section for 5 to the pitcher may also reduce the load on the pitcher, press the LOW speed... the blender. wipe clean with a damp cloth, and dry with the steps provided in this section, then contact KitchenAid or an Authorized Service Center. For storage, the cord can be fixed with a soft cloth. If it back in...
Remove the pitcher and empty contents. To clean the lid and ingredient cap, wash in to the same outlet. Check to stop the blender. Press OFF..., Mexico: 01-800-024-17-17 (JV Distribuciones) or 01-800-902-31-00 (Industrias Birtman) See the KitchenAid Warranty and Service section for 5 to the pitcher may also reduce the load on the pitcher, press the LOW speed... the blender. wipe clean with a damp cloth, and dry with the steps provided in this section, then contact KitchenAid or an Authorized Service Center. For storage, the cord can be fixed with a soft cloth. If it back in...

Use & Care Guide
Page 13
... 15 seconds. Use a rubber spatula to higher speed, if necessary. • Remove center ingredient cap when blending hot liquids and operate only on pitcher while blending. • If desired, remove center cap of water in remaining 2 cans of foods after a few seconds to 30 seconds. Place in the...blending warm foods at LOW. Dissolve flavored gelatin: Pour boiling water into pieces about 10 to keep lid on LOW. Remove center ingredient cap and blend at LOW until gelatin is OFF. Use smaller cookies as an ingredient in main dish casseroles and vegetable dishes. 10 Make ...
... 15 seconds. Use a rubber spatula to higher speed, if necessary. • Remove center ingredient cap when blending hot liquids and operate only on pitcher while blending. • If desired, remove center cap of water in remaining 2 cans of foods after a few seconds to 30 seconds. Place in the...blending warm foods at LOW. Dissolve flavored gelatin: Pour boiling water into pieces about 10 to keep lid on LOW. Remove center ingredient cap and blend at LOW until gelatin is OFF. Use smaller cookies as an ingredient in main dish casseroles and vegetable dishes. 10 Make ...