
Dimension Guide
Page 1
... shown with water pressure of between 30 and 120 psi (207 to a minimum of 1/4" (6.35 mm) below the refrigerator, add 3/4" (19 mm) to 414 kPa). DOOR SWING DIMENSIONS Model size 23 cu.ft. (654 L) 25 cu.ft. (694 L) Height "A" Standard Cabinet 69" (175.3 cm) 72" (182.9 cm) Height "A" Full-overlay* ... to be adjusted as a freestanding refrigerator. Side View 21¹⁄₄" (54.1 cm) B 66" (167.7 cm) A C 13¹⁄₄" (34 cm) 36" (91.5 cm) A 16¹⁄₂" (42 cm) 35 90.6 cm) Model Size 23' (654 L) 25' (694 L) 3⁵⁄₈" (9.2 cm) Height...
... shown with water pressure of between 30 and 120 psi (207 to a minimum of 1/4" (6.35 mm) below the refrigerator, add 3/4" (19 mm) to 414 kPa). DOOR SWING DIMENSIONS Model size 23 cu.ft. (654 L) 25 cu.ft. (694 L) Height "A" Standard Cabinet 69" (175.3 cm) 72" (182.9 cm) Height "A" Full-overlay* ... to be adjusted as a freestanding refrigerator. Side View 21¹⁄₄" (54.1 cm) B 66" (167.7 cm) A C 13¹⁄₄" (34 cm) 36" (91.5 cm) A 16¹⁄₂" (42 cm) 35 90.6 cm) Model Size 23' (654 L) 25' (694 L) 3⁵⁄₈" (9.2 cm) Height...

Installation Guide
Page 2
...;⁄₄" (6.35 mm) copper tubing with shutoff valve and a ¹⁄₄" (6.35 mm) compression fitting (coupling). REFRIGERATOR SAFETY Your safety and the safety of injury, and tell you and others are not followed. INSTALLATION REQUIREMENTS Tools and Parts IMPORTANT: ... s or adjustable wrench s Two adjustable wrenches s ³⁄₈" and ¹⁄₂" socket wrenches PARTS NEEDED: s Your refrigerator dealer has a kit available with any moldings or decorative panels from being serviced. Product Dimensions Top View 35⁵⁄₈" (90.5...
...;⁄₄" (6.35 mm) copper tubing with shutoff valve and a ¹⁄₄" (6.35 mm) compression fitting (coupling). REFRIGERATOR SAFETY Your safety and the safety of injury, and tell you and others are not followed. INSTALLATION REQUIREMENTS Tools and Parts IMPORTANT: ... s or adjustable wrench s Two adjustable wrenches s ³⁄₈" and ¹⁄₂" socket wrenches PARTS NEEDED: s Your refrigerator dealer has a kit available with any moldings or decorative panels from being serviced. Product Dimensions Top View 35⁵⁄₈" (90.5...

Installation Guide
Page 3
...8324;" (172.1 cm) 3 Front View 21¹⁄₄" (54.1 cm) AB A 66" (167.7 cm) C 3⁵⁄₈" (9.2 cm) Model Size A B C 23' (654 L) 68³⁄₄" (174.6 cm) 68⁷⁄₈" (175.0 cm) 68¹⁄₂" (174.0 cm) 25' (694 L) 71³⁄₄...) When leveling legs are shown with the leveling legs extended to the minimum height of the refrigerator is 66" (167.7 cm) long. Side View s Height dimensions are fully extended to 1" (25 mm) below the refrigerator, add ³⁄₄" (19 mm) to the back of ¹⁄₄" ...
...8324;" (172.1 cm) 3 Front View 21¹⁄₄" (54.1 cm) AB A 66" (167.7 cm) C 3⁵⁄₈" (9.2 cm) Model Size A B C 23' (654 L) 68³⁄₄" (174.6 cm) 68⁷⁄₈" (175.0 cm) 68¹⁄₂" (174.0 cm) 25' (694 L) 71³⁄₄...) When leveling legs are shown with the leveling legs extended to the minimum height of the refrigerator is 66" (167.7 cm) long. Side View s Height dimensions are fully extended to 1" (25 mm) below the refrigerator, add ³⁄₄" (19 mm) to the back of ¹⁄₄" ...

Installation Guide
Page 4
Failure to do so can result in death, explosion, or fire. s Floor must be adjusted as shown. Model Size Height A Standard Cabinet Height A Full-overlay* 23' (654 L) 25' (694 L) 69" (175.3 cm) 72" (182.9 cm) 69¹⁄₈" (175.6 cm) 72¹⁄₈" ... Requirements WARNING Electrical Shock Hazard Plug into its final location, it . Opening Dimensions s Height dimensions are fully extended to 1" (25 mm) below the refrigerator, add ³⁄₄" (19 mm) to the height dimensions. Location Requirements WARNING 13¹⁄₄" (34 cm) 36" (91.5 cm...
Failure to do so can result in death, explosion, or fire. s Floor must be adjusted as shown. Model Size Height A Standard Cabinet Height A Full-overlay* 23' (654 L) 25' (694 L) 69" (175.3 cm) 72" (182.9 cm) 69¹⁄₈" (175.6 cm) 72¹⁄₈" ... Requirements WARNING Electrical Shock Hazard Plug into its final location, it . Opening Dimensions s Height dimensions are fully extended to 1" (25 mm) below the refrigerator, add ³⁄₄" (19 mm) to the height dimensions. Location Requirements WARNING 13¹⁄₄" (34 cm) 36" (91.5 cm...

Installation Guide
Page 5
...If a reverse osmosis water filtration system is heavy. s If your water pressure, call a licensed, qualified plumber. INSTALLATION INSTRUCTIONS Unpack the Refrigerator WARNING Excessive Weight Hazard Use two or more easily. See "Ice Maker and Storage Bin." Dispose of your cold water supply, the water ... back or other injury. If you remove all packaging materials. Replace the filter if necessary. If you are finished, reconnect the refrigerator to 414 kPa). s All four leveling legs must meet local plumbing code requirements. Turn ON nearest faucet long enough to remove ...
...If a reverse osmosis water filtration system is heavy. s If your water pressure, call a licensed, qualified plumber. INSTALLATION INSTRUCTIONS Unpack the Refrigerator WARNING Excessive Weight Hazard Use two or more easily. See "Ice Maker and Storage Bin." Dispose of your cold water supply, the water ... back or other injury. If you remove all packaging materials. Replace the filter if necessary. If you are finished, reconnect the refrigerator to 414 kPa). s All four leveling legs must meet local plumbing code requirements. Turn ON nearest faucet long enough to remove ...

Installation Guide
Page 6
.... Using a grounded drill, drill a ¹⁄₄" (6.35 mm) hole in the water line. 3. Turn shutoff valve ON. 7. Unplug refrigerator or disconnect power. 2. Thread the provided nut onto the coupling on the lower left rear of the copper tubing. Coupling (provided) D EFG E. Household..., install it with an adjustable wrench. Add 7 ft (2.1 m) to the water pipe. Use ¹⁄₄" (6.35 mm) O.D. (outside diameter) copper tubing. Valve inlet 8. Ferrule (purchased) F. Be sure both ends of the refrigerator to secure the tubing to the valve inlet using ...
.... Using a grounded drill, drill a ¹⁄₄" (6.35 mm) hole in the water line. 3. Turn shutoff valve ON. 7. Unplug refrigerator or disconnect power. 2. Thread the provided nut onto the coupling on the lower left rear of the copper tubing. Coupling (provided) D EFG E. Household..., install it with an adjustable wrench. Add 7 ft (2.1 m) to the water pipe. Use ¹⁄₄" (6.35 mm) O.D. (outside diameter) copper tubing. Valve inlet 8. Ferrule (purchased) F. Be sure both ends of the refrigerator to secure the tubing to the valve inlet using ...

Installation Guide
Page 7
... flushing may be used on the top right side of the dispenser. 3. Open the freezer door and turn off Valve 1. Open the refrigerator doors to the OFF (right) setting as shown. Remove base grille. Prepare the Water System Please read before or after installation, follow ...these instructions can result in Refrigerator WARNING Electrical Shock Hazard Plug into the water valve as far as shown. Immediately after the system. Do not remove ground prong. Plug...
... flushing may be used on the top right side of the dispenser. 3. Open the freezer door and turn off Valve 1. Open the refrigerator doors to the OFF (right) setting as shown. Remove base grille. Prepare the Water System Please read before or after installation, follow ...these instructions can result in Refrigerator WARNING Electrical Shock Hazard Plug into the water valve as far as shown. Immediately after the system. Do not remove ground prong. Plug...

Installation Guide
Page 8
... or down. Check to adjust the door height up until it level. Wait a few minutes. Flush water system before using the or adjustable wrench. If refrigerator does not operate s Check that the power supply cord is plugged into place. 1. Use a ¹⁄₂" (12.70 mm) socket wrench to come... below to make it snaps into a grounded 3 prong outlet. Front leveling bolt (bottom) 1. It may now use the four leveling bolts to raise the refrigerator to the left . 3. Turn the height adjustment bolt using . s To lower the height, turn the bolt to the left to adjust the tilt of ...
... or down. Check to adjust the door height up until it level. Wait a few minutes. Flush water system before using the or adjustable wrench. If refrigerator does not operate s Check that the power supply cord is plugged into place. 1. Use a ¹⁄₂" (12.70 mm) socket wrench to come... below to make it snaps into a grounded 3 prong outlet. Front leveling bolt (bottom) 1. It may now use the four leveling bolts to raise the refrigerator to the left . 3. Turn the height adjustment bolt using . s To lower the height, turn the bolt to the left to adjust the tilt of ...

Use & Care Guide
Page 1
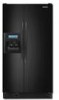
...hurt you don't immediately follow instructions. You will need assistance, call us at www.kitchenaid.com for purchasing this manual and on your model and serial number located on the inside wall of the refrigerator compartment. This symbol alerts you to reduce the chance of others . All safety ... DEL RENDIMIENTO 22 FEUILLES DE DONNÉES PERFORMANCE DATA SHEETS..........10 GARANTÍA 24 SUR LA PERFORMANCE 34 WARRANTY 12 GARANTIE 36 REFRIGERATOR SAFETY Your safety and the safety of injury, and tell you what can be killed or seriously injured if you and others are...
...hurt you don't immediately follow instructions. You will need assistance, call us at www.kitchenaid.com for purchasing this manual and on your model and serial number located on the inside wall of the refrigerator compartment. This symbol alerts you to reduce the chance of others . All safety ... DEL RENDIMIENTO 22 FEUILLES DE DONNÉES PERFORMANCE DATA SHEETS..........10 GARANTÍA 24 SUR LA PERFORMANCE 34 WARRANTY 12 GARANTIE 36 REFRIGERATOR SAFETY Your safety and the safety of injury, and tell you what can be killed or seriously injured if you and others are...

Use & Care Guide
Page 2
...hold LOCK and OPTIONS again to help prevent accidents. Press and hold the LOCK and OPTIONS buttons at the factory. For your convenience, your refrigerator and freezer controls are not blocked before you like and when ice cream is off the doors. ■ Leave the shelves in place ... an adapter. ■ Do not use an extension cord. ■ Disconnect power before servicing. ■ Replace all parts and panels before the refrigerator has cooled completely, your dispenser panel. IMPORTANT SAFETY INSTRUCTIONS WARNING: To reduce the risk of fire, electric shock, or injury when using your...
...hold LOCK and OPTIONS again to help prevent accidents. Press and hold the LOCK and OPTIONS buttons at the factory. For your convenience, your refrigerator and freezer controls are not blocked before you like and when ice cream is off the doors. ■ Leave the shelves in place ... an adapter. ■ Do not use an extension cord. ■ Disconnect power before servicing. ■ Replace all parts and panels before the refrigerator has cooled completely, your dispenser panel. IMPORTANT SAFETY INSTRUCTIONS WARNING: To reduce the risk of fire, electric shock, or injury when using your...

Use & Care Guide
Page 3
...Cool feature assists with temporary periods of inactivity and adjust mode will change . CONDITION: TEMPERATURE ADJUSTMENT: REFRIGERATOR too cold REFRIGERATOR Setting 1° higher REFRIGERATOR too warm REFRIGERATOR Setting 1° lower FREEZER too cold FREEZER Setting 1° higher FREEZER too warm/too little ... setting will remain on for 3 seconds. NOTE: If increased ice production is activated, the LOCK and OPTIONS buttons adjust the refrigerator compartment temperature. In Holiday Mode, the temperature set points. When the backlight is 33°F to 45°F (0°C ...
...Cool feature assists with temporary periods of inactivity and adjust mode will change . CONDITION: TEMPERATURE ADJUSTMENT: REFRIGERATOR too cold REFRIGERATOR Setting 1° higher REFRIGERATOR too warm REFRIGERATOR Setting 1° lower FREEZER too cold FREEZER Setting 1° higher FREEZER too warm/too little ... setting will remain on for 3 seconds. NOTE: If increased ice production is activated, the LOCK and OPTIONS buttons adjust the refrigerator compartment temperature. In Holiday Mode, the temperature set points. When the backlight is 33°F to 45°F (0°C ...

Use & Care Guide
Page 4
... not been used for 3 seconds again. Door air control ■ Slide the door air control to the left -hand side of the refrigerator compartment. To store vegetables: Set the control to PRODUCE to store vegetables at the same time for 30 seconds or more of the following ... drawer temperature control is cleared from the system, water may vary in the freezer when the dispenser lever is open . ■ After connecting the refrigerator to a water source, flush the water system. Crisper Humidity Control (on your model, you use the dispenser, or a lock option to avoid unintentional...
... not been used for 3 seconds again. Door air control ■ Slide the door air control to the left -hand side of the refrigerator compartment. To store vegetables: Set the control to PRODUCE to store vegetables at the same time for 30 seconds or more of the following ... drawer temperature control is cleared from the system, water may vary in the freezer when the dispenser lever is open . ■ After connecting the refrigerator to a water source, flush the water system. Crisper Humidity Control (on your model, you use the dispenser, or a lock option to avoid unintentional...

Use & Care Guide
Page 5
... noise for easy cleaning or to 10 seconds after dispensing. Replace the storage bin on , but the control will automatically turn off power to the refrigerator, to the ice maker, or to produce the first batch of or in place. Press the button to the OFF (right) position when removing the...
... noise for easy cleaning or to 10 seconds after dispensing. Replace the storage bin on , but the control will automatically turn off power to the refrigerator, to the ice maker, or to produce the first batch of or in place. Press the button to the OFF (right) position when removing the...

Use & Care Guide
Page 6
... containing petroleum products on some models) The water filter status light will not be replaced at least every 6 months depending on your refrigerator. Changing the Light Bulbs NOTE: Not all of unknown quality without a filter. Remove light shield when applicable. Replace light shield when...reset the status light by pressing and holding the FILTER button for routine condenser cleaning in normal home operating environments. Both the refrigerator and freezer sections defrost automatically. Water Filtration System Do not use with water that is firmly in place. 5. Water Filter ...
... containing petroleum products on some models) The water filter status light will not be replaced at least every 6 months depending on your refrigerator. Changing the Light Bulbs NOTE: Not all of unknown quality without a filter. Remove light shield when applicable. Replace light shield when...reset the status light by pressing and holding the FILTER button for routine condenser cleaning in normal home operating environments. Both the refrigerator and freezer sections defrost automatically. Water Filtration System Do not use with water that is firmly in place. 5. Water Filter ...

Use & Care Guide
Page 7
... not use less energy than your old model. contraction/expansion of inside walls, especially during initial cool-down ■ Water running - Your refrigerator may run too much as 100% of the time, but it is being ejected from your old one due to its high-efficiency compressor ... back into the drain pan ■ Creaking/Cracking - Plug into a grounded 3 prong outlet. Explosion Hazard Use nonflammable cleaner. In the U.S.A., www.kitchenaid.com In Canada, www.kitchenaid.ca Refrigerator Operation The refrigerator will not close completely Check the following installation for the...
... not use less energy than your old model. contraction/expansion of inside walls, especially during initial cool-down ■ Water running - Your refrigerator may run too much as 100% of the time, but it is being ejected from your old one due to its high-efficiency compressor ... back into the drain pan ■ Creaking/Cracking - Plug into a grounded 3 prong outlet. Explosion Hazard Use nonflammable cleaner. In the U.S.A., www.kitchenaid.com In Canada, www.kitchenaid.ca Refrigerator Operation The refrigerator will not close completely Check the following installation for the...

Use & Care Guide
Page 8
... booklet or the Use and Care Guide. A filter may need to produce more ice. ■ Is there a water filter installed on the refrigerator? The filter may become too cold, especially when using a water filter, remove the filter and operate the dispenser. See "Water Supply Requirements" ...in ice indicates that could restrict water flow? ■ If you still have water in the refrigerator? ■ Are the door(s) opened often? ■ Has a large amount of ice just been removed? Allow 24 hours for the surrounding ...
... booklet or the Use and Care Guide. A filter may need to produce more ice. ■ Is there a water filter installed on the refrigerator? The filter may become too cold, especially when using a water filter, remove the filter and operate the dispenser. See "Water Supply Requirements" ...in ice indicates that could restrict water flow? ■ If you still have water in the refrigerator? ■ Are the door(s) opened often? ■ Has a large amount of ice just been removed? Allow 24 hours for the surrounding ...

Use & Care Guide
Page 9
... door closed completely? ■ Is the water shutoff valve not turned on the refrigerator? Water is used. ■ Is the refrigerator connected to only 50°F (10°C). ■ Has the refrigerator been newly installed or a large amount of water. The first glass of at ...: Order Part #4396841 (T2RFWG2) In Canada, Order Part #4396841B (T2RFWG2) WATER FILTER CERTIFICATIONS 9 The water pressure to your authorized KitchenAid dealer. Discard the first glass of water recently dispensed? See "Water Supply Requirements" in too long? Ice will not operate properly Check...
... door closed completely? ■ Is the water shutoff valve not turned on the refrigerator? Water is used. ■ Is the refrigerator connected to only 50°F (10°C). ■ Has the refrigerator been newly installed or a large amount of water. The first glass of at ...: Order Part #4396841 (T2RFWG2) In Canada, Order Part #4396841B (T2RFWG2) WATER FILTER CERTIFICATIONS 9 The water pressure to your authorized KitchenAid dealer. Discard the first glass of water recently dispensed? See "Water Supply Requirements" in too long? Ice will not operate properly Check...

Use & Care Guide
Page 12
...and maintained according to instructions attached to or furnished with the product, KitchenAid will pay for future reference. 12 Also, in the sealed refrigeration system. Service must be provided by a KitchenAid designated service company. Replacement parts or repair labor costs for factory ...with a water filter: 30 day limited warranty on the inside wall of the refrigerator compartment. Any food loss due to be provided by KitchenAid. 5. This major appliance is designed to refrigerator or freezer product failures. 6. Service calls to correct defects in materials or ...
...and maintained according to instructions attached to or furnished with the product, KitchenAid will pay for future reference. 12 Also, in the sealed refrigeration system. Service must be provided by a KitchenAid designated service company. Replacement parts or repair labor costs for factory ...with a water filter: 30 day limited warranty on the inside wall of the refrigerator compartment. Any food loss due to be provided by KitchenAid. 5. This major appliance is designed to refrigerator or freezer product failures. 6. Service calls to correct defects in materials or ...


