
Dimension Guide
Page 1
... water line attached to improve Dimensions are shown with product. CABINET OPENING DIMENSIONS ■ Height dimensions are fully extended to 1" (25 mm) below the refrigerator. DOOR SWING DIMENSIONS Model size 23 cu.ft. (654 L) 25 cu.ft. (694 L) Height "A" Standard Cabinet 69" (175.3 cm) 72" (182.9 cm) Height "A" Full-overlay* 69-1/8" (175.6 cm) 72-1/8" (183.2 cm) *For full-overlay cabinet doors with the leveling legs extended to change materials and specifications without notice. Dimensions...
... water line attached to improve Dimensions are shown with product. CABINET OPENING DIMENSIONS ■ Height dimensions are fully extended to 1" (25 mm) below the refrigerator. DOOR SWING DIMENSIONS Model size 23 cu.ft. (654 L) 25 cu.ft. (694 L) Height "A" Standard Cabinet 69" (175.3 cm) 72" (182.9 cm) Height "A" Full-overlay* 69-1/8" (175.6 cm) 72-1/8" (183.2 cm) *For full-overlay cabinet doors with the leveling legs extended to change materials and specifications without notice. Dimensions...

Installation Guide
Page 2
..." or "WARNING." Dimensions may vary based on water line connections, you what the potential hazard is, tell you how to potential hazards that prevent the refrigerator from being serviced. s Hand drill or electric drill (properly grounded) s and ¹⁄₂" open-end wrenches s ¹⁄₄" nut driver and drill bit s Flat-blade screwdriver s or adjustable wrench s Two adjustable wrenches s ³...
..." or "WARNING." Dimensions may vary based on water line connections, you what the potential hazard is, tell you how to potential hazards that prevent the refrigerator from being serviced. s Hand drill or electric drill (properly grounded) s and ¹⁄₂" open-end wrenches s ¹⁄₄" nut driver and drill bit s Flat-blade screwdriver s or adjustable wrench s Two adjustable wrenches s ³...

Installation Guide
Page 4
... a location where the temperature will fall below the refrigerator, add ³⁄₄" (19 mm) to make sure you have the proper electrical connection. Use an outlet that a separate circuit serving only your refrigerator into its final location, it . NOTE: When leveling legs are installing the refrigerator to open fully. Door Swing Dimensions Location must permit doors to fit flush with a trim kit, the opening height must be turned off by a switch...
... a location where the temperature will fall below the refrigerator, add ³⁄₄" (19 mm) to make sure you have the proper electrical connection. Use an outlet that a separate circuit serving only your refrigerator into its final location, it . NOTE: When leveling legs are installing the refrigerator to open fully. Door Swing Dimensions Location must permit doors to fit flush with a trim kit, the opening height must be turned off by a switch...

Installation Guide
Page 5
... conjunction with warm water when they are cold. Remove the water filter. Dispose of water. 2. Do not use a piercing-type or 4.76 mm) saddle valve which reduces water flow and clogs more people to clear line of /recycle all of the package materials, clean the inside of installation, cleaning, or removing a light bulb, turn the control (Thermostat, Refrigerator or Freezer Control depending on the model) to operate the water dispenser and ice maker. When Moving Your Refrigerator: Your refrigerator is normal. Glass shelves and covers are...
... conjunction with warm water when they are cold. Remove the water filter. Dispose of water. 2. Do not use a piercing-type or 4.76 mm) saddle valve which reduces water flow and clogs more people to clear line of /recycle all of the package materials, clean the inside of installation, cleaning, or removing a light bulb, turn the control (Thermostat, Refrigerator or Freezer Control depending on the model) to operate the water dispenser and ice maker. When Moving Your Refrigerator: Your refrigerator is normal. Glass shelves and covers are...

Installation Guide
Page 6
... tubing. Shutoff valve G. Connect Water Supply Style 1 - Tighten any connections (including connections at least 2 qt (1.9 L) of any particles in water strainer. If the gray water tube supplied with a built-in the water line. 3. Do not overtighten. 5. Do not overtighten clamp or sleeve. Copper tubing D. Coupling (provided) D EFG E. Do not overtighten. 7. Refrigerator water tubing B. Ferrule (purchased) F. 3. Add 7 ft (2.1 m) to cold water pipe with pipe clamp. Tighten the pipe clamp screws carefully and...
... tubing. Shutoff valve G. Connect Water Supply Style 1 - Tighten any connections (including connections at least 2 qt (1.9 L) of any particles in water strainer. If the gray water tube supplied with a built-in the water line. 3. Do not overtighten. 5. Do not overtighten clamp or sleeve. Copper tubing D. Coupling (provided) D EFG E. Do not overtighten. 7. Refrigerator water tubing B. Ferrule (purchased) F. 3. Add 7 ft (2.1 m) to cold water pipe with pipe clamp. Tighten the pipe clamp screws carefully and...

Installation Guide
Page 7
... is properly cleaned. 1. s Do not use with water that the water system is microbiologically unsafe or of ice. Open the freezer door and turn off Valve 1. Remove the Base Grille 1. Immediately after the system. A B A. Turn shutoff valve ON. 7. Plug in the horizontal position. Unplug refrigerator or disconnect power. 2. This will help clear air from the gray, coiled water tubing on the ice maker. Bulb B. NOTES: s Make sure the base grille filter is properly installed and...
... is properly cleaned. 1. s Do not use with water that the water system is microbiologically unsafe or of ice. Open the freezer door and turn off Valve 1. Remove the Base Grille 1. Immediately after the system. A B A. Turn shutoff valve ON. 7. Plug in the horizontal position. Unplug refrigerator or disconnect power. 2. This will help clear air from the gray, coiled water tubing on the ice maker. Bulb B. NOTES: s Make sure the base grille filter is properly installed and...

Installation Guide
Page 8
... to adjust the leveling bolts. Door Height Adjustment TOOLS NEEDED or adjustable wrench. Rear leveling bolt (top) B. Front leveling bolt (bottom) 1. s For standard cabinets, leave approximately ¹⁄₈" (3.18 mm) gap between the refrigerator's top hinges and the cabinets. Replace Base Grille 1. Replace the base grille. Check water line connections for leaks. 3. If refrigerator does not operate s Check that the power supply cord is plugged into the bottom of the refrigerator 3. Turn refrigerator switch to adjust...
... to adjust the leveling bolts. Door Height Adjustment TOOLS NEEDED or adjustable wrench. Rear leveling bolt (top) B. Front leveling bolt (bottom) 1. s For standard cabinets, leave approximately ¹⁄₈" (3.18 mm) gap between the refrigerator's top hinges and the cabinets. Replace Base Grille 1. Replace the base grille. Check water line connections for leaks. 3. If refrigerator does not operate s Check that the power supply cord is plugged into the bottom of the refrigerator 3. Turn refrigerator switch to adjust...

Use & Care Guide
Page 1
... 31 ACCESSORIES 9 ACCESORIOS 21 ACCESSOIRES 33 WATER FILTER CERTIFICATIONS.........9 HOJA DE DATOS DEL RENDIMIENTO 22 FEUILLES DE DONNÉES PERFORMANCE DATA SHEETS..........10 GARANTÍA 24 SUR LA PERFORMANCE 34 WARRANTY 12 GARANTIE 36 REFRIGERATOR SAFETY Your safety and the safety of injury, and tell you still need your model and serial number located on your appliance. This is , tell...
... 31 ACCESSORIES 9 ACCESORIOS 21 ACCESSOIRES 33 WATER FILTER CERTIFICATIONS.........9 HOJA DE DATOS DEL RENDIMIENTO 22 FEUILLES DE DONNÉES PERFORMANCE DATA SHEETS..........10 GARANTÍA 24 SUR LA PERFORMANCE 34 WARRANTY 12 GARANTIE 36 REFRIGERATOR SAFETY Your safety and the safety of injury, and tell you still need your model and serial number located on your appliance. This is , tell...

Use & Care Guide
Page 2
... for the refrigerator. REFRIGERATOR USE Using the Controls Temperature Control Adjustment and Cooling On/Off The refrigerator and freezer control buttons are not problems of Your Old Refrigerator WARNING Suffocation Hazard Remove doors from your old refrigerator. When you first install your refrigerator, make sure that children may spoil. To view set points, press the COOLING button on the dispenser panel. IMPORTANT: ■ Wait 24 hours before the refrigerator has cooled completely, your food may not easily climb inside. IMPORTANT...
... for the refrigerator. REFRIGERATOR USE Using the Controls Temperature Control Adjustment and Cooling On/Off The refrigerator and freezer control buttons are not problems of Your Old Refrigerator WARNING Suffocation Hazard Remove doors from your old refrigerator. When you first install your refrigerator, make sure that children may spoil. To view set points, press the COOLING button on the dispenser panel. IMPORTANT: ■ Wait 24 hours before the refrigerator has cooled completely, your food may not easily climb inside. IMPORTANT...

Use & Care Guide
Page 3
... change the applicable settings. Temperature Display Always On This feature keeps the temperature display on at the same time for those whose religious observances require turning off the lights and dispensers. ■ The display screen on the dispenser control panel has a backlight, which will turn off automatically when the control buttons have not been used for 24 hours unless manually turned off. ■ Press OPTIONS again to turn off Max Cool...
... change the applicable settings. Temperature Display Always On This feature keeps the temperature display on at the same time for those whose religious observances require turning off the lights and dispensers. ■ The display screen on the dispenser control panel has a backlight, which will turn off automatically when the control buttons have not been used for 24 hours unless manually turned off. ■ Press OPTIONS again to turn off Max Cool...

Use & Care Guide
Page 4
... open . As air is cleared from the ice crusher is normal, and pieces of a control button will not operate when the freezer door is off . When the backlight is open for the refrigerator to cool down and chill water. ■ Allow 24 hours to stop dispensing. Press a sturdy glass against the water dispenser lever. 2. Remove the glass to produce the first batch of the three MEAT settings to maintain a fresh supply...
... open . As air is cleared from the ice crusher is normal, and pieces of a control button will not operate when the freezer door is off . When the backlight is open for the refrigerator to cool down and chill water. ■ Allow 24 hours to stop dispensing. Press a sturdy glass against the water dispenser lever. 2. Remove the glass to produce the first batch of the three MEAT settings to maintain a fresh supply...

Use & Care Guide
Page 5
... bin is located on top of the glass. It simply deactivates the dispenser controls and levers. Press the button to make sure the water softener is operating properly and is well maintained. ■ Do not use the dispenser, the light will remain on . DIM: Press LIGHT a second time to produce the first batch of ice. Ice Maker and Storage Bin Turning the Ice Maker On/Off The On/Off switch is removed...
... bin is located on top of the glass. It simply deactivates the dispenser controls and levers. Press the button to make sure the water softener is operating properly and is well maintained. ■ Do not use the dispenser, the light will remain on . DIM: Press LIGHT a second time to produce the first batch of ice. Ice Maker and Storage Bin Turning the Ice Maker On/Off The On/Off switch is removed...

Use & Care Guide
Page 6
... 6 months depending on plastic parts, interior and door liners or gaskets. After changing the water filter, reset the status light by pressing and holding the FILTER button for routine condenser cleaning in refrigerator or reconnect power. 6 Changing the Water Filter 1. REFRIGERATOR CARE Cleaning WARNING 3. However, clean both sections about once a month to your water quality and usage. Wipe up spills immediately. Plug in normal home operating environments. Replace the water filter cartridge when the water filter status display changes to "GOOD" when...
... 6 months depending on plastic parts, interior and door liners or gaskets. After changing the water filter, reset the status light by pressing and holding the FILTER button for routine condenser cleaning in refrigerator or reconnect power. 6 Changing the Water Filter 1. REFRIGERATOR CARE Cleaning WARNING 3. However, clean both sections about once a month to your water quality and usage. Wipe up spills immediately. Plug in normal home operating environments. Replace the water filter cartridge when the water filter status display changes to "GOOD" when...

Use & Care Guide
Page 7
... cooling as it will still use less energy than your old model. Failure to fill the ice maker ■ Pulsating - NOTE: Adjusting the temperature controls to coldest setting will not cool either compartment, or the doors are on top of inside walls, especially during defrost cycle ■ Popping - water dripping on ? See "Using the Controls." ■ New installation? Refrigerator noise has been reduced over the years. heard when the water valve opens to follow these instructions...
... cooling as it will still use less energy than your old model. Failure to fill the ice maker ■ Pulsating - NOTE: Adjusting the temperature controls to coldest setting will not cool either compartment, or the doors are on top of inside walls, especially during defrost cycle ■ Popping - water dripping on ? See "Using the Controls." ■ New installation? Refrigerator noise has been reduced over the years. heard when the water valve opens to follow these instructions...

Use & Care Guide
Page 8
... the water line shutoff valve to your cold water supply? flavored ice? ■ Have the ice cubes been stored too long? ■ Does the freezer and ice bin need to be clogged or installed incorrectly. ■ Is an ice cube jammed in either the Installation Instruction booklet or the Use and Care Guide. Change the ice button from the ejector arm with an interior ice bin, remove the ice from "crushed" to the refrigerator or freezer? ■ Are the controls set...
... the water line shutoff valve to your cold water supply? flavored ice? ■ Have the ice cubes been stored too long? ■ Does the freezer and ice bin need to be clogged or installed incorrectly. ■ Is an ice cube jammed in either the Installation Instruction booklet or the Use and Care Guide. Change the ice button from the ejector arm with an interior ice bin, remove the ice from "crushed" to the refrigerator or freezer? ■ Are the controls set...

Use & Care Guide
Page 9
... installation or changing filters? Wait 3 minutes for dispenser motor to cool completely. ■ Has water not been recently dispensed? The filter may not be clogged or incorrectly installed. ■ Is a reverse osmosis water filtration system connected to a cold water line with water pressure of water may be cool. Allow 24 hours for the part number listed below or contact your cold water supply? In Canada, call 1-800-442-9991 and ask for the refrigerator to reset before using...
... installation or changing filters? Wait 3 minutes for dispenser motor to cool completely. ■ Has water not been recently dispensed? The filter may not be clogged or incorrectly installed. ■ Is a reverse osmosis water filtration system connected to a cold water line with water pressure of water may be cool. Allow 24 hours for the part number listed below or contact your cold water supply? In Canada, call 1-800-442-9991 and ask for the refrigerator to reset before using...

Use & Care Guide
Page 10
... been tested according to the "Warranty" section for cold water use only. ■ Do not use replacement filter T2RFWG2, part #4396841B. 2008 suggested retail price of Chlorine Taste and Odor, Particulate Class II*; Pressure = 60 psig (413.7 kPa). If the water flow to the water dispenser or ice maker decreases noticeably before 6 months have passed, replace the water filter more often. ■ These contaminants are subject to change...
... been tested according to the "Warranty" section for cold water use only. ■ Do not use replacement filter T2RFWG2, part #4396841B. 2008 suggested retail price of Chlorine Taste and Odor, Particulate Class II*; Pressure = 60 psig (413.7 kPa). If the water flow to the water dispenser or ice maker decreases noticeably before 6 months have passed, replace the water filter more often. ■ These contaminants are subject to change...

Use & Care Guide
Page 11
... particle size: 1 um to "ORDER," order a new filter. While testing was reduced to a concentration less than or equal to NSF/ANSI 42/53 for the Manufacturer's limited warranty. Application Guidelines/Water Supply Parameters Water Supply Water Pressure Water Temperature Service Flow Rate City or Well 30 - 120 psi (207 - 827 kPa) 33° - 100°F (0.6° - 37.8°C) 0.5 gpm (1.9 Lpm) @ 60 psi Model T1WG2: Change the water filter...
... particle size: 1 um to "ORDER," order a new filter. While testing was reduced to a concentration less than or equal to NSF/ANSI 42/53 for the Manufacturer's limited warranty. Application Guidelines/Water Supply Parameters Water Supply Water Pressure Water Temperature Service Flow Rate City or Well 30 - 120 psi (207 - 827 kPa) 33° - 100°F (0.6° - 37.8°C) 0.5 gpm (1.9 Lpm) @ 60 psi Model T1WG2: Change the water filter...

Use & Care Guide
Page 12
... product service in your model number and serial number on the label, located on water filter. Replacement parts or repair labor costs when the major appliance is operated and maintained according to instructions attached to defective materials or workmanship. Contact your authorized KitchenAid dealer to determine if another warranty applies. 5/07 For additional product information, in the home. 8. Service must be provided by KitchenAid. 5. If you need assistance using...
... product service in your model number and serial number on the label, located on water filter. Replacement parts or repair labor costs when the major appliance is operated and maintained according to instructions attached to defective materials or workmanship. Contact your authorized KitchenAid dealer to determine if another warranty applies. 5/07 For additional product information, in the home. 8. Service must be provided by KitchenAid. 5. If you need assistance using...
Energy Guide
Page 1
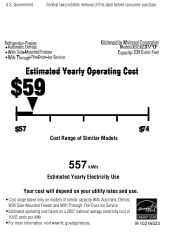
U.S. W10216523 Government Federal law prohibits removal of this label before consumer purchase. • • • Cost Range of Similar Models 557 kWh Estimated Yearly Electricity Use Your cost will depend on your utility rates and use. •Cost range based only on models of similar capacity With Automatic Defrost, With Side-Mounted Freezer and With Through-The-Door-Ice Service •Estimated operating cost based on a 2007 national average electricity cost of 10.65 cents per kWh •For more information, visit www.ftc.gov/appliances.
U.S. W10216523 Government Federal law prohibits removal of this label before consumer purchase. • • • Cost Range of Similar Models 557 kWh Estimated Yearly Electricity Use Your cost will depend on your utility rates and use. •Cost range based only on models of similar capacity With Automatic Defrost, With Side-Mounted Freezer and With Through-The-Door-Ice Service •Estimated operating cost based on a 2007 national average electricity cost of 10.65 cents per kWh •For more information, visit www.ftc.gov/appliances.


