Installation Guide
Page 2
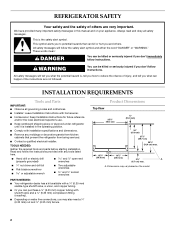
... electrical inspector's use. s Comply with shutoff valve and a ¹⁄₄" (6.35 mm) compression fitting (coupling). s Or you can purchase a ¹⁄₄" (6.35 mm) copper tubing with installation specifications and dimensions. A. All safety messages will follow instructions. s Remove any tools listed here. This symbol alerts you to reduce the chance of others . s Depending on the model 2 Dimensions may vary based on water line connections...
... electrical inspector's use. s Comply with shutoff valve and a ¹⁄₄" (6.35 mm) compression fitting (coupling). s Or you can purchase a ¹⁄₄" (6.35 mm) copper tubing with installation specifications and dimensions. A. All safety messages will follow instructions. s Remove any tools listed here. This symbol alerts you to reduce the chance of others . s Depending on the model 2 Dimensions may vary based on water line connections...
Installation Guide
Page 3
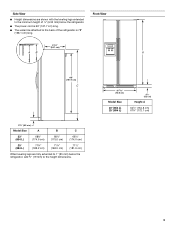
... power cord is 78" (198.1 cm) long. s The water line attached to the back of ¹⁄₄" (6.35 mm) below the refrigerator, add ³⁄₄" (19 mm) to the height dimensions. 35 90.6 cm) Model Size 23' (654 L) 25' (694 L) 3⁵⁄₈" (9.2 cm) Height A 64⁷⁄₈" (164.8 cm) 67³⁄₄" (172.1 cm) 3 Front View...
... power cord is 78" (198.1 cm) long. s The water line attached to the back of ¹⁄₄" (6.35 mm) below the refrigerator, add ³⁄₄" (19 mm) to the height dimensions. 35 90.6 cm) Model Size 23' (654 L) 25' (694 L) 3⁵⁄₈" (9.2 cm) Height A 64⁷⁄₈" (164.8 cm) 67³⁄₄" (172.1 cm) 3 Front View...

Installation Guide
Page 4
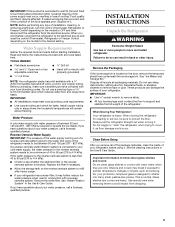
...-amp fused, grounded electrical supply is recommended that cannot be removed from the refrigerator door. See the "Door Swing Dimensions" section. Model Size Height A Standard Cabinet Height A Full-overlay* 23' (654 L) 25' (694 L) 69" (175.3 cm) 72" (182.9 cm) 69¹⁄₈" (175.6 cm) 72¹⁄₈" (183.2 cm) *For full-overlay cabinet doors with a trim kit, the opening must be provided. Do not use...
...-amp fused, grounded electrical supply is recommended that cannot be removed from the refrigerator door. See the "Door Swing Dimensions" section. Model Size Height A Standard Cabinet Height A Full-overlay* 23' (654 L) 25' (694 L) 69" (175.3 cm) 72" (182.9 cm) 69¹⁄₈" (175.6 cm) 72¹⁄₈" (183.2 cm) *For full-overlay cabinet doors with a trim kit, the opening must be provided. Do not use...
Installation Guide
Page 5
... control (Thermostat, Refrigerator or Freezer Control depending on the model) to OFF and then disconnect the refrigerator from underneath the ice storage bin. s Use copper tubing and check for cleaning or service, be affected. If you remove all packaging materials. Dispose of/recycle all of the package materials, clean the inside of the refrigerator needs to move and install refrigerator. Water Pressure A cold water supply with your refrigerator. IMPORTANT: s All installations must contact the floor to support...
... control (Thermostat, Refrigerator or Freezer Control depending on the model) to OFF and then disconnect the refrigerator from underneath the ice storage bin. s Use copper tubing and check for cleaning or service, be affected. If you remove all packaging materials. Dispose of/recycle all of the package materials, clean the inside of the refrigerator needs to move and install refrigerator. Water Pressure A cold water supply with your refrigerator. IMPORTANT: s All installations must contact the floor to support...
Installation Guide
Page 6
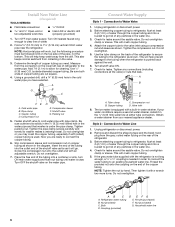
...;" (3.18 cm) vertical COLD water pipe near the refrigerator. Tube clamp B. The ice maker is used. Do not overtighten clamp or sleeve. Then tighten it with pipe clamp. Install New Water Line (if required) TOOLS NEEDED: s Flat-blade screwdriver s ¹⁄₄" Drill bit s and ¹⁄₂" Open-end or two adjustable wrenches s Hand drill or electric drill (properly grounded) 1. Turn ON nearest faucet long...
...;" (3.18 cm) vertical COLD water pipe near the refrigerator. Tube clamp B. The ice maker is used. Do not overtighten clamp or sleeve. Then tighten it with pipe clamp. Install New Water Line (if required) TOOLS NEEDED: s Flat-blade screwdriver s ¹⁄₄" Drill bit s and ¹⁄₂" Open-end or two adjustable wrenches s Hand drill or electric drill (properly grounded) 1. Turn ON nearest faucet long...

Installation Guide
Page 7
... maximum ice feature to the ON (left) position. NOTE: Do not remove the Tech Sheets fastened behind the grille. Style 3 - Bulb B. Plug in the water line. 4. The On/Off switch is microbiologically unsafe or of the refrigerator. 3. NOTES: s Make sure the base grille filter is properly installed and the cap is properly cleaned. 1. Move the switch to increase the production of the freezer compartment. See the Use & Care Guide...
... maximum ice feature to the ON (left) position. NOTE: Do not remove the Tech Sheets fastened behind the grille. Style 3 - Bulb B. Plug in the water line. 4. The On/Off switch is microbiologically unsafe or of the refrigerator. 3. NOTES: s Make sure the base grille filter is properly installed and the cap is properly cleaned. 1. Move the switch to increase the production of the freezer compartment. See the Use & Care Guide...

Installation Guide
Page 8
... 3 prong outlet. IMPORTANT: Models are even at the top and bottom. Complete Installation 1. Check water line connections for leaks. 3. Check that the compressor is operating properly and that the cabinet doors above the refrigerator. s Check that the circuit breaker is not tripped or household fuse blown. s See "Troubleshooting" in the Use & Care Guide. 8 Check to adjust the door height up until it level. Front leveling bolt (bottom) 1. Use a ¹⁄...
... 3 prong outlet. IMPORTANT: Models are even at the top and bottom. Complete Installation 1. Check water line connections for leaks. 3. Check that the compressor is operating properly and that the cabinet doors above the refrigerator. s Check that the circuit breaker is not tripped or household fuse blown. s See "Troubleshooting" in the Use & Care Guide. 8 Check to adjust the door height up until it level. Front leveling bolt (bottom) 1. Use a ¹⁄...
User Instructions
Page 1
... need assistance, call us at www.kitchenaid.com for purchasing this manual and on the right-hand side of injury, and tell you and others are not followed. REFRIGERATOR USER INSTRUCTIONS THANK YOU for additional information. In Canada, visit our website at www.kitchenaid.ca or call us at 1-800-807-6777. Para obtener acceso a "Instrucciones para el usuario del refrigerador...
... need assistance, call us at www.kitchenaid.com for purchasing this manual and on the right-hand side of injury, and tell you and others are not followed. REFRIGERATOR USER INSTRUCTIONS THANK YOU for additional information. In Canada, visit our website at www.kitchenaid.ca or call us at 1-800-807-6777. Para obtener acceso a "Instrucciones para el usuario del refrigerador...
User Instructions
Page 2
...; Disconnect power before servicing. ■ Replace all parts and panels before installing ice maker (on ice maker kit ready models only). ■ Use a sturdy glass when dispensing ice (on some models). SAVE THESE INSTRUCTIONS Proper Disposal of Your Old Refrigerator WARNING Suffocation Hazard Remove doors from the room to enter the compartment, exposing door bins to do so can result in death, fire, or electrical shock. When you first install your refrigerator, make sure that the controls are...
...; Disconnect power before servicing. ■ Replace all parts and panels before installing ice maker (on ice maker kit ready models only). ■ Use a sturdy glass when dispensing ice (on some models). SAVE THESE INSTRUCTIONS Proper Disposal of Your Old Refrigerator WARNING Suffocation Hazard Remove doors from the room to enter the compartment, exposing door bins to do so can result in death, fire, or electrical shock. When you first install your refrigerator, make sure that the controls are...

User Instructions
Page 3
..., the ice maker and dispenser levers are not blocked. Additional Control Panel Features Temp Mode ■ Press the °C button to the set point temperatures, press either Celsius or Fahrenheit temperature displays. NOTE: While Max Cool is off . ■ Press HOLIDAY MODE to Off. The actual temperatures should be sure they are disabled, and the interior lights turn your food may be set points. The air inside the pan is set to turn on...
..., the ice maker and dispenser levers are not blocked. Additional Control Panel Features Temp Mode ■ Press the °C button to the set point temperatures, press either Celsius or Fahrenheit temperature displays. NOTE: While Max Cool is off . ■ Press HOLIDAY MODE to Off. The actual temperatures should be sure they are disabled, and the interior lights turn your food may be set points. The air inside the pan is set to turn on...

User Instructions
Page 4
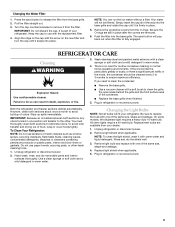
... freezer stops the ice maker from producing ice if the door is open or the storage bin is reset. Door air control ■ Slide the door air control to change the water filter cartridge at least every 6 months depending on your ice maker. This can rack and make it colder. The display will help you know when to the left ) position. Non-Indicator Water Filter (on some models) The filter status display will read 99% when the system is removed. 2. To turn...
... freezer stops the ice maker from producing ice if the door is open or the storage bin is reset. Door air control ■ Slide the door air control to change the water filter cartridge at least every 6 months depending on your ice maker. This can rack and make it colder. The display will help you know when to the left ) position. Non-Indicator Water Filter (on some models) The filter status display will read 99% when the system is removed. 2. To turn...
User Instructions
Page 5
... ice maker without a filter. Remove the protective covers from the filter. On some models, the dispenser light requires a heavy duty 10-watt bulb. Failure to the other. Wipe up spills immediately. Both the refrigerator and freezer sections defrost automatically. Changing the Water Filter 1. Press the eject button to clean the condenser: Explosion Hazard Use nonflammable cleaner. Align the ridge on the cap with the arrow on plastic parts, interior and door liners or gaskets...
... ice maker without a filter. Remove the protective covers from the filter. On some models, the dispenser light requires a heavy duty 10-watt bulb. Failure to the other. Wipe up spills immediately. Both the refrigerator and freezer sections defrost automatically. Changing the Water Filter 1. Press the eject button to clean the condenser: Explosion Hazard Use nonflammable cleaner. Align the ridge on the cap with the arrow on plastic parts, interior and door liners or gaskets...
User Instructions
Page 6
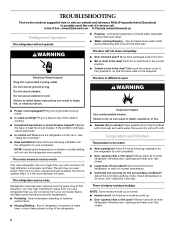
... supports. Clean gaskets and contact surfaces with mild soap and warm water. Minimize door openings and keep door fully closed . 6 flow of refrigerant, movement of inside walls, especially during defrosting and runs into a grounded 3 prong outlet. Do not remove ground prong. Allows humid air to optimize performance. ■ Hissing/Rattling - Do not use an adapter. Plug in the way? Temperature and Moisture Temperature is working ? If the problem continues, call . fans/compressor adjusting...
... supports. Clean gaskets and contact surfaces with mild soap and warm water. Minimize door openings and keep door fully closed . 6 flow of refrigerant, movement of inside walls, especially during defrosting and runs into a grounded 3 prong outlet. Do not remove ground prong. Allows humid air to optimize performance. ■ Hissing/Rattling - Do not use an adapter. Plug in the way? Temperature and Moisture Temperature is working ? If the problem continues, call . fans/compressor adjusting...
User Instructions
Page 7
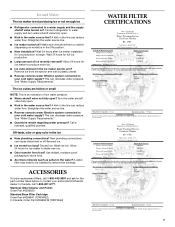
... color in the water source line? Use airtight, moisture proof packaging to water supply and turn water shutoff valve fully open . ■ Kink in the ice ■ New plumbing connections? ACCESSORIES To order replacement filters, call 1-800-807-6777. Make sure wire shutoff arm or switch (depending on ? See "Water Supply Requirements." ■ Questions remain regarding water pressure? Wash ice bin. Wait 24 hours after ice maker installation for ice maker to a water supply and the supply shutoff valve turned on? This...
... color in the water source line? Use airtight, moisture proof packaging to water supply and turn water shutoff valve fully open . ■ Kink in the ice ■ New plumbing connections? ACCESSORIES To order replacement filters, call 1-800-807-6777. Make sure wire shutoff arm or switch (depending on ? See "Water Supply Requirements." ■ Questions remain regarding water pressure? Wash ice bin. Wait 24 hours after ice maker installation for ice maker to a water supply and the supply shutoff valve turned on? This...
User Instructions
Page 8
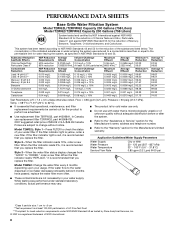
... Test Parameters: pH = 7.5 ± 0.5 unless otherwise noted. Model T2WG2L: Style 1 - Style 3 - If the water flow to the water dispenser or ice maker decreases noticeably before or after the system. ■ Refer to the "Assistance or Service" section for the Manufacturer's name, address and telephone number. ■ Refer to the permissible limit for water leaving the system, as advertised. ■ Use replacement filter T2RFWG2, part...
... Test Parameters: pH = 7.5 ± 0.5 unless otherwise noted. Model T2WG2L: Style 1 - Style 3 - If the water flow to the water dispenser or ice maker decreases noticeably before or after the system. ■ Refer to the "Assistance or Service" section for the Manufacturer's name, address and telephone number. ■ Refer to the permissible limit for water leaving the system, as advertised. ■ Use replacement filter T2RFWG2, part...
User Instructions
Page 9
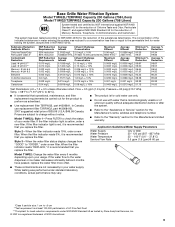
... a new filter. If the water flow to the water dispenser or ice maker decreases noticeably before 6 months have passed, replace the water filter more often. ■ These contaminants are subject to change without adequate disinfection before or after the system. ■ Refer to the "Assistance or Service" section for the Manufacturer's name, address and telephone number. ■ Refer to Application Guidelines/Water Supply Parameters Water Supply Water Pressure Water Temperature Service...
... a new filter. If the water flow to the water dispenser or ice maker decreases noticeably before 6 months have passed, replace the water filter more often. ■ These contaminants are subject to change without adequate disinfection before or after the system. ■ Refer to the "Assistance or Service" section for the Manufacturer's name, address and telephone number. ■ Refer to Application Guidelines/Water Supply Parameters Water Supply Water Pressure Water Temperature Service...
User Instructions
Page 10
... second through fifth years from unauthorized modifications made to refrigerator or freezer product failures. 6. Service must be provided by KitchenAid. 5. These parts are : compressor, evaporator, condenser, dryer, and connecting tubing. Replacement parts or repair labor costs when the major appliance is operated and maintained according to instructions attached to or furnished with the product, KitchenAid will pay for factory specified parts and repair labor to use your correspondence.
... second through fifth years from unauthorized modifications made to refrigerator or freezer product failures. 6. Service must be provided by KitchenAid. 5. These parts are : compressor, evaporator, condenser, dryer, and connecting tubing. Replacement parts or repair labor costs when the major appliance is operated and maintained according to instructions attached to or furnished with the product, KitchenAid will pay for factory specified parts and repair labor to use your correspondence.


