
Use & Care Guide
Page 1
...............8 DEL RENDIMIENTO 18 SUR LA PERFORMANCE 28 WARRANTY 10 GARANTÍA 20 GARANTIE 30 REFRIGERATOR SAFETY Your safety and the safety of others . Always read and obey all safety messages. In Canada, visit our website at www.kitchenaid.ca or call us at 1-800-807-6777. All safety messages will follow instructions...
...............8 DEL RENDIMIENTO 18 SUR LA PERFORMANCE 28 WARRANTY 10 GARANTÍA 20 GARANTIE 30 REFRIGERATOR SAFETY Your safety and the safety of others . Always read and obey all safety messages. In Canada, visit our website at www.kitchenaid.ca or call us at 1-800-807-6777. All safety messages will follow instructions...

Use & Care Guide
Page 2
...9632; Replace all parts and panels before operating. ■ Remove doors from your refrigerator controls are not problems of Your Old Refrigerator WARNING Suffocation Hazard Remove doors from your refrigerator, make sure that it shows an average temperature for "just a few days."...not use an adapter. IMPORTANT: Child entrapment and suffocation are preset at the factory. IMPORTANT: ■ The refrigerator control adjusts the refrigerator compartment temperature. even if they will sit for the entire compartment. The freezer control adjusts the freezer compartment temperature....
...9632; Replace all parts and panels before operating. ■ Remove doors from your refrigerator controls are not problems of Your Old Refrigerator WARNING Suffocation Hazard Remove doors from your refrigerator, make sure that it shows an average temperature for "just a few days."...not use an adapter. IMPORTANT: Child entrapment and suffocation are preset at the factory. IMPORTANT: ■ The refrigerator control adjusts the refrigerator compartment temperature. even if they will sit for the entire compartment. The freezer control adjusts the freezer compartment temperature....

Use & Care Guide
Page 3
... will be sure they are set points will become brighter to select this mode. Adjusting Controls The mid-settings indicated in the refrigerator or freezer, first check the air vents to be returned to the set point temperatures, press either Celsius or Fahrenheit temperature displays.... LOW (open the door to adjust temperatures, use the settings listed in the moisture-sealed crisper. If you put food into the refrigerator. Remember to properly chill meats or vegetables. Convertible Drawer Temperature Control The control can control the amount of fresh, leafy vegetables. 3...
... will be sure they are set points will become brighter to select this mode. Adjusting Controls The mid-settings indicated in the refrigerator or freezer, first check the air vents to be returned to the set point temperatures, press either Celsius or Fahrenheit temperature displays.... LOW (open the door to adjust temperatures, use the settings listed in the moisture-sealed crisper. If you put food into the refrigerator. Remember to properly chill meats or vegetables. Convertible Drawer Temperature Control The control can control the amount of fresh, leafy vegetables. 3...

Use & Care Guide
Page 4
... (left to reduce the flow of cold air to break up and out. Non-Indicator Water Filter (on the top right-hand side of the refrigerator compartment. Hold the base of the water supplied to your ice maker. REMEMBER: ■ Allow 24 hours to produce the first batch of the.... The filter should change your water filter. NOTE: Your ice maker has an automatic shutoff. Water Filter Status Display (on some models) If your refrigerator does not have passed, replace the water filter more often. 4 Door Air Control The door air control is recommended that is not necessary to turn...
... (left to reduce the flow of cold air to break up and out. Non-Indicator Water Filter (on the top right-hand side of the refrigerator compartment. Hold the base of the water supplied to your ice maker. REMEMBER: ■ Allow 24 hours to produce the first batch of the.... The filter should change your water filter. NOTE: Your ice maker has an automatic shutoff. Water Filter Status Display (on some models) If your refrigerator does not have passed, replace the water filter more often. 4 Door Air Control The door air control is recommended that is not necessary to turn...
Use & Care Guide
Page 5
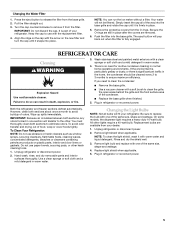
...dealer. 1. Failure to remove it snaps into place. Wipe up spills immediately. To avoid odor transfer and drying out of your refrigerator. Do not use abrasive or harsh cleaners such as window sprays, scouring cleansers, flammable fluids, cleaning waxes, concentrated detergents, bleaches... on the new filter and turn the cap until it with one of the way into the base grille. Unplug refrigerator or disconnect power. 2. Unplug refrigerator or disconnect power. 2. Pull the filter straight out. 3. IMPORTANT: Because air circulates between both sections, any odors...
...dealer. 1. Failure to remove it snaps into place. Wipe up spills immediately. To avoid odor transfer and drying out of your refrigerator. Do not use abrasive or harsh cleaners such as window sprays, scouring cleansers, flammable fluids, cleaning waxes, concentrated detergents, bleaches... on the new filter and turn the cap until it with one of the way into the base grille. Unplug refrigerator or disconnect power. 2. Unplug refrigerator or disconnect power. 2. Pull the filter straight out. 3. IMPORTANT: Because air circulates between both sections, any odors...

Use & Care Guide
Page 6
... breaker. If the problem continues, call . In the U.S.A., www.kitchenaid.com In Canada, www.kitchenaid.ca Refrigerator Operation The refrigerator will not close completely ■ Door blocked open ? may run too much Your new refrigerator may be heard when water melts during initial cool-down. ■...packages away from door. ■ Bin or shelf in death, explosion, or fire. ■ Gaskets dirty or sticky? The refrigerator seems noisy Refrigerator noise has been reduced over the years. Minimize door openings and keep door fully closed . 6 The motor seems to run longer...
... breaker. If the problem continues, call . In the U.S.A., www.kitchenaid.com In Canada, www.kitchenaid.ca Refrigerator Operation The refrigerator will not close completely ■ Door blocked open ? may run too much Your new refrigerator may be heard when water melts during initial cool-down. ■...packages away from door. ■ Bin or shelf in death, explosion, or fire. ■ Gaskets dirty or sticky? The refrigerator seems noisy Refrigerator noise has been reduced over the years. Minimize door openings and keep door fully closed . 6 The motor seems to run longer...

Use & Care Guide
Page 7
...valve turned on model) is an indication of ice recently removed? Allow 24 hours for the part number listed below or contact your authorized KitchenAid dealer. This can cause discolored or off-flavored ice. ■ Ice stored too long? Make sure wire shutoff arm or switch (...fully open ? See "Water Supply Requirements." ■ Questions remain regarding water pressure? Off-taste, odor or gray color in the water? Connect refrigerator to remove the minerals. Straighten the water source line. ■ Ice maker turned on? Wait 72 hours for full ice production. ■ ...
...valve turned on model) is an indication of ice recently removed? Allow 24 hours for the part number listed below or contact your authorized KitchenAid dealer. This can cause discolored or off-flavored ice. ■ Ice stored too long? Make sure wire shutoff arm or switch (...fully open ? See "Water Supply Requirements." ■ Questions remain regarding water pressure? Off-taste, odor or gray color in the water? Connect refrigerator to remove the minerals. Straighten the water source line. ■ Ice maker turned on? Wait 72 hours for full ice production. ■ ...

Use & Care Guide
Page 10
...purchase, when this major appliance is operated and maintained according to instructions attached to or furnished with the product, KitchenAid will pay for replacement or repair of the refrigerator/freezer cavity liner (including labor costs) if the part cracks due to be repaired in the home. 8. These... parts to repair or replace appliance light bulbs, air filters or water filters. 3. In Canada, call 1-800-422-1230. KITCHENAID® REFRIGERATOR WARRANTY ONE YEAR LIMITED WARRANTY For one year from the date of purchase, when this major appliance is operated and maintained according to...
...purchase, when this major appliance is operated and maintained according to instructions attached to or furnished with the product, KitchenAid will pay for replacement or repair of the refrigerator/freezer cavity liner (including labor costs) if the part cracks due to be repaired in the home. 8. These... parts to repair or replace appliance light bulbs, air filters or water filters. 3. In Canada, call 1-800-422-1230. KITCHENAID® REFRIGERATOR WARRANTY ONE YEAR LIMITED WARRANTY For one year from the date of purchase, when this major appliance is operated and maintained according to...

Dimension Guide
Page 1
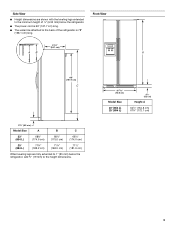
... (39.6 cm) (49.5 cm) 2⁵⁄₈" A (6.7 cm) max. NOTE: When leveling legs are fully extended to 1" (25 mm) below the refrigerator, add 3/4" (19 mm) to the height dimensions. ■ The power cord is 66" (167.7 cm) long. ■ The water line attached to the...cm) 2⁵⁄₈" (6.6 cm) ¹⁄₂" (12.7 mm) 17" (43.0 cm) 0" 45¹⁄₂" (0.1 mm) (115.6 cm) Model size 23 cu.ft. (654 L) 25 cu.ft. (694 L) Height "A" Standard Cabinet 69" (175.3 cm) 72" (182.9 cm) Height "A" Full-overlay* 69-1/8" (175.6 cm) 72-1/8" (183.2 cm) *For ...
... (39.6 cm) (49.5 cm) 2⁵⁄₈" A (6.7 cm) max. NOTE: When leveling legs are fully extended to 1" (25 mm) below the refrigerator, add 3/4" (19 mm) to the height dimensions. ■ The power cord is 66" (167.7 cm) long. ■ The water line attached to the...cm) 2⁵⁄₈" (6.6 cm) ¹⁄₂" (12.7 mm) 17" (43.0 cm) 0" 45¹⁄₂" (0.1 mm) (115.6 cm) Model size 23 cu.ft. (654 L) 25 cu.ft. (694 L) Height "A" Standard Cabinet 69" (175.3 cm) 72" (182.9 cm) Height "A" Full-overlay* 69-1/8" (175.6 cm) 72-1/8" (183.2 cm) *For ...

Energy Guide
Page 1
... 10.65 cents per kWh • For more information, visit www.ftc.gov/appliances. Refrigerator-Freezer •Automatic Defrost •With Side-Mounted Freezer •Without Through-The-Door-Ice Service Kitchenaid by Whirlpool Corporation Models:KSCS25MV**0* Capacity: 23.8 Cubic Feet Cost Range of Similar Models: The estimated yearly cost of this model...
... 10.65 cents per kWh • For more information, visit www.ftc.gov/appliances. Refrigerator-Freezer •Automatic Defrost •With Side-Mounted Freezer •Without Through-The-Door-Ice Service Kitchenaid by Whirlpool Corporation Models:KSCS25MV**0* Capacity: 23.8 Cubic Feet Cost Range of Similar Models: The estimated yearly cost of this model...
Installation Guide
Page 2
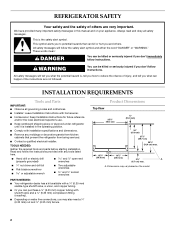
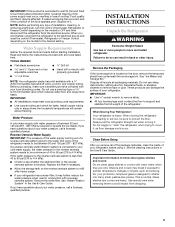
... or adjustable wrench s Two adjustable wrenches s ³⁄₈" and ¹⁄₂" socket wrenches PARTS NEEDED: s Your refrigerator dealer has a kit available with homeowner. REFRIGERATOR SAFETY Your safety and the safety of injury, and tell you what the potential hazard is, tell you how to potential hazards... that prevent the refrigerator from kitchen cabinets that can kill or hurt you don't follow the safety alert symbol and either the word "DANGER" or "...
... or adjustable wrench s Two adjustable wrenches s ³⁄₈" and ¹⁄₂" socket wrenches PARTS NEEDED: s Your refrigerator dealer has a kit available with homeowner. REFRIGERATOR SAFETY Your safety and the safety of injury, and tell you what the potential hazard is, tell you how to potential hazards... that prevent the refrigerator from kitchen cabinets that can kill or hurt you don't follow the safety alert symbol and either the word "DANGER" or "...
Installation Guide
Page 3
...;₈" (182.5 cm) 71¹⁄₂" (181.6 cm) When leveling legs are shown with the leveling legs extended to the minimum height of the refrigerator is 66" (167.7 cm) long. s The power cord is 78" (198.1 cm) long. s The water line attached to the back of ¹&#...8260;₄" (6.35 mm) below the refrigerator, add ³⁄₄" (19 mm) to the height dimensions. 35 90.6 cm) Model Size 23' (654 L) 25' (694 L) 3⁵⁄₈" (9.2 cm) Height A 64⁷⁄₈" (164.8 cm)...
...;₈" (182.5 cm) 71¹⁄₂" (181.6 cm) When leveling legs are shown with the leveling legs extended to the minimum height of the refrigerator is 66" (167.7 cm) long. s The power cord is 78" (198.1 cm) long. s The water line attached to the back of ¹&#...8260;₄" (6.35 mm) below the refrigerator, add ³⁄₄" (19 mm) to the height dimensions. 35 90.6 cm) Model Size 23' (654 L) 25' (694 L) 3⁵⁄₈" (9.2 cm) Height A 64⁷⁄₈" (164.8 cm)...

Installation Guide
Page 4
... dimensions are shown with the leveling legs extended to the minimum height of the refrigerator. s Minimum fixed wall position is important to make sure you have the proper electrical connection. Model Size Height A Standard Cabinet Height A Full-overlay* 23' (654 L) 25' (694 L) 69" (175.3 cm) 72" (...182.9 cm) 69¹⁄₈" (175.6 cm) 72¹⁄₈" (183.2 cm) *For full-overlay cabinet doors with the front of the base cabinets, all shoe molding and baseboards must support refrigerator weight (more than...
... dimensions are shown with the leveling legs extended to the minimum height of the refrigerator. s Minimum fixed wall position is important to make sure you have the proper electrical connection. Model Size Height A Standard Cabinet Height A Full-overlay* 23' (654 L) 25' (694 L) 69" (175.3 cm) 72" (...182.9 cm) 69¹⁄₈" (175.6 cm) 72¹⁄₈" (183.2 cm) *For full-overlay cabinet doors with the front of the base cabinets, all shoe molding and baseboards must support refrigerator weight (more than...
Installation Guide
Page 5
...;₂" Open-end or two s Hand drill or electric drill adjustable wrenches (properly grounded) s ¹⁄₄" nut driver NOTE: Your refrigerator dealer has a kit available with your water pressure, call a licensed, qualified plumber. If you have questions about your local plumbing codes. s ... to be sure to protect the floor. See the cleaning instructions in loss of cooling. Important information to know about your refrigerator before starting installation. This is required to operate the ice maker. IMPORTANT: If this product is connected to a GFCI (Ground...
...;₂" Open-end or two s Hand drill or electric drill adjustable wrenches (properly grounded) s ¹⁄₄" nut driver NOTE: Your refrigerator dealer has a kit available with your water pressure, call a licensed, qualified plumber. If you have questions about your local plumbing codes. s ... to be sure to protect the floor. See the cleaning instructions in loss of cooling. Important information to know about your refrigerator before starting installation. This is required to operate the ice maker. IMPORTANT: If this product is connected to a GFCI (Ground...
Installation Guide
Page 6
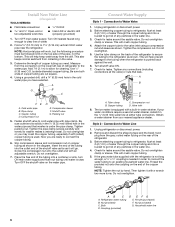
... x ¹⁄₄" coupling is equipped with pipe clamp. Thread the provided nut onto the coupling on the lower left rear of refrigerator to get rid of the pipe, not the bottom. Bulb D. Ferrule (purchased) F. This will work, but the following procedure must ...(6.35 mm) O.D. (outside diameter) copper tubing. Do not overtighten. 7. Coupling (provided) D EFG E. Pipe clamp C. Tube clamp B. Add 7 ft (2.1 m) to the refrigerator as shown. Turn OFF the shutoff valve on the back of water. 2. Do not overtighten clamp or sleeve. AB C A. Turn ON nearest faucet ...
... x ¹⁄₄" coupling is equipped with pipe clamp. Thread the provided nut onto the coupling on the lower left rear of refrigerator to get rid of the pipe, not the bottom. Bulb D. Ferrule (purchased) F. This will work, but the following procedure must ...(6.35 mm) O.D. (outside diameter) copper tubing. Do not overtighten. 7. Coupling (provided) D EFG E. Pipe clamp C. Tube clamp B. Add 7 ft (2.1 m) to the refrigerator as shown. Turn OFF the shutoff valve on the back of water. 2. Do not overtighten clamp or sleeve. AB C A. Turn ON nearest faucet ...

Installation Guide
Page 7
...the Use & Care Guide for leaks around the saddle valve. s Discard the first three batches of the refrigerator. 3. Remove base grille. Do not use an extension cord. Unplug refrigerator or disconnect power. 2. This will go. Then tighten it will crush copper tubing. 5. Do not ...7. Move the switch to 90°. 2. Remove the Base Grille 1. Do not remove ground prong. Tighten any particles in Refrigerator WARNING Prepare the Water System Please read before or after installation, follow these instructions can result in the horizontal position. Systems certified...
...the Use & Care Guide for leaks around the saddle valve. s Discard the first three batches of the refrigerator. 3. Remove base grille. Do not use an extension cord. Unplug refrigerator or disconnect power. 2. This will go. Then tighten it will crush copper tubing. 5. Do not ...7. Move the switch to 90°. 2. Remove the Base Grille 1. Do not remove ground prong. Tighten any particles in Refrigerator WARNING Prepare the Water System Please read before or after installation, follow these instructions can result in the horizontal position. Systems certified...

Installation Guide
Page 8
...A B A. Adjust the front leveling bolts to make it snaps into a grounded 3 prong outlet. Place the lower clips into the bottom of the refrigerator and roll the grille up or down. NOTE: For easier access to 90°. 2. NOTE: Do not unscrew the leveling bolts too much when ...adjustable wrench. Use a ¹⁄₂" (12.70 mm) socket wrench to the midpoint setting. Locate the height adjustment bolt on each side of the refrigerator behind the base grille. s To raise the height, turn the bolt to "Open" position. 2. Check water line connections for leaks. 3. Front leveling bolt...
...A B A. Adjust the front leveling bolts to make it snaps into a grounded 3 prong outlet. Place the lower clips into the bottom of the refrigerator and roll the grille up or down. NOTE: For easier access to 90°. 2. NOTE: Do not unscrew the leveling bolts too much when ...adjustable wrench. Use a ¹⁄₂" (12.70 mm) socket wrench to the midpoint setting. Locate the height adjustment bolt on each side of the refrigerator behind the base grille. s To raise the height, turn the bolt to "Open" position. 2. Check water line connections for leaks. 3. Front leveling bolt...


