Owners Manual 1
Page 2
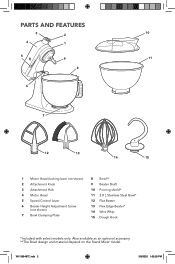
PARTS AND FEATURES 3 2 10 4 1 5 9 11 8 6 7 12 13 14 15 1 Motor Head (locking lever not shown) 2 Attachment Knob 3 Attachment Hub 4 Motor Head 5 Speed Control Lever 6 Beater Height Adjustment Screw (not shown) 7 Bowl Clamping Plate 8 Bowl** 9 Beater Shaft 10 Pouring shield* 11 2.8 L Stainless Steel Bowl* 12 Flat Beater 13 Flex Edge Beater* 14 Wire Whip 15 Dough Hook *Included with select models only. Also available as an optional accessory. **The Bowl design and material depend on the Stand Mixer model. W11368487C.indb 2 3/9/2020 1:06:28 PM
PARTS AND FEATURES 3 2 10 4 1 5 9 11 8 6 7 12 13 14 15 1 Motor Head (locking lever not shown) 2 Attachment Knob 3 Attachment Hub 4 Motor Head 5 Speed Control Lever 6 Beater Height Adjustment Screw (not shown) 7 Bowl Clamping Plate 8 Bowl** 9 Beater Shaft 10 Pouring shield* 11 2.8 L Stainless Steel Bowl* 12 Flat Beater 13 Flex Edge Beater* 14 Wire Whip 15 Dough Hook *Included with select models only. Also available as an optional accessory. **The Bowl design and material depend on the Stand Mixer model. W11368487C.indb 2 3/9/2020 1:06:28 PM

Owners Manual 1
Page 3
... adjustment. 7. Turn the appliance OFF, then unplug from the power cord. 5. The use , before assembling or disassembling parts, and before cleaning. W11368487C.indb 3 3 3/9/2020 1:06:29 PM Read all instructions. 2. This appliance is necessary when any manner. To unplug, grasp the plug and pull from beater during operation to reduce the risk of experience and knowledge, unless they do not put Stand Mixer...
... adjustment. 7. Turn the appliance OFF, then unplug from the power cord. 5. The use , before assembling or disassembling parts, and before cleaning. W11368487C.indb 3 3 3/9/2020 1:06:29 PM Read all instructions. 2. This appliance is necessary when any manner. To unplug, grasp the plug and pull from beater during operation to reduce the risk of experience and knowledge, unless they do not put Stand Mixer...

Owners Manual 1
Page 4
... PM Remove the beaters, wire whip, or dough hook from the Stand Mixer before washing. GETTING STARTED CHOOSING THE RIGHT ACCESSORY Accessories Flat Beater Flex Edge Beater* Wire Whip Dough Hook Use to mix Normal to heavy mixtures Mixtures that draws the greatest load (power). SAVE THESE INSTRUCTIONS This product is designed for your Stand Mixer is too short, have a qualified electrician or service technician install an outlet near the appliance. Do not use only. Eggs, egg whites, heavy cream...
... PM Remove the beaters, wire whip, or dough hook from the Stand Mixer before washing. GETTING STARTED CHOOSING THE RIGHT ACCESSORY Accessories Flat Beater Flex Edge Beater* Wire Whip Dough Hook Use to mix Normal to heavy mixtures Mixtures that draws the greatest load (power). SAVE THESE INSTRUCTIONS This product is designed for your Stand Mixer is too short, have a qualified electrician or service technician install an outlet near the appliance. Do not use only. Eggs, egg whites, heavy cream...

Owners Manual 1
Page 5
..., whipping For whipping cream, egg whites, and boiled frostings. PRODUCT ASSEMBLY 1 2 Unplug and turn the Stand Mixer "OFF/0". Speed Stir 1 2 Accessory Flat Beater Flex Edge Beater* Flat Beater Flex Edge Beater* Dough Hook 4 Flat Beater Flex Edge Beater* Wire Whip 6 Flat Beater Flex Edge Beater* Wire Whip 8 Wire Whip Action Description Stir For starting all mixing procedures, slow stirring, combining, and mashing. mix thin or splashy batters. NOTE: To move it lifted. *Included with ease, lift slightly up as you move the Speed Control Lever with select models...
..., whipping For whipping cream, egg whites, and boiled frostings. PRODUCT ASSEMBLY 1 2 Unplug and turn the Stand Mixer "OFF/0". Speed Stir 1 2 Accessory Flat Beater Flex Edge Beater* Flat Beater Flex Edge Beater* Dough Hook 4 Flat Beater Flex Edge Beater* Wire Whip 6 Flat Beater Flex Edge Beater* Wire Whip 8 Wire Whip Action Description Stir For starting all mixing procedures, slow stirring, combining, and mashing. mix thin or splashy batters. NOTE: To move it lifted. *Included with ease, lift slightly up as you move the Speed Control Lever with select models...

Owners Manual 1
Page 6
... you over-adjust the screw, the Bowl lock lever may not lock into place. (OPTIONAL) Place the Pouring Shield***: Slide the Pouring Shield*** from front of the Bowl*. *The Bowl design and material depend on the Stand Mixer model. **Locking option is available on selected models. ***Included with select models only. PRODUCT ASSEMBLY 3 4 1 2 Place the Bowl* on the Clamping Plate and twist to Bowl Clearance: Tilt and lock** the Motor Head back. Unlock the Motor Head and move it...
... you over-adjust the screw, the Bowl lock lever may not lock into place. (OPTIONAL) Place the Pouring Shield***: Slide the Pouring Shield*** from front of the Bowl*. *The Bowl design and material depend on the Stand Mixer model. **Locking option is available on selected models. ***Included with select models only. PRODUCT ASSEMBLY 3 4 1 2 Place the Bowl* on the Clamping Plate and twist to Bowl Clearance: Tilt and lock** the Motor Head back. Unlock the Motor Head and move it...

Owners Manual 1
Page 7
Scraping the Bowl* once or twice during mixing is usually sufficient. (OPTIONAL): Pour ingredients into a grounded 3 prong outlet. ENGLISH PRODUCT USAGE 1 Plug it gradually. Start with lower speed to the "Speed Control Guide". 2 Do not scrape the Bowl* while operating. W11368487C.indb 7 7 3/9/2020 1:06:31 PM Refer to avoid splashing and increase it into the Bowl* through the Pouring Chute. *The Bowl design and material depend on the Stand Mixer model.
Scraping the Bowl* once or twice during mixing is usually sufficient. (OPTIONAL): Pour ingredients into a grounded 3 prong outlet. ENGLISH PRODUCT USAGE 1 Plug it gradually. Start with lower speed to the "Speed Control Guide". 2 Do not scrape the Bowl* while operating. W11368487C.indb 7 7 3/9/2020 1:06:31 PM Refer to avoid splashing and increase it into the Bowl* through the Pouring Chute. *The Bowl design and material depend on the Stand Mixer model.

Owners Manual 1
Page 8
... of the Pouring Shield** clear of the rim of optional attachments such as the Spiralizer, Pasta Cutters, or Food Grinder that may be attached to the Stand Mixer attachment power hub as an optional accessory. ***The Bowl design and material depend on selected models. **Included with select models only. Unlock and lift the Motor Head. OPTIONAL ATTACHMENTS KitchenAid® offers a wide range of the Bowl***. Remove the Attachment Hub cover. *Locking option is available on the Stand Mixer model. 8 W11368487C...
... of the Pouring Shield** clear of the rim of optional attachments such as the Spiralizer, Pasta Cutters, or Food Grinder that may be attached to the Stand Mixer attachment power hub as an optional accessory. ***The Bowl design and material depend on selected models. **Included with select models only. Unlock and lift the Motor Head. OPTIONAL ATTACHMENTS KitchenAid® offers a wide range of the Bowl***. Remove the Attachment Hub cover. *Locking option is available on the Stand Mixer model. 8 W11368487C...

Owners Manual 1
Page 9
.... 1 2 Unplug and turn the Stand Mixer "OFF/0". 3 Dishwasher-safe parts, top rack only: Stainless Steel Bowl, Bowl Lid, Flat Beater, Dough Hook, Flex Edge Beater*, and Pouring Shield*. 4 Wipe the Stand Mixer body with select models only. Tighten the Attachment Knob by turning it clockwise until the attachment is secured to the Stand Mixer. Also available as an optional accessory. 9 W11368487C.indb 9 3/9/2020 1:06:32 PM ENGLISH OPTIONAL ATTACHMENTS 3 4 Insert attachment into Attachment Hub, making certain that attachment power shaft fits into the square Attachment Hub socket.
.... 1 2 Unplug and turn the Stand Mixer "OFF/0". 3 Dishwasher-safe parts, top rack only: Stainless Steel Bowl, Bowl Lid, Flat Beater, Dough Hook, Flex Edge Beater*, and Pouring Shield*. 4 Wipe the Stand Mixer body with select models only. Tighten the Attachment Knob by turning it clockwise until the attachment is secured to the Stand Mixer. Also available as an optional accessory. 9 W11368487C.indb 9 3/9/2020 1:06:32 PM ENGLISH OPTIONAL ATTACHMENTS 3 4 Insert attachment into Attachment Hub, making certain that attachment power shaft fits into the square Attachment Hub socket.

Owners Manual 1
Page 10
... the Speed Control Lever with ease, lift slightly up during use: Under heavy loads with extended mixing time periods, you move smoothly or easily: as you may not be able to cool for 10-15 seconds, then turn it back on . Do not return the Stand Mixer to Bowl Clearance. Do not use an adapter. If the Flat Beater hits the bowl: Stop the Stand Mixer. Note: If the problem cannot...
... the Speed Control Lever with ease, lift slightly up during use: Under heavy loads with extended mixing time periods, you move smoothly or easily: as you may not be able to cool for 10-15 seconds, then turn it back on . Do not return the Stand Mixer to Bowl Clearance. Do not use an adapter. If the Flat Beater hits the bowl: Stop the Stand Mixer. Note: If the problem cannot...
Owners Manual 1
Page 11
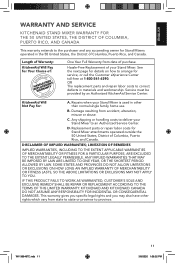
... NOT APPLY TO YOU. Hassle-Free Replacement of your Stand Mixer to an Authorized Service Center. KitchenAid Will Not Pay for Stand Mixer attachments operated outside the 50 United States, District of Columbia, Puerto Rico, and Canada. Any shipping or handling costs to deliver your Stand Mixer. LIMITATION OF REMEDIES IMPLIED WARRANTIES, INCLUDING TO THE EXTENT APPLICABLE WARRANTIES OF MERCHANTABILITY OR FITNESS FOR A PARTICULAR PURPOSE, ARE EXCLUDED...
... NOT APPLY TO YOU. Hassle-Free Replacement of your Stand Mixer to an Authorized Service Center. KitchenAid Will Not Pay for Stand Mixer attachments operated outside the 50 United States, District of Columbia, Puerto Rico, and Canada. Any shipping or handling costs to deliver your Stand Mixer. LIMITATION OF REMEDIES IMPLIED WARRANTIES, INCLUDING TO THE EXTENT APPLICABLE WARRANTIES OF MERCHANTABILITY OR FITNESS FOR A PARTICULAR PURPOSE, ARE EXCLUDED...

Owners Manual 1
Page 12
... to : Customer eXperience Center, KitchenAid Small Appliances, P.O. Proof of purchase will arrange to deliver an identical or comparable replacement to your door free of charge and arrange to have your Stand Mixer should fail within the first year of ownership, we will be covered by our one year limited warranty. Give the consultant your original sales receipt available when you call...
... to : Customer eXperience Center, KitchenAid Small Appliances, P.O. Proof of purchase will arrange to deliver an identical or comparable replacement to your door free of charge and arrange to have your Stand Mixer should fail within the first year of ownership, we will be covered by our one year limited warranty. Give the consultant your original sales receipt available when you call...


