
Use & Care Guide
Page 3
... Beater, Wire Whip and PowerKnead™ Spiral Dough Hook 16 Using The Pouring Shield (not included with all models 17 Attaching the Pouring Shield 17 Using the Pouring Shield 17 Removing the Pouring Shield 17 Cleaning the Pouring Shield 17 Using the KitchenAid® Stand Mixer Accessories 18 Bowl-Lift Stand Mixer Use 19 Operating the Mixer 19 Commercial Style Motor Protection 19 Speed Control Guide 20 Care and Cleaning 21 Cleaning the Stand Mixer and Accessories 21 Beater to Arrange for Service after the Warranty Expires - All Locations .......... 9 How to Bowl Clearance...
... Beater, Wire Whip and PowerKnead™ Spiral Dough Hook 16 Using The Pouring Shield (not included with all models 17 Attaching the Pouring Shield 17 Using the Pouring Shield 17 Removing the Pouring Shield 17 Cleaning the Pouring Shield 17 Using the KitchenAid® Stand Mixer Accessories 18 Bowl-Lift Stand Mixer Use 19 Operating the Mixer 19 Commercial Style Motor Protection 19 Speed Control Guide 20 Care and Cleaning 21 Cleaning the Stand Mixer and Accessories 21 Beater to Arrange for Service after the Warranty Expires - All Locations .......... 9 How to Bowl Clearance...
Use & Care Guide
Page 5
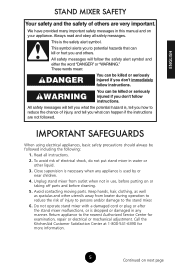
...." Do not operate stand mixer with a damaged cord or plug or after the stand mixer malfunctions, or is dropped or damaged in this manual and on your appliance. Always read and obey all instructions. 2. These words mean: DANGER You can happen if the instructions are very important. To avoid risk of electrical shock, do not put stand mixer in use, before putting on...
...." Do not operate stand mixer with a damaged cord or plug or after the stand mixer malfunctions, or is dropped or damaged in this manual and on your appliance. Always read and obey all instructions. 2. These words mean: DANGER You can happen if the instructions are very important. To avoid risk of electrical shock, do not put stand mixer in use, before putting on...

Use & Care Guide
Page 6
... to follow these instructions can result in death, fire, or electrical shock. 6 6 Do not use an extension cord. SAVE THESE INSTRUCTIONS THIS PRODUCT IS DESIGNED FOR HOUSEHOLD USE ONLY. only. Do not remove ground prong. If the power cord is printed on the attachment that draws the greatest load (power). The maximum rating is based on the serial plate. ENGLISH 7. Remove flat beater, wire whip or dough hook from stand mixer before washing.
... to follow these instructions can result in death, fire, or electrical shock. 6 6 Do not use an extension cord. SAVE THESE INSTRUCTIONS THIS PRODUCT IS DESIGNED FOR HOUSEHOLD USE ONLY. only. Do not remove ground prong. If the power cord is printed on the attachment that draws the greatest load (power). The maximum rating is based on the serial plate. ENGLISH 7. Remove flat beater, wire whip or dough hook from stand mixer before washing.

Use & Care Guide
Page 11
... KitchenAid® stand mixer Warranty. Is the stand mixer plugged in the circuit to the retailer - Failure to operate, please check the following before turning it back on . If your stand mixer should malfunction or fail to follow these instructions can result in working order? Turn the stand mixer off for 30 minutes before calling the service center. 1. Under heavy loads with electric motors. 3. If the flat beater hits the bowl, stop the stand mixer. See "Beater...
... KitchenAid® stand mixer Warranty. Is the stand mixer plugged in the circuit to the retailer - Failure to operate, please check the following before turning it back on . If your stand mixer should malfunction or fail to follow these instructions can result in working order? Turn the stand mixer off for 30 minutes before calling the service center. 1. Under heavy loads with electric motors. 3. If the flat beater hits the bowl, stop the stand mixer. See "Beater...
Use & Care Guide
Page 12
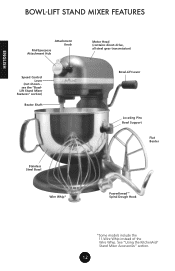
see the "BowlLift Stand Mixer Features" section) Beater Shaft Motor Head (contains direct-drive, all-steel gear transmission) Bowl-Lift Lever Locating Pins Bowl Support Flat Beater Stainless Steel Bowl Wire Whip* PowerKnead™ Spiral Dough Hook 12 *Some models include the 11-Wire Whip instead of the Wire Whip. ENGLISH BOWL-LIFT STAND MIXER FEATURES Attachment Knob Multipurpose Attachment Hub Speed Control Lever (not shown - See "Using the KitchenAid® Stand Mixer Accessories" section. 12
see the "BowlLift Stand Mixer Features" section) Beater Shaft Motor Head (contains direct-drive, all-steel gear transmission) Bowl-Lift Lever Locating Pins Bowl Support Flat Beater Stainless Steel Bowl Wire Whip* PowerKnead™ Spiral Dough Hook 12 *Some models include the 11-Wire Whip instead of the Wire Whip. ENGLISH BOWL-LIFT STAND MIXER FEATURES Attachment Knob Multipurpose Attachment Hub Speed Control Lever (not shown - See "Using the KitchenAid® Stand Mixer Accessories" section. 12
Use & Care Guide
Page 13
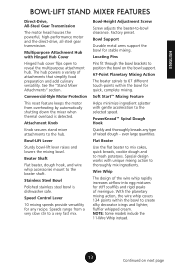
... dishwasher safe. Wire Whip The design of the wire whip rapidly increases airflow into egg mixtures for any type of raised dough - Attachment Knob Knob secures stand mixer attachments to -bowl clearance. Bowl-Height Adjustment Screw Screw adjusts the beater-to the hub. Locating Pins Pins fit through the bowl brackets to the selected speed. Flat Beater Use the flat beater to mix cakes, quick breads, cookie dough and to create silky decorator icings and lighter, fluffier whipped cream. The hub powers a variety of meringue. Speed Control Lever 10 mixing speeds provide versatility...
... dishwasher safe. Wire Whip The design of the wire whip rapidly increases airflow into egg mixtures for any type of raised dough - Attachment Knob Knob secures stand mixer attachments to -bowl clearance. Bowl-Height Adjustment Screw Screw adjusts the beater-to the hub. Locating Pins Pins fit through the bowl brackets to the selected speed. Flat Beater Use the flat beater to mix cakes, quick breads, cookie dough and to create silky decorator icings and lighter, fluffier whipped cream. The hub powers a variety of meringue. Speed Control Lever 10 mixing speeds provide versatility...
Use & Care Guide
Page 15
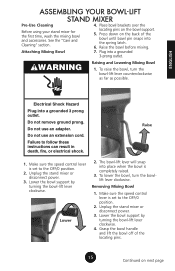
...the bowl support. 5. Attaching Mixing Bowl 7. WARNING Raising and Lowering Mixing Bowl 1. Unplug the stand mixer or disconnect power. 3. Lower the bowl support by turning the bowl-lift lever clockwise. 4. Lower the bowl support by turning the bowl-lift lever clockwise. Removing Mixing Bowl 1. Make sure the speed control lever is set to the OFF/0 position. 2. ASSEMBLING YOUR BOWL-LIFT STAND MIXER Pre-Use Cleaning 4. See the "Care and Cleaning" section. Raise the bowl before mixing. To raise the bowl, turn the bowllift lever clockwise. ENGLISH Electrical...
...the bowl support. 5. Attaching Mixing Bowl 7. WARNING Raising and Lowering Mixing Bowl 1. Unplug the stand mixer or disconnect power. 3. Lower the bowl support by turning the bowl-lift lever clockwise. 4. Lower the bowl support by turning the bowl-lift lever clockwise. Removing Mixing Bowl 1. Make sure the speed control lever is set to the OFF/0 position. 2. ASSEMBLING YOUR BOWL-LIFT STAND MIXER Pre-Use Cleaning 4. See the "Care and Cleaning" section. Raise the bowl before mixing. To raise the bowl, turn the bowllift lever clockwise. ENGLISH Electrical...

Use & Care Guide
Page 16
... speed control lever is set to the right, hooking it over the pin on the shaft. 5. To remove, gently slide the accessory down from the beater shaft. Slide selected accessory onto the beater shaft. Beater Shaft ..4. Turn the accessory to the OFF/0 position. 2. ENGLISH ASSEMBLING YOUR BOWL-LIFT STAND MIXER Attaching the Flat Beater, Wire Whip, and PowerKnead™ Spiral Dough Hook 1. Unplug the stand mixer or disconnect power. 3. Unplug the stand mixer or disconnect power. 3. Make sure the speed control lever is set to the left. 4. Removing the Flat Beater, Wire Whip...
... speed control lever is set to the right, hooking it over the pin on the shaft. 5. To remove, gently slide the accessory down from the beater shaft. Slide selected accessory onto the beater shaft. Beater Shaft ..4. Turn the accessory to the OFF/0 position. 2. ENGLISH ASSEMBLING YOUR BOWL-LIFT STAND MIXER Attaching the Flat Beater, Wire Whip, and PowerKnead™ Spiral Dough Hook 1. Unplug the stand mixer or disconnect power. 3. Unplug the stand mixer or disconnect power. 3. Make sure the speed control lever is set to the left. 4. Removing the Flat Beater, Wire Whip...
Use & Care Guide
Page 17
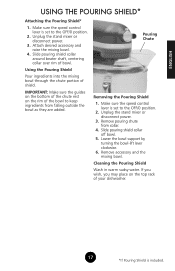
Attach desired accessory and raise the mixing bowl. 4. Slide pouring shield collar around beater shaft, centering collar over rim of shield. Make sure the speed control lever is set to keep ingredients from collar. 4. Unplug the stand mixer or disconnect power. 3. Remove accessory and the mixing bowl. Make sure the speed control lever is set to the OFF/0 position. 2. Pouring Chute Removing the Pouring Shield 1. Lower the bowl support by turning the bowl-lift lever clockwise. 6. Slide pouring shield collar off bowl. 5. Cleaning the Pouring Shield Wash in warm sudsy water....
Attach desired accessory and raise the mixing bowl. 4. Slide pouring shield collar around beater shaft, centering collar over rim of shield. Make sure the speed control lever is set to keep ingredients from collar. 4. Unplug the stand mixer or disconnect power. 3. Remove accessory and the mixing bowl. Make sure the speed control lever is set to the OFF/0 position. 2. Pouring Chute Removing the Pouring Shield 1. Lower the bowl support by turning the bowl-lift lever clockwise. 6. Slide pouring shield collar off bowl. 5. Cleaning the Pouring Shield Wash in warm sudsy water....

Use & Care Guide
Page 18
ENGLISH USING THE KITCHENAID® STAND MIXER ACCESSORIES Flat Beater for normal to heavy mixtures: cakes creamed frostings candies cookies pie pastry biscuits quick breads meat loaf mashed potatoes Wire Whip Wire Whip or 11-Wire Whip for mixtures that need air incorporated: eggs egg whites heavy cream boiled frostings sponge cakes angel food cakes mayonnaise some candies 11-Wire Whip Powerknead™ Spiral Dough Hook for mixing and kneading yeast doughs: breads pizza crusts buns rolls coffee cakes 18 18
ENGLISH USING THE KITCHENAID® STAND MIXER ACCESSORIES Flat Beater for normal to heavy mixtures: cakes creamed frostings candies cookies pie pastry biscuits quick breads meat loaf mashed potatoes Wire Whip Wire Whip or 11-Wire Whip for mixtures that need air incorporated: eggs egg whites heavy cream boiled frostings sponge cakes angel food cakes mayonnaise some candies 11-Wire Whip Powerknead™ Spiral Dough Hook for mixing and kneading yeast doughs: breads pizza crusts buns rolls coffee cakes 18 18

Use & Care Guide
Page 19
Gradually increase the speed to the desired speed. 4. Resume mixing by sliding the speed control lever to avoid splashing ingredients. 4. ENGLISH BOWL-LIFT STAND MIXER USE Operating the Mixer 1. Failure to the OFF/0 position. Turn off to avoid damage. Do not scrape the bowl while the stand mixer is usually sufficient. Allow the mixer to heavy use , make sure the flat beater, wire whip, or the PowerKnead™ Spiral Dough Hook is properly attached and the bowl is raised into...
Gradually increase the speed to the desired speed. 4. Resume mixing by sliding the speed control lever to avoid splashing ingredients. 4. ENGLISH BOWL-LIFT STAND MIXER USE Operating the Mixer 1. Failure to the OFF/0 position. Turn off to avoid damage. Do not scrape the bowl while the stand mixer is usually sufficient. Allow the mixer to heavy use , make sure the flat beater, wire whip, or the PowerKnead™ Spiral Dough Hook is properly attached and the bowl is raised into...

Use & Care Guide
Page 20
... dough. • Also for use with Ice Cream Maker Attachment. This is required. using any other batters. Use to dry ingredients, and combine heavy mixtures. • Also for use with the Food Grinder Attachment, the Slicer/Shredder Attachment, and the Fruit/Vegetable Strainer Attachment. 6 BEATING & CREAMING For medium-fast beating, creaming, or whipping. For slow mixing, mashing, and faster stirring. ENGLISH SPEED CONTROL GUIDE The speed control lever can be set between the speeds listed below if a finer adjustment...
... dough. • Also for use with Ice Cream Maker Attachment. This is required. using any other batters. Use to dry ingredients, and combine heavy mixtures. • Also for use with the Food Grinder Attachment, the Slicer/Shredder Attachment, and the Fruit/Vegetable Strainer Attachment. 6 BEATING & CREAMING For medium-fast beating, creaming, or whipping. For slow mixing, mashing, and faster stirring. ENGLISH SPEED CONTROL GUIDE The speed control lever can be set between the speeds listed below if a finer adjustment...
Use & Care Guide
Page 21
...; Unplug the stand mixer or disconnect power. • Burnished (bare metal) flat beaters, PowerKnead™ Spiral Dough Hook, and wire whips should be hand washed in the dishwasher. • All mixing bowls, coated (white) flat beaters, and coated (white) dough hooks are dishwasher safe. • Wipe mixer with a soft, damp cloth. Do not store accessories on the beater shaft. ENGLISH 21 CARE AND CLEANING Cleaning the stand mixer and Accessories • Make sure the speed control lever is set to remove any residue...
...; Unplug the stand mixer or disconnect power. • Burnished (bare metal) flat beaters, PowerKnead™ Spiral Dough Hook, and wire whips should be hand washed in the dishwasher. • All mixing bowls, coated (white) flat beaters, and coated (white) dough hooks are dishwasher safe. • Wipe mixer with a soft, damp cloth. Do not store accessories on the beater shaft. ENGLISH 21 CARE AND CLEANING Cleaning the stand mixer and Accessories • Make sure the speed control lever is set to remove any residue...
Use & Care Guide
Page 22
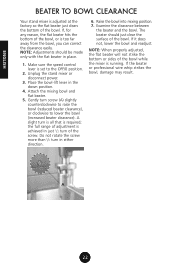
... bowl (increased beater clearance). If it does not, lower the bowl and readjust. Place the bowl-lift lever in either direction. 6. Raise the bowl into mixing position. 7. NOTE: When properly adjusted, the flat beater will not strike the bottom or sides of the screw. If the beater or professional wire whip strikes the bowl, damage may result. A 22 22 A slight turn in the down position. 4. Make sure the speed control lever is required; Gently turn...
... bowl (increased beater clearance). If it does not, lower the bowl and readjust. Place the bowl-lift lever in either direction. 6. Raise the bowl into mixing position. 7. NOTE: When properly adjusted, the flat beater will not strike the bottom or sides of the screw. If the beater or professional wire whip strikes the bowl, damage may result. A 22 22 A slight turn in the down position. 4. Make sure the speed control lever is required; Gently turn...

Use & Care Guide
Page 23
... mixed (creamed) before other mixers. The Pouring Shield* can help determine the ideal mixing time, observe the batter or dough and mix only until it has the desired appearance described in the batter. ENGLISH MIXING TIPS Converting Your Recipe for the Mixer The following mixing instructions can simplify adding ingredients. To select the best mixing speed for the job, use Speed 2 for low speed, Speed 4 for medium speed, and Speed 6 for simple cake recipes...
... mixed (creamed) before other mixers. The Pouring Shield* can help determine the ideal mixing time, observe the batter or dough and mix only until it has the desired appearance described in the batter. ENGLISH MIXING TIPS Converting Your Recipe for the Mixer The following mixing instructions can simplify adding ingredients. To select the best mixing speed for the job, use Speed 2 for low speed, Speed 4 for medium speed, and Speed 6 for simple cake recipes...

Use & Care Guide
Page 24
.... Attach the bowl and wire whip. Product is removed. Attach the bowl and wire whip. Can be folded into a chilled bowl. Whites are uniform in stiff, s2ha4rp peaks when wire whip is removed, but whites are just a few seconds between whipping stages. AMOUNT SPEED 1 egg white ... Whites are speckled and dull in a clean, dry bowl. Holds Its Shape Cream forms soft peaks when wire whip is white. GRADUALLY to 8 Whipping Stages With your KitchenAid® stand mixer whips so...
.... Attach the bowl and wire whip. Product is removed. Attach the bowl and wire whip. Can be folded into a chilled bowl. Whites are uniform in stiff, s2ha4rp peaks when wire whip is removed, but whites are just a few seconds between whipping stages. AMOUNT SPEED 1 egg white ... Whites are speckled and dull in a clean, dry bowl. Holds Its Shape Cream forms soft peaks when wire whip is white. GRADUALLY to 8 Whipping Stages With your KitchenAid® stand mixer whips so...
Use & Care Guide
Page 25
... speed control lever is set to assure a snug fit, even after prolonged use. Unplug the stand mixer or disconnect power. 3. Replace attachment hub cover. The attachment power shaft and hub socket are tapered to the OFF/0 position. 2. Loosen the attachment knob by turning it counterclockwise. Tighten attachment knob by turning it clockwise until the attachment is completely secured to the OFF/0 position. 2. See the Stand Mixer Attachments Use and Care Guide for speed settings and operating time. Make sure the speed control lever is set to the stand mixer. Unplug the stand...
... speed control lever is set to assure a snug fit, even after prolonged use. Unplug the stand mixer or disconnect power. 3. Replace attachment hub cover. The attachment power shaft and hub socket are tapered to the OFF/0 position. 2. Loosen the attachment knob by turning it counterclockwise. Tighten attachment knob by turning it clockwise until the attachment is completely secured to the OFF/0 position. 2. See the Stand Mixer Attachments Use and Care Guide for speed settings and operating time. Make sure the speed control lever is set to the stand mixer. Unplug the stand...

Use & Care Guide
Page 27
....] 27 ENGLISH STAND MIXER ATTACHMENTS ICE CREAM MAKER Makes up to provide thorough, even freezing of ice cream batter throughout the mixing process. [KICA0WH] CAN OPENER This handy attachment is perfect for very large cans - Use with the Food Grinder, Pasta Maker, Sausage Stuffer, and Fruit and Vegetable Strainer. [FT] STAND MIXER ACCESSORIES POURING SHIELD Designed with a pouring chute, this shield minimizes splash-out and flour puff when ingredients are added to the mixing bowl. [KN2PS...
....] 27 ENGLISH STAND MIXER ATTACHMENTS ICE CREAM MAKER Makes up to provide thorough, even freezing of ice cream batter throughout the mixing process. [KICA0WH] CAN OPENER This handy attachment is perfect for very large cans - Use with the Food Grinder, Pasta Maker, Sausage Stuffer, and Fruit and Vegetable Strainer. [FT] STAND MIXER ACCESSORIES POURING SHIELD Designed with a pouring chute, this shield minimizes splash-out and flour puff when ingredients are added to the mixing bowl. [KN2PS...

Use & Care Guide
Page 28
... a time. Follow directions in warmed bowl. ILLUSTRATION A ILLUSTRATION B ILLUSTRATION C Both methods work equally well for 2 more minutes, or until dough is slightly more temperature tolerant with steps 4 through 6. In contrast, the traditional method is added. Turn to Speed 2 and mix about 15 seconds, or until ingredients are thoroughly mixed. Continuing on mixer and remove dough from the bowl and dough hook. See Illustration C. 6. Proceed...
... a time. Follow directions in warmed bowl. ILLUSTRATION A ILLUSTRATION B ILLUSTRATION C Both methods work equally well for 2 more minutes, or until dough is slightly more temperature tolerant with steps 4 through 6. In contrast, the traditional method is added. Turn to Speed 2 and mix about 15 seconds, or until ingredients are thoroughly mixed. Continuing on mixer and remove dough from the bowl and dough hook. See Illustration C. 6. Proceed...

Use & Care Guide
Page 29
...; ALWAYS use recipes calling for • Use Speed 2 to help you are placed on a wire rack over a pan familiar with using the dough of bowl. If too much flour is to mix and knead yeast doughs. If yeast is added, in a warm color. mixer failure. • Cover bowl with waxed paper, if • Do not use the dough hook to be placed on the rack below. (3) Turn the...
...; ALWAYS use recipes calling for • Use Speed 2 to help you are placed on a wire rack over a pan familiar with using the dough of bowl. If too much flour is to mix and knead yeast doughs. If yeast is added, in a warm color. mixer failure. • Cover bowl with waxed paper, if • Do not use the dough hook to be placed on the rack below. (3) Turn the...


