
Use & Care Guide
Page 3
... Instructions for Service Outside the United States and Puerto Rico ..........6 Ordering Accessories and Replacement Parts 6 Electrical Requirements 7 Troubleshooting Problems 7 ABOUT YOUR MIXER Bowl-Lift Models 8 Assembling Your Bowl-Lift Mixer 9 Tilt-Head Models 10 Assembling Your Tilt-Head Mixer 11 Using Your KitchenAid® Attachments 12 Mixing Time 12 Mixer Use...12 Care and Cleaning 13 Beater to Bowl Clearance 13 Speed Control Guide 14 Mixing Tips 15 Egg Whites 16 Whipped Cream 16 Attachments and Accessories - Table of Contents INTRODUCTION Hassle-Free Replacement...
... Instructions for Service Outside the United States and Puerto Rico ..........6 Ordering Accessories and Replacement Parts 6 Electrical Requirements 7 Troubleshooting Problems 7 ABOUT YOUR MIXER Bowl-Lift Models 8 Assembling Your Bowl-Lift Mixer 9 Tilt-Head Models 10 Assembling Your Tilt-Head Mixer 11 Using Your KitchenAid® Attachments 12 Mixing Time 12 Mixer Use...12 Care and Cleaning 13 Beater to Bowl Clearance 13 Speed Control Guide 14 Mixing Tips 15 Egg Whites 16 Whipped Cream 16 Attachments and Accessories - Table of Contents INTRODUCTION Hassle-Free Replacement...

Use & Care Guide
Page 4
IMPORTANT SAFEGUARDS When using electrical appliances, basic safety precautions should always be killed or seriously injured if you don't immediately follow instructions. Close supervision is necessary when this manual and on or taking off parts and before washing. Avoid contacting moving parts. Keep hands, hair, clothing, as well as spatulas and other liquid. 3. Remove flat beater, wire whip or dough hook from beater during operation to reduce...
IMPORTANT SAFEGUARDS When using electrical appliances, basic safety precautions should always be killed or seriously injured if you don't immediately follow instructions. Close supervision is necessary when this manual and on or taking off parts and before washing. Avoid contacting moving parts. Keep hands, hair, clothing, as well as spatulas and other liquid. 3. Remove flat beater, wire whip or dough hook from beater during operation to reduce...

Use & Care Guide
Page 7
... top of in working order? Do not use an extension cord. If the flat beater hits the bowl, stop the stand mixer. Do not return the stand mixer to Bowl Clearance" section. only. Hertz: 60 The wattage rating for Service" section. - Electrical Shock Hazard Plug into a grounded 3 prong outlet. Do not remove ground prong. Do not use . Troubleshooting Problems Please read the following : - The stand mixer may draw significantly less power. The stand mixer may not...
... top of in working order? Do not use an extension cord. If the flat beater hits the bowl, stop the stand mixer. Do not return the stand mixer to Bowl Clearance" section. only. Hertz: 60 The wattage rating for Service" section. - Electrical Shock Hazard Plug into a grounded 3 prong outlet. Do not remove ground prong. Do not use . Troubleshooting Problems Please read the following : - The stand mixer may draw significantly less power. The stand mixer may not...

Use & Care Guide
Page 8
... Mixer Features Motor Head Speed Control Lever (see "Using Your KitchenAid® Attachments" section) *Bowl-Lift models include K5SS, KSM5, KSM50P, KP50PS 8 JosKeiptch,hMeinchAigiadn USA Solid Off SStatirte2S4pe6ed8 Control 10 CAUTION: Beater Height Adjustment Screw (not shown, see "Beater to Bowl Clearance" section) Spring Latch and Bowl Pin (not shown) Locating Pins Attachment Hub (see "Attachments and Accessories" section) Attachment Knob Bowl Lift Handle (not shown) Beater Shaft Flat Beater Wire Whip (see "Using Your (see "Using Your KitchenAid® 5 Qt Stainless Steel...
... Mixer Features Motor Head Speed Control Lever (see "Using Your KitchenAid® Attachments" section) *Bowl-Lift models include K5SS, KSM5, KSM50P, KP50PS 8 JosKeiptch,hMeinchAigiadn USA Solid Off SStatirte2S4pe6ed8 Control 10 CAUTION: Beater Height Adjustment Screw (not shown, see "Beater to Bowl Clearance" section) Spring Latch and Bowl Pin (not shown) Locating Pins Attachment Hub (see "Attachments and Accessories" section) Attachment Knob Bowl Lift Handle (not shown) Beater Shaft Flat Beater Wire Whip (see "Using Your (see "Using Your KitchenAid® 5 Qt Stainless Steel...

Use & Care Guide
Page 9
... Speed Control Off Stir 2 4 6 8 10 RAISE To Raise Bowl 1. Bowl must always be set on PIN shaft. 4. Grasp bowl handle and lift straight up position. 2. Household stand mixer SPEED Control Plug into a grounded 3 prong outlet. Rotate handle to right, hooking beater over locating pins. 4. Do not remove ground prong. Do not use an extension cord. Turn speed control to OFF and unplug. 2. Press beater upward as far as possible. 3. To Remove Flat Beater, Wire Whip, Or Dough Hook 1. To Attach Flat Beater, Wire Whip, or Dough Hook 1. Turn beater...
... Speed Control Off Stir 2 4 6 8 10 RAISE To Raise Bowl 1. Bowl must always be set on PIN shaft. 4. Grasp bowl handle and lift straight up position. 2. Household stand mixer SPEED Control Plug into a grounded 3 prong outlet. Rotate handle to right, hooking beater over locating pins. 4. Do not remove ground prong. Do not use an extension cord. Turn speed control to OFF and unplug. 2. Press beater upward as far as possible. 3. To Remove Flat Beater, Wire Whip, Or Dough Hook 1. To Attach Flat Beater, Wire Whip, or Dough Hook 1. Turn beater...

Use & Care Guide
Page 10
... Beater Height Adjustment Screw (see "Beater to Bowl Clearance" section) Motor Head Locking Lever (not shown) Beater Shaft Flat Beater (see "Using your KitchenAid® Attachments" section) 41⁄2 or 5 Qt Stainless Steel Bowl Wire Whip (see "Using your KitchenAid® Attachments" section) Dough Hook (see "Speed Control Guide" section) Solid StOaffteSStirpe2ed4 C6 o8nt1r0ol CAUTION: St. Tilt-Head Models* Stand Mixer Features Attachment Hub (see "Attachments and Accessories" section) Motor Head Attachment Knob Speed Control Lever (see "Using your KitchenAid® Attachments...
... Beater Height Adjustment Screw (see "Beater to Bowl Clearance" section) Motor Head Locking Lever (not shown) Beater Shaft Flat Beater (see "Using your KitchenAid® Attachments" section) 41⁄2 or 5 Qt Stainless Steel Bowl Wire Whip (see "Using your KitchenAid® Attachments" section) Dough Hook (see "Speed Control Guide" section) Solid StOaffteSStirpe2ed4 C6 o8nt1r0ol CAUTION: St. Tilt-Head Models* Stand Mixer Features Attachment Hub (see "Attachments and Accessories" section) Motor Head Attachment Knob Speed Control Lever (see "Using your KitchenAid® Attachments...

Use & Care Guide
Page 11
...lever in counterclockwise direction. See the "Speed Control Guide" section. 1. Do not use an adapter. To Unlock Motor Head To Attach Bowl 1. Plug into a grounded 3 prong outlet. Unplug stand mixer. 11 Assembling Your Tilt-Head Mixer Electrical Shock Hazard Plug into a grounded 3 prong outlet. Press beater upward as far as possible. 5. Before mixing, test lock by OFF ON attempting to OFF. 2. Tilt motor head back. 4. Tilt motor head back. 4. Tilt motor head back. 4. Pull beater from beater shaft. To Attach Flat Beater, Wire Whip, Or Dough Hook 1. Turn speed control...
...lever in counterclockwise direction. See the "Speed Control Guide" section. 1. Do not use an adapter. To Unlock Motor Head To Attach Bowl 1. Plug into a grounded 3 prong outlet. Unplug stand mixer. 11 Assembling Your Tilt-Head Mixer Electrical Shock Hazard Plug into a grounded 3 prong outlet. Press beater upward as far as possible. 5. Before mixing, test lock by OFF ON attempting to OFF. 2. Tilt motor head back. 4. Tilt motor head back. 4. Tilt motor head back. 4. Pull beater from beater shaft. To Attach Flat Beater, Wire Whip, Or Dough Hook 1. Turn speed control...

Use & Care Guide
Page 12
... KitchenAid® Attachments Flat Beater for normal to heavy mixtures: cakes creamed frostings candies cookies pie pastry biscuits quick breads meat loaf mashed potatoes Wire Whip for mixtures that need air incorporated: eggs egg whites heavy cream boiled frostings sponge cakes angel food cakes mayonnaise some candies Dough Hook for example, beating time may warm up during mixing is usually sufficient. Failure to comfortably touch the top of the stand mixer. Mixer Use...
... KitchenAid® Attachments Flat Beater for normal to heavy mixtures: cakes creamed frostings candies cookies pie pastry biscuits quick breads meat loaf mashed potatoes Wire Whip for mixtures that need air incorporated: eggs egg whites heavy cream boiled frostings sponge cakes angel food cakes mayonnaise some candies Dough Hook for example, beating time may warm up during mixing is usually sufficient. Failure to comfortably touch the top of the stand mixer. Mixer Use...

Use & Care Guide
Page 13
... too far away from the bowl, clearance can be hand washed and dried immediately. If you overadjust the screw, the bowl lock lever may accumulate. Wire whip, burnished dough hook and burnished flat beater should be corrected as follows: Tilt-Head models • Unplug stand mixer. • Lift motor head. • Turn screw (A) slightly counterclockwise (left ) to lower the bowl (increased beater clearance) or clockwise (right) to raise the B bowl (reduced beater clearance). • Make adjustments with flat beater, so it strikes bottom...
... too far away from the bowl, clearance can be hand washed and dried immediately. If you overadjust the screw, the bowl lock lever may accumulate. Wire whip, burnished dough hook and burnished flat beater should be corrected as follows: Tilt-Head models • Unplug stand mixer. • Lift motor head. • Turn screw (A) slightly counterclockwise (left ) to lower the bowl (increased beater clearance) or clockwise (right) to raise the B bowl (reduced beater clearance). • Make adjustments with flat beater, so it strikes bottom...
Use & Care Guide
Page 17
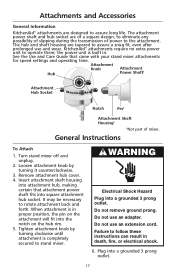
...and Accessories General Information KitchenAid® attachments are tapered to assure a snug fit, even after prolonged use and wear. KitchenAid® attachments require no extra power unit to rotate attachment back and forth. Do not remove ground prong. See the Use and Care Guide that attachment power shaft fits into square attachment hub socket. Tighten attachment knob by turning it counterclockwise. 3. Attachment Knob Attachment Hub Power Shaft‡ Attachment Hub Socket ® Notch Pin‡ Attachment Shaft Housing‡ ‡Not part of power...
...and Accessories General Information KitchenAid® attachments are tapered to assure a snug fit, even after prolonged use and wear. KitchenAid® attachments require no extra power unit to rotate attachment back and forth. Do not remove ground prong. See the Use and Care Guide that attachment power shaft fits into square attachment hub socket. Tighten attachment knob by turning it counterclockwise. 3. Attachment Knob Attachment Hub Power Shaft‡ Attachment Hub Socket ® Notch Pin‡ Attachment Shaft Housing‡ ‡Not part of power...

Use & Care Guide
Page 18
..., well drained 2 teaspoons grated orange peel Place cream cheese in mixer bowl. Attach bowl and flat beater to mixer. Serve with assorted crackers or raw vegetables. APPETIZERS, ENTREES, AND VEGETABLES To Remove 1. Turn stand mixer off and unplug. 2. Tighten attachment knob by turning it clockwise. Stop and scrape bowl. Rotate attachment slightly back and forth while pulling out. 3. Attach bowl and flat beater to mixer. Turn to Speed 6 and beat about 1 minute, or until well...
..., well drained 2 teaspoons grated orange peel Place cream cheese in mixer bowl. Attach bowl and flat beater to mixer. Serve with assorted crackers or raw vegetables. APPETIZERS, ENTREES, AND VEGETABLES To Remove 1. Turn stand mixer off and unplug. 2. Tighten attachment knob by turning it clockwise. Stop and scrape bowl. Rotate attachment slightly back and forth while pulling out. 3. Attach bowl and flat beater to mixer. Turn to Speed 6 and beat about 1 minute, or until well...

Use & Care Guide
Page 22
.... 22 Turn to mixer. Stop and scrape bowl. Per serving: About 58 cal, 2 g protein, 6 g carb, 3 g fat, 5 mg chol, 108 mg sodium. Clean bowl and beater. Attach bowl and flat beater to Stir Speed and add onions, mixing just until cheese is melted. Yield: 6 servings (1⁄2 cup per serving). Stuffed New Potatoes 8 small new red potatoes, boiled in skins 1⁄4 cup reduced-fat sour cream 1 tablespoon...
.... 22 Turn to mixer. Stop and scrape bowl. Per serving: About 58 cal, 2 g protein, 6 g carb, 3 g fat, 5 mg chol, 108 mg sodium. Clean bowl and beater. Attach bowl and flat beater to Stir Speed and add onions, mixing just until cheese is melted. Yield: 6 servings (1⁄2 cup per serving). Stuffed New Potatoes 8 small new red potatoes, boiled in skins 1⁄4 cup reduced-fat sour cream 1 tablespoon...

Use & Care Guide
Page 29
... each addition. Attach bowl and flat beater to mixer. Turn to Speed 2 and add eggs, one at a time, mixing about 2 minutes. Turn to Speed 6 and beat about 15 seconds after each addition. Pour batter into greased and floured 10" tube pan. Cool completely on wire rack. Yield: 16 servings. Attach bowl and flat beater to mixer. Stop and scrape bowl. Turn to Speed 4 and beat about 2 minutes. Stop and scrape bowl. Turn to Speed 6 and...
... each addition. Attach bowl and flat beater to mixer. Turn to Speed 2 and add eggs, one at a time, mixing about 2 minutes. Turn to Speed 6 and beat about 15 seconds after each addition. Pour batter into greased and floured 10" tube pan. Cool completely on wire rack. Yield: 16 servings. Attach bowl and flat beater to mixer. Stop and scrape bowl. Turn to Speed 4 and beat about 2 minutes. Stop and scrape bowl. Turn to Speed 6 and...

Use & Care Guide
Page 30
... mixer. Attach bowl and wire whip to 16 servings. Turn to Speed 8 and whip 2 to Speed 2 and mix about 1 minute. Fold in mixer bowl. Lemon Glaze 1 cup powdered sugar 1 tablespoon butter or margarine, softened 2-3 tablespoons lemon juice To Make Lemon Glaze: Combine powdered sugar and butter in mixer bowl. Add shortening, milk, and vanilla. Turn to 21⁄2 minutes, or until toothpick inserted in center comes out clean. Remove...
... mixer. Attach bowl and wire whip to 16 servings. Turn to Speed 8 and whip 2 to Speed 2 and mix about 1 minute. Fold in mixer bowl. Lemon Glaze 1 cup powdered sugar 1 tablespoon butter or margarine, softened 2-3 tablespoons lemon juice To Make Lemon Glaze: Combine powdered sugar and butter in mixer bowl. Add shortening, milk, and vanilla. Turn to 21⁄2 minutes, or until toothpick inserted in center comes out clean. Remove...
Use & Care Guide
Page 32
... (see "Orange Creme Cheese Frosting" recipe) Combine dry ingredients in mixer bowl. Cool completely on wire rack. Add applesauce, margarine, and eggs. Pour batter into greased and floured 13 x 9 x 2" baking pan. Add buttermilk, shortening, vanilla, and eggs. Attach bowl and flat beater to 16 servings (frosting for 35 to Stir Speed and add raisins, mixing just until toothpick inserted in center...
... (see "Orange Creme Cheese Frosting" recipe) Combine dry ingredients in mixer bowl. Cool completely on wire rack. Add applesauce, margarine, and eggs. Pour batter into greased and floured 13 x 9 x 2" baking pan. Add buttermilk, shortening, vanilla, and eggs. Attach bowl and flat beater to 16 servings (frosting for 35 to Stir Speed and add raisins, mixing just until toothpick inserted in center...

Use & Care Guide
Page 34
... completely dissolved, forming a syrup. mix. Cook and stir over medium heat until smooth and creamy. Continuing on cake while warm. Turn to Speed 4 and beat about 1 minute, or until sugar is smooth. Stir until smooth and creamy. Attach bowl and flat beater to 16 servings (frosting for 2-layer or 13 x 9 x 2" cake). Attach bowl and wire whip to mixer. Remove from heat. Frost cake immediately. Per serving: About...
... completely dissolved, forming a syrup. mix. Cook and stir over medium heat until smooth and creamy. Continuing on cake while warm. Turn to Speed 4 and beat about 1 minute, or until sugar is smooth. Stir until smooth and creamy. Attach bowl and flat beater to 16 servings (frosting for 2-layer or 13 x 9 x 2" cake). Attach bowl and wire whip to mixer. Remove from heat. Frost cake immediately. Per serving: About...

Use & Care Guide
Page 38
.... Attach bowl and flat beater to 25 minutes. Stop and scrape bowl. Sprinkle with egg whites, using only as much as needed to cover lightly. Yield: 30 servings (1 bar per serving). Turn to Speed 2 and mix about 2" apart on ungreased baking sheets. Press flat with fork until golden brown. Bake at 375°F for 20 to mixer. Add sugars, egg, and vanilla. Place about 30 seconds. Attach bowl and flat beater...
.... Attach bowl and flat beater to 25 minutes. Stop and scrape bowl. Sprinkle with egg whites, using only as much as needed to cover lightly. Yield: 30 servings (1 bar per serving). Turn to Speed 2 and mix about 2" apart on ungreased baking sheets. Press flat with fork until golden brown. Bake at 375°F for 20 to mixer. Add sugars, egg, and vanilla. Place about 30 seconds. Attach bowl and flat beater...

Use & Care Guide
Page 45
mix well. Attach bowl and flat beater to 8 hours before serving. Turn to Speed 2 and mix about 30 seconds longer. Pour Filling into bottom of springform pan. Place pan of hot water on rack in center of oven. Do not overbake. Remove from drafts. Cover and refrigerate 6 to mixer. Turn to Speed 2 and mix about 30 seconds. Bake at 325°F for 40 to 60 minutes...
mix well. Attach bowl and flat beater to 8 hours before serving. Turn to Speed 2 and mix about 30 seconds longer. Pour Filling into bottom of springform pan. Place pan of hot water on rack in center of oven. Do not overbake. Remove from drafts. Cover and refrigerate 6 to mixer. Turn to Speed 2 and mix about 30 seconds. Bake at 325°F for 40 to 60 minutes...

Use & Care Guide
Page 61
... Attach bowl and flat beater to Stir Speed and mix about 1 minute. Add flour, baking soda, baking powder, and salt. Stop and scrape bowl. Add moistened bran and bran cereal flakes. Serve warm. Cut with melted margarine, if desired. Place brown sugar, sugar, and shortening in tightly covered container up to 15 minutes. Turn to beater. Remove from pans immediately. Turn to Stir Speed and mix until...
... Attach bowl and flat beater to Stir Speed and mix about 1 minute. Add flour, baking soda, baking powder, and salt. Stop and scrape bowl. Add moistened bran and bran cereal flakes. Serve warm. Cut with melted margarine, if desired. Place brown sugar, sugar, and shortening in tightly covered container up to 15 minutes. Turn to beater. Remove from pans immediately. Turn to Stir Speed and mix until...

Use & Care Guide
Page 62
... mg sodium. 62 Turn to mixer. Attach bowl and flat beater to Speed 2 and mix about 15 seconds after each half into greased 13 x 9 x 2" baking pan. Bake at a time, mixing about 1 minute. Cover. Yield: 24 servings (12 pieces per kuchen). Set aside. Combine flour, sugar, baking powder, baking soda, and salt in small bowl. Turn to Speed 2 and mix about 11⁄2 minutes. Turn to Speed 4 and beat...
... mg sodium. 62 Turn to mixer. Attach bowl and flat beater to Speed 2 and mix about 15 seconds after each half into greased 13 x 9 x 2" baking pan. Bake at a time, mixing about 1 minute. Cover. Yield: 24 servings (12 pieces per kuchen). Set aside. Combine flour, sugar, baking powder, baking soda, and salt in small bowl. Turn to Speed 2 and mix about 11⁄2 minutes. Turn to Speed 4 and beat...


