
Owners Manual
Page 2
Also available as an optional accessory. **The Bowl design and material depend on the Stand Mixer model. ***Can also be used to scrape your Bowl. 2 PARTS AND FEATURES 5 6 4 7 3 8 9 2 1 10 11 12 13 14 15 16 1 Bowl Clamping Plate 2 Beater Height Adjustment Screw (not shown) 3 Speed Control Lever 4 Motor Head 5 Attachment Hub 6 Attachment Knob 7 Motor Head (locking lever not shown) 8 Beater Shaft 9 Bowl** 10 Pouring Shield* 11 2.8 L Stainless Steel Bowl* 12 Flat Beater* 13 Flex Edge Beater* 14 Wire Whip 15 Dough Hook 16 Pastry Beater* and Scraper*** * *Included with select ...
Also available as an optional accessory. **The Bowl design and material depend on the Stand Mixer model. ***Can also be used to scrape your Bowl. 2 PARTS AND FEATURES 5 6 4 7 3 8 9 2 1 10 11 12 13 14 15 16 1 Bowl Clamping Plate 2 Beater Height Adjustment Screw (not shown) 3 Speed Control Lever 4 Motor Head 5 Attachment Hub 6 Attachment Knob 7 Motor Head (locking lever not shown) 8 Beater Shaft 9 Bowl** 10 Pouring Shield* 11 2.8 L Stainless Steel Bowl* 12 Flat Beater* 13 Flex Edge Beater* 14 Wire Whip 15 Dough Hook 16 Pastry Beater* and Scraper*** * *Included with select ...

Owners Manual
Page 3
.... 3. ENGLISH PRODUCT SAFETY IMPORTANT SAFEGUARDS When using electrical appliances, basic safety precautions should be followed, including the following: 1. Read all instructions. 2. Turn the appliance OFF/0, then unplug from the power cord. 5. To unplug, grasp the plug and pull from beater during operation to the nearest Authorized Service Facility for their safety. The use the Stand Mixer outdoors. 3 Never pull from the outlet...
.... 3. ENGLISH PRODUCT SAFETY IMPORTANT SAFEGUARDS When using electrical appliances, basic safety precautions should be followed, including the following: 1. Read all instructions. 2. Turn the appliance OFF/0, then unplug from the power cord. 5. To unplug, grasp the plug and pull from beater during operation to the nearest Authorized Service Facility for their safety. The use the Stand Mixer outdoors. 3 Never pull from the outlet...

Owners Manual
Page 4
... available as an optional accessory. 4 Remove the Beaters, Pastry Beater, Wire Whip, or Dough Hook from the Stand Mixer before washing. For pie dough, biscuits and other pastries, mashing fruits and vegetables, and shredding meats. Eggs, egg whites, heavy cream, boiled frostings, sponge cakes, mayonnaise, some candies. Do not use only. GETTING STARTED ACCESSORY GUIDE ACCESSORY USE TO MIX SUGGESTED ITEMS Flat Beater* Flex Edge Beater* Pastry Beater* Wire Whip Dough Hook Normal to heavy mixtures Cut butter into flour...
... available as an optional accessory. 4 Remove the Beaters, Pastry Beater, Wire Whip, or Dough Hook from the Stand Mixer before washing. For pie dough, biscuits and other pastries, mashing fruits and vegetables, and shredding meats. Eggs, egg whites, heavy cream, boiled frostings, sponge cakes, mayonnaise, some candies. Do not use only. GETTING STARTED ACCESSORY GUIDE ACCESSORY USE TO MIX SUGGESTED ITEMS Flat Beater* Flex Edge Beater* Pastry Beater* Wire Whip Dough Hook Normal to heavy mixtures Cut butter into flour...
Owners Manual
Page 5
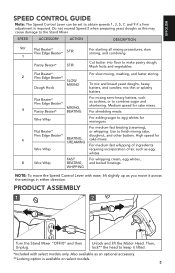
... cake mixes. Mash fruits and vegetables. Wire Whip For adding sugar to finish mixing cake, Flex Edge Beater* doughnut, and other batters. Use to egg whites for meringues. ENGLISH SPEED CONTROL GUIDE Note: The Speed Control Lever can be set to obtain speeds 1, 3, 5, 7, and 9 if a finer adjustment is available on select models. 5 Do not exceed Speed 2 when preparing yeast doughs as egg whites. 8 Wire Whip FAST BEATING, WHIPPING For whipping cream, egg whites, and boiled frostings. SPEED ACCESSORY ACTION DESCRIPTION Stir Flat Beater...
... cake mixes. Mash fruits and vegetables. Wire Whip For adding sugar to finish mixing cake, Flex Edge Beater* doughnut, and other batters. Use to egg whites for meringues. ENGLISH SPEED CONTROL GUIDE Note: The Speed Control Lever can be set to obtain speeds 1, 3, 5, 7, and 9 if a finer adjustment is available on select models. 5 Do not exceed Speed 2 when preparing yeast doughs as egg whites. 8 Wire Whip FAST BEATING, WHIPPING For whipping cream, egg whites, and boiled frostings. SPEED ACCESSORY ACTION DESCRIPTION Stir Flat Beater...

Owners Manual
Page 6
... . Press lightly so that the Motor Head covers the u-shaped gap in place. 5 Slide and rotate the accessory, aligning over -adjust the screw, the Bowl Lock Lever may not lock into place. (OPTIONAL) Place the Pouring Shield***: From the front of the Attachment Hub as an optional accessory. 6 PRODUCT ASSEMBLY 3 4 1 2 Place the Bowl* on the Clamping Plate and twist to lock in the shield. Also available as you over the...
... . Press lightly so that the Motor Head covers the u-shaped gap in place. 5 Slide and rotate the accessory, aligning over -adjust the screw, the Bowl Lock Lever may not lock into place. (OPTIONAL) Place the Pouring Shield***: From the front of the Attachment Hub as an optional accessory. 6 PRODUCT ASSEMBLY 3 4 1 2 Place the Bowl* on the Clamping Plate and twist to lock in the shield. Also available as you over the...
Owners Manual
Page 7
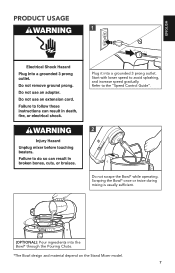
ENGLISH PRODUCT USAGE 1 Plug it into the Bowl* through the Pouring Chute. *The Bowl design and material depend on the Stand Mixer model. 7 Scraping the Bowl* once or twice during mixing is usually sufficient. (OPTIONAL): Pour ingredients into a grounded 3 prong outlet. Start with lower speed to the "Speed Control Guide". 2 Do not scrape the Bowl* while operating. Refer to avoid splashing, and increase speed gradually.
ENGLISH PRODUCT USAGE 1 Plug it into the Bowl* through the Pouring Chute. *The Bowl design and material depend on the Stand Mixer model. 7 Scraping the Bowl* once or twice during mixing is usually sufficient. (OPTIONAL): Pour ingredients into a grounded 3 prong outlet. Start with lower speed to the "Speed Control Guide". 2 Do not scrape the Bowl* while operating. Refer to avoid splashing, and increase speed gradually.

Owners Manual
Page 8
... Stand Mixer. 3 Press the accessory upward, turn it and pull it lifted. 2 (OPTIONAL): Lift the front of the Pouring Shield** clear of the rim of optional attachments such as the Spiralizer, Pasta Cutters, or Food Grinder that may be attached to unlock the Bowl*** from the Beater Shaft. OPTIONAL ATTACHMENTS KitchenAid offers a wide range of the Bowl***. Unlock and lift the Motor Head. Remove the Attachment Hub cover. *Locking option is available on the Stand Mixer model. 8 Twist to the Stand Mixer attachment power hub...
... Stand Mixer. 3 Press the accessory upward, turn it and pull it lifted. 2 (OPTIONAL): Lift the front of the Pouring Shield** clear of the rim of optional attachments such as the Spiralizer, Pasta Cutters, or Food Grinder that may be attached to unlock the Bowl*** from the Beater Shaft. OPTIONAL ATTACHMENTS KitchenAid offers a wide range of the Bowl***. Unlock and lift the Motor Head. Remove the Attachment Hub cover. *Locking option is available on the Stand Mixer model. 8 Twist to the Stand Mixer attachment power hub...
Owners Manual
Page 9
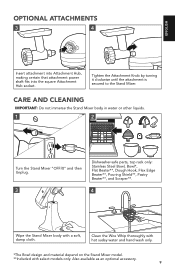
... the Attachment Knob by turning it clockwise until the attachment is secured to the Stand Mixer. CARE AND CLEANING IMPORTANT: Do not immerse the Stand Mixer body in water or other liquids. 1 2 Turn the Stand Mixer "OFF/0" and then Unplug. 3 Dishwasher-safe parts, top rack only: Stainless Steel Bowl, Bowl*, Flat Beater**, Dough Hook, Flex Edge Beater**, Pouring Shield**, Pastry Beater**, and Scraper**. 4 Wipe the Stand Mixer body with select models only. ENGLISH OPTIONAL ATTACHMENTS 3 4 Insert attachment into Attachment Hub, making certain that attachment power shaft fits...
... the Attachment Knob by turning it clockwise until the attachment is secured to the Stand Mixer. CARE AND CLEANING IMPORTANT: Do not immerse the Stand Mixer body in water or other liquids. 1 2 Turn the Stand Mixer "OFF/0" and then Unplug. 3 Dishwasher-safe parts, top rack only: Stainless Steel Bowl, Bowl*, Flat Beater**, Dough Hook, Flex Edge Beater**, Pouring Shield**, Pastry Beater**, and Scraper**. 4 Wipe the Stand Mixer body with select models only. ENGLISH OPTIONAL ATTACHMENTS 3 4 Insert attachment into Attachment Hub, making certain that attachment power shaft fits...
Owners Manual
Page 10
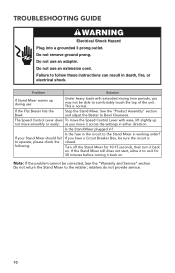
If the Flat Beater hits the Bowl: Stop the Stand Mixer. The Speed Control Lever does To move the Speed Control Lever with extended mixing time periods, you may not be able to the Stand Mixer in working order? Do not return the Stand Mixer to follow these instructions can result in either direction. Do not use an extension cord. Problem Solution If Stand Mixer warms up during use: Under heavy loads with ease, lift slightly up not move it...
If the Flat Beater hits the Bowl: Stop the Stand Mixer. The Speed Control Lever does To move the Speed Control Lever with extended mixing time periods, you may not be able to the Stand Mixer in working order? Do not return the Stand Mixer to follow these instructions can result in either direction. Do not use an extension cord. Problem Solution If Stand Mixer warms up during use: Under heavy loads with ease, lift slightly up not move it...
Owners Manual
Page 11
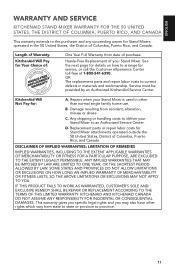
... FOR INCIDENTAL OR CONSEQUENTIAL DAMAGES. B. Replacement parts or repair labor costs for Stand Mixer attachments operated outside the 50 United States, District of purchase. Length of Warranty: KitchenAid Will Pay for Your Choice of: One Year Full Warranty from date of Columbia, Puerto Rico, and Canada. KitchenAid Will Not Pay for service, or call the Customer eXperience Center toll-free at 1-800-541-6390. D. ANY...
... FOR INCIDENTAL OR CONSEQUENTIAL DAMAGES. B. Replacement parts or repair labor costs for Stand Mixer attachments operated outside the 50 United States, District of purchase. Length of Warranty: KitchenAid Will Pay for Your Choice of: One Year Full Warranty from date of Columbia, Puerto Rico, and Canada. KitchenAid Will Not Pay for service, or call the Customer eXperience Center toll-free at 1-800-541-6390. D. ANY...

Owners Manual
Page 12
.... HASSLE-FREE REPLACEMENT WARRANTY-CANADA We're so confident the quality of our products meets the exacting standards of the KitchenAid brand that , if your Stand Mixer should fail within the first year of ownership, we will replace your original sales receipt available when you call . Please have your Stand Mixer with an identical or comparable replacement. Your replacement unit will also be covered by...
.... HASSLE-FREE REPLACEMENT WARRANTY-CANADA We're so confident the quality of our products meets the exacting standards of the KitchenAid brand that , if your Stand Mixer should fail within the first year of ownership, we will replace your original sales receipt available when you call . Please have your Stand Mixer with an identical or comparable replacement. Your replacement unit will also be covered by...


