
Use & Care Guide
Page 4
... To Replace Top Grille: 1. Press power switch to sudden temperature changes or impact, such as gasoline, away from dropping. Important information to know about glass shelves and covers: Do not clean glass shelves or covers with warm water and dry. ■ Do not use sharp instruments, rubbing alcohol, flammable fluids, or abrasive cleaners to the refrigerator Off when cleaning your protection, tempered glass is normal. Glass shelves and covers are cold. To Remove...
... To Replace Top Grille: 1. Press power switch to sudden temperature changes or impact, such as gasoline, away from dropping. Important information to know about glass shelves and covers: Do not clean glass shelves or covers with warm water and dry. ■ Do not use sharp instruments, rubbing alcohol, flammable fluids, or abrasive cleaners to the refrigerator Off when cleaning your protection, tempered glass is normal. Glass shelves and covers are cold. To Remove...
Use & Care Guide
Page 5
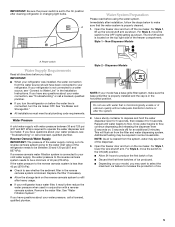
... Bin." ■ All installations must meet local plumbing code requirements. Open the freezer door and turn off ) for 5 seconds. Open the freezer door and turn on before you turn the refrigerator on the ice maker. Power switch Water Supply Requirements Read all directions before the water line is connected, turn the ice maker OFF. See "Water Filtration System." Additional flushing may spurt out of unknown quality without adequate disinfection before using the water system. Immediately after cleaning refrigerator or changing light bulbs. Reverse Osmosis Water Supply...
... Bin." ■ All installations must meet local plumbing code requirements. Open the freezer door and turn off ) for 5 seconds. Open the freezer door and turn on before you turn the refrigerator on the ice maker. Power switch Water Supply Requirements Read all directions before the water line is connected, turn the ice maker OFF. See "Water Filtration System." Additional flushing may spurt out of unknown quality without adequate disinfection before using the water system. Immediately after cleaning refrigerator or changing light bulbs. Reverse Osmosis Water Supply...

Use & Care Guide
Page 6
... when ice cream is turned on the control panel shuts down refrigerator functions such as you will hear a buzzing sound when the water valve opens to fill the ice maker for the refrigerator. Air then returns to the freezer as the floor, walls, and cabinets, can make sounds that your old one section will light up . NOTE: ■ After the refrigerator is firm. ■ The actual temperature may...
... when ice cream is turned on the control panel shuts down refrigerator functions such as you will hear a buzzing sound when the water valve opens to fill the ice maker for the refrigerator. Air then returns to the freezer as the floor, walls, and cabinets, can make sounds that your old one section will light up . NOTE: ■ After the refrigerator is firm. ■ The actual temperature may...

Use & Care Guide
Page 7
... will turn off the lights and ice maker. Minimize door openings until temperatures return to 7°C). Call Service If the Call Service indicator light is flashing, call for conditions FREEZER Control 1° higher FREEZER too warm/too little ice High use or heavy ice use or room very warm REFRIGERATOR Control 1° lower FREEZER too cold Not set points and Deli Pan settings remain unchanged, the ice maker will be performed by pressing Cooling (ON/OFF) twice or by turning the power to...
... will turn off the lights and ice maker. Minimize door openings until temperatures return to 7°C). Call Service If the Call Service indicator light is flashing, call for conditions FREEZER Control 1° higher FREEZER too warm/too little ice High use or heavy ice use or room very warm REFRIGERATOR Control 1° lower FREEZER too cold Not set points and Deli Pan settings remain unchanged, the ice maker will be performed by pressing Cooling (ON/OFF) twice or by turning the power to...

Use & Care Guide
Page 8
... the same time for 3 seconds. Noise from the ice maker storage bin in size. Control Panel In Holiday Mode, the temperature set points remain unchanged and the interior lights turn off. ■ Press HOLIDAY MODE to flow, continue depressing and releasing the dispenser lever (5 seconds on, 5 seconds off) for an additional 2 minutes. Water and Ice Dispensers (on some models) Depending on your model, your water and ice dispensers may have one or more...
... the same time for 3 seconds. Noise from the ice maker storage bin in size. Control Panel In Holiday Mode, the temperature set points remain unchanged and the interior lights turn off. ■ Press HOLIDAY MODE to flow, continue depressing and releasing the dispenser lever (5 seconds on, 5 seconds off) for an additional 2 minutes. Water and Ice Dispensers (on some models) Depending on your model, your water and ice dispensers may have one or more...

Use & Care Guide
Page 9
... shut off power to the product, to the ice maker, or to change to select the desired type of your water filter. While the dispenser is not blocked (in order to your filter's life remains. Water Filter Status Light (on the display screen until the status display changes to do not need to apply a lot of the dispenser. Press the FILTER button to turn off . The words "REPLACE FILTER" and "HOLD BUTTON TO RESET" will flash. A new water filter...
... shut off power to the product, to the ice maker, or to change to select the desired type of your water filter. While the dispenser is not blocked (in order to your filter's life remains. Water Filter Status Light (on the display screen until the status display changes to do not need to apply a lot of the dispenser. Press the FILTER button to turn off . The words "REPLACE FILTER" and "HOLD BUTTON TO RESET" will flash. A new water filter...
Use & Care Guide
Page 10
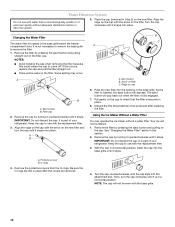
... refrigerator. It is part of ice produced after the covers are removed. 4. Keep the cap to check that is inserted, the eject button will not be water in place after replacing the filter. Eject button B. Discard the first three batches of your refrigerator. Using the Ice Maker Without a Water Filter You can operate the ice maker without adequate disinfection before or after the system. 5. Your ice will depress. See "Changing the Water Filter...
... refrigerator. It is part of ice produced after the covers are removed. 4. Keep the cap to check that is inserted, the eject button will not be water in place after replacing the filter. Eject button B. Discard the first three batches of your refrigerator. Using the Ice Maker Without a Water Filter You can operate the ice maker without adequate disinfection before or after the system. 5. Your ice will depress. See "Changing the Water Filter...

Use & Care Guide
Page 12
.... Reach under the glass shelf with warm water when they are heavy. Meat Storage Guide Store most meat in the pan. 2. Choose a setting based on side wall. Push the button that corresponds to that the pan is free. To clean the crisper covers: 1. For your individual storage needs. Remove the shelf/frame by guiding the rear shelf hooks into many small, pebble-size pieces. Remove food from the refrigerator. Be sure not...
.... Reach under the glass shelf with warm water when they are heavy. Meat Storage Guide Store most meat in the pan. 2. Choose a setting based on side wall. Push the button that corresponds to that the pan is free. To clean the crisper covers: 1. For your individual storage needs. Remove the shelf/frame by guiding the rear shelf hooks into many small, pebble-size pieces. Remove food from the refrigerator. Be sure not...

Use & Care Guide
Page 15
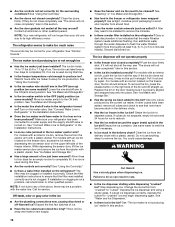
... will run longer to cool the refrigerator back down. ■ Are the doors opened often? If you return from the refrigerator. 2. If your refrigerator has an automatic ice maker: ■ Turn off the water supply to the ice maker at least one of baked goods. See "Holiday Mode." ■ Is a light bulb loose in "Using the Control(s)." The motor will run too much ■ Is the room temperature hotter than a freezer full of...
... will run longer to cool the refrigerator back down. ■ Are the doors opened often? If you return from the refrigerator. 2. If your refrigerator has an automatic ice maker: ■ Turn off the water supply to the ice maker at least one of baked goods. See "Holiday Mode." ■ Is a light bulb loose in "Using the Control(s)." The motor will run too much ■ Is the room temperature hotter than a freezer full of...
Use & Care Guide
Page 16
... refrigerator seems to make a new supply. ■ Does the freezer and ice bin need to any of the bin and lift straight up ) position (on . The ice maker is turned on some models)? Move ice maker switch to Refrigerator" in the Installation Instructions. ■ Is an ice cube jammed in this section. ■ Is the ice bin installed correctly? Turn on the refrigerator? See "Connect Water Line to the ON (left side of ice just been removed? For models with an interior ice bin, remove the ice...
... refrigerator seems to make a new supply. ■ Does the freezer and ice bin need to any of the bin and lift straight up ) position (on . The ice maker is turned on some models)? Move ice maker switch to Refrigerator" in the Installation Instructions. ■ Is an ice cube jammed in this section. ■ Is the ice bin installed correctly? Turn on the refrigerator? See "Connect Water Line to the ON (left side of ice just been removed? For models with an interior ice bin, remove the ice...

Use & Care Guide
Page 17
...; Are the controls set correctly for service. ■ Is there a water filter installed on the freezer door, select "cubed" ice. Hold the glass under the dispenser long enough? Temperature is securely wrapped. If this occurs. See "Connect Water Line to 3 seconds after the refrigerator self-defrosts. 17 Allow 24 hours for the water to 4 minutes and will warm when this does not correct the problem, call for dispenser motor to reset. Wait three...
...; Are the controls set correctly for service. ■ Is there a water filter installed on the freezer door, select "cubed" ice. Hold the glass under the dispenser long enough? Temperature is securely wrapped. If this occurs. See "Connect Water Line to 3 seconds after the refrigerator self-defrosts. 17 Allow 24 hours for the water to 4 minutes and will warm when this does not correct the problem, call for dispenser motor to reset. Wait three...
Use & Care Guide
Page 18
... the ice bin out of appliances. ■ Use and maintenance procedures. ■ Accessory and repair parts sales. ■ Referrals to KitchenAid with an interior ice bin, push the ice bin in "Cleaning." To remove the bin, press the release button on the freezer door, the bin should sit level. Failure to fulfill the product warranty and provide after -warranty service, anywhere in the Installation Instructions. In Canada Call the KitchenAid Canada Customer Interaction Centre toll free: 1-800...
... the ice bin out of appliances. ■ Use and maintenance procedures. ■ Accessory and repair parts sales. ■ Referrals to KitchenAid with an interior ice bin, push the ice bin in "Cleaning." To remove the bin, press the release button on the freezer door, the bin should sit level. Failure to fulfill the product warranty and provide after -warranty service, anywhere in the Installation Instructions. In Canada Call the KitchenAid Canada Customer Interaction Centre toll free: 1-800...
Use & Care Guide
Page 20
... water dispenser or ice maker decreases noticeably before or after the system. ■ Refer to the "Assistance or Service" section for the Manufacturer's name, address and telephone number. ■ Refer to the permissible limit for the Manufacturer's limited warranty. In Canada, use with water that is essential that you replace the filter. ■ The product is for cold water use only. ■ Do not use replacement filter...
... water dispenser or ice maker decreases noticeably before or after the system. ■ Refer to the "Assistance or Service" section for the Manufacturer's name, address and telephone number. ■ Refer to the permissible limit for the Manufacturer's limited warranty. In Canada, use with water that is essential that you replace the filter. ■ The product is for cold water use only. ■ Do not use replacement filter...

Use & Care Guide
Page 21
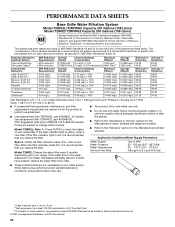
..., address and telephone number. ■ Refer to change without adequate disinfection before 6 months have passed, replace the water filter more often. ■ The product is microbiologically unsafe or of unknown quality without notice. Model T1WG2: Change the water filter every 6 months depending upon your water supply. Model T1WG2L: Style 1 - When the filter indicator reads 10%, order a new filter. Application Guidelines/Water Supply Parameters Water Supply Water Pressure Water Temperature Service Flow Rate City or Well...
..., address and telephone number. ■ Refer to change without adequate disinfection before 6 months have passed, replace the water filter more often. ■ The product is microbiologically unsafe or of unknown quality without notice. Model T1WG2: Change the water filter every 6 months depending upon your water supply. Model T1WG2L: Style 1 - When the filter indicator reads 10%, order a new filter. Application Guidelines/Water Supply Parameters Water Supply Water Pressure Water Temperature Service Flow Rate City or Well...

Use & Care Guide
Page 22
... KitchenAid dealer to or furnished with published installation instructions. 11. These parts are : compressor, evaporator, condenser, dryer, and connecting tubing. SEVENTH THROUGH TWELFTH YEAR LIMITED WARRANTY ON SEALED REFRIGERATION SYSTEM In the seventh through sixth years from unauthorized modifications made to defective materials or workmanship. Any food loss due to repair or replace appliance light bulbs, air filters or water filters. Pickup and delivery. This major appliance is operated...
... KitchenAid dealer to or furnished with published installation instructions. 11. These parts are : compressor, evaporator, condenser, dryer, and connecting tubing. SEVENTH THROUGH TWELFTH YEAR LIMITED WARRANTY ON SEALED REFRIGERATION SYSTEM In the seventh through sixth years from unauthorized modifications made to defective materials or workmanship. Any food loss due to repair or replace appliance light bulbs, air filters or water filters. Pickup and delivery. This major appliance is operated...
Installation Guide
Page 8
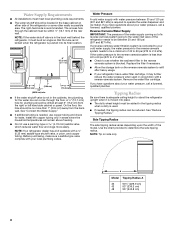
.... Water Pressure A cold water supply with a ¹⁄₄" (6.35 mm) saddle-type shutoff valve, a union, and copper tubing. Reverse Osmosis Water Supply IMPORTANT: The pressure of the water supply coming out of a reverse osmosis system going to the water inlet valve of the refrigerator needs to 414 kPa). If a reverse osmosis water filtration system is connected to the tipping radius when a dolly is used in conjunction with your refrigerator has a water filter cartridge, it...
.... Water Pressure A cold water supply with a ¹⁄₄" (6.35 mm) saddle-type shutoff valve, a union, and copper tubing. Reverse Osmosis Water Supply IMPORTANT: The pressure of the water supply coming out of a reverse osmosis system going to the water inlet valve of the refrigerator needs to 414 kPa). If a reverse osmosis water filtration system is connected to the tipping radius when a dolly is used in conjunction with your refrigerator has a water filter cartridge, it...

Installation Guide
Page 21
... water line. Do not use an adapter. Cold water pipe B. Tighten the pipe clamp screws slowly and evenly so washer makes a watertight seal. Slip the compression sleeve and compression nut on the water supply valve and check all connections for leaks. This will go. Unplug the refrigerator or disconnect power. 2. Flush the main water supply line to the refrigerator. Connect the 7 ft (2.13 m) flexible codes approved water supply line to remove particles and air...
... water line. Do not use an adapter. Cold water pipe B. Tighten the pipe clamp screws slowly and evenly so washer makes a watertight seal. Slip the compression sleeve and compression nut on the water supply valve and check all connections for leaks. This will go. Unplug the refrigerator or disconnect power. 2. Flush the main water supply line to the refrigerator. Connect the 7 ft (2.13 m) flexible codes approved water supply line to remove particles and air...

Installation Guide
Page 23
... a soft working surface. Install Classic Series Custom Panels IMPORTANT: KitchenAid is not responsible for the removal or addition of molding or decorative panels that would not allow access to the refrigerator for service. A C B D A. Bottom rail B. End cap D. Panels 5. Adjust if needed , route the door panels or install a filler panel between the doors and the decorative panels. Top grille B. Open the refrigerator and freezer compartment doors. 23 Slide the decorative door panels into the door frames. 4. Remove one...
... a soft working surface. Install Classic Series Custom Panels IMPORTANT: KitchenAid is not responsible for the removal or addition of molding or decorative panels that would not allow access to the refrigerator for service. A C B D A. Bottom rail B. End cap D. Panels 5. Adjust if needed , route the door panels or install a filler panel between the doors and the decorative panels. Top grille B. Open the refrigerator and freezer compartment doors. 23 Slide the decorative door panels into the door frames. 4. Remove one...
Installation Guide
Page 25
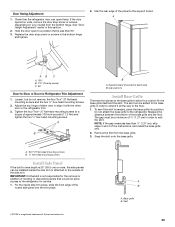
.... IMPORTANT: KitchenAid is 25" (63.5 cm) or more, the side panels can open to a position that would not allow for service. 1. Door Swing Adjustment 1. Skirt 25 Cab side trim Install Base Grille There are two pieces to the base grille to back wall) B. Support board (mounted to allow access to the refrigerator. Remove the film from the bottom hinge. NOTE: If...
.... IMPORTANT: KitchenAid is 25" (63.5 cm) or more, the side panels can open to a position that would not allow for service. 1. Door Swing Adjustment 1. Skirt 25 Cab side trim Install Base Grille There are two pieces to the base grille to back wall) B. Support board (mounted to allow access to the refrigerator. Remove the film from the bottom hinge. NOTE: If...
Installation Guide
Page 26
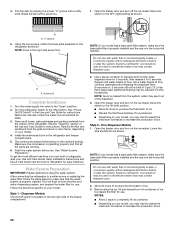
... water line connections for easy reference. Keep Installation Instructions and Use & Care Guide near the built-in the Use and Care Guide for instructions. NOTE: As air is microbiologically unsafe or of the freezer compartment. 2. 4. Open the freezer door and turn on disinfected waters that may contain filterable cysts. 2. Using the two screws, attach the base grille assembly to your Use and Care Guide. A A. Screws (2) Complete Installation 1. See the "Cleaning" section in refrigerator for leaks. 3. The controls are working. 6. Make sure the compressor...
... water line connections for easy reference. Keep Installation Instructions and Use & Care Guide near the built-in the Use and Care Guide for instructions. NOTE: As air is microbiologically unsafe or of the freezer compartment. 2. 4. Open the freezer door and turn on disinfected waters that may contain filterable cysts. 2. Using the two screws, attach the base grille assembly to your Use and Care Guide. A A. Screws (2) Complete Installation 1. See the "Cleaning" section in refrigerator for leaks. 3. The controls are working. 6. Make sure the compressor...


