

Instruction and Recipe Booklet
Page 3
... Instructions for Service Outside the 50 United States and Puerto Rico .....6 Ordering Accessories and Replacement Parts 6 Electrical Requirements 7 Troubleshooting Problems 7 About Your Mixer Bowl Lift Stand Mixer Features 8 Assembling Your Bowl Lift Mixer 9 Assembling Your Pouring Shield 10 Using Your KitchenAid® Attachments 11 Mixing Time 11 Mixer Use...11 Care and Cleaning 12 Beater to Bowl Clearance 12 Speed Control Guide 13 Mixing Tips 14 Egg Whites 15 Whipped Cream 15 Attachments and Accessories - Table of Contents Hassle-Free Replacement Warranty Inside Front Cover...
... Instructions for Service Outside the 50 United States and Puerto Rico .....6 Ordering Accessories and Replacement Parts 6 Electrical Requirements 7 Troubleshooting Problems 7 About Your Mixer Bowl Lift Stand Mixer Features 8 Assembling Your Bowl Lift Mixer 9 Assembling Your Pouring Shield 10 Using Your KitchenAid® Attachments 11 Mixing Time 11 Mixer Use...11 Care and Cleaning 12 Beater to Bowl Clearance 12 Speed Control Guide 13 Mixing Tips 14 Egg Whites 15 Whipped Cream 15 Attachments and Accessories - Table of Contents Hassle-Free Replacement Warranty Inside Front Cover...

Instruction and Recipe Booklet
Page 4
..., electrical shock or injury. 8. Close supervision is necessary when this manual and on or taking off parts and before washing. Do not use of injury, and tell you don't immediately follow the safety alert symbol and either the word "DANGER" or "WARNING." Do not let the cord hang over edge of others . Remove flat beater, wire whip or dough hook from beater during operation...
..., electrical shock or injury. 8. Close supervision is necessary when this manual and on or taking off parts and before washing. Do not use of injury, and tell you don't immediately follow the safety alert symbol and either the word "DANGER" or "WARNING." Do not let the cord hang over edge of others . Remove flat beater, wire whip or dough hook from beater during operation...

Instruction and Recipe Booklet
Page 5
... on how to arrange for stand mixers operated outside the 50 United States and District of your stand mixer to an Authorized Service Center. KitchenAid Will Not Pay For: A. C. This warranty gives you specific legal rights and you . Any shipping or handling costs to correct defects in materials and workmanship. OR The replacement parts and repair labor costs to deliver your stand mixer. KITCHENAID DOES NOT ASSUME ANY...
... on how to arrange for stand mixers operated outside the 50 United States and District of your stand mixer to an Authorized Service Center. KitchenAid Will Not Pay For: A. C. This warranty gives you specific legal rights and you . Any shipping or handling costs to correct defects in materials and workmanship. OR The replacement parts and repair labor costs to deliver your stand mixer. KITCHENAID DOES NOT ASSUME ANY...

Instruction and Recipe Booklet
Page 7
... with electric motors. 3. See the "Beater Bowl Clearance" section. Is the stand mixer plugged in the circuit to operate, please check the following before turning it back on the serial plate. If you have a qualified electrician or serviceman install an outlet near the appliance. If the problem is closed. - If the power supply cord is common with extended mixing time periods, you of in-warranty service. Other recommended attachments...
... with electric motors. 3. See the "Beater Bowl Clearance" section. Is the stand mixer plugged in the circuit to operate, please check the following before turning it back on the serial plate. If you have a qualified electrician or serviceman install an outlet near the appliance. If the problem is closed. - If the power supply cord is common with extended mixing time periods, you of in-warranty service. Other recommended attachments...

Instruction and Recipe Booklet
Page 8
Bowl Lift Stand Mixer Features Motor Head Attachment Hub (see the "Attachments and Accessories" section.) Speed Control RESET OFF/0 STIR Knob Bowl Height Adjustment Screw Locating Pins Bowl Support Attachment Knob Bowl Lift Handle (not shown) Beater Shaft Stainless Steel Bowl Bowl Handle Dough Hook Flat Beater Wire Whip 8
Bowl Lift Stand Mixer Features Motor Head Attachment Hub (see the "Attachments and Accessories" section.) Speed Control RESET OFF/0 STIR Knob Bowl Height Adjustment Screw Locating Pins Bowl Support Attachment Knob Bowl Lift Handle (not shown) Beater Shaft Stainless Steel Bowl Bowl Handle Dough Hook Flat Beater Wire Whip 8

Instruction and Recipe Booklet
Page 9
... wire whip, or dough hook. 4. Auto-Reset Motor Protection If the stand mixer stops due to overload, slide the speed control lever to the desired speed and continue mixing. To Remove Bowl 1. Slide the Speed Control Lever to OFF. Grasp bowl handle and lift straight up position. 2. Bowl must always be set on shaft. 4. Place bowl lift handle in down . Press down position 3. To Raise Bowl 1. To Lower Bowl 1. Place bowl lift handle in raised, locked position when mixing. PIN 3. To Remove Flat Beater, Wire Whip, Or Dough Hook 1. Press beater upward and turn...
... wire whip, or dough hook. 4. Auto-Reset Motor Protection If the stand mixer stops due to overload, slide the speed control lever to the desired speed and continue mixing. To Remove Bowl 1. Slide the Speed Control Lever to OFF. Grasp bowl handle and lift straight up position. 2. Bowl must always be set on shaft. 4. Place bowl lift handle in down . Press down position 3. To Raise Bowl 1. To Lower Bowl 1. Place bowl lift handle in raised, locked position when mixing. PIN 3. To Remove Flat Beater, Wire Whip, Or Dough Hook 1. Press beater upward and turn...
Instruction and Recipe Booklet
Page 10
... accessory (flat beater, dough hook or wire whip) and bowl. 4. Be sure speed control is OFF and stand mixer is unplugged. 2. Insert the tabs on rim of bowl. Place bowl lift handle in collar toward front of bowl. Slide pouring shield collar around beater shaft, centering collar over rim of stand mixer. Place bowl lift handle in up position. 5. Attach desired accessory (flat beater, dough hook or wire whip) and bowl. 4. Fit the three notched guides on the collar. 7. Remove pouring chute from bowl. 3. Lift pouring chute from collar. 3. To Attach Pouring Shield 1. To Use...
... accessory (flat beater, dough hook or wire whip) and bowl. 4. Be sure speed control is OFF and stand mixer is unplugged. 2. Insert the tabs on rim of bowl. Place bowl lift handle in collar toward front of bowl. Slide pouring shield collar around beater shaft, centering collar over rim of stand mixer. Place bowl lift handle in up position. 5. Attach desired accessory (flat beater, dough hook or wire whip) and bowl. 4. Fit the three notched guides on the collar. 7. Remove pouring chute from bowl. 3. Lift pouring chute from collar. 3. To Attach Pouring Shield 1. To Use...

Instruction and Recipe Booklet
Page 11
... other stand mixers. Failure to provide thorough mixing without frequent scraping. Scraping the bowl once or twice during use. Turn unit off before touching beaters. Using Your KitchenAid® Attachments Flat Beater for normal to heavy mixtures: cakes creamed frostings candies cookies pie pastry biscuits quick breads meat loaf mashed potatoes Wire Whip for mixtures that need air incorporated: eggs egg whites heavy cream boiled frostings sponge cakes angel food cakes mayonnaise some candies Dough Hook...
... other stand mixers. Failure to provide thorough mixing without frequent scraping. Scraping the bowl once or twice during use. Turn unit off before touching beaters. Using Your KitchenAid® Attachments Flat Beater for normal to heavy mixtures: cakes creamed frostings candies cookies pie pastry biscuits quick breads meat loaf mashed potatoes Wire Whip for mixtures that need air incorporated: eggs egg whites heavy cream boiled frostings sponge cakes angel food cakes mayonnaise some candies Dough Hook...
Instruction and Recipe Booklet
Page 14
... side of the pan during baking. Adding Nuts, Raisins, or Candied Fruits Follow individual recipes for guidelines on the package directions. Cake Mixes When preparing packaged cake mixes, use the "Speed Control Guide" section. Mixing Tips Converting Your Recipe for the Mixer The mixing instructions for recipes in this book can be dusted with most cake recipes. Look for recipes similar to Bowl Clearance" section. For all liquid ingredients in one step.
... side of the pan during baking. Adding Nuts, Raisins, or Candied Fruits Follow individual recipes for guidelines on the package directions. Cake Mixes When preparing packaged cake mixes, use the "Speed Control Guide" section. Mixing Tips Converting Your Recipe for the Mixer The mixing instructions for recipes in this book can be dusted with most cake recipes. Look for recipes similar to Bowl Clearance" section. For all liquid ingredients in one step.

Instruction and Recipe Booklet
Page 16
... . Flip up hinged hub cover. 4. Plug into square attachment hub socket. Turn stand mixer off and unplug. 2. The hub and shaft housing are designed to assure long life. Insert attachment shaft housing into attachment hub, making certain that attachment power shaft fits into a grounded 3 prong outlet. Tighten attachment knob by turning it clockwise. 16 To Remove 1. Attachments and Accessories General Information KitchenAid® Attachments are tapered to assure a snug fit, even after prolonged use and wear. The attachment power shaft and hub socket are of a square...
... . Flip up hinged hub cover. 4. Plug into square attachment hub socket. Turn stand mixer off and unplug. 2. The hub and shaft housing are designed to assure long life. Insert attachment shaft housing into attachment hub, making certain that attachment power shaft fits into a grounded 3 prong outlet. Tighten attachment knob by turning it clockwise. 16 To Remove 1. Attachments and Accessories General Information KitchenAid® Attachments are tapered to assure a snug fit, even after prolonged use and wear. The attachment power shaft and hub socket are of a square...
Instruction and Recipe Booklet
Page 27
... White Cake 2 cups all -purpose flour 11⁄3 cups sugar 3 teaspoons baking powder 1⁄2 teaspoon salt 1⁄2 cup shortening 1 cup low-fat milk 1 teaspoon vanilla 2 eggs Combine dry ingredients in mixer bowl. Stop and scrape bowl. Pour batter into two greased and floured 8- Stop and scrape bowl. Turn to 16 servings. Yield: 12 to Speed 6 and beat about 1 minute. Remove from pans. Turn to Speed...
... White Cake 2 cups all -purpose flour 11⁄3 cups sugar 3 teaspoons baking powder 1⁄2 teaspoon salt 1⁄2 cup shortening 1 cup low-fat milk 1 teaspoon vanilla 2 eggs Combine dry ingredients in mixer bowl. Stop and scrape bowl. Pour batter into two greased and floured 8- Stop and scrape bowl. Turn to 16 servings. Yield: 12 to Speed 6 and beat about 1 minute. Remove from pans. Turn to Speed...
Instruction and Recipe Booklet
Page 30
... to mixer. Prepare as directed above. Bake at a time, mixing about 2 minutes. Chocolate Glaze Melt 1 square (1 oz) semisweet chocolate and 1 teaspoon shortening in center comes out clean. Yield: 16 servings. Attach bowl and flat beater to 1 cup. Turn to Speed 2 and add eggs, one at 325°F for 1 hour 15 minutes, or until toothpick inserted in small saucepan over cake. Remove cake...
... to mixer. Prepare as directed above. Bake at a time, mixing about 2 minutes. Chocolate Glaze Melt 1 square (1 oz) semisweet chocolate and 1 teaspoon shortening in center comes out clean. Yield: 16 servings. Attach bowl and flat beater to 1 cup. Turn to Speed 2 and add eggs, one at 325°F for 1 hour 15 minutes, or until toothpick inserted in small saucepan over cake. Remove cake...

Instruction and Recipe Booklet
Page 31
... STIR Speed and mix just until toothpick inserted in center comes out clean. Turn to mixer. Attach bowl and wire whip to Speed 2 and mix about 30 seconds, or until smooth and creamy. Stop and scrape bowl. Add buttermilk, vanilla, and remaining flour mixture. Italian Cream Cake 5 eggs, separated 1⁄2 cup butter or margarine 1⁄2 cup shortening 13⁄4 cup sugar 2 cups all ingredients in mixer bowl.
... STIR Speed and mix just until toothpick inserted in center comes out clean. Turn to mixer. Attach bowl and wire whip to Speed 2 and mix about 30 seconds, or until smooth and creamy. Stop and scrape bowl. Add buttermilk, vanilla, and remaining flour mixture. Italian Cream Cake 5 eggs, separated 1⁄2 cup butter or margarine 1⁄2 cup shortening 13⁄4 cup sugar 2 cups all ingredients in mixer bowl.

Instruction and Recipe Booklet
Page 36
... over sugar mixture in mixer bowl. Serve warm or at 350ºF for 3 to 5 minutes, or until center springs back when touched lightly. Set aside. Attach bowl and flat beater to Speed 2 and mix about 45 seconds. Turn to mixer. Bake at room temperature. Cook and stir over pear slices. Continuing on Speed 2, add eggs and mix about 45 seconds longer. Invert onto serving plate. Pour evenly...
... over sugar mixture in mixer bowl. Serve warm or at 350ºF for 3 to 5 minutes, or until center springs back when touched lightly. Set aside. Attach bowl and flat beater to Speed 2 and mix about 45 seconds. Turn to mixer. Bake at room temperature. Cook and stir over pear slices. Continuing on Speed 2, add eggs and mix about 45 seconds longer. Invert onto serving plate. Pour evenly...

Instruction and Recipe Booklet
Page 38
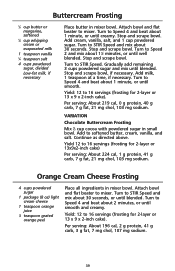
... about 30 seconds. Stir until whites begin to Speed 10 and whip about 1 minute, or until smooth and creamy. Attach bowl and flat beater to 16 servings (frosting for 2-layer or 13 x 9 x 2-inch cake). Place powdered sugar in mixer bowl. Continuing on cake while warm. Turn to mixer. Add brown sugar and milk, stirring to 11⁄2 minutes. Attach bowl and wire whip to Speed 4 and beat about 45 seconds...
... about 30 seconds. Stir until whites begin to Speed 10 and whip about 1 minute, or until smooth and creamy. Attach bowl and flat beater to 16 servings (frosting for 2-layer or 13 x 9 x 2-inch cake). Place powdered sugar in mixer bowl. Continuing on cake while warm. Turn to mixer. Add brown sugar and milk, stirring to 11⁄2 minutes. Attach bowl and wire whip to Speed 4 and beat about 45 seconds...
Instruction and Recipe Booklet
Page 39
... directed above. Attach bowl and flat beater to STIR Speed. Per serving: About 196 cal, 2 g protein, 41 g carb, 3 g fat, 7 mg chol, 107 mg sodium. 39 Stop and scrape bowl. Turn to mixer. Add milk, 1 teaspoon at a time, if necessary. Add to Speed 2 and mix about 2 minutes, or until smooth. Add cream, vanilla, salt, and 1 cup powdered sugar. Stop and scrape bowl, if necessary. Turn to softened butter, cream...
... directed above. Attach bowl and flat beater to STIR Speed. Per serving: About 196 cal, 2 g protein, 41 g carb, 3 g fat, 7 mg chol, 107 mg sodium. 39 Stop and scrape bowl. Turn to mixer. Add milk, 1 teaspoon at a time, if necessary. Add to Speed 2 and mix about 2 minutes, or until smooth. Add cream, vanilla, salt, and 1 cup powdered sugar. Stop and scrape bowl, if necessary. Turn to softened butter, cream...
Instruction and Recipe Booklet
Page 44
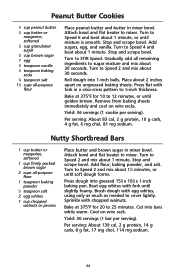
... sugar in mixer bowl. Remove from baking sheets immediately and cool on ungreased baking sheets. Turn to 25 minutes. Cool on wire rack. Add sugars, egg, and vanilla. Roll dough into bars while warm. Attach bowl and flat beater to mixer. Turn to cover lightly. Sprinkle with egg whites, using only as much as needed to Speed 2 and mix about 30 seconds. Stop and scrape bowl. Brush dough with chopped walnuts. Attach bowl and flat beater to mixer. Stop...
... sugar in mixer bowl. Remove from baking sheets immediately and cool on ungreased baking sheets. Turn to 25 minutes. Cool on wire rack. Add sugars, egg, and vanilla. Roll dough into bars while warm. Attach bowl and flat beater to mixer. Turn to cover lightly. Sprinkle with egg whites, using only as much as needed to Speed 2 and mix about 30 seconds. Stop and scrape bowl. Brush dough with chopped walnuts. Attach bowl and flat beater to mixer. Stop...
Instruction and Recipe Booklet
Page 51
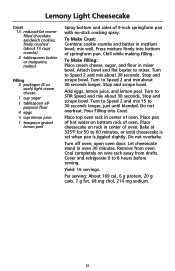
... wire rack away from oven. Turn off oven; Remove from drafts. Turn to Speed 2 and mix about 30 seconds longer. Stop and scrape bowl. Turn to 30 seconds longer, just until cheesecake is set when pan is jiggled slightly. Turn to Speed 2 and mix 15 to STIR Speed and mix about 11⁄2 cups crumbs) 2 tablespoons butter or margarine, melted Filling 3 packages (8 oz each) light cream...
... wire rack away from oven. Turn off oven; Remove from drafts. Turn to Speed 2 and mix about 30 seconds longer. Stop and scrape bowl. Turn to 30 seconds longer, just until cheesecake is set when pan is jiggled slightly. Turn to Speed 2 and mix 15 to STIR Speed and mix about 11⁄2 cups crumbs) 2 tablespoons butter or margarine, melted Filling 3 packages (8 oz each) light cream...
Parts List
Page 5
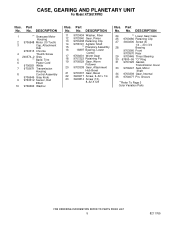
... Gasket, Transmission Cover 33 9706247 Seal, Motor Shaft 34 9703339 Gear, Internal 35 9704677 Pin, Groove Refer To Page 3 Color Variation Parts 5 8211765 Part No. Part No. No. Part No. No. CASE, GEARING AND PLANETARY UNIT For Model: KT2651XWW3 Illus. No. DESCRIPTION 1 Gearcase Motor Housing 2 9706548 Motor (10 Tooth) 3 Cap, Attachment Hub 9703315 Chrome 4 Thumb Screw 240374−2 Gray 5 Band, Trim 6 Power Cord 9706551 White 7 9703671 Transmission Housing 8 Control Assembly 9706649 Gray Knob 9 9703312 Sensor...
... Gasket, Transmission Cover 33 9706247 Seal, Motor Shaft 34 9703339 Gear, Internal 35 9704677 Pin, Groove Refer To Page 3 Color Variation Parts 5 8211765 Part No. Part No. No. Part No. No. CASE, GEARING AND PLANETARY UNIT For Model: KT2651XWW3 Illus. No. DESCRIPTION 1 Gearcase Motor Housing 2 9706548 Motor (10 Tooth) 3 Cap, Attachment Hub 9703315 Chrome 4 Thumb Screw 240374−2 Gray 5 Band, Trim 6 Power Cord 9706551 White 7 9703671 Transmission Housing 8 Control Assembly 9706649 Gray Knob 9 9703312 Sensor...
Parts List
Page 6
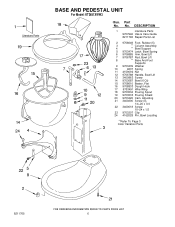
DESCRIPTION 1 Literature Parts 9707946 Use & Care Guide 8211765 Repair Parts List 2 9708649 Foot, Rubber (5) 3 Column Assembly 4 Bowl Support 5 9703474 Latch, Bowl Spring 6 9706885 Arm, Bowl Lift 7 9706787 Rod, Bowl Lift 8 Base And Foot Supports 9 9703439 Washer 10 9237 Spring 11 4159092 Nut 12 9706788 Handle, Bowl Lift 13 3400863 Screw 14 9703687 Bowl (6 Qt) 15 9708610 Beater, Flat 16 9708833 Dough Hook 17 9703491 Wire Whip 18 9703534 Pouring Spout 19 9703533 Pouring Shield 20 9703426 Cam, Adjusting 21 3400200 Screw (3), 1/4−20 x 3/4 22 3400018...
DESCRIPTION 1 Literature Parts 9707946 Use & Care Guide 8211765 Repair Parts List 2 9708649 Foot, Rubber (5) 3 Column Assembly 4 Bowl Support 5 9703474 Latch, Bowl Spring 6 9706885 Arm, Bowl Lift 7 9706787 Rod, Bowl Lift 8 Base And Foot Supports 9 9703439 Washer 10 9237 Spring 11 4159092 Nut 12 9706788 Handle, Bowl Lift 13 3400863 Screw 14 9703687 Bowl (6 Qt) 15 9708610 Beater, Flat 16 9708833 Dough Hook 17 9703491 Wire Whip 18 9703534 Pouring Spout 19 9703533 Pouring Shield 20 9703426 Cam, Adjusting 21 3400200 Screw (3), 1/4−20 x 3/4 22 3400018...


