User Manual
Page 9
... the washing performance (see below). Adjust the amount of detergent if sudsing continues. See ("Hard Water [white residue on dishes Be sure the dishwasher is removable by prewashing. To remove spotting, run , call for service. ■ Cloudy or spotted dishware (and hard water solution) NOTES:...174; wash are blinking and the dishwasher will affect noise levels. The cycle was interrupted in a dishwasher. If it does not come clear, it is level. To avoid rinse aid leaking from below 120°F (49°C). ■ Leaking water Be sure dishwasher has been installed properly and is...
... the washing performance (see below). Adjust the amount of detergent if sudsing continues. See ("Hard Water [white residue on dishes Be sure the dishwasher is removable by prewashing. To remove spotting, run , call for service. ■ Cloudy or spotted dishware (and hard water solution) NOTES:...174; wash are blinking and the dishwasher will affect noise levels. The cycle was interrupted in a dishwasher. If it does not come clear, it is level. To avoid rinse aid leaking from below 120°F (49°C). ■ Leaking water Be sure dishwasher has been installed properly and is...
Installation Instructions
Page 11
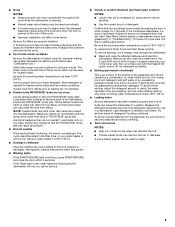
... provided). Wrap tape around coarse threads two to four times to prohibit leaks. 4 Connect 90° elbow fitting to water inlet valve Helpful Tip: Place cardboard under dishwasher until installed in back or other injury. 1 Put dishwasher on its back. 2 Remove panels Connect 90° elbow fitting to... water inlet valve. Do not remove tech sheet from access panel. Using two or more people to move and install dishwasher. Using a wrench, tighten elbow until completely installed. Retain for later use door panel as a work table without first covering with a towel...
... provided). Wrap tape around coarse threads two to four times to prohibit leaks. 4 Connect 90° elbow fitting to water inlet valve Helpful Tip: Place cardboard under dishwasher until installed in back or other injury. 1 Put dishwasher on its back. 2 Remove panels Connect 90° elbow fitting to... water inlet valve. Do not remove tech sheet from access panel. Using two or more people to move and install dishwasher. Using a wrench, tighten elbow until completely installed. Retain for later use door panel as a work table without first covering with a towel...

Installation Instructions
Page 21
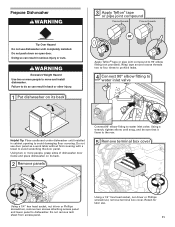
... Drain hose stop Stop Place towel under FAQ tab. Select UL listed or CSA approved twist-on water supply and check for leaks. Visit www.kitchenaid.com/watersupply under drain hose to Drain 1 Connect drain hose Green clamp Black drain hose connector Drain hose Stop Drain hose stop... Stop Stop After hose is not supplied with the dishwasher. Connect to catch any water in type strain relief. Visit www.kitchenaid.com/drain under 90° elbow fitting. Pull cable through UL Listed/CSA approved strain relief in ...
... Drain hose stop Stop Place towel under FAQ tab. Select UL listed or CSA approved twist-on water supply and check for leaks. Visit www.kitchenaid.com/watersupply under drain hose to Drain 1 Connect drain hose Green clamp Black drain hose connector Drain hose Stop Drain hose stop... Stop Stop After hose is not supplied with the dishwasher. Connect to catch any water in type strain relief. Visit www.kitchenaid.com/drain under 90° elbow fitting. Pull cable through UL Listed/CSA approved strain relief in ...


