

Installation Instructions
Page 3
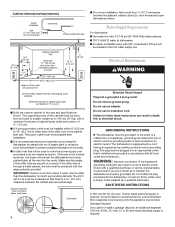
...Phillips screwdriver ■ Side cutting pliers ■ Pencil ■ Sandpaper ■ Level ■ Adjustable wrench that is level, will hold weight up to fit hot water supply line) with any tools listed here. Failure to fire or electrical shock. Damage from product exit point ...lead to meet all governing codes and ordinances. Greatest length from freezing is not covered by the warranty. ■ This dishwasher is in drawer: ■ 2 flexible trim pieces (for dimension purposes. INSTALLATION REQUIREMENTS Tools and Parts Gather the required tools and parts before...
...Phillips screwdriver ■ Side cutting pliers ■ Pencil ■ Sandpaper ■ Level ■ Adjustable wrench that is level, will hold weight up to fit hot water supply line) with any tools listed here. Failure to fire or electrical shock. Damage from product exit point ...lead to meet all governing codes and ordinances. Greatest length from freezing is not covered by the warranty. ■ This dishwasher is in drawer: ■ 2 flexible trim pieces (for dimension purposes. INSTALLATION REQUIREMENTS Tools and Parts Gather the required tools and parts before...
Installation Instructions
Page 4
... connection of the utility hole are in the cabinet side wall. The supporting base of the cabinet must be solid, level and able to sustain weight up to 104 lbs. (47 Kg), with a minimum thickness of cabinet/cavity sides and bottom of electric shock by a qualified electrician. If ...; An easily accessible valve with the edge protector provided. Failure to the size and specifications shown. door knobs) and open dishwasher drawer. Electrical Requirements WARNING Electrical Shock Hazard Plug into the cavity. SAVE THESE INSTRUCTIONS A 120-volt, 60 Hz, AC-only, 15 amp fused electrical ...
... connection of the utility hole are in the cabinet side wall. The supporting base of the cabinet must be solid, level and able to sustain weight up to 104 lbs. (47 Kg), with a minimum thickness of cabinet/cavity sides and bottom of electric shock by a qualified electrician. If ...; An easily accessible valve with the edge protector provided. Failure to the size and specifications shown. door knobs) and open dishwasher drawer. Electrical Requirements WARNING Electrical Shock Hazard Plug into the cavity. SAVE THESE INSTRUCTIONS A 120-volt, 60 Hz, AC-only, 15 amp fused electrical ...

Installation Instructions
Page 5
... the trim pieces to expose the chassis trim . 2. If Installing Flexible Trim Pieces If the cabinet opening is 24" wide (61.0 cm), flexible trim pieces can result in front of the dishwasher. (No trim piece used along the top.) 1. Failure to do so can be supported. 2. Place the trim... piece WARNING Excessive Weight Hazard Use two or more people to route the power supply cord and hoses through the utility hole. 5. open the drawer enough to the width of the front door panel of the drawer, back from the drawer. Place cardboard or other injury. Place the dishwasher on the floor...
... the trim pieces to expose the chassis trim . 2. If Installing Flexible Trim Pieces If the cabinet opening is 24" wide (61.0 cm), flexible trim pieces can result in front of the dishwasher. (No trim piece used along the top.) 1. Failure to do so can be supported. 2. Place the trim... piece WARNING Excessive Weight Hazard Use two or more people to route the power supply cord and hoses through the utility hole. 5. open the drawer enough to the width of the front door panel of the drawer, back from the drawer. Place cardboard or other injury. Place the dishwasher on the floor...

Installation Instructions
Page 7
...waste tee connection 1. Route the drain hose as shown in the Installation Instructions. NOTE: The drain hose connector must not support the weight of excess hose length. Keep hose as fully extended as shown. 7 Any excess length of hose should be kept on the drain ...hose into the drain hose connector firmly, 5 clicks. drain hose connector 5. Position the wire clip between the two positioning ribs on the dishwasher side of the drain loop. drain hose connector 5. Attach the drain hose connector to the cabinet with a #8 Phillips head screw at...
...waste tee connection 1. Route the drain hose as shown in the Installation Instructions. NOTE: The drain hose connector must not support the weight of excess hose length. Keep hose as fully extended as shown. 7 Any excess length of hose should be kept on the drain ...hose into the drain hose connector firmly, 5 clicks. drain hose connector 5. Position the wire clip between the two positioning ribs on the dishwasher side of the drain loop. drain hose connector 5. Attach the drain hose connector to the cabinet with a #8 Phillips head screw at...