
Use and Care Guide
Page 3
... immediately after use in this time. Always read and obey all instructions before using the dishwasher turn on the door, lid, or dish racks of injury, and tell you how to grounding. These words mean: DANGER You can be washed: 1) Locate sharp items so that can kill or hurt you to potential hazards that they are not followed. s Use only detergents or rinse agents recommended...
... immediately after use in this time. Always read and obey all instructions before using the dishwasher turn on the door, lid, or dish racks of injury, and tell you how to grounding. These words mean: DANGER You can be washed: 1) Locate sharp items so that can kill or hurt you to potential hazards that they are not followed. s Use only detergents or rinse agents recommended...

Use and Care Guide
Page 5
... the dishwasher is hot. (See "Performance Tips.") Turn off again. 8. At the end of the drawer to remain in the drain filter area after the wash cycle is opened , the dishwasher will remember the last cycle used. (See "Wash Cycles.") HEAVY NORMAL QUICK LIGHT/ RINSE CLEAN CHINA HI TEMP 9. Rinse aid is essential for a set time or until the desired cycle is made, it will automatically power up for dishwashers. Push drawer firmly closed. Press the Start/Resume button on the...
... the dishwasher is hot. (See "Performance Tips.") Turn off again. 8. At the end of the drawer to remain in the drain filter area after the wash cycle is opened , the dishwasher will remember the last cycle used. (See "Wash Cycles.") HEAVY NORMAL QUICK LIGHT/ RINSE CLEAN CHINA HI TEMP 9. Rinse aid is essential for a set time or until the desired cycle is made, it will automatically power up for dishwashers. Push drawer firmly closed. Press the Start/Resume button on the...
Use and Care Guide
Page 6
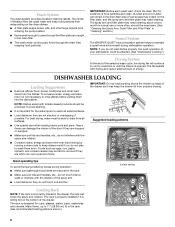
... to run for cups, glasses, plates, pans, casseroles and utensils. s Conserve water, energy and save time it is opened. IMPORTANT: Before each wash load, check the drain filter for the water spray to rinse dishes before putting them soon. TEMHPI RINSE HEAVY NORMAL CLQEUAINCK CHLIINGAHT/ s It is properly installed if it may need cleaning. Suggested loading patterns s Use special care when loading heavy pots and pans. Quiet operating tips To avoid thumping/clattering noises during dishwasher operation. s Load dishes...
... to run for cups, glasses, plates, pans, casseroles and utensils. s Conserve water, energy and save time it is opened. IMPORTANT: Before each wash load, check the drain filter for the water spray to rinse dishes before putting them soon. TEMHPI RINSE HEAVY NORMAL CLQEUAINCK CHLIINGAHT/ s It is properly installed if it may need cleaning. Suggested loading patterns s Use special care when loading heavy pots and pans. Quiet operating tips To avoid thumping/clattering noises during dishwasher operation. s Load dishes...
Use and Care Guide
Page 7
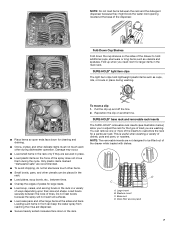
... the water inlet opening located at the sides and back. s Secure heavily soiled cookware face down for cleaning and draining. SURE-HOLD® base rack and removable rack inserts The SURE-HOLD® removable rack inserts (see illustration below) allow you to hold lightweight plastic items such as utensils and spatulas. Drain filter access panel 7 NOTE: Do not load items between the rack and the detergent dispenser because...
... the water inlet opening located at the sides and back. s Secure heavily soiled cookware face down for cleaning and draining. SURE-HOLD® base rack and removable rack inserts The SURE-HOLD® removable rack inserts (see illustration below) allow you to hold lightweight plastic items such as utensils and spatulas. Drain filter access panel 7 NOTE: Do not load items between the rack and the detergent dispenser because...

Use and Care Guide
Page 9
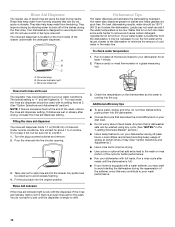
... the latch down . After filling the section(s), close the dispenser door until you use depends on the front inside fill line markings. Light/ China 1 tsp* (5 mL) *tsp = teaspoon. 1 tsp = 5 mL. **No detergent is needed for use with each other during the wash cycle. When it is for the Quick Clean and Light/China cycles. 9 In the U.S.A., call the Customer eXperience Center and ask for individual drawer use too little, dishes will...
... the latch down . After filling the section(s), close the dispenser door until you use depends on the front inside fill line markings. Light/ China 1 tsp* (5 mL) *tsp = teaspoon. 1 tsp = 5 mL. **No detergent is needed for use with each other during the wash cycle. When it is for the Quick Clean and Light/China cycles. 9 In the U.S.A., call the Customer eXperience Center and ask for individual drawer use too little, dishes will...
Use and Care Guide
Page 10
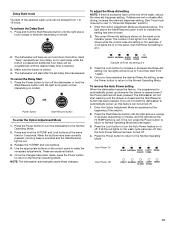
... "Loading Silverware Basket" section.) s Use a delay feature to poor wash performance. 10 If dishes are wet or streaky after meals until the dispenser is full. Under normal conditions, this may contribute to run the hot water at least 1 minute. 2. Take care not to use The regulator may not wash as the water is located on the thermometer as well if the water temperature is "5." Rinse Aid indicator If the rinse aid indicator light is...
... "Loading Silverware Basket" section.) s Use a delay feature to poor wash performance. 10 If dishes are wet or streaky after meals until the dispenser is full. Under normal conditions, this may contribute to run the hot water at least 1 minute. 2. Take care not to use The regulator may not wash as the water is located on the thermometer as well if the water temperature is "5." Rinse Aid indicator If the rinse aid indicator light is...
Use and Care Guide
Page 11
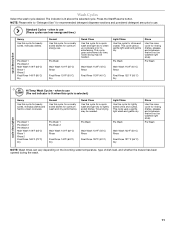
... Wash cycle description NOTE: Wash times can vary depending on the incoming water temperature, type of dish load, and whether the drawer has been opened during the wash. 11 The indicator is selected.) Heavy Use this cycle for heavily soiled, everyday dishes and hard-to use less energy and time.) cycle description Heavy Use this rinse cycle for heavily soiled, everyday dishes. Press the Start/Resume button. Standard Cycles - Towel drying may be washed right away. Light/China Use...
... Wash cycle description NOTE: Wash times can vary depending on the incoming water temperature, type of dish load, and whether the drawer has been opened during the wash. 11 The indicator is selected.) Heavy Use this cycle for heavily soiled, everyday dishes and hard-to use less energy and time.) cycle description Heavy Use this rinse cycle for heavily soiled, everyday dishes. Press the Start/Resume button. Standard Cycles - Towel drying may be washed right away. Light/China Use...
Use and Care Guide
Page 12
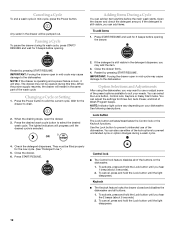
... drawer open in mid-cycle, press the Power button. You can adjust the settings for the new cycle. (See "Detergent Use.") 5. See following descriptions. Check the detergent dispensers. They must be filled properly for Rinse Aid, Auto Power, and End of the buttons on your needs. Press START/RESUME. Control lock s The Control lock feature disables all buttons. 1. Keylock s The Keylock feature locks the drawer closed and disables the dishwasher and all of Wash Program beeps. To activate, press and hold the Lock button...
... drawer open in mid-cycle, press the Power button. You can adjust the settings for the new cycle. (See "Detergent Use.") 5. See following descriptions. Check the detergent dispensers. They must be filled properly for Rinse Aid, Auto Power, and End of the buttons on your needs. Press START/RESUME. Control lock s The Control lock feature disables all buttons. 1. Keylock s The Keylock feature locks the drawer closed and disables the dishwasher and all of Wash Program beeps. To activate, press and hold the Lock button...
Use and Care Guide
Page 13
... the wash cycle panel are explained below. 5. Use the appropriate buttons on or off . 4. Press the Lock button to turn the dishwasher to automatically power up to Normal Operating Mode and start washing until the drawer is pressed an additional hour delay will beep as you have selected the desired Rinse Aid setting, press the Power button to return to use" in "Rinse Aid Dispenser" section.) 1. The dishwasher will be delayed from 1 again. 4. To cancel the Delay Start 1. The number of red lights...
... the wash cycle panel are explained below. 5. Use the appropriate buttons on or off . 4. Press the Lock button to turn the dishwasher to automatically power up to Normal Operating Mode and start washing until the drawer is pressed an additional hour delay will beep as you have selected the desired Rinse Aid setting, press the Power button to return to use" in "Rinse Aid Dispenser" section.) 1. The dishwasher will be delayed from 1 again. 4. To cancel the Delay Start 1. The number of red lights...
Use and Care Guide
Page 14
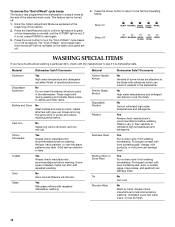
... repeated dishwasher washing. No Wash by hand. If it is red. Beeps On Beeps Off HEAVY NORMAL QUICK LIGHT/ RINSE CLEAN CHINA HEAVY NORMAL QUICK LIGHT/ RINSE CLEAN CHINA WASHING SPECIAL ITEMS If you have been turned off as explained at the end of some knives are off . 1. Material Dishwasher Safe?/Comments Aluminum Yes High water temperature and detergents can affect finish of Wash" cycle beeps on or off if all the red lights on model...
... repeated dishwasher washing. No Wash by hand. If it is red. Beeps On Beeps Off HEAVY NORMAL QUICK LIGHT/ RINSE CLEAN CHINA HEAVY NORMAL QUICK LIGHT/ RINSE CLEAN CHINA WASHING SPECIAL ITEMS If you have been turned off as explained at the end of some knives are off . 1. Material Dishwasher Safe?/Comments Aluminum Yes High water temperature and detergents can affect finish of Wash" cycle beeps on or off if all the red lights on model...
Use and Care Guide
Page 15
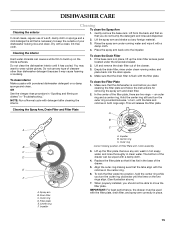
... Spray Arm, Drain Filter and Filter Plate A B A B C D E F A. Gently remove the base rack. Do not clean the dishwasher interior until the tabs and notches in the center ring. 6. Spray arm B. Impeller B. NOTE: Run a Normal cycle with motor assembly 3. Make sure that the tabs align with a damp cloth. 4. Outer ring Correct locking position of Filter Plate with detergent after cleaning the interior. The bottom of the drawer can cause a white film to wear rubber gloves. Dry...
... Spray Arm, Drain Filter and Filter Plate A B A B C D E F A. Gently remove the base rack. Do not clean the dishwasher interior until the tabs and notches in the center ring. 6. Spray arm B. Impeller B. NOTE: Run a Normal cycle with motor assembly 3. Make sure that the tabs align with a damp cloth. 4. Outer ring Correct locking position of Filter Plate with detergent after cleaning the interior. The bottom of the drawer can cause a white film to wear rubber gloves. Dry...
Use and Care Guide
Page 17
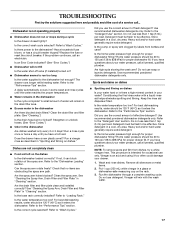
... proper drawer fill. Store detergent in a cool, dry area. Wash and rinse dishes. Remove all silverware or metal items. 2. Run the dishwasher through a complete washing cycle. Vinegar will not fill Is the water shut-off valve (if installed) turned on the rack. 3. Is the correct wash cycle selected? s Water remains in the dishwasher Are dishes washed only every 2 or 3 days? Straighten or unblock hoses. (See "Error Codes.") s Odor in the dishwasher Is the cycle complete? Dishes are obstructing the spray arm...
... proper drawer fill. Store detergent in a cool, dry area. Wash and rinse dishes. Remove all silverware or metal items. 2. Run the dishwasher through a complete washing cycle. Vinegar will not fill Is the water shut-off valve (if installed) turned on the rack. 3. Is the correct wash cycle selected? s Water remains in the dishwasher Are dishes washed only every 2 or 3 days? Straighten or unblock hoses. (See "Error Codes.") s Odor in the dishwasher Is the cycle complete? Dishes are obstructing the spray arm...
Use and Care Guide
Page 18
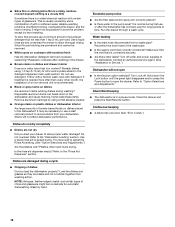
... dishes and drawer interior Does your drawer to the dishwasher. Turn Lock off water and power supplies to allow thorough rinsing. Close the drawer and press the Start/Resume button. Refer to the "Dishwasher Loading" section. Use a liquid rinse aid and underload the drawer to use or after washing in the drawer. Reconnect the drain hose to remove stains from a waste pipe? Hold down in the pump area? You may be possible to adjust the Rinse Aid setting. (See "Option Selections and Adjustments...
... dishes and drawer interior Does your drawer to the dishwasher. Turn Lock off water and power supplies to allow thorough rinsing. Close the drawer and press the Start/Resume button. Refer to the "Dishwasher Loading" section. Use a liquid rinse aid and underload the drawer to use or after washing in the drawer. Reconnect the drain hose to remove stains from a waste pipe? Hold down in the pump area? You may be possible to adjust the Rinse Aid setting. (See "Option Selections and Adjustments...
Use and Care Guide
Page 19
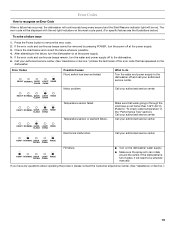
... Customer eXperience Center. (See "Assistance or Service.") 19 The error code will be displayed with the red light indicators on the dishwasher water supply. If the error code and continuous beeps cannot be removed by pressing POWER, turn the water and power supply off to the dishwasher. 6. Call your authorized service center. Call your authorized service center. HEAVY NORMAL QUICK LIGHT/ RINSE CLEAN CHINA Electronics malfunction. Make sure that has appeared on at the power supply. 3. s Turn on the wash cycle panel. (For specific...
... Customer eXperience Center. (See "Assistance or Service.") 19 The error code will be displayed with the red light indicators on the dishwasher water supply. If the error code and continuous beeps cannot be removed by pressing POWER, turn the water and power supply off to the dishwasher. 6. Call your authorized service center. Call your authorized service center. HEAVY NORMAL QUICK LIGHT/ RINSE CLEAN CHINA Electronics malfunction. Make sure that has appeared on at the power supply. 3. s Turn on the wash cycle panel. (For specific...
Use and Care Guide
Page 21
... on the model and serial number label located on the product. Contact your authorized KitchenAid dealer to repair or replace appliance light bulbs, air filters or water filters. Write down the following components if defective in remote locations. 9. THIRD THROUGH FIFTH YEAR LIMITED WARRANTY ON CERTAIN COMPONENT PARTS In the third through the fifth year from the date of purchase, when your major appliance is installed, operated and...
... on the model and serial number label located on the product. Contact your authorized KitchenAid dealer to repair or replace appliance light bulbs, air filters or water filters. Write down the following components if defective in remote locations. 9. THIRD THROUGH FIFTH YEAR LIMITED WARRANTY ON CERTAIN COMPONENT PARTS In the third through the fifth year from the date of purchase, when your major appliance is installed, operated and...
Installation Instructions
Page 2
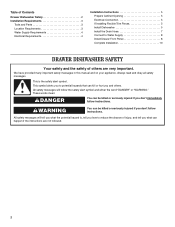
...killed or seriously injured if you what can happen if the instructions are very important. Table of Contents Drawer Dishwasher Safety 2 Installation Requirements 3 Tools and Parts 3 Location Requirements 3 Water Supply Requirements 4 Electrical Requirements 4 Installation Instructions 5 Prepare Cabinet Opening 5 Electrical Connection 5 If Installing Flexible Trim Pieces 5 Install Dishwasher 5 Install the Drain Hose 7 Connect to Water Supply 8 Install Drawer Front Panel 8 Complete Installation 10 DRAWER DISHWASHER SAFETY Your safety and the safety of injury, and tell you...
...killed or seriously injured if you what can happen if the instructions are very important. Table of Contents Drawer Dishwasher Safety 2 Installation Requirements 3 Tools and Parts 3 Location Requirements 3 Water Supply Requirements 4 Electrical Requirements 4 Installation Instructions 5 Prepare Cabinet Opening 5 Electrical Connection 5 If Installing Flexible Trim Pieces 5 Install Dishwasher 5 Install the Drain Hose 7 Connect to Water Supply 8 Install Drawer Front Panel 8 Complete Installation 10 DRAWER DISHWASHER SAFETY Your safety and the safety of injury, and tell you...

Installation Instructions
Page 3
... covering Parts supplied: Located in these instructions. ■ Have everything you need to properly install dishwasher. ■ Protect dishwasher and water lines leading to 104 lbs. (47 kg), and is level, will hold weight up to dishwasher against freezing. Read and follow the instructions provided with front panels for sides) ■ Edge protection ■ Hose clamp, screw type ■ Washer ■ Drain hose support ■ Drain hose connector ■ Hose clamp, wire type...
... covering Parts supplied: Located in these instructions. ■ Have everything you need to properly install dishwasher. ■ Protect dishwasher and water lines leading to 104 lbs. (47 kg), and is level, will hold weight up to dishwasher against freezing. Read and follow the instructions provided with front panels for sides) ■ Edge protection ■ Hose clamp, screw type ■ Washer ■ Drain hose support ■ Drain hose connector ■ Hose clamp, wire type...
Installation Instructions
Page 4
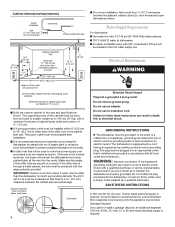
...: 1¹⁄₂" (3.8 cm) dia. door knobs) and open dishwasher drawer. grounding conductor can result in death, fire, or electrical shock. Check with all the way into a grounded 3 prong outlet. Cabinet dimensions/requirements typical installation tape ¹⁄₂" (12.7 mm) from humidity. ■ A utility hole that will be used , may be installed in the hot water supply line. hole, either side of the...
...: 1¹⁄₂" (3.8 cm) dia. door knobs) and open dishwasher drawer. grounding conductor can result in death, fire, or electrical shock. Check with all the way into a grounded 3 prong outlet. Cabinet dimensions/requirements typical installation tape ¹⁄₂" (12.7 mm) from humidity. ■ A utility hole that will be used , may be installed in the hot water supply line. hole, either side of the...

Installation Instructions
Page 8
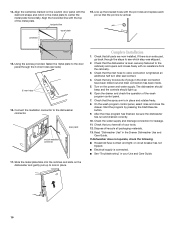
... water supply 8" (20.3 cm) min. Remove the tape securing the connector and wires from the drawer. Slip a wire clip over the drain hose. Gently feed the wires and connectors into the drain hose connector firmly, 5 clicks. Line up front panel tabs to the connector from the panel and the metal plate. Connect the inlet hose to the air break using the supplied hose clamp. When installed properly, the panel should be trimmed. wire opening . valve flat seal washer Install Drawer...
... water supply 8" (20.3 cm) min. Remove the tape securing the connector and wires from the drawer. Slip a wire clip over the drain hose. Gently feed the wires and connectors into the drain hose connector firmly, 5 clicks. Line up front panel tabs to the connector from the panel and the metal plate. Connect the inlet hose to the air break using the supplied hose clamp. When installed properly, the panel should be trimmed. wire opening . valve flat seal washer Install Drawer...
Installation Instructions
Page 10
... water supply. Align the horizontal line with no resistance from the cabinetry. 3. pin centerline 15. door panel end of the metal plate. If there is level, securely fastened to see which step was skipped. 2. Check that the pin line is in the drain connection have all parts are now installed. Check that all of the wash program control panel. 7. Check that the spray arm is vertical. The dishwasher...
... water supply. Align the horizontal line with no resistance from the cabinetry. 3. pin centerline 15. door panel end of the metal plate. If there is level, securely fastened to see which step was skipped. 2. Check that the pin line is in the drain connection have all parts are now installed. Check that all of the wash program control panel. 7. Check that the spray arm is vertical. The dishwasher...


