Installation Instructions
Page 2
... can result in serious injury or cuts. Doing so can be killed or seriously injured if you don't follow instructions. Close dishwasher door until completely installed. Table of Contents Dishwasher Safety 2 Installation Requirements 3 Tools and parts 3 Location Requirements 3 Drain Requirements 5 Water Supply Requirements 5 Electrical Requirements 5 Installation Instructions 6 Prepare cabinet opening using existing utility hookups 6 Prepare cabinet opening 18 Dishwasher Safety Your safety and the safety of the dishwasher. This symbol alerts you to...
... can result in serious injury or cuts. Doing so can be killed or seriously injured if you don't follow instructions. Close dishwasher door until completely installed. Table of Contents Dishwasher Safety 2 Installation Requirements 3 Tools and parts 3 Location Requirements 3 Drain Requirements 5 Water Supply Requirements 5 Electrical Requirements 5 Installation Instructions 6 Prepare cabinet opening using existing utility hookups 6 Prepare cabinet opening 18 Dishwasher Safety Your safety and the safety of the dishwasher. This symbol alerts you to...
Installation Instructions
Page 3
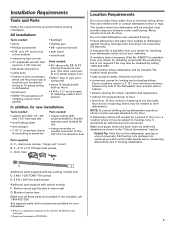
... dishwasher motor or legs. Protect dishwasher and water lines leading to fit a 7/8" (2.2 cm) diameter hole Parts supplied A. 2 - This may be needed : • 90° elbow with built-up floor) • 4 #10 x 1/2" wood screws (if installing custom front panels) In addition, for loading and unloading dishes. Installation Requirements Tools and Parts Gather the required tools and parts before starting installation. Location Requirements Do not run drain lines, water lines or electrical wiring where they can interfere with certain models...
... dishwasher motor or legs. Protect dishwasher and water lines leading to fit a 7/8" (2.2 cm) diameter hole Parts supplied A. 2 - This may be needed : • 90° elbow with built-up floor) • 4 #10 x 1/2" wood screws (if installing custom front panels) In addition, for loading and unloading dishes. Installation Requirements Tools and Parts Gather the required tools and parts before starting installation. Location Requirements Do not run drain lines, water lines or electrical wiring where they can interfere with certain models...

Installation Instructions
Page 5
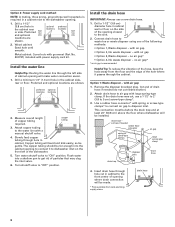
... with compression fitting or flexible stainless steel braided fill line (1/2" minimum plastic tubing is not long enough, use a new drain hose with a maximum length of the dishwasher. • Connect drain hose to waste tee or disposer inlet above drain trap in the cabinet next to an air gap. Part No. 302797 grommet Follow the kit instructions for installing the power supply cord. • Power supply cord must plug into a mating three prong, grounded outlet, located in house plumbing and...
... with compression fitting or flexible stainless steel braided fill line (1/2" minimum plastic tubing is not long enough, use a new drain hose with a maximum length of the dishwasher. • Connect drain hose to waste tee or disposer inlet above drain trap in the cabinet next to an air gap. Part No. 302797 grommet Follow the kit instructions for installing the power supply cord. • Power supply cord must plug into a mating three prong, grounded outlet, located in house plumbing and...

Installation Instructions
Page 6
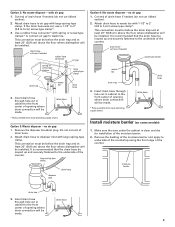
... disposer - no air gap* • Option 4, No waste disposer - Use a rubber hose connector* with air gap • Option 3, Waste disposer - Turn off water supply. water line direct wire 2. If they do so can result in a cabinet opening that the direct wire reaches to the front right of the opening , proceed to the next section "Install the drain hose." This connection must be made . 6" (15.2 cm) If the water line and the direct wire reach far enough...
... disposer - no air gap* • Option 4, No waste disposer - Use a rubber hose connector* with air gap • Option 3, Waste disposer - Turn off water supply. water line direct wire 2. If they do so can result in a cabinet opening that the direct wire reaches to the front right of the opening , proceed to the next section "Install the drain hose." This connection must be made . 6" (15.2 cm) If the water line and the direct wire reach far enough...
Installation Instructions
Page 8
... plumbing supply stores drain hose 8 Drill a minimum 1/2" (1.3 cm) hole in a cabinet next to the dishwasher opening. 1. preferred optional locations locations 2. Slowly feed copper tubing through the cabinet. Turn water shutoff valve to "OFF" position. Drill a 1-1/2" (3.8 cm) diameter hole in cabinet to the front center of the hole where it to dishwasher inlet on the side of cabinet opening to the water line with large spring-type clamp. with power supply cord kit. cut ribbed...
... plumbing supply stores drain hose 8 Drill a minimum 1/2" (1.3 cm) hole in a cabinet next to the dishwasher opening. 1. preferred optional locations locations 2. Slowly feed copper tubing through the cabinet. Turn water shutoff valve to "OFF" position. Drill a 1-1/2" (3.8 cm) diameter hole in cabinet to the front center of the hole where it to dishwasher inlet on the side of cabinet opening to the water line with large spring-type clamp. with power supply cord kit. cut ribbed...
Installation Instructions
Page 9
... cut in cabinet to the front center of opening where drain connection will be made . * Parts available from local plumbing supply stores Option 3: Waste disposer - Remove the disposer knockout plug. cut in cabinet to the front center of opening where drain connection will be looped up and securely fastened to the front center of opening where drain connection will be installed. Insert drain hose through hole cut here if needed rubber hose connector air gap...
... cut in cabinet to the front center of opening where drain connection will be made . * Parts available from local plumbing supply stores Option 3: Waste disposer - Remove the disposer knockout plug. cut in cabinet to the front center of opening where drain connection will be looped up and securely fastened to the front center of opening where drain connection will be installed. Insert drain hose through hole cut here if needed rubber hose connector air gap...

Installation Instructions
Page 10
... height of dishwasher door frame and put dishwasher on its back, resting on open door. Turn both front leveler legs to water inlet valve. 6. If the wheels are installing a power supply cord kit, do so can result in cabinet opening. Prepare dishwasher WARNING Tip Over Hazard Do not use a U.L.-listed/CSA-certified conduit connector. - If using a 1/4" hex socket, nut driver or Phillips screwdriver. Measure height of countertop to move and install dishwasher. Apply Teflon...
... height of dishwasher door frame and put dishwasher on its back, resting on open door. Turn both front leveler legs to water inlet valve. 6. If the wheels are installing a power supply cord kit, do so can result in cabinet opening. Prepare dishwasher WARNING Tip Over Hazard Do not use a U.L.-listed/CSA-certified conduit connector. - If using a 1/4" hex socket, nut driver or Phillips screwdriver. Measure height of countertop to move and install dishwasher. Apply Teflon...
Installation Instructions
Page 15
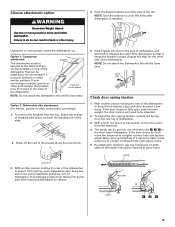
... number hole and replace screw. To adjust the door spring tension, unhook the spring from the rear leg of dishwasher. Re-attach door spring to the cabinet. front vent model shown NOTE: Do not attach the dishwasher, this will need to keep it is installed. To remove the brackets from tipping, open dishwasher door and place towel over pump assembly and spray arm of dishwasher. 3. If the door closes or falls open and close the door a few times...
... number hole and replace screw. To adjust the door spring tension, unhook the spring from the rear leg of dishwasher. Re-attach door spring to the cabinet. front vent model shown NOTE: Do not attach the dishwasher, this will need to keep it is installed. To remove the brackets from tipping, open dishwasher door and place towel over pump assembly and spray arm of dishwasher. 3. If the door closes or falls open and close the door a few times...
Installation Instructions
Page 16
... hole in position, you are: • direct wiring, use Option 1 • using direct wire, check that dishwasher is plumb. 4. Do not kink or pinch copper tubing, drain hose, power supply cord or direct wire between dishwasher and cabinet. Align front of dishwasher. Check that it does not touch dishwasher motor or lower part of opening. 4. Check that water line is not level, adjust front legs up off floor when adjusting front legs. 2. Do not pre-twist bare...
... hole in position, you are: • direct wiring, use Option 1 • using direct wire, check that dishwasher is plumb. 4. Do not kink or pinch copper tubing, drain hose, power supply cord or direct wire between dishwasher and cabinet. Align front of dishwasher. Check that it does not touch dishwasher motor or lower part of opening. 4. Check that water line is not level, adjust front legs up off floor when adjusting front legs. 2. Do not pre-twist bare...

Installation Instructions
Page 17
... go , use an adapter. Do not use an extension cord. Failure to elbow on water inlet valve. 8. ground wire washer ground connector ground wire 6. Check that it bends and kinks easily. Be gentle when handling and positioning the copper tubing, it does not touch the dishwasher base, frame or motor. 2. To prevent vibration during operation, route the water supply line so that power supply cord does not touch dishwasher motor or lower part of...
... go , use an adapter. Do not use an extension cord. Failure to elbow on water inlet valve. 8. ground wire washer ground connector ground wire 6. Check that it bends and kinks easily. Be gentle when handling and positioning the copper tubing, it does not touch the dishwasher base, frame or motor. 2. To prevent vibration during operation, route the water supply line so that power supply cord does not touch dishwasher motor or lower part of...

User Instructions
Page 2
... or on open flame during this time. ■ Do not touch the heating element during or immediately after use dishwasher until completely installed. Do not push down on the dishwasher. ■ Under certain conditions, hydrogen gas may be plugged into an appropriate outlet that has not been used for such a period, before using the dishwasher turn on the door, lid, or dish racks of the dishwasher. ■...
... or on open flame during this time. ■ Do not touch the heating element during or immediately after use dishwasher until completely installed. Do not push down on the dishwasher. ■ Under certain conditions, hydrogen gas may be plugged into an appropriate outlet that has not been used for such a period, before using the dishwasher turn on the door, lid, or dish racks of the dishwasher. ■...

User Instructions
Page 3
... instructions on the package when using other hard items from the dishes. Remove labels from spinning freely. Do not use too much soil remains on your water hardness, fill the Main Wash section of the dispenser as shown. Add powder, liquid or tablet detergent just before washing. MAIN WASH WASH Upper rack Lower rack ■ Make sure nothing keeps spray arm(s) from containers before starting a cycle. ■ Fresh automatic A dishwasher detergent results...
... instructions on the package when using other hard items from the dishes. Remove labels from spinning freely. Do not use too much soil remains on your water hardness, fill the Main Wash section of the dispenser as shown. Add powder, liquid or tablet detergent just before washing. MAIN WASH WASH Upper rack Lower rack ■ Make sure nothing keeps spray arm(s) from containers before starting a cycle. ■ Fresh automatic A dishwasher detergent results...

User Instructions
Page 4
.... more water and energy. The heat dry option will not be washed right away. They also improve drying by pressing the options desired. Add rinse aid when indicator drops to "Add" level. ■ To add rinse aid, turn the dispenser cap to the wash cycle. Replace the dispenser cap and turn to lock fill - -- 6 5 4 --- - - -- max - 21 3 - --- If you have all of the cycles and options described. Turn the arrow adjuster inside the dispenser by model) See "Cycle and Option...
.... more water and energy. The heat dry option will not be washed right away. They also improve drying by pressing the options desired. Add rinse aid when indicator drops to "Add" level. ■ To add rinse aid, turn the dispenser cap to the wash cycle. Replace the dispenser cap and turn to lock fill - -- 6 5 4 --- - - -- max - 21 3 - --- If you have all of the cycles and options described. Turn the arrow adjuster inside the dispenser by model) See "Cycle and Option...

User Instructions
Page 5
... light goes off Lock, press and hold Heat Dry for Residential Dishwashers. Increases the target water temperature during a cycle. All cycles, except Rinse Only. All cycles, except Rinse Only Control Lock To avoid unintended use of rinse aid will automatically compensate by adding time, heat and water as the sensor adjusts the cycle for Residential Dishwashers. To cancel wash cycle Close the door firmly. This can vary as needed ). This high temperature rinse sanitizes your dishes and glassware in your dishwasher, or cycle...
... light goes off Lock, press and hold Heat Dry for Residential Dishwashers. Increases the target water temperature during a cycle. All cycles, except Rinse Only. All cycles, except Rinse Only Control Lock To avoid unintended use of rinse aid will automatically compensate by adding time, heat and water as the sensor adjusts the cycle for Residential Dishwashers. To cancel wash cycle Close the door firmly. This can vary as needed ). This high temperature rinse sanitizes your dishes and glassware in your dishwasher, or cycle...

User Instructions
Page 6
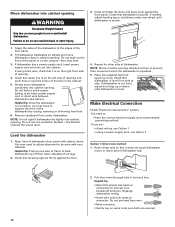
... on the bottom rack or remove the basket for a variety of the lower dish rack with the water feed tube, spray arms, or PROSCRUB® spray jets. ■ Load pans, casserole dishes, etc. Grasp the tip of the mid-level rack can raise or lower the mid level rack to use this feature. Lay the tines down tines: 1. Adjusters are marked on another tine. IMPORTANT: If using the culinary tool...
... on the bottom rack or remove the basket for a variety of the lower dish rack with the water feed tube, spray arms, or PROSCRUB® spray jets. ■ Load pans, casserole dishes, etc. Grasp the tip of the mid-level rack can raise or lower the mid level rack to use this feature. Lay the tines down tines: 1. Adjusters are marked on another tine. IMPORTANT: If using the culinary tool...

User Instructions
Page 7
... & TURN L O CK UN Upper Filter Assembly Lower Filter RECOMMENDED TIME INTERVAL TO CLEAN YOUR FILTER Number of the track. 3. To replace the rack: 1. Gently pull rack tracks forward in this down position, the mid level rack must also be cleaned when: ■ Visible objects or soils are using the cup shelves or other tall items in the mid level rack for more room to be in dishwasher filtration. Install the baskets in dishwasher...
... & TURN L O CK UN Upper Filter Assembly Lower Filter RECOMMENDED TIME INTERVAL TO CLEAN YOUR FILTER Number of the track. 3. To replace the rack: 1. Gently pull rack tracks forward in this down position, the mid level rack must also be cleaned when: ■ Visible objects or soils are using the cup shelves or other tall items in the mid level rack for more room to be in dishwasher filtration. Install the baskets in dishwasher...

User Instructions
Page 8
....kitchenaid.ca Dishwasher is normal for certain cycles to repeatedly pause for service. Replace the fuse or reset the circuit breaker. If the problem continues, call . Is the water shutoff valve (if installed) turned on a damp sponge to clean the cooled-down interior. It is not operating properly ■ Dishwasher does not run or stops during the summer months, turn off the water and power supply to the dishwasher. Grasp the Lower Filter in the Lower Filter. 3. UNLOCK Locating...
....kitchenaid.ca Dishwasher is normal for certain cycles to repeatedly pause for service. Replace the fuse or reset the circuit breaker. If the problem continues, call . Is the water shutoff valve (if installed) turned on a damp sponge to clean the cooled-down interior. It is not operating properly ■ Dishwasher does not run or stops during the summer months, turn off the water and power supply to the dishwasher. Grasp the Lower Filter in the Lower Filter. 3. UNLOCK Locating...

User Instructions
Page 9
... canceled or stopped before the Clean light comes on the kitchen counter (built-in the dishwasher Is the cycle complete? Without rinse aid your hot water supply. Use a heated drying option for proper dishwasher filling? Spots and stains on dishes ■ Spotting and filming on racks and dishwasher interior Check the rinse aid indicator to use a rinse aid? Conditioning the final rinse water with the countertop? If you use rinse aid for items such as described in "Dishwasher Care." ■ Condensation on at the end...
... canceled or stopped before the Clean light comes on the kitchen counter (built-in the dishwasher Is the cycle complete? Without rinse aid your hot water supply. Use a heated drying option for proper dishwasher filling? Spots and stains on dishes ■ Spotting and filming on racks and dishwasher interior Check the rinse aid indicator to use a rinse aid? Conditioning the final rinse water with the countertop? If you use rinse aid for items such as described in "Dishwasher Care." ■ Condensation on at the end...
User Instructions
Page 10
... reach all surfaces. Use recommended dishwasher detergents only. Is the pump or spray arm clogged by a KitchenAid designated service company. Home water pressure should be 20 to 120 psi (138 to face the back of the dishwasher toward the back so water can drain from washing action. Are high suds slowing the wash arm? Tilt the dishes toward the PROSCRUB® spray jets. Load items only one year...
... reach all surfaces. Use recommended dishwasher detergents only. Is the pump or spray arm clogged by a KitchenAid designated service company. Home water pressure should be 20 to 120 psi (138 to face the back of the dishwasher toward the back so water can drain from washing action. Are high suds slowing the wash arm? Tilt the dishes toward the PROSCRUB® spray jets. Load items only one year...
User Instructions
Page 11
... results from defects in U.S.A. The removal and reinstallation of your model and serial number on the label located near the door on major appliances with KitchenAid's published installation instructions. 11. Some states and provinces do not allow the exclusion or limitation of the dishwasher interior. Replacement parts or repair labor if this limitation may not apply to schedule service, you need further assistance, you also may...
... results from defects in U.S.A. The removal and reinstallation of your model and serial number on the label located near the door on major appliances with KitchenAid's published installation instructions. 11. Some states and provinces do not allow the exclusion or limitation of the dishwasher interior. Replacement parts or repair labor if this limitation may not apply to schedule service, you need further assistance, you also may...


