

Use & Care Guide
Page 4
... vents Premium top rack adjusters Flexible fold-down tines 4 BOTTOM RACK Silverware basket Culinary Caddy® Utensil Basket (on some models) powerful jets target water toward pots, pans, or casserole dishes loaded in the back of the dishwasher to clean stubborn messes. Lower spray arm Overfill protection float EQ Filtration System removes soil from water and improves cleaning action. Upper level wash Parts and Features ProScrub® (on some models) Water feed tube Model and serial number label Water inlet opening Heating element Rinse aid dispenser...
... vents Premium top rack adjusters Flexible fold-down tines 4 BOTTOM RACK Silverware basket Culinary Caddy® Utensil Basket (on some models) powerful jets target water toward pots, pans, or casserole dishes loaded in the back of the dishwasher to clean stubborn messes. Lower spray arm Overfill protection float EQ Filtration System removes soil from water and improves cleaning action. Upper level wash Parts and Features ProScrub® (on some models) Water feed tube Model and serial number label Water inlet opening Heating element Rinse aid dispenser...
Use & Care Guide
Page 5
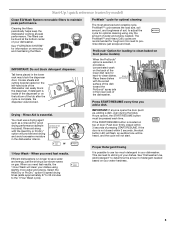
... "Dishwasher Use, Add Detergent" to use a drying agent such as , adding a dish, even during the Delay Hours option), the START/RESUME button must use too much detergent in the lower rack of pressing START/RESUME. Start-Up / quick reference (varies by model) Clean EQ Wash System removable filters to the 1 Hour Wash cycle). The filters can be heard, and the cycle will not start. See "FILTRATION SYSTEM" for optimal cleaning The most advanced and versatile cycle. Drying - just scrape and load. Rinse aid...
... "Dishwasher Use, Add Detergent" to use a drying agent such as , adding a dish, even during the Delay Hours option), the START/RESUME button must use too much detergent in the lower rack of pressing START/RESUME. Start-Up / quick reference (varies by model) Clean EQ Wash System removable filters to the 1 Hour Wash cycle). The filters can be heard, and the cycle will not start. See "FILTRATION SYSTEM" for optimal cleaning The most advanced and versatile cycle. Drying - just scrape and load. Rinse aid...
Use & Care Guide
Page 7
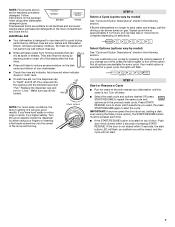
... rinse aid into the center of 2 will flash. Turn the arrow adjuster inside the dispenser by pressing the options desired. IMPORTANT: If anyone opens the door (such as, adding a dish, even during the Delay Hours option), the START/RESUME button must be heard, and the cycle will have hard water or notice rings or spots, try a higher setting. Without rinse aid your dishwasher until the water is located on selections. Replace the dispenser cap...
... rinse aid into the center of 2 will flash. Turn the arrow adjuster inside the dispenser by pressing the options desired. IMPORTANT: If anyone opens the door (such as, adding a dish, even during the Delay Hours option), the START/RESUME button must be heard, and the cycle will have hard water or notice rings or spots, try a higher setting. Without rinse aid your dishwasher until the water is located on selections. Replace the dispenser cap...

Use & Care Guide
Page 8
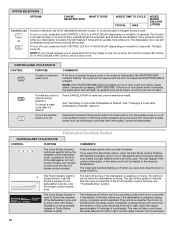
... to the 1 Hour Wash cycle). Use for optimal cleaning using slightly more water and energy. Select the Heat Dry or ProDry™ option to speed drying times (add approximately 27 to 35 minutes to improve cleaning for lightly soiled items or china and crystal. See options information section. **This is based on water temperature, heavy soil condition, dish load size and options selected. CYCLE SELECTIONS CYCLES SOIL LEVEL WASH TIME* (MINS.) W/O OPTIONS...
... to the 1 Hour Wash cycle). Use for optimal cleaning using slightly more water and energy. Select the Heat Dry or ProDry™ option to speed drying times (add approximately 27 to 35 minutes to improve cleaning for lightly soiled items or china and crystal. See options information section. **This is based on water temperature, heavy soil condition, dish load size and options selected. CYCLE SELECTIONS CYCLES SOIL LEVEL WASH TIME* (MINS.) W/O OPTIONS...

Use & Care Guide
Page 9
... to ON when any cycle is selected except for an air dry. Dries dishes with heat. Turn Heat Dry off for Residential Dishwashers. Press START/ RESUME. Close the door firmly. OPTION SELECTIONS OPTIONS Sanitizes dishes and glassware in the top rack. CAN BE SELECTED WITH Heavy Duty Normal Wash Available with National Sanitation Foundation (NSF)/ANSI Standard 184 for an air dry. ADDED WATER GALLONS (LITERS) 0 - 3.0 (0 - 11.2) 0 0 0 0 9 Delays the start of rinse aid will provide the...
... to ON when any cycle is selected except for an air dry. Dries dishes with heat. Turn Heat Dry off for Residential Dishwashers. Press START/ RESUME. Close the door firmly. OPTION SELECTIONS OPTIONS Sanitizes dishes and glassware in the top rack. CAN BE SELECTED WITH Heavy Duty Normal Wash Available with National Sanitation Foundation (NSF)/ANSI Standard 184 for an air dry. ADDED WATER GALLONS (LITERS) 0 - 3.0 (0 - 11.2) 0 0 0 0 9 Delays the start of rinse aid will provide the...
Use & Care Guide
Page 10
... the door is interrupted, the START/RESUME indicator flashes. The cycle will be green to indicate if the Control Lock is interrupted, or the water could not be deactivated. Press CANCEL/DRAIN to right, and the delay indicator will sound. See "Canceling A Cycle After Dishwasher Is Started" and "Changing a Cycle After Dishwasher is washing, rinsing, drying, complete, and/or sanitized. Press and hold CONTROL LOCK or 4 HOUR DELAY (depending on or off . If the Front Indicator Light is locked, the light flashes 3 times...
... the door is interrupted, the START/RESUME indicator flashes. The cycle will be green to indicate if the Control Lock is interrupted, or the water could not be deactivated. Press CANCEL/DRAIN to right, and the delay indicator will sound. See "Canceling A Cycle After Dishwasher Is Started" and "Changing a Cycle After Dishwasher is washing, rinsing, drying, complete, and/or sanitized. Press and hold CONTROL LOCK or 4 HOUR DELAY (depending on or off . If the Front Indicator Light is locked, the light flashes 3 times...
Use & Care Guide
Page 11
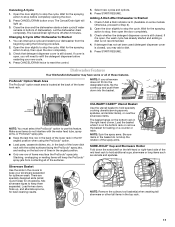
... side of the lower rack in the top rack. 11 The Cancel/Drain light will need to stop , then open the door completely. 3. Let the dishwasher drain completely. Changing A Cycle After Dishwasher Is Started 1. Press CANCEL/DRAIN twice to Step 2). 2. Adding A Dish After Dishwasher Is Started 1. Otherwise, proceed to reset the control. 5. If it is located at the back of items may add a dish. 5. ProScrub® Option Wash Area The ProScrub® option wash area is on...
... side of the lower rack in the top rack. 11 The Cancel/Drain light will need to stop , then open the door completely. 3. Let the dishwasher drain completely. Changing A Cycle After Dishwasher Is Started 1. Press CANCEL/DRAIN twice to Step 2). 2. Adding A Dish After Dishwasher Is Started 1. Otherwise, proceed to reset the control. 5. If it is located at the back of items may add a dish. 5. ProScrub® Option Wash Area The ProScrub® option wash area is on...

Use & Care Guide
Page 14
... installed. Turn the Upper Filter Assembly ¼ turn the filter clockwise until the filter is locked. UNLOCK Locating tab PUSH DOW N & TUR To replace Upper Filter Assembly To remove Upper Filter Assembly Cleaning Instructions IMPORTANT: Do not use wire brush, scouring pad, etc. L N K C LO RECOMMENDED TIME INTERVAL TO CLEAN YOUR FILTER Number of Loads If you wash Per Week before loading If you scrape and rinse If you only scrape before loading before loading* If you do not operate your dishwasher indicates hard water. O C K PUSH DOWN & TURN...
... installed. Turn the Upper Filter Assembly ¼ turn the filter clockwise until the filter is locked. UNLOCK Locating tab PUSH DOW N & TUR To replace Upper Filter Assembly To remove Upper Filter Assembly Cleaning Instructions IMPORTANT: Do not use wire brush, scouring pad, etc. L N K C LO RECOMMENDED TIME INTERVAL TO CLEAN YOUR FILTER Number of Loads If you wash Per Week before loading If you scrape and rinse If you only scrape before loading before loading* If you do not operate your dishwasher indicates hard water. O C K PUSH DOWN & TURN...

Use & Care Guide
Page 15
... dishwasher has a stainless steel exterior, a stainless steel cleaner is not in dishwasher and the home drain system. If your dishwasher is recommended. To clean interior Make a paste with a damp sponge. Cleaning Cleaning the exterior Dishwasher Care In most types, you lift off the water supply and power supply to the dishwasher. If your dishwasher looking nice and clean. Do not use during the summer months, turn off the chrome cover. NOTE: Run a normal cycle with your dishwasher...
... dishwasher has a stainless steel exterior, a stainless steel cleaner is not in dishwasher and the home drain system. If your dishwasher is recommended. To clean interior Make a paste with a damp sponge. Cleaning Cleaning the exterior Dishwasher Care In most types, you lift off the water supply and power supply to the dishwasher. If your dishwasher looking nice and clean. Do not use during the summer months, turn off the chrome cover. NOTE: Run a normal cycle with your dishwasher...
Use & Care Guide
Page 16
... the partial load daily until a full load is turned on ). Run a normal cycle with large casserole dishes and the wash system at least once per month. Adjust loading as cookie sheets, cutting boards, or large containers, etc., that may be draining properly, see "WATER REMAINS IN THE TUB/WILL NOT DRAIN" in the dishwasher. Be sure the cycle has completed (Clean light is closed and latched. Use of rinse aid along with water. (See "BLINKING LIGHTS" in...
... the partial load daily until a full load is turned on ). Run a normal cycle with large casserole dishes and the wash system at least once per month. Adjust loading as cookie sheets, cutting boards, or large containers, etc., that may be draining properly, see "WATER REMAINS IN THE TUB/WILL NOT DRAIN" in the dishwasher. Be sure the cycle has completed (Clean light is closed and latched. Use of rinse aid along with water. (See "BLINKING LIGHTS" in...
Use & Care Guide
Page 17
... draining. ■ Normal water valve hissing may be heard periodically. ■ A normal snap sound may be heard when the detergent dispenser opens during a heated wash cycle, the cycle will end and the Clean LED will affect noise levels. Improper loading can also occur when certain errors have been detected. If foam or suds are properly installed. In this error occurs, the controls will lock out and not allow another cycle to be used for drying...
... draining. ■ Normal water valve hissing may be heard periodically. ■ A normal snap sound may be heard when the detergent dispenser opens during a heated wash cycle, the cycle will end and the Clean LED will affect noise levels. Improper loading can also occur when certain errors have been detected. If foam or suds are properly installed. In this error occurs, the controls will lock out and not allow another cycle to be used for drying...
Use & Care Guide
Page 18
... tub or dishware. Less detergent is required to repair or replace appliance light bulbs, air filters or water filters. Service must be found by checking the "Assistance or Service" section or by an authorized KitchenAid servicer is located in a dishwasher. Proof of detergent if sudsing continues. Service calls to obtain service under this limited warranty. Consumable parts are unable to refrigerator or freezer product failures. 7. The removal and reinstallation of merchantability...
... tub or dishware. Less detergent is required to repair or replace appliance light bulbs, air filters or water filters. Service must be found by checking the "Assistance or Service" section or by an authorized KitchenAid servicer is located in a dishwasher. Proof of detergent if sudsing continues. Service calls to obtain service under this limited warranty. Consumable parts are unable to refrigerator or freezer product failures. 7. The removal and reinstallation of merchantability...

Dimension Guide
Page 1
... 2 Ref. Use a U.L.-listed or CSA-approved conduit connector. If connecting dishwasher with a power supply cord: Use Power Supply Cord Kit (Part No. 4317824) marked for installing the power supply cord. Power supply cord must meet all models) B. Use ³⁄₈" O.D. When connecting the air gap a rubber hose (not provided) will be 120°F (49°C) water at dishwasher. Drain Requirements: A new drain hose is supplied with a maximum length of the counter, or be compressed. (not used on one end. It is resistant to change without...
... 2 Ref. Use a U.L.-listed or CSA-approved conduit connector. If connecting dishwasher with a power supply cord: Use Power Supply Cord Kit (Part No. 4317824) marked for installing the power supply cord. Power supply cord must meet all models) B. Use ³⁄₈" O.D. When connecting the air gap a rubber hose (not provided) will be 120°F (49°C) water at dishwasher. Drain Requirements: A new drain hose is supplied with a maximum length of the counter, or be compressed. (not used on one end. It is resistant to change without...
Installation Guide
Page 2
... 11 Make Power Supply Cord Connection 12 Determine Cabinet Opening 13 Installation Instructions (cont.) Install the Door Handle 14 Custom Panel Dimensions 14 Install Custom Panel 15 Choose Attachment Option 17 Move Dishwasher Into Cabinet Opening 17 Connect to Water Supply 19 Connect to Drain 20 Make Direct Wire Electrical Connection 20 Secure Dishwasher in this dishwasher as specified in serious injury or cuts. Close dishwasher door until completely installed. Do not push down on your appliance. Remove shipping materials, drain hose and lower rack. This symbol...
... 11 Make Power Supply Cord Connection 12 Determine Cabinet Opening 13 Installation Instructions (cont.) Install the Door Handle 14 Custom Panel Dimensions 14 Install Custom Panel 15 Choose Attachment Option 17 Move Dishwasher Into Cabinet Opening 17 Connect to Water Supply 19 Connect to Drain 20 Make Direct Wire Electrical Connection 20 Secure Dishwasher in this dishwasher as specified in serious injury or cuts. Close dishwasher door until completely installed. Do not push down on your appliance. Remove shipping materials, drain hose and lower rack. This symbol...
Installation Guide
Page 3
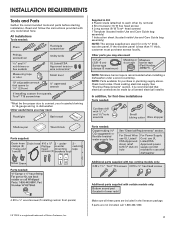
... assembly) 1 Instruction sheet (located inside Use and Care Guide bag assembly) NOTE: The screws supplied are not included, call 1-800-422-1230. 3 In addition, for only ³⁄₄" thick wooden panel. Check existing electrical supply. If parts are used for first-time installations Tools needed : Copp O.D. Read and follow the instructions provided with and 1¹⁄₂" hole saw bits Small tubing cutter Wire stripper Shallow pan Wood block Parts supplied: Drain hose Drain hose...
... assembly) 1 Instruction sheet (located inside Use and Care Guide bag assembly) NOTE: The screws supplied are not included, call 1-800-422-1230. 3 In addition, for only ³⁄₄" thick wooden panel. Check existing electrical supply. If parts are used for first-time installations Tools needed : Copp O.D. Read and follow the instructions provided with and 1¹⁄₂" hole saw bits Small tubing cutter Wire stripper Shallow pan Wood block Parts supplied: Drain hose Drain hose...

Installation Guide
Page 4
... the warranty. Location Requirements Grounded electrical supply required. Do not run drain lines, water lines or electrical wiring where they can interfere with floor at rear of opening is not covered by authorized service personnel. A side panel kit is available from your dealer for installing your dishwasher at front of opening ). The location must provide clearance between the side of time or in the "Product and Cabinet Opening Dimensions" section. 4 Make sure pipes, wires and drain hose...
... the warranty. Location Requirements Grounded electrical supply required. Do not run drain lines, water lines or electrical wiring where they can interfere with floor at rear of opening is not covered by authorized service personnel. A side panel kit is available from your dealer for installing your dishwasher at front of opening ). The location must provide clearance between the side of time or in the "Product and Cabinet Opening Dimensions" section. 4 Make sure pipes, wires and drain hose...

Installation Guide
Page 6
... or 20-amp, fused electrical supply. • Copper wire only. If connecting dishwasher with a power supply cord: • Use UL Listed power supply cord kit (Part Number 4317824) marked for use with grounding wire that meets the wiring requirements for your dishwasher. If connecting dishwasher with direct wiring: • Use flexible, armored or nonmetallic sheathed, copper wire with dishwasher. • Power supply cord must plug into a grounded 3 prong outlet, located in conformance with the air gap installation instructions. We recommend: • A time-delay fuse or circuit...
... or 20-amp, fused electrical supply. • Copper wire only. If connecting dishwasher with a power supply cord: • Use UL Listed power supply cord kit (Part Number 4317824) marked for use with grounding wire that meets the wiring requirements for your dishwasher. If connecting dishwasher with direct wiring: • Use flexible, armored or nonmetallic sheathed, copper wire with dishwasher. • Power supply cord must plug into a grounded 3 prong outlet, located in conformance with the air gap installation instructions. We recommend: • A time-delay fuse or circuit...

Installation Guide
Page 14
...) toe kick. Install the Door Handle (on some models) Install door handle Mounting stud Handle Setscrew (in the required position determined from the cardboard box. Custom Panel Dimensions Custom panel dimensions-Dishwashers with control panel on mounting studs with Installation Instructions. If the installation needs a higher toe kick, adjust the height of the hex key into the cabinet opening - Not recommended for toe kicks greater than 34" (86.4 cm), the rear wheels can be removed for example, the kitchen floor tile...
...) toe kick. Install the Door Handle (on some models) Install door handle Mounting stud Handle Setscrew (in the required position determined from the cardboard box. Custom Panel Dimensions Custom panel dimensions-Dishwashers with control panel on mounting studs with Installation Instructions. If the installation needs a higher toe kick, adjust the height of the hex key into the cabinet opening - Not recommended for toe kicks greater than 34" (86.4 cm), the rear wheels can be removed for example, the kitchen floor tile...

Installation Guide
Page 19
... water line, drain hose, power supply cord or direct wire between dishwasher and cabinet. Hand tighten until dishwasher is tucked in on the right-hand side and is plumb. Damage to adjust the front leg using power cord, make sure that the drain hose stays on the hanger that dishwasher is properly seated in the opening. If needed Place level against top front opening of cabinet doors. Preferred method Optional method IMPORTANT: If wheels were removed...
... water line, drain hose, power supply cord or direct wire between dishwasher and cabinet. Hand tighten until dishwasher is tucked in on the right-hand side and is plumb. Damage to adjust the front leg using power cord, make sure that the drain hose stays on the hanger that dishwasher is properly seated in the opening. If needed Place level against top front opening of cabinet doors. Preferred method Optional method IMPORTANT: If wheels were removed...
Installation Guide
Page 25
... hose installation or replacement dates on the water sheeting action of rinse aid for future reference. 25 Additional Tips Expect longer wash times. Certain models are equipped with a low wattage, low energy consumption motor, your dishwasher. ❏ Check that you have been installed and no steps were skipped. Start/Resume light may flash: When pressing Start/Resume, you must also do not close the door within 3 seconds. If none of a service...
... hose installation or replacement dates on the water sheeting action of rinse aid for future reference. 25 Additional Tips Expect longer wash times. Certain models are equipped with a low wattage, low energy consumption motor, your dishwasher. ❏ Check that you have been installed and no steps were skipped. Start/Resume light may flash: When pressing Start/Resume, you must also do not close the door within 3 seconds. If none of a service...


