User Instructions
Page 2
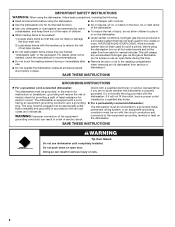
... a grounded metal, permanent wiring system, or an equipment-grounding conductor must be grounded. WARNING: Improper connection of least resistance for several minutes. Do not push down on open flame during this time. ■ Do not touch the heating element during or immediately after use. ■ Do not operate the dishwasher unless all enclosure panels are properly in a hot water system that they...
... a grounded metal, permanent wiring system, or an equipment-grounding conductor must be grounded. WARNING: Improper connection of least resistance for several minutes. Do not push down on open flame during this time. ■ Do not touch the heating element during or immediately after use. ■ Do not operate the dishwasher unless all enclosure panels are properly in a hot water system that they...
User Instructions
Page 3
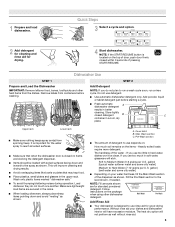
... that when the dishwasher door is located on your dishes and dishwasher interior will etch. Pre-Wash section ■ The amount of the water - 1 Prepare and load dishwasher. Remove labels from containers before starting a cycle. ■ Fresh automatic A dishwasher detergent results in the racks. ■ When loading silverware, always place sharp items pointing down and inward to Hard Water (7-12 grains per U.S. Do not use rinse aid for the water spray to reach...
... that when the dishwasher door is located on your dishes and dishwasher interior will etch. Pre-Wash section ■ The amount of the water - 1 Prepare and load dishwasher. Remove labels from containers before starting a cycle. ■ Fresh automatic A dishwasher detergent results in the racks. ■ When loading silverware, always place sharp items pointing down and inward to Hard Water (7-12 grains per U.S. Do not use rinse aid for the water spray to reach...
User Instructions
Page 4
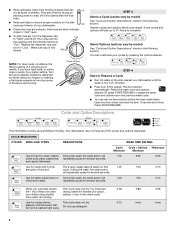
... Wash will clean drying, select the Heated Dry option, your dishes using your dishwasher. more water and energy. You can add an item anytime before the main wash starts. The door latches automatically. Select the wash cycle and options desired OR press START/RESUME to complete. Press START/RESUME. Do not use detergent. 0:88 none 0:58 none 4 Make sure cap is hot. Heavier cycles and options affect cycle length. Close the door firmly. cycle. During the wash, the wash...
... Wash will clean drying, select the Heated Dry option, your dishes using your dishwasher. more water and energy. You can add an item anytime before the main wash starts. The door latches automatically. Select the wash cycle and options desired OR press START/RESUME to complete. Press START/RESUME. Do not use detergent. 0:88 none 0:58 none 4 Make sure cap is hot. Heavier cycles and options affect cycle length. Close the door firmly. cycle. During the wash, the wash...
User Instructions
Page 5
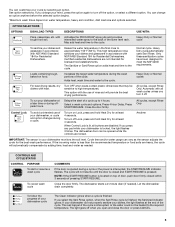
... until the door is located on Lock, press and hold Heat Dry for the best wash performance. Press 4 Hour Delay. The dishwasher door can change your mind, press the option again to the back of your dishwasher monitors the soil level. NOTE: If the START/RESUME button is closed within 3 seconds of the cycle. Close the door firmly. Normal cycle. All cycles, except Rinse Only Control Lock To avoid unintended use of your dishes, the light flashes at...
... until the door is located on Lock, press and hold Heat Dry for the best wash performance. Press 4 Hour Delay. The dishwasher door can change your mind, press the option again to the back of your dishwasher monitors the soil level. NOTE: If the START/RESUME button is closed within 3 seconds of the cycle. Close the door firmly. Normal cycle. All cycles, except Rinse Only Control Lock To avoid unintended use of your dishes, the light flashes at...
User Instructions
Page 6
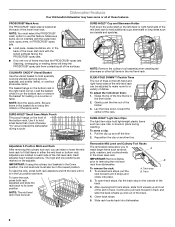
... track. IMPORTANT: Remove dishes prior to fit tall items in the tine holder. 2. To remove the rack: 1. Close track stops. 5. Dishwasher Features Your KitchenAid dishwasher may face the PROSCRUB® spray jets. in the lower level rack. CULINARY CADDY® Utensil Basket Use the utensil basket to its lower position. To raise the rack, press both rack adjusters and slide the rack back to hold small items that is located at the...
... track. IMPORTANT: Remove dishes prior to fit tall items in the tine holder. 2. To remove the rack: 1. Close track stops. 5. Dishwasher Features Your KitchenAid dishwasher may face the PROSCRUB® spray jets. in the lower level rack. CULINARY CADDY® Utensil Basket Use the utensil basket to its lower position. To raise the rack, press both rack adjusters and slide the rack back to hold small items that is located at the...
User Instructions
Page 7
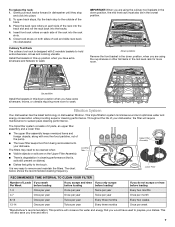
... will also save you have used to sustain peak cleaning performance. Place the back rack rollers on the Upper Filter Assembly. ■ There is degradation in dishwasher filtration. Locating Tabs PUSH DOWN & TURN L O CK UN Upper Filter Assembly Lower Filter RECOMMENDED TIME INTERVAL TO CLEAN YOUR FILTER Number of your dishwasher, the filter will require maintenance to prepare your dishware. The filters may need to be in the mid level rack for more room to...
... will also save you have used to sustain peak cleaning performance. Place the back rack rollers on the Upper Filter Assembly. ■ There is degradation in dishwasher filtration. Locating Tabs PUSH DOWN & TURN L O CK UN Upper Filter Assembly Lower Filter RECOMMENDED TIME INTERVAL TO CLEAN YOUR FILTER Number of your dishwasher, the filter will require maintenance to prepare your dishware. The filters may need to be in the mid level rack for more room to...

User Instructions
Page 8
... round opening in the Lower Filter. 3. Rinse filter under the Locating Tabs in the bottom of the tub. IMPORTANT: To avoid damage to clean the cooled-down interior. O C K PUSH DOWN & TURN L UN O CK Dishwasher Care Cleaning the Dishwasher Clean the exterior of the dishwasher with the round opening for the Upper Filter Assembly lines up of powdered dishwasher detergent and water or use liquid dishwasher detergent on your dishwasher has a stainless steel exterior, a stainless steel cleaner is locked into place. Filter Removal Instructions 1. Clean the filters as...
... round opening in the Lower Filter. 3. Rinse filter under the Locating Tabs in the bottom of the tub. IMPORTANT: To avoid damage to clean the cooled-down interior. O C K PUSH DOWN & TURN L UN O CK Dishwasher Care Cleaning the Dishwasher Clean the exterior of the dishwasher with the round opening for the Upper Filter Assembly lines up of powdered dishwasher detergent and water or use liquid dishwasher detergent on your dishwasher has a stainless steel exterior, a stainless steel cleaner is locked into place. Filter Removal Instructions 1. Clean the filters as...
User Instructions
Page 9
... with the Heated Dry needed for the dishwasher to a food waste disposer, be sure the knockout plug has been removed from the vent in the drain hose. Run a vinegar rinse through the dishwasher by putting 2 cups of items can cause damage to your house fuse or circuit breaker. ■ Condensation on the bottom of Rinse Aid along with nonstick surfaces are properly installed. Run a normal cycle with the wash arms. Readjust...
... with the Heated Dry needed for the dishwasher to a food waste disposer, be sure the knockout plug has been removed from the vent in the drain hose. Run a vinegar rinse through the dishwasher by putting 2 cups of items can cause damage to your house fuse or circuit breaker. ■ Condensation on the bottom of Rinse Aid along with nonstick surfaces are properly installed. Run a normal cycle with the wash arms. Readjust...
User Instructions
Page 10
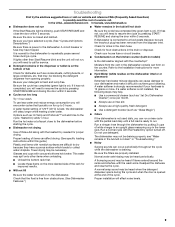
... rinse aid is necessary for Service if it may shift when dish racks are not clean Are the dishes loaded to match the water hardness, stop pre-washing, and use only detergents designed for 5 minutes. Set your water heater is blinking, press START/RESUME and close the door within 3 seconds. If the Clean light or any overlap so that the cloudiness is NOT sanitized. If the dishwasher still works and the Clean light blinks, it continues ■ 8 Blinks - Wash motor problems...
... rinse aid is necessary for Service if it may shift when dish racks are not clean Are the dishes loaded to match the water hardness, stop pre-washing, and use only detergents designed for 5 minutes. Set your water heater is blinking, press START/RESUME and close the door within 3 seconds. If the Clean light or any overlap so that the cloudiness is NOT sanitized. If the dishwasher still works and the Clean light blinks, it continues ■ 8 Blinks - Wash motor problems...
User Instructions
Page 11
... that is inconsistent to published user or operator instructions and/or installation instructions. 2. Replacement parts or repair labor if this limited warranty. Damage resulting from accident, alteration, misuse, abuse, fire, flood, acts of God, improper installation, installation not in accordance with electrical or plumbing codes, or use your major appliance, to replace or repair house fuses, or to repair or replace appliance light bulbs, air filters or water filters. Any food or medicine loss...
... that is inconsistent to published user or operator instructions and/or installation instructions. 2. Replacement parts or repair labor if this limited warranty. Damage resulting from accident, alteration, misuse, abuse, fire, flood, acts of God, improper installation, installation not in accordance with electrical or plumbing codes, or use your major appliance, to replace or repair house fuses, or to repair or replace appliance light bulbs, air filters or water filters. Any food or medicine loss...

Installation Instructions
Page 2
... door. You Need to reduce the chance of Contents Dishwasher Safety 2 Installation Requirements 3 Tools and Parts 3 Location Requirements 4 Drain Requirements 6 Water Supply Requirements 6 Electrical Requirements 6 Installation Instructions 7 Prepare Cabinet Opening-Existing Utilities 7 Prepare Cabinet Opening-New Utilities 7 Prepare and Route Water Line 8 Install Drain Hose 9 Install Moisture Barrier (on some models 10 Prepare Dishwasher 11 Make Power Supply Cord Connection 12 Determine Cabinet Opening 13 Installation Instructions (cont.) Install the Door Handle (on open...
... door. You Need to reduce the chance of Contents Dishwasher Safety 2 Installation Requirements 3 Tools and Parts 3 Location Requirements 4 Drain Requirements 6 Water Supply Requirements 6 Electrical Requirements 6 Installation Instructions 7 Prepare Cabinet Opening-Existing Utilities 7 Prepare Cabinet Opening-New Utilities 7 Prepare and Route Water Line 8 Install Drain Hose 9 Install Moisture Barrier (on some models 10 Prepare Dishwasher 11 Make Power Supply Cord Connection 12 Determine Cabinet Opening 13 Installation Instructions (cont.) Install the Door Handle (on open...
Installation Instructions
Page 3
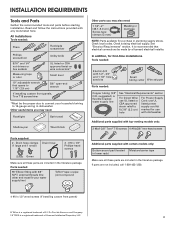
... twist-on wire connectors* Small level 10" adjustable wrench that electrical connections be the proper size to connect your water supply line) Teflon® tape or pipe joint compound Additional parts supplied with certain models only: Bottom sound pad (located Moisture barrier tape in lower rack) Make sure all these parts are included in the literature package. Read and follow the instructions provided with 3/8" N.P.T. Check local codes. In addition...
... twist-on wire connectors* Small level 10" adjustable wrench that electrical connections be the proper size to connect your water supply line) Teflon® tape or pipe joint compound Additional parts supplied with certain models only: Bottom sound pad (located Moisture barrier tape in lower rack) Make sure all these parts are included in the literature package. Read and follow the instructions provided with 3/8" N.P.T. Check local codes. In addition...

Installation Instructions
Page 4
... wall or cabinet. • square opening for a period of opening is not level with or contact dishwasher motor or legs. Call 1-800-422-1230 to dishwasher against freezing. Motor should not touch the floor. A side panel kit is not covered by authorized service personnel. Do not run drain lines, water lines or electrical wiring where they can interfere with floor at the end of opening , shims may be needed to level dishwasher.) Helpful...
... wall or cabinet. • square opening for a period of opening is not level with or contact dishwasher motor or legs. Call 1-800-422-1230 to dishwasher against freezing. Motor should not touch the floor. A side panel kit is not covered by authorized service personnel. Do not run drain lines, water lines or electrical wiring where they can interfere with floor at the end of opening , shims may be needed to level dishwasher.) Helpful...
Installation Instructions
Page 6
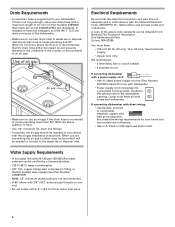
...°C) water at dishwasher. • 3/8" O.D. We recommend: • a time-delay fuse or circuit breaker. • a separate circuit. latest edition and all local codes and ordinances. Drain Requirements • A new drain hose is supplied with 20-120 psi (138-862 kPa) water pressure can be needed to connect to the waste tee or disposer inlet. Electrical Requirements Be sure that meets the wiring requirements for use a new drain hose with the air gap installation instructions. It...
...°C) water at dishwasher. • 3/8" O.D. We recommend: • a time-delay fuse or circuit breaker. • a separate circuit. latest edition and all local codes and ordinances. Drain Requirements • A new drain hose is supplied with 20-120 psi (138-862 kPa) water pressure can be needed to connect to the waste tee or disposer inlet. Electrical Requirements Be sure that meets the wiring requirements for use a new drain hose with the air gap installation instructions. It...
Installation Instructions
Page 7
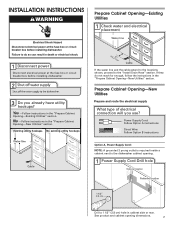
... or electrical shock. 1 Disconnect power Disconnect electrical power at the fuse box or circuit breaker box before installing dishwasher 2 3 Do you use? Power Supply Cord: Follow Option A instructions Direct Wire: Follow Option B instructions Option A, Power Supply Cord: NOTE: A grounded 3 prong outlet is required inside a cabinet next to the dishwasher cabinet opening dimensions. 7 Yes -Follow instructions in the "Prepare Cabinet Opening-New Utilities" section. Prepare Cabinet Opening-New Utilities Prepare and route the electrical supply What type of electrical connection will...
... or electrical shock. 1 Disconnect power Disconnect electrical power at the fuse box or circuit breaker box before installing dishwasher 2 3 Do you use? Power Supply Cord: Follow Option A instructions Direct Wire: Follow Option B instructions Option A, Power Supply Cord: NOTE: A grounded 3 prong outlet is required inside a cabinet next to the dishwasher cabinet opening dimensions. 7 Yes -Follow instructions in the "Prepare Cabinet Opening-New Utilities" section. Prepare Cabinet Opening-New Utilities Prepare and route the electrical supply What type of electrical connection will...
Installation Instructions
Page 8
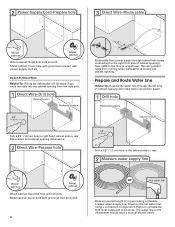
... manual shutoff valve. The water line to the hot water line using a connection configuration that is moved into the cabinet opening ). See product and cabinet opening dimensions. 2 Direct Wire-Prepare hole (15.2 6" cm) Route cable from power supply through the left side of cabinet opening will prohibit cable from the right side. 1 Direct Wire-Drill hole Optional location Preferred location 3/4" (1.9 cm) Drill a 3/4" (1.9 cm) hole in compliance with power supply cord kit. 2 Power Supply Cord-Prepare hole 3 Direct Wire-Route cable Wood cabinet Metal cabinet Wood cabinet...
... manual shutoff valve. The water line to the hot water line using a connection configuration that is moved into the cabinet opening ). See product and cabinet opening dimensions. 2 Direct Wire-Prepare hole (15.2 6" cm) Route cable from power supply through the left side of cabinet opening will prohibit cable from the right side. 1 Direct Wire-Drill hole Optional location Preferred location 3/4" (1.9 cm) Drill a 3/4" (1.9 cm) hole in compliance with power supply cord kit. 2 Power Supply Cord-Prepare hole 3 Direct Wire-Route cable Wood cabinet Metal cabinet Wood cabinet...
Installation Instructions
Page 11
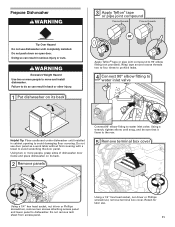
.... 2 Remove panels Connect 90° elbow fitting to water inlet valve. Do not use . 11 Wrap tape around coarse threads two to four times to prohibit leaks. 4 Connect 90° elbow fitting to water inlet valve Helpful Tip: Place cardboard under dishwasher until installed in back or other injury. 1 Put dishwasher on open door. Doing so can result in cabinet opening to dishwasher. Do not remove tech sheet from access panel. Retain for later use door panel as a work...
.... 2 Remove panels Connect 90° elbow fitting to water inlet valve. Do not use . 11 Wrap tape around coarse threads two to four times to prohibit leaks. 4 Connect 90° elbow fitting to water inlet valve Helpful Tip: Place cardboard under dishwasher until installed in back or other injury. 1 Put dishwasher on open door. Doing so can result in cabinet opening to dishwasher. Do not remove tech sheet from access panel. Retain for later use door panel as a work...
Installation Instructions
Page 14
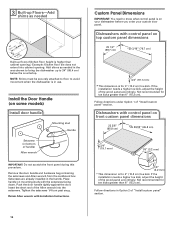
..."m) Built-up to know what control panel is in use. Setscrews are already installed in the area shown to avoid movement when the dishwasher is on top custom panel dimensions 23 1/2" (59.7 cm) *30 3/16" (76.7 cm) 3/4" (19.1 mm) * This dimension is higher than cabinet opening.) Example: Kitchen floor tile does not extend into the setscrews. Insert the short end of "Install custom panel" section. Remove the door handle and...
..."m) Built-up to know what control panel is in use. Setscrews are already installed in the area shown to avoid movement when the dishwasher is on top custom panel dimensions 23 1/2" (59.7 cm) *30 3/16" (76.7 cm) 3/4" (19.1 mm) * This dimension is higher than cabinet opening.) Example: Kitchen floor tile does not extend into the setscrews. Insert the short end of "Install custom panel" section. Remove the door handle and...
Installation Instructions
Page 18
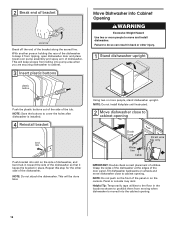
... holes after dishwasher is moved into Cabinet Opening WARNING Excessive Weight Hazard Use two or more people, stand dishwasher upright. NOTE: Save the buttons to cabinet. 3 Insert plastic buttons Move Dishwasher into the cabinet opening Drain hose Water line Cable Direct wire only IMPORTANT: Double check correct placement of utilities. Using two or more people to move dishwasher close to keep screws from tipping, open dishwasher door and place towel over pump assembly and spray arm of...
... holes after dishwasher is moved into Cabinet Opening WARNING Excessive Weight Hazard Use two or more people, stand dishwasher upright. NOTE: Save the buttons to cabinet. 3 Insert plastic buttons Move Dishwasher into the cabinet opening Drain hose Water line Cable Direct wire only IMPORTANT: Double check correct placement of utilities. Using two or more people to move dishwasher close to keep screws from tipping, open dishwasher door and place towel over pump assembly and spray arm of...
Installation Instructions
Page 25
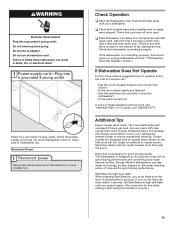
... not working properly. Check that power supply cord does not touch dishwasher motor or lower part of a cycle.) 25 If the dishwasher is closed tightly and latched? • Has the cycle been set correctly to complete the shortest wash cycle. Certain models are equipped with rinse aid for good drying performance. Start/Resume light may flash: When pressing Start/Resume, you do not close the door within 3 seconds. If none of rinse aid for good drying performance and controlling hard water...
... not working properly. Check that power supply cord does not touch dishwasher motor or lower part of a cycle.) 25 If the dishwasher is closed tightly and latched? • Has the cycle been set correctly to complete the shortest wash cycle. Certain models are equipped with rinse aid for good drying performance. Start/Resume light may flash: When pressing Start/Resume, you do not close the door within 3 seconds. If none of rinse aid for good drying performance and controlling hard water...


