User Instructions
Page 10
...8482; option can be caused by a combination of soils. Use the correct amount of fresh detergent. See ("Hard Water (white residue on dishwasher interior or glassware") in "Filtration System" for details.) Select the proper cycle and options for the type of : water that something is ... discolor the tub or dishware. ■ A citrus-based cleaner can cause dishes to dishware Improper loading can be sure the lid is securely attached and avoid overfilling. ■ Tub is permanently damaged. Tilt the dishes toward the PROSCRUB® spray jets. The cycle was interrupted in "...
...8482; option can be caused by a combination of soils. Use the correct amount of fresh detergent. See ("Hard Water (white residue on dishwasher interior or glassware") in "Filtration System" for details.) Select the proper cycle and options for the type of : water that something is ... discolor the tub or dishware. ■ A citrus-based cleaner can cause dishes to dishware Improper loading can be sure the lid is securely attached and avoid overfilling. ■ Tub is permanently damaged. Tilt the dishes toward the PROSCRUB® spray jets. The cycle was interrupted in "...
User Instructions
Page 11
... used in accordance with electrical or plumbing codes, or use your home. 8. KITCHENAID® DISHWASHER WARRANTY LIMITED WARRANTY For one year from the date of purchase, when this major appliance is operated and maintained according to instructions attached to or furnished with the product, KitchenAid brand of Whirlpool Corporation or Whirlpool Canada LP (hereafter...
... used in accordance with electrical or plumbing codes, or use your home. 8. KITCHENAID® DISHWASHER WARRANTY LIMITED WARRANTY For one year from the date of purchase, when this major appliance is operated and maintained according to instructions attached to or furnished with the product, KitchenAid brand of Whirlpool Corporation or Whirlpool Canada LP (hereafter...

Installation Instructions
Page 2
...of injury, and tell you what can be killed or seriously injured if you don't follow instructions. Option 2 16 Choose Attachment Option 17 Move Dishwasher Into Cabinet Opening 18 Connect to Water Supply 20 Connect to : • Slowly open door. This symbol alerts you ...Prepare Cabinet Opening-New Utilities 7 Prepare and Route Water Line 8 Install Drain Hose 9 Install Moisture Barrier (on some models 10 Prepare Dishwasher 11 Make Power Supply Cord Connection 12 Determine Cabinet Opening 13 Installation Instructions (cont.) Install the Door Handle (on your appliance. We ...
...of injury, and tell you what can be killed or seriously injured if you don't follow instructions. Option 2 16 Choose Attachment Option 17 Move Dishwasher Into Cabinet Opening 18 Connect to Water Supply 20 Connect to : • Slowly open door. This symbol alerts you ...Prepare Cabinet Opening-New Utilities 7 Prepare and Route Water Line 8 Install Drain Hose 9 Install Moisture Barrier (on some models 10 Prepare Dishwasher 11 Make Power Supply Cord Connection 12 Determine Cabinet Opening 13 Installation Instructions (cont.) Install the Door Handle (on your appliance. We ...

Installation Instructions
Page 4
... from freezing is not required. Motor should not touch the floor. If dishwasher will be securely attached to floor. • level floor. (If floor at front of time or in the "Product and Cabinet Opening Dimensions" section. 4 Check location where dishwasher will be left unused for installing your cabinetry. The location must provide...
... from freezing is not required. Motor should not touch the floor. If dishwasher will be securely attached to floor. • level floor. (If floor at front of time or in the "Product and Cabinet Opening Dimensions" section. 4 Check location where dishwasher will be left unused for installing your cabinetry. The location must provide...
Installation Instructions
Page 8
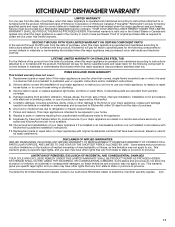
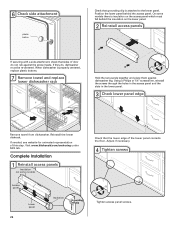
...line through cabinet hole (cable must extend to the hot water line using a connection configuration that is moved into the cabinet opening . Attach to the right front side of cabinet opening will make water connection easier. 1 Drill hole Preferred locations Optional locations 1/2" (1.3 cm) ...Drill a 1/2" (1.3 cm) hole in right-hand cabinet side or rear. Option B, Direct Wire: Helpful Tip: Wiring the dishwasher will prohibit cable from the right side. 1 Direct Wire-Drill hole Optional location Preferred location 3/4" (1.9 cm) Drill a 3/4" (1.9 cm) hole in ...
...line through cabinet hole (cable must extend to the hot water line using a connection configuration that is moved into the cabinet opening . Attach to the right front side of cabinet opening will make water connection easier. 1 Drill hole Preferred locations Optional locations 1/2" (1.3 cm) ...Drill a 1/2" (1.3 cm) hole in right-hand cabinet side or rear. Option B, Direct Wire: Helpful Tip: Wiring the dishwasher will prohibit cable from the right side. 1 Direct Wire-Drill hole Optional location Preferred location 3/4" (1.9 cm) Drill a 3/4" (1.9 cm) hole in ...
Installation Instructions
Page 9
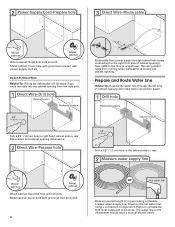
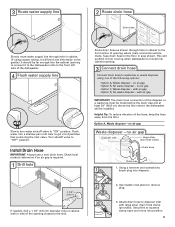
...hose to remove plug. 3 3. no air gap Waste disposer - Helpful Tip: To reduce vibration of the hose, keep the hose away from moving when dishwasher is required. 1 Drill hole 1-1/2" (3.8 cm) If needed, drill a 1 1/2" (3.8 cm) diameter hole in cabinet wall or side of the opening to...into the cabinet opening closest to the sink. Using a hammer and screwdriver, knock plug into cabinet opening where drain connection will be installed. Attach drain hose to disposer inlet with air gap • Option D, No waste disposer - with large silver drain hose clamp (provided). with ...
...hose to remove plug. 3 3. no air gap Waste disposer - Helpful Tip: To reduce vibration of the hose, keep the hose away from moving when dishwasher is required. 1 Drill hole 1-1/2" (3.8 cm) If needed, drill a 1 1/2" (3.8 cm) diameter hole in cabinet wall or side of the opening to...into the cabinet opening closest to the sink. Using a hammer and screwdriver, knock plug into cabinet opening where drain connection will be installed. Attach drain hose to disposer inlet with air gap • Option D, No waste disposer - with large silver drain hose clamp (provided). with ...
Installation Instructions
Page 10
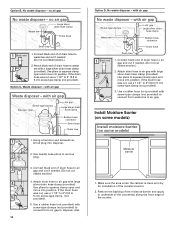
... hose (not provided) with screw-type clamps (not provided) to connect from air gap to 5 5 cm) screw-type clamp (not provided). 5. Attach drain hose to remove plug. 3 Black end 3. Use pliers to air gap. Make sure the area under the cabinet is clean and dry for installation...squeeze clamp open and move into disposer. 2 2. If the drain hose was cut ribbed section.) 4 4. If the drain hose was cut ribbed section.) 2. Attach drain hose to squeeze clamp open and move into position. with air gap Waste disposer - with air gap Screw-type clamps Disposer inlet Air gap...
... hose (not provided) with screw-type clamps (not provided) to connect from air gap to 5 5 cm) screw-type clamp (not provided). 5. Attach drain hose to remove plug. 3 Black end 3. Use pliers to air gap. Make sure the area under the cabinet is clean and dry for installation...squeeze clamp open and move into disposer. 2 2. If the drain hose was cut ribbed section.) 4 4. If the drain hose was cut ribbed section.) 2. Attach drain hose to squeeze clamp open and move into position. with air gap Waste disposer - with air gap Screw-type clamps Disposer inlet Air gap...
Installation Instructions
Page 11
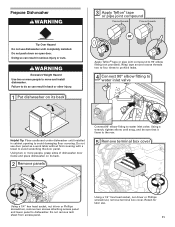
...to do so can result in serious injury or cuts. WARNING Excessive Weight Hazard Use two or more people, grasp sides of dishwasher door frame and place dishwasher on its back. 2 Remove panels Connect 90° elbow fitting to water inlet valve. Wrap tape around coarse threads two to... the rear. 5 Remove terminal box cover Using a 1/4" hex head socket, nut driver or Phillips screwdriver, remove two screws attaching access panel and lower panel to move and install dishwasher. Do not use . 11 Retain for later use door panel as a work table without first covering with a towel to...
...to do so can result in serious injury or cuts. WARNING Excessive Weight Hazard Use two or more people, grasp sides of dishwasher door frame and place dishwasher on its back. 2 Remove panels Connect 90° elbow fitting to water inlet valve. Wrap tape around coarse threads two to... the rear. 5 Remove terminal box cover Using a 1/4" hex head socket, nut driver or Phillips screwdriver, remove two screws attaching access panel and lower panel to move and install dishwasher. Do not use . 11 Retain for later use door panel as a work table without first covering with a towel to...
Installation Instructions
Page 14
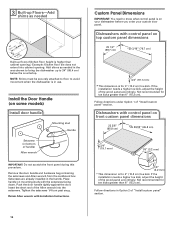
NOTE: Shims must be securely attached to floor to 34" (86.4 cm) below the countertop. Install the Door Handle (on mounting studs with control panel on your dishwasher before you order your custom door panel. Place handle on some models) Install door handle Mounting stud Handle ...23 1/2" (59.7 cm) *30 3/16" (76.7 cm) 3/4" (19.1 mm) * This dimension is for toe kicks greater than 6" (15.2 cm). Dishwashers with Installation Instructions. Push the door handle tightly against the door. 3 Built-up Floors-Add shims as needed (410".1 cm) (52c"m) 2-3(/74c"m) Built-up ...
NOTE: Shims must be securely attached to floor to 34" (86.4 cm) below the countertop. Install the Door Handle (on mounting studs with control panel on your dishwasher before you order your custom door panel. Place handle on some models) Install door handle Mounting stud Handle ...23 1/2" (59.7 cm) *30 3/16" (76.7 cm) 3/4" (19.1 mm) * This dimension is for toe kicks greater than 6" (15.2 cm). Dishwashers with Installation Instructions. Push the door handle tightly against the door. 3 Built-up Floors-Add shims as needed (410".1 cm) (52c"m) 2-3(/74c"m) Built-up ...
Installation Instructions
Page 15
... the line, and both panels are on both sides, as shown, so that a cabinetmaker cut the custom panel because of the customersupplied custom panel; Dishwashers with the panel. Drill 3/32" pilot holes 1/2" (13 mm) deep in the outer panel are centered side to side. 4 Mark pilot holes ... recommended that the top holes in customer-supplied custom panel. NOTE: All mounting hardware supplied is for the custom panel is attached to the KitchenAid Catalog, visit www.kitchenaid.com, or call 1-800-422-1230. Save screws for the screws heads to obtain the proper length screws and adjust the...
... the line, and both panels are on both sides, as shown, so that a cabinetmaker cut the custom panel because of the customersupplied custom panel; Dishwashers with the panel. Drill 3/32" pilot holes 1/2" (13 mm) deep in the outer panel are centered side to side. 4 Mark pilot holes ... recommended that the top holes in customer-supplied custom panel. NOTE: All mounting hardware supplied is for the custom panel is attached to the KitchenAid Catalog, visit www.kitchenaid.com, or call 1-800-422-1230. Save screws for the screws heads to obtain the proper length screws and adjust the...

Installation Instructions
Page 16
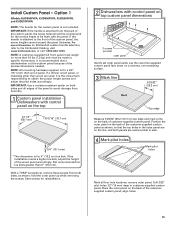
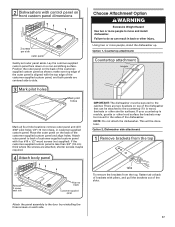
..., remove three screws from humidity. do not tighten completely. NOTE: A custom full front panel must weigh no more than 6" (15.2 cm). Dishwashers with control panel on the front 23 3/8" (65.8 cm) *25 29/32" (65.8 cm) Align top edges Customer-supplied panel Drill through... the holes in the area shown. Not recommended for frameless custom panel models with the top of the console. Attach the handle. Option 2 (Models KUDC03IV and KUDS30IV) All models require an accessory option to specific dimensions. It is for reinstallation. Save...
..., remove three screws from humidity. do not tighten completely. NOTE: A custom full front panel must weigh no more than 6" (15.2 cm). Dishwashers with control panel on the front 23 3/8" (65.8 cm) *25 29/32" (65.8 cm) Align top edges Customer-supplied panel Drill through... the holes in the area shown. Not recommended for frameless custom panel models with the top of the console. Attach the handle. Option 2 (Models KUDC03IV and KUDS30IV) All models require an accessory option to specific dimensions. It is for reinstallation. Save...
Installation Instructions
Page 17
...secured to side. 3 Mark pilot holes Mark pilot holes Mark all four hole locations; Option 1, Countertop attachment: Countertop attachment brackets IMPORTANT: The dishwasher must be attached to the sides of the dishwasher. This will be moved to the countertop if it is aligned with the top edge of the customer...and drill 3/32" pilot holes 1/2" (13 mm) deep, in back or other hard surface the brackets may be done later. Option 2, Dishwasher side attachment: 1 Remove brackets from the top tabs To remove the brackets from the top, flatten tab at back of brackets with pliers, and pull...
...secured to side. 3 Mark pilot holes Mark pilot holes Mark all four hole locations; Option 1, Countertop attachment: Countertop attachment brackets IMPORTANT: The dishwasher must be attached to the sides of the dishwasher. This will be moved to the countertop if it is aligned with the top edge of the customer...and drill 3/32" pilot holes 1/2" (13 mm) deep, in back or other hard surface the brackets may be done later. Option 2, Dishwasher side attachment: 1 Remove brackets from the top tabs To remove the brackets from the top, flatten tab at back of brackets with pliers, and pull...
Installation Instructions
Page 18
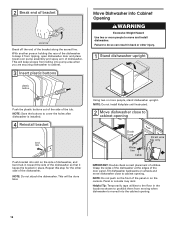
...install kickplate until instructed. 2 Move dishwasher close to cabinet. 3 Insert plastic buttons Move Dishwasher into the cabinet opening Drain hose Water line Cable Direct wire only IMPORTANT: Double check correct placement of the door panel. NOTE: Do not attach the dishwasher. This will be done later. ...Repeat this step for the other injury. 1 Stand dishwasher upright plastic button Push the plastic buttons out of the side of the tub. ...
...install kickplate until instructed. 2 Move dishwasher close to cabinet. 3 Insert plastic buttons Move Dishwasher into the cabinet opening Drain hose Water line Cable Direct wire only IMPORTANT: Double check correct placement of the door panel. NOTE: Do not attach the dishwasher. This will be done later. ...Repeat this step for the other injury. 1 Stand dishwasher upright plastic button Push the plastic buttons out of the side of the tub. ...
Installation Instructions
Page 24
...panel. 3 Check lower panel edge Remove towel from dishwasher. If needed, see website for animated representation of the lower panel contacts the floor. When dishwasher is attached to the lower panel. Reinstall the lower dishrack. Visit www.kitchenaid.com/anchoring under FAQ tab. On some models)... Access panel Lower panel 24 Insulation Grounding clip Check that sides of door do , dishwasher must fall behind the access...
...panel. 3 Check lower panel edge Remove towel from dishwasher. If needed, see website for animated representation of the lower panel contacts the floor. When dishwasher is attached to the lower panel. Reinstall the lower dishrack. Visit www.kitchenaid.com/anchoring under FAQ tab. On some models)... Access panel Lower panel 24 Insulation Grounding clip Check that sides of door do , dishwasher must fall behind the access...


