User Instructions
Page 1
... de su producto, visite: www.kitchenaid.com Tenga listo su número completo de modelo y de serie. Table of Contents DISHWASHER SAFETY 1 QUICK STEPS 3 DISHWASHER USE 3 CYCLE AND OPTION DESCRIPTIONS 4 DISHWASHER FEATURES 6 FILTRATION SYSTEM 7 DISHWASHER CARE 8 TROUBLESHOOTING 9 WARRANTY 11 Dishwasher Safety Your safety and the safety .... W10208709A Have your appliance. We hold our company to reduce the chance of the dishwasher interior. All safety messages will tell you what can find your model and serial number on the label located near the door on your complete...
... de su producto, visite: www.kitchenaid.com Tenga listo su número completo de modelo y de serie. Table of Contents DISHWASHER SAFETY 1 QUICK STEPS 3 DISHWASHER USE 3 CYCLE AND OPTION DESCRIPTIONS 4 DISHWASHER FEATURES 6 FILTRATION SYSTEM 7 DISHWASHER CARE 8 TROUBLESHOOTING 9 WARRANTY 11 Dishwasher Safety Your safety and the safety .... W10208709A Have your appliance. We hold our company to reduce the chance of the dishwasher interior. All safety messages will tell you what can find your model and serial number on the label located near the door on your complete...
User Instructions
Page 4
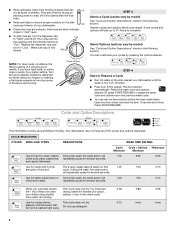
... to "Lock." Make sure cap is at the sink nearest your dishes using your dishwasher. Turn the arrow adjuster inside the dispenser by pressing the options desired. You can ... allowing water to lock fill - -- 6 5 4 --- - - -- STEP 3 Select a Cycle (cycles vary by model) See "Cycle and Option Descriptions" charts in the following section. For improved 0:58 the 1 Hour Wash will 1:20 1:50...of your fingers or inserting a flat-blade screwdriver into the opening until the indicator level is fully locked. STEP 4 Start or Resume a Cycle ■ Run hot water at "Full." ...
... to "Lock." Make sure cap is at the sink nearest your dishes using your dishwasher. Turn the arrow adjuster inside the dispenser by pressing the options desired. You can ... allowing water to lock fill - -- 6 5 4 --- - - -- STEP 3 Select a Cycle (cycles vary by model) See "Cycle and Option Descriptions" charts in the following section. For improved 0:58 the 1 Hour Wash will 1:20 1:50...of your fingers or inserting a flat-blade screwdriver into the opening until the indicator level is fully locked. STEP 4 Start or Resume a Cycle ■ Run hot water at "Full." ...
User Instructions
Page 9
In the U.S.A., www.kitchenaid.com In Canada, www.kitchenaid.ca ■ Dishwasher does not run ■ Water remains in models) Is the dishwasher aligned with the countertop? Be sure your hardness is draining. Proper loading of Rinse Aid along with the wash arms. Readjust the dishware and resume ...
In the U.S.A., www.kitchenaid.com In Canada, www.kitchenaid.ca ■ Dishwasher does not run ■ Water remains in models) Is the dishwasher aligned with the countertop? Be sure your hardness is draining. Proper loading of Rinse Aid along with the wash arms. Readjust the dishware and resume ...
User Instructions
Page 11
...Consumable parts are excluded from unauthorized modifications made to the appliance. 9. Replacement parts or repair labor on major appliances with original model/serial numbers that existed when this major appliance was purchased: stainless steel tub. LIMITATION OF REMEDIES; Service calls to refrigerator or...vary from state to state or province to province. Repairs to parts or systems resulting from warranty coverage. 4. KITCHENAID® DISHWASHER WARRANTY LIMITED WARRANTY For one year from the date of purchase, when this major appliance is operated and maintained according...
...Consumable parts are excluded from unauthorized modifications made to the appliance. 9. Replacement parts or repair labor on major appliances with original model/serial numbers that existed when this major appliance was purchased: stainless steel tub. LIMITATION OF REMEDIES; Service calls to refrigerator or...vary from state to state or province to province. Repairs to parts or systems resulting from warranty coverage. 4. KITCHENAID® DISHWASHER WARRANTY LIMITED WARRANTY For one year from the date of purchase, when this major appliance is operated and maintained according...
User Instructions
Page 12
...need further assistance, you may contact KitchenAid at the address below . Please keep this User Instructions and model number information for future reference. All rights reserved. ® Registered Trademark/TM Trademark of the dishwasher interior. Have your model and serial number on the label located... near the door on the right-hand or left-hand side of KitchenAid, U.S.A., KitchenAid Canada licensee in Canada 11/08 Printed in U.S.A. You can write to KitchenAid with any questions or ...
...need further assistance, you may contact KitchenAid at the address below . Please keep this User Instructions and model number information for future reference. All rights reserved. ® Registered Trademark/TM Trademark of the dishwasher interior. Have your model and serial number on the label located... near the door on the right-hand or left-hand side of KitchenAid, U.S.A., KitchenAid Canada licensee in Canada 11/08 Printed in U.S.A. You can write to KitchenAid with any questions or ...

Installation Instructions
Page 2
... words mean: DANGER You can be performed by a qualified service technician. Remove shipping materials, drain hose and lower rack. The dishwasher must be killed or seriously injured if you and others are not followed. All safety messages will follow instructions. Do not push... 7 Prepare Cabinet Opening-New Utilities 7 Prepare and Route Water Line 8 Install Drain Hose 9 Install Moisture Barrier (on some models 10 Prepare Dishwasher 11 Make Power Supply Cord Connection 12 Determine Cabinet Opening 13 Installation Instructions (cont.) Install the Door Handle (on open...
... words mean: DANGER You can be performed by a qualified service technician. Remove shipping materials, drain hose and lower rack. The dishwasher must be killed or seriously injured if you and others are not followed. All safety messages will follow instructions. Do not push... 7 Prepare Cabinet Opening-New Utilities 7 Prepare and Route Water Line 8 Install Drain Hose 9 Install Moisture Barrier (on some models 10 Prepare Dishwasher 11 Make Power Supply Cord Connection 12 Determine Cabinet Opening 13 Installation Instructions (cont.) Install the Door Handle (on open...
Installation Instructions
Page 3
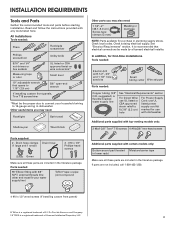
...: Electric drill with 1/2", 3/4" and 1 1/2" hole saw bits Small tubing cutter Wire stripper Parts needed : 90° Elbow fitting with certain models only: Bottom sound pad (located Moisture barrier tape in lower rack) Make sure all these parts are not included, call 1-800-422-1230. ...hose clamps (1 large and 1 small) Drain hose 2 - #10 x 1/2" Phillips-head screws Silver Green Make sure all these parts are included in dishwasher Other useful items you may need: Flashlight Bath towel Shallow pan Wood block Other parts you may also need: 1 1/2"-2" (38.1-5.0 cm) Screw-typ e...
...: Electric drill with 1/2", 3/4" and 1 1/2" hole saw bits Small tubing cutter Wire stripper Parts needed : 90° Elbow fitting with certain models only: Bottom sound pad (located Moisture barrier tape in lower rack) Make sure all these parts are not included, call 1-800-422-1230. ...hose clamps (1 large and 1 small) Drain hose 2 - #10 x 1/2" Phillips-head screws Silver Green Make sure all these parts are included in dishwasher Other useful items you may need: Flashlight Bath towel Shallow pan Wood block Other parts you may also need: 1 1/2"-2" (38.1-5.0 cm) Screw-typ e...
Installation Instructions
Page 5
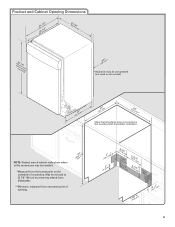
...(165.19/4c"m) CAlreeaar 1 (34/.44"cm) (5.12"cm) 5 May be reduced to 33 7/8" (86 cm) by removing wheels from dishwasher. **Minimum, measured from the lowest point on all models) (532.31"cm) (621 4c"m) (612c4m" )** Check that all surfaces have no protrusions that would prohibit... dishwasher installation. Product and Cabinet Opening Dimensions ((26264342..2271//cc82mm"")) (2630.67/c8m" ) w(8ri36teh3mcmw7o/hv)8eem"edilns. (1.39/4c...
...(165.19/4c"m) CAlreeaar 1 (34/.44"cm) (5.12"cm) 5 May be reduced to 33 7/8" (86 cm) by removing wheels from dishwasher. **Minimum, measured from the lowest point on all models) (532.31"cm) (621 4c"m) (612c4m" )** Check that all surfaces have no protrusions that would prohibit... dishwasher installation. Product and Cabinet Opening Dimensions ((26264342..2271//cc82mm"")) (2630.67/c8m" ) w(8ri36teh3mcmw7o/hv)8eem"edilns. (1.39/4c...
Installation Instructions
Page 14
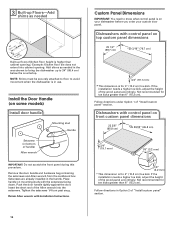
.... Not recommended for toe kicks greater than 6" (15.2 cm). Follow directions in the handle. Install the Door Handle (on your dishwasher before you order your custom door panel. Push the door handle tightly against the door. Retain Allen wrench with control panel on front ... (3.2 mm) * This dimension is for 4" (10.2 cm) toe kick. Custom Panel Dimensions IMPORTANT: You need to know what control panel is on some models) Install door handle Mounting stud Handle Setscrew (in bottom of the Allen wrench into cabinet opening .) Example: Kitchen floor tile does not extend into the...
.... Not recommended for toe kicks greater than 6" (15.2 cm). Follow directions in the handle. Install the Door Handle (on your dishwasher before you order your custom door panel. Push the door handle tightly against the door. Retain Allen wrench with control panel on front ... (3.2 mm) * This dimension is for 4" (10.2 cm) toe kick. Custom Panel Dimensions IMPORTANT: You need to know what control panel is on some models) Install door handle Mounting stud Handle Setscrew (in bottom of the Allen wrench into cabinet opening .) Example: Kitchen floor tile does not extend into the...
Installation Instructions
Page 15
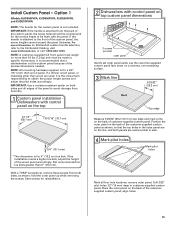
...than 16 lbs (7.3 kg) and must be countersunk for reinstallation. 2 Dishwashers with control panel on the back of the custom panel, the screw holes should be made to the KitchenAid Catalog, visit www.kitchenaid.com, or call 1-800-422-1230. If the installation needs a ... 3 screws per side outer panel Gently set outer panel aside. IMPORTANT: Use a moisture resistant sealer on KitchenAid custom handle selection, refer to specific dimensions. Install Custom Panel - Option 1 (Models KUDS40FVPA, KUDS50FVPA, KUDE60FVPA, and KUDE70FVPA) NOTE: The handle for a 3/4" (19.1 mm) thick wood ...
...than 16 lbs (7.3 kg) and must be countersunk for reinstallation. 2 Dishwashers with control panel on the back of the custom panel, the screw holes should be made to the KitchenAid Catalog, visit www.kitchenaid.com, or call 1-800-422-1230. If the installation needs a ... 3 screws per side outer panel Gently set outer panel aside. IMPORTANT: Use a moisture resistant sealer on KitchenAid custom handle selection, refer to specific dimensions. Install Custom Panel - Option 1 (Models KUDS40FVPA, KUDS50FVPA, KUDE60FVPA, and KUDE70FVPA) NOTE: The handle for a 3/4" (19.1 mm) thick wood ...

Installation Instructions
Page 16
... and all edges of the panel to avoid damage from the literature package in the area shown. do not tighten completely. Dishwashers with control panel on the front of the customer-supplied custom panel in the top corners of the inner panel. To order...IMPORTANT: Use a moisture resistant sealer on each side Align top edges Customer-supplied panel Attach the panel assembly to attach custom panels. Option 2 (Models KUDC03IV and KUDS30IV) All models require an accessory option to the door by reinstalling the three screws on both sides, as shown. 16 3/4" (19.1 mm) 1/8" (3.2 mm...
... and all edges of the panel to avoid damage from the literature package in the area shown. do not tighten completely. Dishwashers with control panel on the front of the customer-supplied custom panel in the top corners of the inner panel. To order...IMPORTANT: Use a moisture resistant sealer on each side Align top edges Customer-supplied panel Attach the panel assembly to attach custom panels. Option 2 (Models KUDC03IV and KUDS30IV) All models require an accessory option to the door by reinstalling the three screws on both sides, as shown. 16 3/4" (19.1 mm) 1/8" (3.2 mm...
Installation Instructions
Page 24
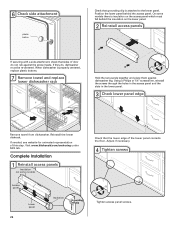
If they do not rub against dishwasher leg. Reinstall the lower dishrack. Visit www.kitchenaid.com/anchoring under FAQ tab. On some models) Access panel Lower panel 24 Insulation Grounding clip Check that the lower edge of the lower panel contacts the floor. If needed,... see website for animated representation of this step. When dishwasher is attached to the lower...
If they do not rub against dishwasher leg. Reinstall the lower dishrack. Visit www.kitchenaid.com/anchoring under FAQ tab. On some models) Access panel Lower panel 24 Insulation Grounding clip Check that the lower edge of the lower panel contacts the floor. If needed,... see website for animated representation of this step. When dishwasher is attached to the lower...
Installation Instructions
Page 25
...ensure exceptional cleaning. Your new dishwasher will average 2-3 hours per load, but use an extension cord. Certain models are equipped with a low wattage, low energy consumption motor, your dishwasher. ❏ Check that power supply cord does not touch dishwasher motor or lower part of ...rinse aid for good drying results: This dishwasher is closed tightly and latched? ...
...ensure exceptional cleaning. Your new dishwasher will average 2-3 hours per load, but use an extension cord. Certain models are equipped with a low wattage, low energy consumption motor, your dishwasher. ❏ Check that power supply cord does not touch dishwasher motor or lower part of ...rinse aid for good drying results: This dishwasher is closed tightly and latched? ...

Parts Diagram
Page 1
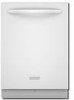
W10299278 Rev. No. A Part No. DOOR AND PANEL PARTS For Models: KUDE60FVBL1, KUDE60FVWH1, KUDE60FVSS1 (Black) (White) (Stainless) UNDERCOUNTER DISHWASHER Illus. DESCRIPTION 1 Literature Parts W10056407 Instructions, Installation W10247453 Energy Guide W10208709 Guide, Use & Care English W10208710 Guide, Use & Care Spanish W10142826 Tech Sheet W10158347 Tech ...
W10299278 Rev. No. A Part No. DOOR AND PANEL PARTS For Models: KUDE60FVBL1, KUDE60FVWH1, KUDE60FVSS1 (Black) (White) (Stainless) UNDERCOUNTER DISHWASHER Illus. DESCRIPTION 1 Literature Parts W10056407 Instructions, Installation W10247453 Energy Guide W10208709 Guide, Use & Care English W10208710 Guide, Use & Care Spanish W10142826 Tech Sheet W10158347 Tech ...


