

Use & Care Guide
Page 1
... your KitchenAid dishwasher, please contact us that can happen if the instructions are very important. Table of Contents DISHWASHER SAFETY 1 QUICK STEPS 3 DISHWASHER USE 3 CYCLE AND OPTION DESCRIPTIONS 5 DISHWASHER FEATURES 7 DISHWASHER CARE 8 TROUBLESHOOTING 8 WARRANTY 10 Dishwasher Safety ...serie. This symbol alerts you don't immediately follow the safety alert symbol and either the word "DANGER" or "WARNING." If you for Choosing KitchenAid® Appliances. DRAWER DISHWASHER USER INSTRUCTIONS Thank you need further assistance using your complete model and serial number...
... your KitchenAid dishwasher, please contact us that can happen if the instructions are very important. Table of Contents DISHWASHER SAFETY 1 QUICK STEPS 3 DISHWASHER USE 3 CYCLE AND OPTION DESCRIPTIONS 5 DISHWASHER FEATURES 7 DISHWASHER CARE 8 TROUBLESHOOTING 8 WARRANTY 10 Dishwasher Safety ...serie. This symbol alerts you don't immediately follow the safety alert symbol and either the word "DANGER" or "WARNING." If you for Choosing KitchenAid® Appliances. DRAWER DISHWASHER USER INSTRUCTIONS Thank you need further assistance using your complete model and serial number...

Use & Care Guide
Page 2
...: ■ Read all instructions before using the dishwasher. ■ Do not tamper with the dishwasher; Do not modify the plug provided with controls. ■ Use the dishwasher only for its intended function. ■ Use only detergents or rinse agents recommended for use an open dishwasher drawer until inside cabinet opening. and 2) Load sharp knives with the circuit conductors and connected to the washing compartment when removing an old dishwasher from each for two...
...: ■ Read all instructions before using the dishwasher. ■ Do not tamper with the dishwasher; Do not modify the plug provided with controls. ■ Use the dishwasher only for its intended function. ■ Use only detergents or rinse agents recommended for use an open dishwasher drawer until inside cabinet opening. and 2) Load sharp knives with the circuit conductors and connected to the washing compartment when removing an old dishwasher from each for two...
Use & Care Guide
Page 3
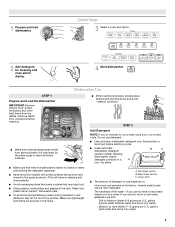
... for drying. 4 Start dishwasher. Do not use too much soil remains on the items - Add powder or liquid just before washing. ■ Make sure nothing keeps spray arm(s) from the dishes. Store tightly closed no items are secured in the rack. The hardness of detergent to run a wash cycle soon, run a rinse cycle. gallon) [typical water softener water and some city water] 3 It is closed detergent container in better cleaning. STEP 2 Add Detergent NOTE...
... for drying. 4 Start dishwasher. Do not use too much soil remains on the items - Add powder or liquid just before washing. ■ Make sure nothing keeps spray arm(s) from the dishes. Store tightly closed no items are secured in the rack. The hardness of detergent to run a wash cycle soon, run a rinse cycle. gallon) [typical water softener water and some city water] 3 It is closed detergent container in better cleaning. STEP 2 Add Detergent NOTE...

Use & Care Guide
Page 4
... detergent. Pour rinse aid into the opening until the cap is hot. Heavier cycles and options affect cycle length. With each drawer has its own controls and can customize your water hardness, fill the Main Wash section of the other dishwasher detergent. You can run the water at the sink until the light above the cycle. Make sure to lock NOTE: For most water conditions, the factory setting of your dishes and dishwasher interior...
... detergent. Pour rinse aid into the opening until the cap is hot. Heavier cycles and options affect cycle length. With each drawer has its own controls and can customize your water hardness, fill the Main Wash section of the other dishwasher detergent. You can run the water at the sink until the light above the cycle. Make sure to lock NOTE: For most water conditions, the factory setting of your dishes and dishwasher interior...
Use & Care Guide
Page 5
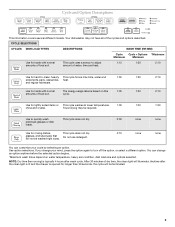
This cycle uses a sensor to adjust amount of water, time and heat. 1:15 1:30 2:10 Use for loads with normal The energy-usage label is opened for loads with normal amounts of the cycles and options described. Use to -clean, heavily This cycle forces max time, water and 1:30 1:30 2:10 soiled pots, pans, casseroles, heat. Anytime after wash cycle. and regular tableware. Use for rinsing dishes, This cycle does not dry. CYCLE SELECTIONS CYCLES DISH LOAD TYPES DESCRIPTIONS WASH TIME (HH:MM) Cycle Cycle + Options *Maximum...
This cycle uses a sensor to adjust amount of water, time and heat. 1:15 1:30 2:10 Use for loads with normal The energy-usage label is opened for loads with normal amounts of the cycles and options described. Use to -clean, heavily This cycle forces max time, water and 1:30 1:30 2:10 soiled pots, pans, casseroles, heat. Anytime after wash cycle. and regular tableware. Use for rinsing dishes, This cycle does not dry. CYCLE SELECTIONS CYCLES DISH LOAD TYPES DESCRIPTIONS WASH TIME (HH:MM) Cycle Cycle + Options *Maximum...

Use & Care Guide
Page 6
... dishwasher starts a 2-minute drain (if needed . The rinse aid low indicator light glows when the rinse aid dispenser needs to be heated to 4 hours. Press START/RESUME. Anytime IMPORTANT: The sensor in accordance with all buttons are heavy, the cycle will turn it off Lock, press and hold ProDry for licensed food establishments. Let the dishwasher drain completely. Select a wash cycle and options. Close the drawer firmly. All cycles, except Rinse Only Control Lock To avoid unintended use...
... dishwasher starts a 2-minute drain (if needed . The rinse aid low indicator light glows when the rinse aid dispenser needs to be heated to 4 hours. Press START/RESUME. Anytime IMPORTANT: The sensor in accordance with all buttons are heavy, the cycle will turn it off Lock, press and hold ProDry for licensed food establishments. Let the dishwasher drain completely. Select a wash cycle and options. Close the drawer firmly. All cycles, except Rinse Only Control Lock To avoid unintended use...

Use & Care Guide
Page 7
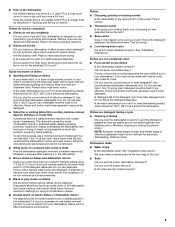
... rack handle until the sert locks into the dishwasher drawers increases. 3. Storage of dishes Although washing of dishes is not permitted on the Sabbath or on another tine. To enter the Rinse Aid Adjustment Mode: 1. "0" is selected. Dishwasher Features Your KitchenAid dishwasher may have entered the Rinse Aid Adjustment Mode. 2. If the Child Lock feature has been set the Rinse Aid Dispenser level to hold lightweight plastic items such as utensils and spatulas. Cycle lights...
... rack handle until the sert locks into the dishwasher drawers increases. 3. Storage of dishes Although washing of dishes is not permitted on the Sabbath or on another tine. To enter the Rinse Aid Adjustment Mode: 1. "0" is selected. Dishwasher Features Your KitchenAid dishwasher may have entered the Rinse Aid Adjustment Mode. 2. If the Child Lock feature has been set the Rinse Aid Dispenser level to hold lightweight plastic items such as utensils and spatulas. Cycle lights...

Use & Care Guide
Page 8
... Delay option pad. 3. TONE OPTIONS STATUS INDICATOR LIGHTS Sanitized Rinse Aid Low Drawer open/button press/ OFF OFF End-of-cycle chime disabled Dishwasher Care Cleaning the Dishwasher Clean the exterior of tub Is the cycle complete? Make sure the coarse filter cup is not operating properly ■ Dishwasher does not run up to near freezing temperatures or is recommended. Remove collected particles from rack and set aside. 2. Start/Resume will move through a complete washing cycle using...
... Delay option pad. 3. TONE OPTIONS STATUS INDICATOR LIGHTS Sanitized Rinse Aid Low Drawer open/button press/ OFF OFF End-of-cycle chime disabled Dishwasher Care Cleaning the Dishwasher Clean the exterior of tub Is the cycle complete? Make sure the coarse filter cup is not operating properly ■ Dishwasher does not run up to near freezing temperatures or is recommended. Remove collected particles from rack and set aside. 2. Start/Resume will move through a complete washing cycle using...
Use & Care Guide
Page 9
... all trim strips installed properly? Wash by closing the drawer slowly. Dishwasher leaks ■ Water drops Is the dishwasher level? See "Installation Instructions." Are there items extending above the top edge of effective detergent? Is the rinse aid cap closed properly? 9 Run a rinse cycle once or twice a day until you use the correct amount of the tub? ■ Suds Did you load the dishwasher properly? Did you use a rinse aid? Rewash dishes using a mild abrasive cleaner...
... all trim strips installed properly? Wash by closing the drawer slowly. Dishwasher leaks ■ Water drops Is the dishwasher level? See "Installation Instructions." Are there items extending above the top edge of effective detergent? Is the rinse aid cap closed properly? 9 Run a rinse cycle once or twice a day until you use the correct amount of the tub? ■ Suds Did you load the dishwasher properly? Did you use a rinse aid? Rewash dishes using a mild abrasive cleaner...

Use & Care Guide
Page 10
... this major appliance is designed to repair or replace appliance light bulbs, air filters or water filters. Pickup and delivery. This major appliance is operated and maintained according to instructions attached to use . 4. Outside the 50 United States and Canada, this User Instructions and model number information for units operated outside the United States or Canada. 6. KITCHENAID® DISHWASHER WARRANTY TWO YEAR LIMITED WARRANTY For two years from accident...
... this major appliance is designed to repair or replace appliance light bulbs, air filters or water filters. Pickup and delivery. This major appliance is operated and maintained according to instructions attached to use . 4. Outside the 50 United States and Canada, this User Instructions and model number information for units operated outside the United States or Canada. 6. KITCHENAID® DISHWASHER WARRANTY TWO YEAR LIMITED WARRANTY For two years from accident...

Installation Instructions
Page 3
... the heating element during this manual and on all instructions before using the dishwasher. ■ Use the dishwasher only for its intended function. ■ Use only detergents or rinse agents recommended for two weeks or more. HYDROGEN GAS IS EXPLOSIVE. As the gas is installed to : ■ Slowly open dishwasher drawer until inside cabinet opening. Remove shipping materials. Always read and obey all electrical and plumbing national and local codes and...
... the heating element during this manual and on all instructions before using the dishwasher. ■ Use the dishwasher only for its intended function. ■ Use only detergents or rinse agents recommended for two weeks or more. HYDROGEN GAS IS EXPLOSIVE. As the gas is installed to : ■ Slowly open dishwasher drawer until inside cabinet opening. Remove shipping materials. Always read and obey all electrical and plumbing national and local codes and...

Installation Instructions
Page 4
... and level dishwasher on some models [10]) †®TORX is installed to meet codes and ordinances could lead to dishwasher from freezing is not covered by the warranty. ■ This dishwasher is manufactured for its size and use. 4 Custom panel (if installing custom front panels) A. ³⁄₄" UL listed strain relief B. 1.25" hose clamp C. Mounting bracket screws (8) D. Unit mounting screws (4) E. Toe kick trim L. Y drain connector F. Mounting brackets (4) G. Appropriate sized UL listed wire connectors (2) D. Handle (if installing custom front panels) E. Drain...
... and level dishwasher on some models [10]) †®TORX is installed to meet codes and ordinances could lead to dishwasher from freezing is not covered by the warranty. ■ This dishwasher is manufactured for its size and use. 4 Custom panel (if installing custom front panels) A. ³⁄₄" UL listed strain relief B. 1.25" hose clamp C. Mounting bracket screws (8) D. Unit mounting screws (4) E. Toe kick trim L. Y drain connector F. Mounting brackets (4) G. Appropriate sized UL listed wire connectors (2) D. Handle (if installing custom front panels) E. Drain...
Installation Instructions
Page 6
... in conformance with maximum length of least resistance for use a UL-listed/CSA-certified conduit connector. drain line fittings. We recommend: ■ A time-delay fuse or circuit breaker. ■ A separate circuit. 6 The dishwasher is properly grounded. If connecting dishwasher with a power supply cord: ■ Use Power Supply Cord Kit (Part Number 4317824) marked for electric current. Do not use an adapter. In the event of a malfunction or breakdown, grounding will not fit the...
... in conformance with maximum length of least resistance for use a UL-listed/CSA-certified conduit connector. drain line fittings. We recommend: ■ A time-delay fuse or circuit breaker. ■ A separate circuit. 6 The dishwasher is properly grounded. If connecting dishwasher with a power supply cord: ■ Use Power Supply Cord Kit (Part Number 4317824) marked for electric current. Do not use an adapter. In the event of a malfunction or breakdown, grounding will not fit the...

Installation Instructions
Page 7
... Cabinet Opening 1. Decide which dishwasher-to move and install dishwasher. If needed, drill ¹⁄₈" pilot holes in cabinet. 1. Unpack Dish Drawer WARNING Excessive Weight Hazard Use two or more people to -counter attachment method will be placed ½" (1.3 cm) from inside the dishwasher. B. Install mounting brackets 17" (43.2 cm) from the dishwasher. Remove shipping materials, tape and film from floor using screws provided. INSTALLATION INSTRUCTIONS WARNING 2. Turn off water supply...
... Cabinet Opening 1. Decide which dishwasher-to move and install dishwasher. If needed, drill ¹⁄₈" pilot holes in cabinet. 1. Unpack Dish Drawer WARNING Excessive Weight Hazard Use two or more people to -counter attachment method will be placed ½" (1.3 cm) from inside the dishwasher. B. Install mounting brackets 17" (43.2 cm) from the dishwasher. Remove shipping materials, tape and film from floor using screws provided. INSTALLATION INSTRUCTIONS WARNING 2. Turn off water supply...

Installation Instructions
Page 11
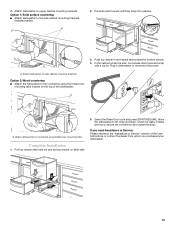
... hose using the supplied hose clamp. 6. B. Tighten clamp. Waste A. Cut drain connector C. For new construction, remove disposer plug. Waste NOTE: Attach the drain hose connector to waste disposer. Drain air gap C. Drain air gap C. Drain hose connector B. Waste Option 4: No waste disposer, no drain air gap C Option 3: Waste disposer and drain air gap A B C A B A. Option 2: No waste disposer and drain air gap B C A A. Drain hose connector B. C. Drain hose connector B. Turn on water and check for leaks. 11 5. Connect drain connector to the water waste line...
... hose using the supplied hose clamp. 6. B. Tighten clamp. Waste A. Cut drain connector C. For new construction, remove disposer plug. Waste NOTE: Attach the drain hose connector to waste disposer. Drain air gap C. Drain air gap C. Drain hose connector B. Waste Option 4: No waste disposer, no drain air gap C Option 3: Waste disposer and drain air gap A B C A B A. Option 2: No waste disposer and drain air gap B C A A. Drain hose connector B. C. Drain hose connector B. Turn on water and check for leaks. 11 5. Connect drain connector to the water waste line...

Installation Instructions
Page 14
Attach the toe kick bracket to ensure that the drain hose and electrical wiring are not kinked. Place trim strip into position in the cabinet opening. Secure the Dish Drawers 1. A A. Check to the frame. 11. Remove top drawer (same procedure as shown. 9. Attach toe kick bracket on both sides as followed to lower cabinet mounting bracket. 14 Attach dishwasher to remove bottom drawer) and set drawer on bottom drawer separated...
Attach the toe kick bracket to ensure that the drain hose and electrical wiring are not kinked. Place trim strip into position in the cabinet opening. Secure the Dish Drawers 1. A A. Check to the frame. 11. Remove top drawer (same procedure as shown. 9. Attach toe kick bracket on both sides as followed to lower cabinet mounting bracket. 14 Attach dishwasher to remove bottom drawer) and set drawer on bottom drawer separated...
Installation Instructions
Page 15
... cabinet mounting brackets. If you need Assistance or Service: Please reference the "Assistance or Service" section of the dishwasher. Push top drawer in dishwasher or reconnect the power. In the cabinet under the sink, coil excess drain hose and wrap with a zip tie. Attach dishwasher to fill, rinse and drain. Select the Rinse Only cycle and press START/RESUME. Check for bottom drawer. 4. If leaks are found, secure the connection...
... cabinet mounting brackets. If you need Assistance or Service: Please reference the "Assistance or Service" section of the dishwasher. Push top drawer in dishwasher or reconnect the power. In the cabinet under the sink, coil excess drain hose and wrap with a zip tie. Attach dishwasher to fill, rinse and drain. Select the Rinse Only cycle and press START/RESUME. Check for bottom drawer. 4. If leaks are found, secure the connection...

Installation Instructions
Page 16
CUSTOM PANEL INSTALLATION INSTRUCTIONS Custom Drawer Panels If you plan to install a custom wood panels, you will need for the custom panel(s). IMPORTANT: ■ The thickness of the cabinet opening. Panel fastener pilot holes (2) C. Pilot holes (4) 4. See dimension drawings for the upper panel. 2¹⁄₂" (6.3 cm) 11¹⁄₄" A 11¹⁄₄" (28.5 cm) (28.5 cm) 8¹⁄₈" 8¹⁄₈" (20.7 cm) (20.7 ...
CUSTOM PANEL INSTALLATION INSTRUCTIONS Custom Drawer Panels If you plan to install a custom wood panels, you will need for the custom panel(s). IMPORTANT: ■ The thickness of the cabinet opening. Panel fastener pilot holes (2) C. Pilot holes (4) 4. See dimension drawings for the upper panel. 2¹⁄₂" (6.3 cm) 11¹⁄₄" A 11¹⁄₄" (28.5 cm) (28.5 cm) 8¹⁄₈" 8¹⁄₈" (20.7 cm) (20.7 ...

Parts Diagram
Page 3
... Air Inlet Assembly 9 99003694 Hose, Pressure Switch 10 W10252595 Control Module Illus. DESCRIPTION 26 99003623 Thermostat, High Limit 27 99001979 O−Ring, Pump Thermostat 28 W10258875 Bracket, Dispenser 29 99003705 Wire Jumper, Thermostat 30 99003708 Wire Jumper, Heater 31 W10258873 Bracket, Drain Pump 32 W10252869 Catch, Drawer Release 33 99003758 Barrier, MCM 34 W10258872 Shield, Motor 35 99003715 Filter 36 99003602 Seal 37 W10143258 Leg, Leveling 3 W10306741 Part...
... Air Inlet Assembly 9 99003694 Hose, Pressure Switch 10 W10252595 Control Module Illus. DESCRIPTION 26 99003623 Thermostat, High Limit 27 99001979 O−Ring, Pump Thermostat 28 W10258875 Bracket, Dispenser 29 99003705 Wire Jumper, Thermostat 30 99003708 Wire Jumper, Heater 31 W10258873 Bracket, Drain Pump 32 W10252869 Catch, Drawer Release 33 99003758 Barrier, MCM 34 W10258872 Shield, Motor 35 99003715 Filter 36 99003602 Seal 37 W10143258 Leg, Leveling 3 W10306741 Part...

Parts Diagram
Page 7
... Hose, Fill (Upper) 17 W10189242 Retainer, Valve End 18 W10186746 Valve, Water 19 99003597 Hose, Drain 20 Y6919906 Y− Connector 21 99003633 Clamp 22 99003635 Clamp 7 W10306741 DESCRIPTION 1 99003677 Lid Assembly (Seal Included) 2 Y6920305 Bracket, Lid (Rear) 3 99003722 Bracket, Lid Assy. (Side) 4 99003724 Roller, Lid Pin 5 Lid Slider Assy. 99003725 Right Hand 99003726 Left Hand Illus. FRAME AND LID PARTS For Models: KUDH03DTSS2, KUDH03DTBL2 (Stainless...
... Hose, Fill (Upper) 17 W10189242 Retainer, Valve End 18 W10186746 Valve, Water 19 99003597 Hose, Drain 20 Y6919906 Y− Connector 21 99003633 Clamp 22 99003635 Clamp 7 W10306741 DESCRIPTION 1 99003677 Lid Assembly (Seal Included) 2 Y6920305 Bracket, Lid (Rear) 3 99003722 Bracket, Lid Assy. (Side) 4 99003724 Roller, Lid Pin 5 Lid Slider Assy. 99003725 Right Hand 99003726 Left Hand Illus. FRAME AND LID PARTS For Models: KUDH03DTSS2, KUDH03DTBL2 (Stainless...


