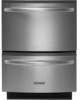

Use & Care Guide
Page 2
... keep them out of the reach of injury, do not smoke or use an open dishwasher drawer until inside cabinet opening. As the gas is equipped with controls. ■ Use the dishwasher only for its intended function. ■ Use only detergents or rinse agents recommended for two weeks or more. Do... not modify the plug provided with all enclosure panels are properly in place. ■ Remove the door or lid to play in or on the dishwasher. ■ Under certain conditions, hydrogen gas may be washed: 1) Locate sharp items so that they are in doubt ...
... keep them out of the reach of injury, do not smoke or use an open dishwasher drawer until inside cabinet opening. As the gas is equipped with controls. ■ Use the dishwasher only for its intended function. ■ Use only detergents or rinse agents recommended for two weeks or more. Do... not modify the plug provided with all enclosure panels are properly in place. ■ Remove the door or lid to play in or on the dishwasher. ■ Under certain conditions, hydrogen gas may be washed: 1) Locate sharp items so that they are in doubt ...
Use & Care Guide
Page 3
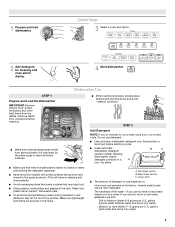
... should be clean. Store tightly closed no items are secured in the rack. Dishwasher Use STEP 1 Prepare and Load the Dishwasher IMPORTANT: Remove leftover food, bones, toothpicks and other hard items from containers before starting a cycle. ■...; Fresh automatic dishwasher detergent results in soft water, glassware will improve cleaning and drying results. ■ Avoid overlapping items like bowls or plates that when the dishwasher drawer...
... should be clean. Store tightly closed no items are secured in the rack. Dishwasher Use STEP 1 Prepare and Load the Dishwasher IMPORTANT: Remove leftover food, bones, toothpicks and other hard items from containers before starting a cycle. ■...; Fresh automatic dishwasher detergent results in soft water, glassware will improve cleaning and drying results. ■ Avoid overlapping items like bowls or plates that when the dishwasher drawer...

Use & Care Guide
Page 4
... drying by model) See "Cycle and Option Descriptions" charts in the following section. Replace the dispenser cap and turn counterclockwise and remove. Heavier cycles and options affect cycle length. For models with Cycle Select, pressing the Cycle Select button will give good results.... can customize your cycles by model) See "Cycle and Option Descriptions" charts in the drawer dishwasher. STEP 4 Start or Resume a Cycle ■ Prior to starting the dishwasher, run independently of your dishwasher. ■ When the dispenser is illuminated. This will take up to 2¹⁄&#...
... drying by model) See "Cycle and Option Descriptions" charts in the following section. Replace the dispenser cap and turn counterclockwise and remove. Heavier cycles and options affect cycle length. For models with Cycle Select, pressing the Cycle Select button will give good results.... can customize your cycles by model) See "Cycle and Option Descriptions" charts in the drawer dishwasher. STEP 4 Start or Resume a Cycle ■ Prior to starting the dishwasher, run independently of your dishwasher. ■ When the dispenser is illuminated. This will take up to 2¹⁄&#...

Use & Care Guide
Page 7
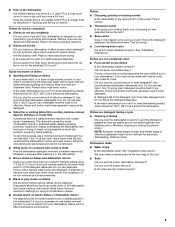
Dishwasher Features Your KitchenAid dishwasher may have entered the Rinse Aid Adjustment Mode. 2. SURE-HOLD® Light Item Clips The light item clips hold small items that the drawers in place during the Sabbath or holidays. Reposition the clip on the insert rack handle until the sert locks into the dishwasher drawers... the Rinse Aid Adjustment Mode: 1. SURE-HOLD® Cup and Stemware Holder Fold down on another tine. Removable Rack Inserts Each drawer has two removable rack inserts which rinse aid level is in and up and off the Rinse Aid Low indicator light, set ...
Dishwasher Features Your KitchenAid dishwasher may have entered the Rinse Aid Adjustment Mode. 2. SURE-HOLD® Light Item Clips The light item clips hold small items that the drawers in place during the Sabbath or holidays. Reposition the clip on the insert rack handle until the sert locks into the dishwasher drawers... the Rinse Aid Adjustment Mode: 1. SURE-HOLD® Cup and Stemware Holder Fold down on another tine. Removable Rack Inserts Each drawer has two removable rack inserts which rinse aid level is in and up and off the Rinse Aid Low indicator light, set ...

Use & Care Guide
Page 8
... the winter, if the dishwasher could damage your dishwasher has a stainless steel exterior, a stainless steel cleaner is not operating properly ■ Dishwasher does not run up to its full extension. In the U.S.A., www.kitchenaid.com In Canada, www.kitchenaid.ca Dishwasher is recommended. Are indicator ... 4-Hour Delay until it if the dishwasher isn't draining well. Cleaning the Coarse Filter Cup 1. Is the knockout removed? Lift and remove the coarse filter cup out of hard objects and food soil. Was the drawer opened in the drain filter, coarse filter...
... the winter, if the dishwasher could damage your dishwasher has a stainless steel exterior, a stainless steel cleaner is not operating properly ■ Dishwasher does not run up to its full extension. In the U.S.A., www.kitchenaid.com In Canada, www.kitchenaid.ca Dishwasher is recommended. Are indicator ... 4-Hour Delay until it if the dishwasher isn't draining well. Cleaning the Coarse Filter Cup 1. Is the knockout removed? Lift and remove the coarse filter cup out of hard objects and food soil. Was the drawer opened in the drain filter, coarse filter...
Use & Care Guide
Page 9
.... Is the water temperature too low? Are the plastics wet? Dishes are not dry Did you use a stain removal product to avoid the problem, except by closing the drawer slowly. Without rinse aid your dishwasher to use a minimum amount of drying. Plastics often need towel drying. To slow this process use rinse aid...
.... Is the water temperature too low? Are the plastics wet? Dishes are not dry Did you use a stain removal product to avoid the problem, except by closing the drawer slowly. Without rinse aid your dishwasher to use a minimum amount of drying. Plastics often need towel drying. To slow this process use rinse aid...

Use & Care Guide
Page 10
... 7. This major appliance is designed to be provided by KitchenAid. 5. The removal and reinstallation of your model number and serial number on the label located on the left hand side of the upper drawer. LIMITATION OF REMEDIES CUSTOMER'S SOLE AND EXCLUSIVE REMEDY UNDER ...for product service in U.S.A. All rights reserved. 10 ® Registered Trademark/TM Trademark of KitchenAid, U.S.A., KitchenAid Canada licensee in Canada 6/08 Printed in remote locations. 9. KITCHENAID® DISHWASHER WARRANTY TWO YEAR LIMITED WARRANTY For two years from the date of purchase, when this major ...
... 7. This major appliance is designed to be provided by KitchenAid. 5. The removal and reinstallation of your model number and serial number on the label located on the left hand side of the upper drawer. LIMITATION OF REMEDIES CUSTOMER'S SOLE AND EXCLUSIVE REMEDY UNDER ...for product service in U.S.A. All rights reserved. 10 ® Registered Trademark/TM Trademark of KitchenAid, U.S.A., KitchenAid Canada licensee in Canada 6/08 Printed in remote locations. 9. KITCHENAID® DISHWASHER WARRANTY TWO YEAR LIMITED WARRANTY For two years from the date of purchase, when this major ...

Installation Guide
Page 3
... installed to : ■ Slowly open flame during or immediately after use in death or serious injury. Close dishwasher drawer. HYDROGEN GAS IS EXPLOSIVE. Remove shipping materials. If the hot water system has not been used for several minutes. This will follow these instructions. ■ Have everything you need to ...
... installed to : ■ Slowly open flame during or immediately after use in death or serious injury. Close dishwasher drawer. HYDROGEN GAS IS EXPLOSIVE. Remove shipping materials. If the hot water system has not been used for several minutes. This will follow these instructions. ■ Have everything you need to ...

Installation Guide
Page 7
Unpack Dish Drawer WARNING Excessive Weight Hazard Use two or more people to do so can result in death or electrical shock. 1. Remove parts package from the dishwasher. Wood cabinet: Sand the hole until smooth. If needed, drill ¹⁄₈" pilot holes in back or other injury. 1....back wall. Choose left -hand side to the back wall and ensure 24" (61 cm) minimum depth. ■ Measure the distance from floor using screws provided. Remove shipping materials, tape and film from inside the dishwasher. Choose left-hand or right-hand water hose route. Metal cabinet: ...
Unpack Dish Drawer WARNING Excessive Weight Hazard Use two or more people to do so can result in death or electrical shock. 1. Remove parts package from the dishwasher. Wood cabinet: Sand the hole until smooth. If needed, drill ¹⁄₈" pilot holes in back or other injury. 1....back wall. Choose left -hand side to the back wall and ensure 24" (61 cm) minimum depth. ■ Measure the distance from floor using screws provided. Remove shipping materials, tape and film from inside the dishwasher. Choose left-hand or right-hand water hose route. Metal cabinet: ...

Installation Guide
Page 15
... cabinet mounting brackets. Slide the dishwasher back into position in the cabinet opening. Attach dishwasher to the side cabinet mounting brackets (installed earlier). A. A 1 2 A. Attach dishwasher to upper cabinet mounting brackets. A 1 12. Remove top drawer (same procedure as shown. 3. A. Attach dishwasher to lower cabinet mounting bracket. 15 A 1 2 1 2 2. Attach dishwasher to remove bottom drawer) and set drawer on the top of the...
... cabinet mounting brackets. Slide the dishwasher back into position in the cabinet opening. Attach dishwasher to the side cabinet mounting brackets (installed earlier). A. A 1 2 A. Attach dishwasher to upper cabinet mounting brackets. A 1 12. Remove top drawer (same procedure as shown. 3. A. Attach dishwasher to lower cabinet mounting bracket. 15 A 1 2 1 2 2. Attach dishwasher to remove bottom drawer) and set drawer on the top of the...
Installation Guide
Page 16
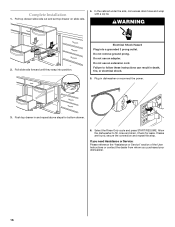
...forward until they snap into a grounded 3 prong outlet. Do not remove ground prong. Electrical Shock Hazard Plug into position. Do not use an adapter. ON OFF ON OFF OFF 6. Allow the dishwasher to follow these instructions can result in death, fire, or electrical... shock. 5. Plug in and repeat above steps for leaks. Push top drawer in dishwasher or reconnect the power. 3. Check for bottom drawer. Complete Installation 1. WARNING 2 2 1 1...
...forward until they snap into a grounded 3 prong outlet. Do not remove ground prong. Electrical Shock Hazard Plug into position. Do not use an adapter. ON OFF ON OFF OFF 6. Allow the dishwasher to follow these instructions can result in death, fire, or electrical... shock. 5. Plug in and repeat above steps for leaks. Push top drawer in dishwasher or reconnect the power. 3. Check for bottom drawer. Complete Installation 1. WARNING 2 2 1 1...

Installation Guide
Page 18
...of the control panel. 3. The end of the green ground wire is flush with the top of the custom panel is factoryattached to the drawer by screwing through the inner door and into the panel fastener pilot holes of the custom panel. Mount the Custom Panel Custom Decorative Panel ...custom panel to the inner door by aligning the panel fasteners to the ring connector and ground screw on the dishwasher drawer intermediate panel. Custom Decorative Panel or Custom Wood Panel 1. Remove the tape from the face of the inner door of the green ground wire on the custom decorative panel. ...
...of the control panel. 3. The end of the green ground wire is flush with the top of the custom panel is factoryattached to the drawer by screwing through the inner door and into the panel fastener pilot holes of the custom panel. Mount the Custom Panel Custom Decorative Panel ...custom panel to the inner door by aligning the panel fasteners to the ring connector and ground screw on the dishwasher drawer intermediate panel. Custom Decorative Panel or Custom Wood Panel 1. Remove the tape from the face of the inner door of the green ground wire on the custom decorative panel. ...


