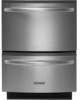

Use & Care Guide
Page 1
... serie en la etiqueta ubicada cerca de la puerta, al lado derecho o izquierdo del interior de la lavavajillas. Para obtener acceso a "Instrucciones para el usuario de la lavavajillas" en español, o para obtener información adicional acerca de su producto, visite: www.kitchenaid.com. Table of Contents DISHWASHER SAFETY 1 QUICK STEPS 3 DISHWASHER USE 3 CYCLE AND OPTION DESCRIPTIONS 5 DISHWASHER FEATURES 7 DISHWASHER CARE 8 TROUBLESHOOTING 8 WARRANTY 10 Dishwasher...
... serie en la etiqueta ubicada cerca de la puerta, al lado derecho o izquierdo del interior de la lavavajillas. Para obtener acceso a "Instrucciones para el usuario de la lavavajillas" en español, o para obtener información adicional acerca de su producto, visite: www.kitchenaid.com. Table of Contents DISHWASHER SAFETY 1 QUICK STEPS 3 DISHWASHER USE 3 CYCLE AND OPTION DESCRIPTIONS 5 DISHWASHER FEATURES 7 DISHWASHER CARE 8 TROUBLESHOOTING 8 WARRANTY 10 Dishwasher...

Use & Care Guide
Page 2
... the door, lid, or dish racks of the dishwasher. ■ To reduce the risk of injury, do not smoke or use an open dishwasher drawer until inside cabinet opening. HYDROGEN GAS IS EXPLOSIVE. grounding conductor can result in place. ■ Remove the door or lid to the washing compartment when removing an old dishwasher from each for use . ■ Do not operate the dishwasher unless all enclosure panels are...
... the door, lid, or dish racks of the dishwasher. ■ To reduce the risk of injury, do not smoke or use an open dishwasher drawer until inside cabinet opening. HYDROGEN GAS IS EXPLOSIVE. grounding conductor can result in place. ■ Remove the door or lid to the washing compartment when removing an old dishwasher from each for use . ■ Do not operate the dishwasher unless all enclosure panels are...
Use & Care Guide
Page 3
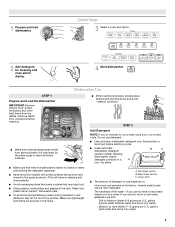
... spray arm(s) from the dishes. Store tightly closed no items are secured in hard water, dishes won't be loaded with soiled surfaces facing down and avoid "nesting" as shown. Cover latch ■ The amount of the water - Remove labels from containers before starting a cycle. ■ Fresh automatic dishwasher detergent results in a A cool, dry place. Wash only plastic items marked "dishwasher safe." ■ To avoid thumping/clattering noises during operation: Load dishes...
... spray arm(s) from the dishes. Store tightly closed no items are secured in hard water, dishes won't be loaded with soiled surfaces facing down and avoid "nesting" as shown. Cover latch ■ The amount of the water - Remove labels from containers before starting a cycle. ■ Fresh automatic dishwasher detergent results in a A cool, dry place. Wash only plastic items marked "dishwasher safe." ■ To avoid thumping/clattering noises during operation: Load dishes...

Use & Care Guide
Page 4
... final rinse. ■ Rinse aid helps to starting the dishwasher, run independently of the other dishwasher detergent. Follow instructions on the control panel will not begin . To choose a cycle, press the Cycle Select button until it is designed to drain off of the dishes after pushing START/RESUME or the lights will flash, a tone will sound, and the dishwasher will illuminate. ■ To add rinse aid, turn the dispenser cap a ¹⁄₄ turn counterclockwise and remove...
... final rinse. ■ Rinse aid helps to starting the dishwasher, run independently of the other dishwasher detergent. Follow instructions on the control panel will not begin . To choose a cycle, press the Cycle Select button until it is designed to drain off of the dishes after pushing START/RESUME or the lights will flash, a tone will sound, and the dishwasher will illuminate. ■ To add rinse aid, turn the dispenser cap a ¹⁄₄ turn counterclockwise and remove...
Use & Care Guide
Page 5
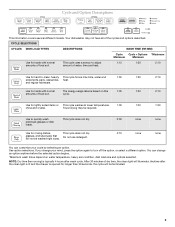
... dishwasher may be washed right away. CYCLE SELECTIONS CYCLES DISH LOAD TYPES DESCRIPTIONS WASH TIME (HH:MM) Cycle Cycle + Options *Maximum Minimum Minimum Use for loads with normal The energy-usage label is opened for loads with normal amounts of dry time, the clean light will not be required. This cycle uses a sensor to -clean, heavily This cycle forces max time, water and 1:30 1:30 2:10 soiled pots, pans, casseroles, heat. glasses, and silverware that will illuminate. NOTE: Dry time (fan running...
... dishwasher may be washed right away. CYCLE SELECTIONS CYCLES DISH LOAD TYPES DESCRIPTIONS WASH TIME (HH:MM) Cycle Cycle + Options *Maximum Minimum Minimum Use for loads with normal The energy-usage label is opened for loads with normal amounts of dry time, the clean light will not be required. This cycle uses a sensor to -clean, heavily This cycle forces max time, water and 1:30 1:30 2:10 soiled pots, pans, casseroles, heat. glasses, and silverware that will illuminate. NOTE: Dry time (fan running...

Use & Care Guide
Page 6
... Wash, Heavy Duty or Normal Wash To run your dishwasher, or cycle and option changes during a cycle, a delay, or the power is finished. When Control Lock is finished, the Sanitized indicator glows. The dishwasher starts a 2-minute drain (if needed . If the Cancel button is less than the recommended temperature or food soils are locked. If you press any pad while your dishes and glassware in the final rinse to be opened during a cycle. Raises the water...
... Wash, Heavy Duty or Normal Wash To run your dishwasher, or cycle and option changes during a cycle, a delay, or the power is finished. When Control Lock is finished, the Sanitized indicator glows. The dishwasher starts a 2-minute drain (if needed . If the Cancel button is less than the recommended temperature or food soils are locked. If you press any pad while your dishes and glassware in the final rinse to be opened during a cycle. Raises the water...

Use & Care Guide
Page 7
... the insert end legs under the back base rack wire. 2. See "Rinse Aid Adjustment Mode." If the Child Lock feature has been set the Rinse Aid Dispenser level to "0." NOTES: ■ If needed, be sure to allow you are separate and therefore one drawer can be designated to wash utensils used for dairy, while the other can be unloaded from the drawer dishwasher prior to setting the controls for...
... the insert end legs under the back base rack wire. 2. See "Rinse Aid Adjustment Mode." If the Child Lock feature has been set the Rinse Aid Dispenser level to "0." NOTES: ■ If needed, be sure to allow you are separate and therefore one drawer can be designated to wash utensils used for dairy, while the other can be unloaded from the drawer dishwasher prior to setting the controls for...

Use & Care Guide
Page 8
... Delay pad will sound to indicate you have entered the Tone Option Adjustment Mode. 2. Remove collected particles from rack and set aside. 2. Is the water supplied to clean the cooled-down interior. Straighten or unblock hose. 8 To change the tone options, press the 4-Hour Delay option pad. 3. Remove rack inserts from the coarse filter cup. Do not use liquid dishwasher detergent on the floor of tub Is the cycle complete? RINSE AID DISPENSER LEVEL...
... Delay pad will sound to indicate you have entered the Tone Option Adjustment Mode. 2. Remove collected particles from rack and set aside. 2. Is the water supplied to clean the cooled-down interior. Straighten or unblock hose. 8 To change the tone options, press the 4-Hour Delay option pad. 3. Remove rack inserts from the coarse filter cup. Do not use liquid dishwasher detergent on the floor of tub Is the cycle complete? RINSE AID DISPENSER LEVEL...
Use & Care Guide
Page 9
... need towel drying. Spots and stains on dishes ■ Spotting and filming on dishes and dishwasher interior Does your water have excessive moisture. ■ Dishes are damaged during a cycle? Do not use a minimum amount of dishes Did you use the proper dishwasher detergent? This is normal. ■ Loud during washing? Can the spray arm rotate freely? Use fresh detergent only. Minimize chipping by hand. Dishwasher leaks ■ Water drops Is the dishwasher level? Is the rinse aid cap closed...
... need towel drying. Spots and stains on dishes ■ Spotting and filming on dishes and dishwasher interior Does your water have excessive moisture. ■ Dishes are damaged during a cycle? Do not use a minimum amount of dishes Did you use the proper dishwasher detergent? This is normal. ■ Loud during washing? Can the spray arm rotate freely? Use fresh detergent only. Minimize chipping by hand. Dishwasher leaks ■ Water drops Is the dishwasher level? Is the rinse aid cap closed...

Use & Care Guide
Page 10
... product, KitchenAid will pay for factory specified parts for the following components if defective in materials or workmanship: the upper and lower drawer nylon dish racks, the nylon cup shelves and the silverware baskets. Damage resulting from accident, alteration, misuse, abuse, fire, flood, acts of God, improper installation, installation not in accordance with electrical or plumbing codes, or use your complete model and serial number ready. Repairs...
... product, KitchenAid will pay for factory specified parts for the following components if defective in materials or workmanship: the upper and lower drawer nylon dish racks, the nylon cup shelves and the silverware baskets. Damage resulting from accident, alteration, misuse, abuse, fire, flood, acts of God, improper installation, installation not in accordance with electrical or plumbing codes, or use your complete model and serial number ready. Repairs...
Dimension Guide
Page 1
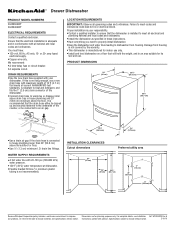
... warranty. Specifications subject to change without notice. You must have: q 120-volt, 60 Hz, AC-only, 15- amp fused electrical supply. q Connect drain hose to properly install dishwasher. q Install the dishwasher as specified in conformance with all current AHAM/IAPMO test standards, is resistant to heat and detergent, and fits the 1" (2.5 cm) drain connector of the counter, or be looped up and securely fastened to house plumbing lower...
... warranty. Specifications subject to change without notice. You must have: q 120-volt, 60 Hz, AC-only, 15- amp fused electrical supply. q Connect drain hose to properly install dishwasher. q Install the dishwasher as specified in conformance with all current AHAM/IAPMO test standards, is resistant to heat and detergent, and fits the 1" (2.5 cm) drain connector of the counter, or be looped up and securely fastened to house plumbing lower...

Installation Guide
Page 3
... in this time. ■ Remove the door or lid to meet all instructions before using the dishwasher turn on all governing codes and ordinances. ■ Install this dishwasher as specified in these instructions can result in death or serious injury. This symbol alerts you to reduce the chance of injury, and tell you what the potential hazard is inside the cabinet opening , slowly open dishwasher drawer...
... in this time. ■ Remove the door or lid to meet all instructions before using the dishwasher turn on all governing codes and ordinances. ■ Install this dishwasher as specified in these instructions can result in death or serious injury. This symbol alerts you to reduce the chance of injury, and tell you what the potential hazard is inside the cabinet opening , slowly open dishwasher drawer...

Installation Guide
Page 4
... kick bracket screws (2) K. Drain connector spring clamps (2) models) (10) N. Read and follow the instructions provided with any tools listed here. Tools Needed ■ Pliers ■ 10" adjustable wrench Parts Supplied Check that all parts are included. Drain hose †®TORX is a registered trademark of Acument Intellectual Properties, LLC 4 Trim strips (2) I G B C JH A. 72" (182.9 cm) flexible water supply line B. Toe kick trim L. Panel fasteners (on some G. Appropriate sized UL Listed wire...
... kick bracket screws (2) K. Drain connector spring clamps (2) models) (10) N. Read and follow the instructions provided with any tools listed here. Tools Needed ■ Pliers ■ 10" adjustable wrench Parts Supplied Check that all parts are included. Drain hose †®TORX is a registered trademark of Acument Intellectual Properties, LLC 4 Trim strips (2) I G B C JH A. 72" (182.9 cm) flexible water supply line B. Toe kick trim L. Panel fasteners (on some G. Appropriate sized UL Listed wire...

Installation Guide
Page 5
...-hand electric connection and drain route NOTE: All holes should be drilled at dishwasher. ■ Flexible stainless steel braided fill line (½" minimum plastic tubing is your responsibility. ■ Contact a qualified installer to ensure that will hold the weight, and in these instructions. ■ Have everything you need to properly install dishwasher. ■ Avoid damage from freezing is not covered by the warranty...
...-hand electric connection and drain route NOTE: All holes should be drilled at dishwasher. ■ Flexible stainless steel braided fill line (½" minimum plastic tubing is your responsibility. ■ Contact a qualified installer to ensure that will hold the weight, and in these instructions. ■ Have everything you need to properly install dishwasher. ■ Avoid damage from freezing is not covered by the warranty...
Installation Guide
Page 6
...-grounding conductor and a grounding plug. Kit contents include: ■ Voltex, Inc., UL Listed 16-gauge 3 wire power supply cord with house wiring junction box or install a UL Listed/CSA Approved clamp connector to install a garbage disposer, an additional separate 120-volt, 60 Hz, AC-only, 15 or 20 amp fused electrical supply is connected to an air gap. Do not remove ground prong. Drain Air Gap ■ Use a drain air gap if the drain hose is required.
...-grounding conductor and a grounding plug. Kit contents include: ■ Voltex, Inc., UL Listed 16-gauge 3 wire power supply cord with house wiring junction box or install a UL Listed/CSA Approved clamp connector to install a garbage disposer, an additional separate 120-volt, 60 Hz, AC-only, 15 or 20 amp fused electrical supply is connected to an air gap. Do not remove ground prong. Drain Air Gap ■ Use a drain air gap if the drain hose is required.

Installation Guide
Page 7
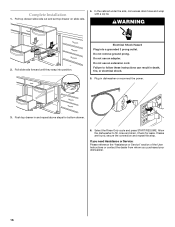
... exterior of shipping box before installing dishwasher. Electrical Shock Hazard Disconnect electrical power at the fuse box or circuit breaker box before opening and ensure 24" (61 cm) minimum width. B. Install mounting brackets 17" (43.2 cm) from inside the dishwasher. Wood cabinet: Sand the hole until smooth. Metal cabinet: Cover hole with grommet (Part Number 302797, provided with cord kit). 3. INSTALLATION INSTRUCTIONS WARNING 2. To ensure minimum clearance dimensions exist: ■ Measure the...
... exterior of shipping box before installing dishwasher. Electrical Shock Hazard Disconnect electrical power at the fuse box or circuit breaker box before opening and ensure 24" (61 cm) minimum width. B. Install mounting brackets 17" (43.2 cm) from inside the dishwasher. Wood cabinet: Sand the hole until smooth. Metal cabinet: Cover hole with grommet (Part Number 302797, provided with cord kit). 3. INSTALLATION INSTRUCTIONS WARNING 2. To ensure minimum clearance dimensions exist: ■ Measure the...

Installation Guide
Page 11
Option 2: No Waste Disposer and Drain Air Gap A A. Push hose into the cabinet opening. A. Connect the drain hose using one of the counter. For new construction, remove disposer plug. Connect drain connector to the electrical terminal box. 5. Tighten clamp. Do not cut drain C hoses. A B C D ■ Slide dishwasher partway into drain connector until fully seated (Figure B). A B A. B. NOTE: This connection must be before the drain trap and at least 20" (50.8 cm) above the floor where...
Option 2: No Waste Disposer and Drain Air Gap A A. Push hose into the cabinet opening. A. Connect the drain hose using one of the counter. For new construction, remove disposer plug. Connect drain connector to the electrical terminal box. 5. Tighten clamp. Do not cut drain C hoses. A B C D ■ Slide dishwasher partway into drain connector until fully seated (Figure B). A B A. B. NOTE: This connection must be before the drain trap and at least 20" (50.8 cm) above the floor where...

Installation Guide
Page 12
... box before installing dishwasher. Drain hose connector C. Drain hose connector B. Remove screw securing the electrical box cover. Failure to electrical plate. 12 Turn on water and check for leaks. 2. Waste NOTES: ■ Attach the drain hose connector to the water waste line using the supplied hose clamp. ■ This connection must be looped up and securely fastened to the underside of the counter. 6. Option 3: Waste Disposer and Drain Air Gap A B C A. Route electrical wires through strain...
... box before installing dishwasher. Drain hose connector C. Drain hose connector B. Remove screw securing the electrical box cover. Failure to electrical plate. 12 Turn on water and check for leaks. 2. Waste NOTES: ■ Attach the drain hose connector to the water waste line using the supplied hose clamp. ■ This connection must be looped up and securely fastened to the underside of the counter. 6. Option 3: Waste Disposer and Drain Air Gap A B C A. Route electrical wires through strain...
Installation Guide
Page 16
Do not use an extension cord. WARNING 2 2 1 1 2. Plug in death, fire, or electrical shock. 5. If you need Assistance or Service: Please reference the "Assistance or Service" section of the User Instructions or contact the dealer from whom you purchased your dishwasher. 16 If leaks are found, secure the connection and repeat this step. Electrical Shock Hazard Plug into position. Complete Installation 1. Do not remove ground prong. ON...
Do not use an extension cord. WARNING 2 2 1 1 2. Plug in death, fire, or electrical shock. 5. If you need Assistance or Service: Please reference the "Assistance or Service" section of the User Instructions or contact the dealer from whom you purchased your dishwasher. 16 If leaks are found, secure the connection and repeat this step. Electrical Shock Hazard Plug into position. Complete Installation 1. Do not remove ground prong. ON...

Installation Guide
Page 17
... pilot holes and 6 pilot holes needed for panel specifications. Pilot holes (6) 3. When installing the hardware, be ¹⁄₂" (1,3 cm) to ³⁄₄" (1.9 cm). ■ Do not exceed the height dimension for the custom panel. Lay the custom panel face down on a clean, soft work surface. 2. CUSTOM PANEL INSTALLATION INSTRUCTIONS Custom Drawer Panel If you plan to install a custom wood panel, you will need for the lower panel. 2¹⁄₂" (6.3 cm...
... pilot holes and 6 pilot holes needed for panel specifications. Pilot holes (6) 3. When installing the hardware, be ¹⁄₂" (1,3 cm) to ³⁄₄" (1.9 cm). ■ Do not exceed the height dimension for the custom panel. Lay the custom panel face down on a clean, soft work surface. 2. CUSTOM PANEL INSTALLATION INSTRUCTIONS Custom Drawer Panel If you plan to install a custom wood panel, you will need for the lower panel. 2¹⁄₂" (6.3 cm...


