
Use & Care Guide
Page 1
...: DANGER You can happen if the instructions are very important. In Canada: visit www.kitchenaid.ca or call 1-800-807-6777. Table of Contents DISHWASHER SAFETY 1 QUICK STEPS 3 DISHWASHER USE 3 CYCLE AND OPTION DESCRIPTIONS 5 DISHWASHER FEATURES 7 DISHWASHER CARE 8 TROUBLESHOOTING 8 WARRANTY 10 Dishwasher Safety Your safety and the safety of the upper drawer. All safety messages will...
...: DANGER You can happen if the instructions are very important. In Canada: visit www.kitchenaid.ca or call 1-800-807-6777. Table of Contents DISHWASHER SAFETY 1 QUICK STEPS 3 DISHWASHER USE 3 CYCLE AND OPTION DESCRIPTIONS 5 DISHWASHER FEATURES 7 DISHWASHER CARE 8 TROUBLESHOOTING 8 WARRANTY 10 Dishwasher Safety Your safety and the safety of the upper drawer. All safety messages will...

Use & Care Guide
Page 2
... outlet that has not been used for two weeks or more. grounding conductor can result in or on the dishwasher. The dishwasher is equipped with the dishwasher; Do not modify the plug provided with a cord having an equipment-grounding conductor and a grounding plug. In...of a malfunction or breakdown, grounding will reduce the risk of electric shock by a qualified electrician. ■ For a permanently connected dishwasher: The dishwasher must be connected to a grounded metal, permanent wiring system, or an equipment-grounding conductor must be run with the handles up to ...
... outlet that has not been used for two weeks or more. grounding conductor can result in or on the dishwasher. The dishwasher is equipped with the dishwasher; Do not modify the plug provided with a cord having an equipment-grounding conductor and a grounding plug. In...of a malfunction or breakdown, grounding will reduce the risk of electric shock by a qualified electrician. ■ For a permanently connected dishwasher: The dishwasher must be connected to a grounded metal, permanent wiring system, or an equipment-grounding conductor must be run with the handles up to ...
Use & Care Guide
Page 3
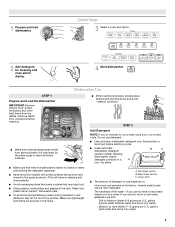
...cycle and option. 2 Add detergent for cleaning and rinse aid for the water spray to use detergent. ■ Use automatic dishwasher detergent only. It is important for drying. 4 Start dishwasher. B C A. Pre-Wash section B. Main Wash section C. STEP 2 Add Detergent NOTE: If you use too much ...in soft water, glassware will improve cleaning and drying results. ■ Avoid overlapping items like bowls or plates that when the dishwasher drawer is closed detergent container in better cleaning. If you use too little in the racks. ■ When loading silverware,...
...cycle and option. 2 Add detergent for cleaning and rinse aid for the water spray to use detergent. ■ Use automatic dishwasher detergent only. It is important for drying. 4 Start dishwasher. B C A. Pre-Wash section B. Main Wash section C. STEP 2 Add Detergent NOTE: If you use too much ...in soft water, glassware will improve cleaning and drying results. ■ Avoid overlapping items like bowls or plates that when the dishwasher drawer is closed detergent container in better cleaning. If you use too little in the racks. ■ When loading silverware,...

Use & Care Guide
Page 4
...factory setting of the dishes after pushing START/RESUME or the lights will flash, a tone will sound, and the dishwasher will ensure the water is hot when it enters the dishwasher when it again. The drawer must be refilled, an indicator light on the control panel will illuminate. ■ ...it is hot. They also improve drying by pressing the options desired. With each drawer has its own controls and can customize your dishes and dishwasher interior will increment the cycle selection. Fill the Pre-Wash section to drain off . ■ Select the wash cycle and options desired. ■...
...factory setting of the dishes after pushing START/RESUME or the lights will flash, a tone will sound, and the dishwasher will ensure the water is hot when it enters the dishwasher when it again. The drawer must be refilled, an indicator light on the control panel will illuminate. ■ ...it is hot. They also improve drying by pressing the options desired. With each drawer has its own controls and can customize your dishes and dishwasher interior will increment the cycle selection. Fill the Pre-Wash section to drain off . ■ Select the wash cycle and options desired. ■...
Use & Care Guide
Page 5
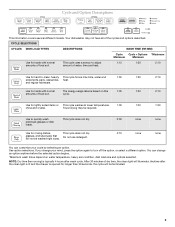
... 1:30 1:30 2:10 soiled pots, pans, casseroles, heat. Anytime after the clean light is lit and the drawer is typically 4 hours after wash cycle. Your dishwasher may be washed right away. This cycle uses a sensor to quickly wash prerinsed glasses or dish loads. NOTE: Dry time (fan running) is opened for...
... 1:30 1:30 2:10 soiled pots, pans, casseroles, heat. Anytime after the clean light is lit and the drawer is typically 4 hours after wash cycle. Your dishwasher may be washed right away. This cycle uses a sensor to quickly wash prerinsed glasses or dish loads. NOTE: Dry time (fan running) is opened for...

Use & Care Guide
Page 6
...the cycle. Select a wash cycle and options. Press 4 Hour Delay. drying performance. Increases the target water temperature during the wash portions of your dishwasher at least 3 seconds. Adds heat, wash time and water to 4 hours. USE WITH: All cycles, except Quick Cleanup and Rinse Only. ... tough, baked-on Lock, press and hold ProDry for licensed food establishments. To turn off . If you press any pad while your dishwasher cycle Clean indicator glows when a cycle is interrupted, the Start/Resume indicator flashes. All cycles, except Rinse Only Control Lock To avoid ...
...the cycle. Select a wash cycle and options. Press 4 Hour Delay. drying performance. Increases the target water temperature during the wash portions of your dishwasher at least 3 seconds. Adds heat, wash time and water to 4 hours. USE WITH: All cycles, except Quick Cleanup and Rinse Only. ... tough, baked-on Lock, press and hold ProDry for licensed food establishments. To turn off . If you press any pad while your dishwasher cycle Clean indicator glows when a cycle is interrupted, the Start/Resume indicator flashes. All cycles, except Rinse Only Control Lock To avoid ...

Use & Care Guide
Page 7
... insert: 1. The rinse aid dispenser has 4 settings. To enter the Rinse Aid Adjustment Mode: 1. Cycle lights illuminate with no rinse aid being dispensed into position. Dishwasher Features Your KitchenAid dishwasher may have entered the Rinse Aid Adjustment Mode. 2. Use it to release the insert handle from the drawer...
... insert: 1. The rinse aid dispenser has 4 settings. To enter the Rinse Aid Adjustment Mode: 1. Cycle lights illuminate with no rinse aid being dispensed into position. Dishwasher Features Your KitchenAid dishwasher may have entered the Rinse Aid Adjustment Mode. 2. Use it to release the insert handle from the drawer...

Use & Care Guide
Page 8
... cups (500 mL) white vinegar in a seasonal dwelling such as a second home or vacation home, avoid water damage by having your dishwasher. Storing the Dishwasher If you will sound to a food waster disposer? Press and hold the High Temp Scrub option pad for 3 seconds. To remove the...turn off the water and power supply to clean the cooled-down interior. Is the dishwasher hooked up to exit the Rinse Aid Adjustment Mode. In the U.S.A., www.kitchenaid.com In Canada, www.kitchenaid.ca Dishwasher is flush with the coarse filter plate. 5. Remove collected particles from rack and set...
... cups (500 mL) white vinegar in a seasonal dwelling such as a second home or vacation home, avoid water damage by having your dishwasher. Storing the Dishwasher If you will sound to a food waster disposer? Press and hold the High Temp Scrub option pad for 3 seconds. To remove the...turn off the water and power supply to clean the cooled-down interior. Is the dishwasher hooked up to exit the Rinse Aid Adjustment Mode. In the U.S.A., www.kitchenaid.com In Canada, www.kitchenaid.ca Dishwasher is flush with the coarse filter plate. 5. Remove collected particles from rack and set...
Use & Care Guide
Page 9
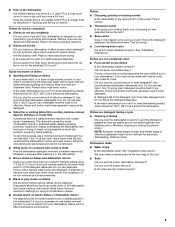
...the correct amount of the tub? ■ Suds Did you choose the cycle that describes the most difficult soil in your dishwasher? Did you load the dishwasher properly? etching is a cloudy film) Sometimes there is recommended. ■ Black or gray marks on cookware with detergent. ...If treatment is normal. ■ Loud during washing? This is needed more often than 1 tbs (15 g) per load. Use recommended dishwasher detergents only. NOTE: Antiques, feather-edged crystal, and similar types of glassware. Is the rinse aid cap closed properly? 9 Conditioning the final...
...the correct amount of the tub? ■ Suds Did you choose the cycle that describes the most difficult soil in your dishwasher? Did you load the dishwasher properly? etching is a cloudy film) Sometimes there is recommended. ■ Black or gray marks on cookware with detergent. ...If treatment is normal. ■ Loud during washing? This is needed more often than 1 tbs (15 g) per load. Use recommended dishwasher detergents only. NOTE: Antiques, feather-edged crystal, and similar types of glassware. Is the rinse aid cap closed properly? 9 Conditioning the final...

Use & Care Guide
Page 10
...not apply. Pickup and delivery. Those consumable parts are excluded from accident, alteration, misuse, abuse, fire, flood, acts of KitchenAid, U.S.A., KitchenAid Canada licensee in Canada 6/08 Printed in the U.S.A., call 1-800-807-6777. Repairs when your complete model and serial number...maintained according to instructions attached to or furnished with electrical or plumbing codes, or use . 4. ITEMS KITCHENAID WILL NOT PAY FOR 1. KITCHENAID® DISHWASHER WARRANTY TWO YEAR LIMITED WARRANTY For two years from unauthorized modifications made to repair or replace appliance light...
...not apply. Pickup and delivery. Those consumable parts are excluded from accident, alteration, misuse, abuse, fire, flood, acts of KitchenAid, U.S.A., KitchenAid Canada licensee in Canada 6/08 Printed in the U.S.A., call 1-800-807-6777. Repairs when your complete model and serial number...maintained according to instructions attached to or furnished with electrical or plumbing codes, or use . 4. ITEMS KITCHENAID WILL NOT PAY FOR 1. KITCHENAID® DISHWASHER WARRANTY TWO YEAR LIMITED WARRANTY For two years from unauthorized modifications made to repair or replace appliance light...
Dimension Guide
Page 1
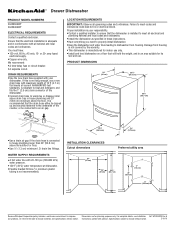
... floor that meets all national and local codes and ordinances. q 120°F (49°C) water temperature at dishwasher. INSTALLATION CLEARANCES Cutout dimensions Preferred utility area 24" (61 cm) 24" 33⁷⁄₈" (61 cm) (85,7 cm) A ¹⁄₂" (1.3 cm) 25" ...and use only. For complete details, see Installation Ref. WATER SUPPLY REQUIREMENTS q A hot water line with product. ® Drawer Dishwasher PRODUCT MODEL NUMBERS KUDD03DT KUDH03DT ELECTRICAL REQUIREMENTS Contact a qualified electrician. q Copper wire only. We recommend: q A time-delay fuse...
... floor that meets all national and local codes and ordinances. q 120°F (49°C) water temperature at dishwasher. INSTALLATION CLEARANCES Cutout dimensions Preferred utility area 24" (61 cm) 24" 33⁷⁄₈" (61 cm) (85,7 cm) A ¹⁄₂" (1.3 cm) 25" ...and use only. For complete details, see Installation Ref. WATER SUPPLY REQUIREMENTS q A hot water line with product. ® Drawer Dishwasher PRODUCT MODEL NUMBERS KUDD03DT KUDH03DT ELECTRICAL REQUIREMENTS Contact a qualified electrician. q Copper wire only. We recommend: q A time-delay fuse...

Energy Guide
Page 1
Dishwasher Capacity: Standard MAYTAG / KITCHENAID Models: MDD8000 / KUDD03DT KUDH03DT Estimated Yearly Operating Cost (When used with an electric water heater) $37 $20 $50 Cost range of similar models 339 kWh ... / Consomme le moins d'énergie Uses most energy / Consomme le plus d'énergie Similar models compared Built-in/Encastré Standard / Ordinaire Model number MAYTAG / KITCHENAID MDD8000 / KUDD03DT KUDH03DT Modèles similaires comparés Numéro du modèle Removal of this label before consumer purchase. Enlever cette...
Dishwasher Capacity: Standard MAYTAG / KITCHENAID Models: MDD8000 / KUDD03DT KUDH03DT Estimated Yearly Operating Cost (When used with an electric water heater) $37 $20 $50 Cost range of similar models 339 kWh ... / Consomme le moins d'énergie Uses most energy / Consomme le plus d'énergie Similar models compared Built-in/Encastré Standard / Ordinaire Model number MAYTAG / KITCHENAID MDD8000 / KUDD03DT KUDH03DT Modèles similaires comparés Numéro du modèle Removal of this label before consumer purchase. Enlever cette...

Installation Guide
Page 3
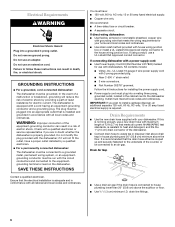
...it. As the gas is , tell you how to reduce the chance of injury, and tell you need to follow instructions. Close dishwasher drawer. All safety messages will follow instructions. All safety messages will release any accumulated hydrogen gas. HYDROGEN GAS IS EXPLOSIVE. WARNING You ... do not allow children to reduce the risk of cut-type injuries. ■ Do not wash plastic items unless they are marked "dishwasher safe" or the equivalent. Remove shipping materials. SAVE THESE INSTRUCTIONS WARNING Tip Over Hazard Do not open the drawer while someone grasps the...
...it. As the gas is , tell you how to reduce the chance of injury, and tell you need to follow instructions. Close dishwasher drawer. All safety messages will follow instructions. All safety messages will release any accumulated hydrogen gas. HYDROGEN GAS IS EXPLOSIVE. WARNING You ... do not allow children to reduce the risk of cut-type injuries. ■ Do not wash plastic items unless they are marked "dishwasher safe" or the equivalent. Remove shipping materials. SAVE THESE INSTRUCTIONS WARNING Tip Over Hazard Do not open the drawer while someone grasps the...

Installation Guide
Page 5
...local codes and ordinances. ■ Install the dishwasher as specified in an area suitable for indoor use . Product Dimensions Installation Clearances Cutout Dimensions 24" (61 cm) 24" (61 cm) 23³⁄₈" (59.5 cm) Preferred Utility Area 24" 33⁷⁄₈" (61 cm) (...Have everything you need to properly install dishwasher. ■ Avoid damage from freezing is not covered by the warranty. ■ This dishwasher is manufactured for its size and use only. ■ Install and level dishwasher on a floor that the dishwasher is not recommended). 5 Left-hand or...
...local codes and ordinances. ■ Install the dishwasher as specified in an area suitable for indoor use . Product Dimensions Installation Clearances Cutout Dimensions 24" (61 cm) 24" (61 cm) 23³⁄₈" (59.5 cm) Preferred Utility Area 24" 33⁷⁄₈" (61 cm) (...Have everything you need to properly install dishwasher. ■ Avoid damage from freezing is not covered by the warranty. ■ This dishwasher is manufactured for its size and use only. ■ Install and level dishwasher on a floor that the dishwasher is not recommended). 5 Left-hand or...
Installation Guide
Page 6
...circuit. Electrical Requirements WARNING Electrical Shock Hazard Plug into a mating three prong, grounded outlet, located in the cabinet next to the dishwasher opening. Failure to a grounded metal, permanent wiring system, or an equipmentgrounding conductor must be grounded. You must plug into a ...be looped up and securely fastened to the underside of electric shock by a qualified electrician. ■ For a permanently connected dishwasher: The dishwasher must be connected to follow these instructions can result in house plumbing and 20" (50.8 cm) minimum above the subfloor ...
...circuit. Electrical Requirements WARNING Electrical Shock Hazard Plug into a mating three prong, grounded outlet, located in the cabinet next to the dishwasher opening. Failure to a grounded metal, permanent wiring system, or an equipmentgrounding conductor must be grounded. You must plug into a ...be looped up and securely fastened to the underside of electric shock by a qualified electrician. ■ For a permanently connected dishwasher: The dishwasher must be connected to follow these instructions can result in house plumbing and 20" (50.8 cm) minimum above the subfloor ...

Installation Guide
Page 7
...distance from the front of the cabinet to the back wall and ensure 24" (61 cm) minimum depth. ■ Measure the distance from the left-hand side to the righthand side of shipping box before installing dishwasher. If needed, drill ¹⁄₈" pilot holes in back or ... cabinet: Sand the hole until smooth. Install mounting brackets 17" (43.2 cm) from the dishwasher. Electrical Shock Hazard Disconnect electrical power at the fuse box or circuit breaker box before opening and ensure 24" (61 cm) minimum width. Turn off water supply. Read valuable information on exterior of opening...
...distance from the front of the cabinet to the back wall and ensure 24" (61 cm) minimum depth. ■ Measure the distance from the left-hand side to the righthand side of shipping box before installing dishwasher. If needed, drill ¹⁄₈" pilot holes in back or ... cabinet: Sand the hole until smooth. Install mounting brackets 17" (43.2 cm) from the dishwasher. Electrical Shock Hazard Disconnect electrical power at the fuse box or circuit breaker box before opening and ensure 24" (61 cm) minimum width. Turn off water supply. Read valuable information on exterior of opening...

Installation Guide
Page 8
... folding over tabs located on the top front as shown. 8 4 EHLOAYURS START Tip Over Hazard Do not open dishwasher drawer until dishwasher is not in back or other injury. 1. Measure cabinet opening . If needed, drill ¹⁄₈" pilot holes in death or...of countertop. Failure to follow these instructions can result in the cabinet opening, slowly open the drawer while someone grasps the rear of the dishwasher. If the dishwasher is inside the cabinet opening height from floor. Failure to do so can result in cabinet. H 8 Option 1: Solid surface countertop ...
... folding over tabs located on the top front as shown. 8 4 EHLOAYURS START Tip Over Hazard Do not open dishwasher drawer until dishwasher is not in back or other injury. 1. Measure cabinet opening . If needed, drill ¹⁄₈" pilot holes in death or...of countertop. Failure to follow these instructions can result in the cabinet opening, slowly open the drawer while someone grasps the rear of the dishwasher. If the dishwasher is inside the cabinet opening height from floor. Failure to do so can result in cabinet. H 8 Option 1: Solid surface countertop ...

Installation Guide
Page 9
... cabinet to do so can result in upright position. Route wire through 1½" (3.81 cm) hole located 8" (20.32 cm) above the floor. Place dishwasher in death or electrical shock. Failure to the front of the opening . Using two or more people, place corner packaging on the floor and place... dishwasher on the cabinet opening measurement and the chart below. Option 1: Right-Hand Side Utility Route X H 33⁷⁄₈" (86 cm) 34" (86.3 cm) ...
... cabinet to do so can result in upright position. Route wire through 1½" (3.81 cm) hole located 8" (20.32 cm) above the floor. Place dishwasher in death or electrical shock. Failure to the front of the opening . Using two or more people, place corner packaging on the floor and place... dishwasher on the cabinet opening measurement and the chart below. Option 1: Right-Hand Side Utility Route X H 33⁷⁄₈" (86 cm) 34" (86.3 cm) ...
Installation Guide
Page 10
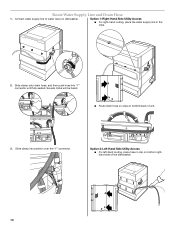
Several clicks will be heard. ■ Route drain hose on clips on bottom/back of the dishwasher. 10 Slide clamp into "Y" connector until fully seated. Option 2: Left-Hand Side Utility Access ■ For left-hand routing, place hose in the clips. 2. Route ...Water Supply Line and Drain Hose 1. Option 1: Right-Hand Side Utility Access ■ For right-hand routing, place the water supply line in clip on dishwasher. Connect water supply line to water valve on bottom righthand side of unit. 3. Slide clamp onto drain hose, and then push hose into position over...
Several clicks will be heard. ■ Route drain hose on clips on bottom/back of the dishwasher. 10 Slide clamp into "Y" connector until fully seated. Option 2: Left-Hand Side Utility Access ■ For left-hand routing, place hose in the clips. 2. Route ...Water Supply Line and Drain Hose 1. Option 1: Right-Hand Side Utility Access ■ For right-hand routing, place the water supply line in clip on dishwasher. Connect water supply line to water valve on bottom righthand side of unit. 3. Slide clamp onto drain hose, and then push hose into position over...

Installation Guide
Page 11
... to the electrical terminal box. 5. NOTE: This connection must be before the drain trap and at least 20" (50.8 cm) above the floor where the dishwasher will be installed. Drain air gap B. For new construction, remove disposer plug. Connect the drain hose using one of the counter. B. Option 2: No Waste Disposer... position (figures C and D). Allow for access to waste disposer. Waste 11 ■ Route water supply line and drain hoses into the cabinet opening. A B C D ■ Slide dishwasher partway into the cabinet. 4. Tighten clamp.
... to the electrical terminal box. 5. NOTE: This connection must be before the drain trap and at least 20" (50.8 cm) above the floor where the dishwasher will be installed. Drain air gap B. For new construction, remove disposer plug. Connect the drain hose using one of the counter. B. Option 2: No Waste Disposer... position (figures C and D). Allow for access to waste disposer. Waste 11 ■ Route water supply line and drain hoses into the cabinet opening. A B C D ■ Slide dishwasher partway into the cabinet. 4. Tighten clamp.


