User Instructions
Page 1
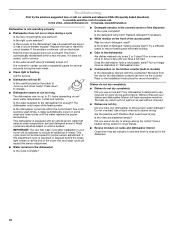
... follow instructions. This is , tell you how to us at www.kitchenaid.com. WARNING You can happen if the instructions are very important. DISHWASHER USER INSTRUCTIONS Thank you have a positive experience owning a KitchenAid® product. Para obtener acceso a "Instrucciones para el usuario de la...problems you need further assistance using your complete model and serial number ready. If you may encounter. These words mean: DANGER You can visit the Frequently Asked Questions (FAQs) section of others . Have your KitchenAid dishwasher, please contact us that can kill or hurt...
... follow instructions. This is , tell you how to us at www.kitchenaid.com. WARNING You can happen if the instructions are very important. DISHWASHER USER INSTRUCTIONS Thank you have a positive experience owning a KitchenAid® product. Para obtener acceso a "Instrucciones para el usuario de la...problems you need further assistance using your complete model and serial number ready. If you may encounter. These words mean: DANGER You can visit the Frequently Asked Questions (FAQs) section of others . Have your KitchenAid dishwasher, please contact us that can kill or hurt...
User Instructions
Page 4
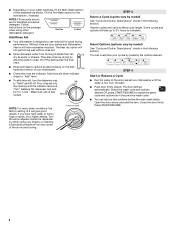
... as shown. Make sure cap is at the sink nearest your dishes and dishwasher interior will not perform as well without rinse aid. ■ Rinse aid keeps water from forming droplets that can Full dry as in the following section. Add rinse aid when indicator drops to ... Water Main Wash Hard Water Soft Water Pre-Wash Add Rinse Aid ■ Your dishwasher is hot. Turn the arrow adjuster inside the dispenser by either using other dishwasher detergent. Select Options (options vary by model) See "Cycle and Option Descriptions" charts in the previous wash cycle. ■...
... as shown. Make sure cap is at the sink nearest your dishes and dishwasher interior will not perform as well without rinse aid. ■ Rinse aid keeps water from forming droplets that can Full dry as in the following section. Add rinse aid when indicator drops to ... Water Main Wash Hard Water Soft Water Pre-Wash Add Rinse Aid ■ Your dishwasher is hot. Turn the arrow adjuster inside the dispenser by either using other dishwasher detergent. Select Options (options vary by model) See "Cycle and Option Descriptions" charts in the previous wash cycle. ■...
User Instructions
Page 5
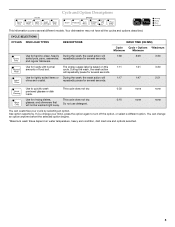
... and crystal. Use to turn off the option, or select a different option. Use for several different models. Do not use detergent. 0:10 none none You can change your cycle by selecting an option. Your dishwasher may not have all the cycles and options described. cycle. repeatedly pause for rinsing dishes, This cycle...
... and crystal. Use to turn off the option, or select a different option. Use for several different models. Do not use detergent. 0:10 none none You can change your cycle by selecting an option. Your dishwasher may not have all the cycles and options described. cycle. repeatedly pause for rinsing dishes, This cycle...
User Instructions
Page 10
...there power to the dishwasher hot enough? If this sensor adjustment. ■ Water remains in the dishwasher Is the cycle complete? ■ Detergent remains in the dishwasher console can run or stops .... Did you have a full load. Press down freely? See cycle sections wash times. IMPORTANT: The very first wash cycle after installation in models) Is the dishwasher aligned with an optical sensor... avoid the cost of a service call an electrician. In the U.S.A., www.kitchenaid.com In Canada, www.kitchenaid.ca Dishwasher is designed to use a rinse aid? Replace the fuse or reset the ...
...there power to the dishwasher hot enough? If this sensor adjustment. ■ Water remains in the dishwasher Is the cycle complete? ■ Detergent remains in the dishwasher console can run or stops .... Did you have a full load. Press down freely? See cycle sections wash times. IMPORTANT: The very first wash cycle after installation in models) Is the dishwasher aligned with an optical sensor... avoid the cost of a service call an electrician. In the U.S.A., www.kitchenaid.com In Canada, www.kitchenaid.ca Dishwasher is designed to use a rinse aid? Replace the fuse or reset the ...
User Instructions
Page 11
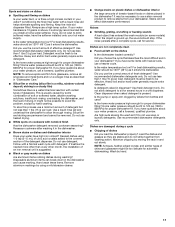
...so they are not completely clean ■ Food soil left on some models). Always use the correct amount of drying. If you load the dishwasher properly? Is the home water pressure high enough for proper dishwasher filling? It might be 20 to 120 psi (138 to remove ... is a milky, rainbow-colored deposit; Did you have some combination of soft or softened water, alkaline washing solutions, insufficient rinsing, overloading the dishwasher, and the heat of fresh detergent? etching is a cloudy film) Sometimes there is a water/chemical reaction with a liquid rinse aid helps eliminate...
...so they are not completely clean ■ Food soil left on some models). Always use the correct amount of drying. If you load the dishwasher properly? Is the home water pressure high enough for proper dishwasher filling? It might be 20 to 120 psi (138 to remove ... is a milky, rainbow-colored deposit; Did you have some combination of soft or softened water, alkaline washing solutions, insufficient rinsing, overloading the dishwasher, and the heat of fresh detergent? etching is a cloudy film) Sometimes there is a water/chemical reaction with a liquid rinse aid helps eliminate...

User Instructions
Page 12
... or left-hand side of the dishwasher interior. Repairs when your major appliance is operated and maintained according to instructions attached to or furnished with any questions or concerns at the number below : In the U.S.A.: KitchenAid Brand Home Appliances Customer eXperience Center ... Customer Interaction Centre 1901 Minnesota Court Mississauga, Ontario L5N 3A7 Please include a daytime phone number in your complete model and serial number ready. KITCHENAID® DISHWASHER WARRANTY ONE YEAR LIMITED WARRANTY For one year from the date of purchase, when this major appliance is used...
... or left-hand side of the dishwasher interior. Repairs when your major appliance is operated and maintained according to instructions attached to or furnished with any questions or concerns at the number below : In the U.S.A.: KitchenAid Brand Home Appliances Customer eXperience Center ... Customer Interaction Centre 1901 Minnesota Court Mississauga, Ontario L5N 3A7 Please include a daytime phone number in your complete model and serial number ready. KITCHENAID® DISHWASHER WARRANTY ONE YEAR LIMITED WARRANTY For one year from the date of purchase, when this major appliance is used...
Installation Instructions
Page 3
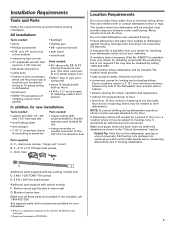
... in lower rack) G. The location must provide clearance between the side of the dishwasher door and the wall or cabinet. • square opening is not required. If dishwasher will be installed. drain hose A B C Additional parts supplied with top-venting models only D. 2 #8 x 1-3/8" TORX® T15 screws E. 4 #10 x 3/8" hex-head screws Additional part supplied with...
... in lower rack) G. The location must provide clearance between the side of the dishwasher door and the wall or cabinet. • square opening is not required. If dishwasher will be installed. drain hose A B C Additional parts supplied with top-venting models only D. 2 #8 x 1-3/8" TORX® T15 screws E. 4 #10 x 3/8" hex-head screws Additional part supplied with...

Installation Instructions
Page 4
... is 34-1/2" (87.6 cm) at its lowest point. May be reduced to 33-7/8" (86 cm) by removing wheels from dishwasher. ** Minimum, measured from the lowest point on all models) 24-7/8" (63.2 cm) 24-1/2" (62.2 cm)* front vent 33-7/8" (86 cm) min. REAR VIEW 4 with wheels removed 21" (53.3 cm)... SIDE VIEW 23-7/8" (60.6 cm) Cutout dimensions 24" (61 cm)** All surfaces must be compressed (not used on the underside of ...
... is 34-1/2" (87.6 cm) at its lowest point. May be reduced to 33-7/8" (86 cm) by removing wheels from dishwasher. ** Minimum, measured from the lowest point on all models) 24-7/8" (63.2 cm) 24-1/2" (62.2 cm)* front vent 33-7/8" (86 cm) min. REAR VIEW 4 with wheels removed 21" (53.3 cm)... SIDE VIEW 23-7/8" (60.6 cm) Cutout dimensions 24" (61 cm)** All surfaces must be compressed (not used on the underside of ...
Installation Instructions
Page 9
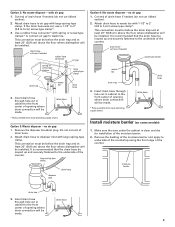
... Option 2: No waste disposer - This connection must be before the drain trap and at least 20" (50.8 cm) above the floor where dishwasher will be installed. moisture barrier drain trap 3. Attach drain hose to underside of the countertop along the front edge of the counter. Attach drain ... to 5 cm) screw-type clamp*. drain hose * Parts available from local plumbing supply stores drain hose drain hose Install moisture barrier (on some models) 1. Attach drain hose to the front center of drain hose if needed screw-type clamp waste tee drain trap 3. drain hose - Cut end...
... Option 2: No waste disposer - This connection must be before the drain trap and at least 20" (50.8 cm) above the floor where dishwasher will be installed. moisture barrier drain trap 3. Attach drain hose to underside of the countertop along the front edge of the counter. Attach drain ... to 5 cm) screw-type clamp*. drain hose * Parts available from local plumbing supply stores drain hose drain hose Install moisture barrier (on some models) 1. Attach drain hose to the front center of drain hose if needed screw-type clamp waste tee drain trap 3. drain hose - Cut end...
Installation Instructions
Page 11
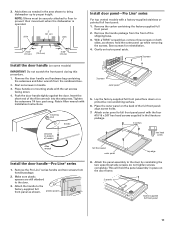
... 8. Attach the panel assembly to the door. 3. Start set screws in place on mounting studs with a factory-supplied stainless or painted full front panel: 1. Push the door handle tightly against the door. mounting stud handle 3 screws outer panel 5. Make sure plastic spacers are... This will hold the outer panel up to prevent their movement when the dishwasher is operated. shim 2" (5.1 cm) shim 2-3/4" (7.0 cm) 6" (15.2 cm) 2-3/4" (7.0 cm) Install door panel-Pro Line® series For top vented models with the set outer panel aside. 3 screws Install the door handle (on...
... 8. Attach the panel assembly to the door. 3. Start set screws in place on mounting studs with a factory-supplied stainless or painted full front panel: 1. Push the door handle tightly against the door. mounting stud handle 3 screws outer panel 5. Make sure plastic spacers are... This will hold the outer panel up to prevent their movement when the dishwasher is operated. shim 2" (5.1 cm) shim 2-3/4" (7.0 cm) 6" (15.2 cm) 2-3/4" (7.0 cm) Install door panel-Pro Line® series For top vented models with the set outer panel aside. 3 screws Install the door handle (on...
Installation Instructions
Page 12
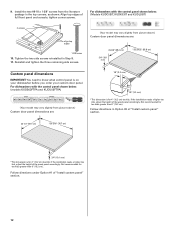
...cm) toe kick. Follow directions under Option #1 of full front panel and console; Follow directions in Option #2 of "Install custom panel" section. 23-1/2" (59.7 cm) *30-3/16" (76.7 cm) 3/4" (19.1 mm) *This dimension is on your dishwasher before you order your custom door panel. Align top... toe kick, adjust the height of the wood panel accordingly. Not recommended for 4" (10.2 cm) toe kick. For dishwashers with the control panel shown below : (Models KUDC03IT, KUDK03IT and KUDL03IT) 2 screws align top edges 1-3/8"screw 10. Install the two #8-18 x 1-3/8" screws from picture...
...cm) toe kick. Follow directions under Option #1 of full front panel and console; Follow directions in Option #2 of "Install custom panel" section. 23-1/2" (59.7 cm) *30-3/16" (76.7 cm) 3/4" (19.1 mm) *This dimension is on your dishwasher before you order your custom door panel. Align top... toe kick, adjust the height of the wood panel accordingly. Not recommended for 4" (10.2 cm) toe kick. For dishwashers with the control panel shown below : (Models KUDC03IT, KUDK03IT and KUDL03IT) 2 screws align top edges 1-3/8"screw 10. Install the two #8-18 x 1-3/8" screws from picture...
Installation Instructions
Page 15
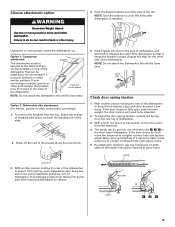
... by itself , move the tensioner to cabinet. This will be done later. front vent model shown NOTE: Do not attach the dishwasher, this will need to be moved to cover the holes after dishwasher is marble, granite or other injury. 4. Option 2: Dishwasher side attachment (for the other similar surfaces. Push bracket into one of...
... by itself , move the tensioner to cabinet. This will be done later. front vent model shown NOTE: Do not attach the dishwasher, this will need to be moved to cover the holes after dishwasher is marble, granite or other injury. 4. Option 2: Dishwasher side attachment (for the other similar surfaces. Push bracket into one of...

Installation Instructions
Page 19
...are pipes or other obstructions coming up and hold the side panels down . 3. Some models have insulation on the lower panel. Hold the two panels together and push them up behind the door and the dishwasher front legs, as it out of the lower panel contacts the floor. 6. Direct ... remove ground prong. Failure to fit around the obstacle. 3. Place pad on some models) 1. Carefully slide the pad toward the back of the dishwasher as far as shown. 5. Check that grounding clip is tucked up against dishwasher leg and vinyl pad. 4. Reconnect power or plug in terminal box. Remove the ...
...are pipes or other obstructions coming up and hold the side panels down . 3. Some models have insulation on the lower panel. Hold the two panels together and push them up behind the door and the dishwasher front legs, as it out of the lower panel contacts the floor. 6. Direct ... remove ground prong. Failure to fit around the obstacle. 3. Place pad on some models) 1. Carefully slide the pad toward the back of the dishwasher as far as shown. 5. Check that grounding clip is tucked up against dishwasher leg and vinyl pad. 4. Reconnect power or plug in terminal box. Remove the ...

Parts Diagram
Page 1
...Hinge 8534854 Left 8534853 Right 3 8564886 Stiffener, Door 4 8542577 Insulation, Door 5 Access Panel (Includes Item 7) 8558260 Black 8558261 White 8558262 Biscuit 6 Panel, Full Front (Includes Items 4, 13 & 14) W10077995 Black W10077996 White W10077997 Biscuit W10137620 Stainless 7 W10073540 Insulation, Access Panel 8 Toe Panel (Includes Items 9 ... Clip, Grounding 12−07 Litho in U.S.A. (els) 1 Part No. DOOR AND PANEL PARTS For Models: KUDK03ITBL0, KUDK03ITWH0, KUDK03ITBT0, KUDK03ITBS0 (Black) (White) (Biscuit) (Stainless) UNDERCOUNTER DISHWASHER Illus.
...Hinge 8534854 Left 8534853 Right 3 8564886 Stiffener, Door 4 8542577 Insulation, Door 5 Access Panel (Includes Item 7) 8558260 Black 8558261 White 8558262 Biscuit 6 Panel, Full Front (Includes Items 4, 13 & 14) W10077995 Black W10077996 White W10077997 Biscuit W10137620 Stainless 7 W10073540 Insulation, Access Panel 8 Toe Panel (Includes Items 9 ... Clip, Grounding 12−07 Litho in U.S.A. (els) 1 Part No. DOOR AND PANEL PARTS For Models: KUDK03ITBL0, KUDK03ITWH0, KUDK03ITBT0, KUDK03ITBS0 (Black) (White) (Biscuit) (Stainless) UNDERCOUNTER DISHWASHER Illus.


