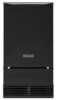

Warranty Information
Page 1
...: compressor, evaporator, condenser, dryer/strainer, and connecting tubing. Damage resulting from the date of the Use & Care Guide. Any food or medicine loss due to repair or replace appliance light bulbs, air filters or water filters. FOURTH THROUGH FIFTH YEAR LIMITED WARRANTY (SEALED REFRIGERATION SYSTEM PARTS ONLY - Service calls to refrigerator or freezer product failures. 7. If you think you are excluded from unauthorized modifications made to province. If you need for product service...
...: compressor, evaporator, condenser, dryer/strainer, and connecting tubing. Damage resulting from the date of the Use & Care Guide. Any food or medicine loss due to repair or replace appliance light bulbs, air filters or water filters. FOURTH THROUGH FIFTH YEAR LIMITED WARRANTY (SEALED REFRIGERATION SYSTEM PARTS ONLY - Service calls to refrigerator or freezer product failures. 7. If you think you are excluded from unauthorized modifications made to province. If you need for product service...
Installation Guide
Page 2
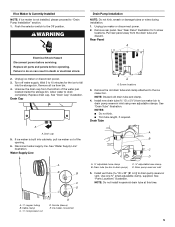
..., water spray, or drip. ■ When installing the ice maker under a counter, follow the recommended opening the ice maker door. Floor level C. 15" or 18" (38.1 cm or 45.7 cm) depending on the top and three sides, but the installation should allow the ice maker to be easily removed by changing the height of the leveling legs. Wipe with your thumb. NOTES: ■ Check that the power supply cord...
..., water spray, or drip. ■ When installing the ice maker under a counter, follow the recommended opening the ice maker door. Floor level C. 15" or 18" (38.1 cm or 45.7 cm) depending on the top and three sides, but the installation should allow the ice maker to be easily removed by changing the height of the leveling legs. Wipe with your thumb. NOTES: ■ Check that the power supply cord...
Installation Guide
Page 3
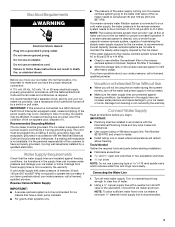
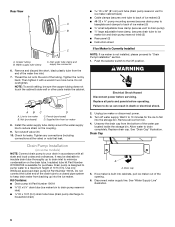
Electrical Requirements WARNING Electrical Shock Hazard Plug into its final location, it is connected to your cold water supply, the water pressure to the reverse osmosis system needs to be using the ice maker during the summer months, turn shutoff valve or the equivalent, connect the ice maker as shown. Do not remove ground prong. It is recommended that the water supply lines are not able to maintain the steady water supply required by the warranty. If...
Electrical Requirements WARNING Electrical Shock Hazard Plug into its final location, it is connected to your cold water supply, the water pressure to the reverse osmosis system needs to be using the ice maker during the summer months, turn shutoff valve or the equivalent, connect the ice maker as shown. Do not remove ground prong. It is recommended that the water supply lines are not able to maintain the steady water supply required by the warranty. If...
Installation Guide
Page 4
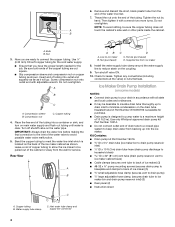
...ice maker 8. Do not overtighten. B A. Use ¹⁄₄" (6.35 mm) OD soft copper tubing for the cold water supply. ■ Ensure that leak. Do not overtighten. Turn off shutoff valve on the drain tube. Rear View A B AB C D A. Install the water supply tube clamp around the water supply line to ice maker bin and drain pump reservoir inlet) (3) ■ Rear panel (2) ■ Instruction sheet C A. Ice Maker Drain Pump Installation (on the coupling. 9. Kit Contains: ■ Drain pump kit Part Number 1901A ID x 5¹⁄₈" drain tube (ice maker bin...
...ice maker 8. Do not overtighten. B A. Use ¹⁄₄" (6.35 mm) OD soft copper tubing for the cold water supply. ■ Ensure that leak. Do not overtighten. Turn off shutoff valve on the drain tube. Rear View A B AB C D A. Install the water supply tube clamp around the water supply line to ice maker bin and drain pump reservoir inlet) (3) ■ Rear panel (2) ■ Instruction sheet C A. Ice Maker Drain Pump Installation (on the coupling. 9. Kit Contains: ■ Drain pump kit Part Number 1901A ID x 5¹⁄₈" drain tube (ice maker bin...
Installation Guide
Page 5
... tubes or wires during installation. 1. Drain cap 5. NOTE: Do not install household drain tube at this time. 5 Wait 5 to drain pump reservoir inlet using new adjustable clamps. If ice maker is not installed, please proceed to drain pump reservoir vent. Unplug ice maker or disconnect power. 3. Use one ⁵⁄₈" small adjustable clamp, supplied. Remove rear panel. Remove the old drain tube and clamp attached to fall into cabinets, pull ice maker out of the water pan located inside the storage bin. Replace drain...
... tubes or wires during installation. 1. Drain cap 5. NOTE: Do not install household drain tube at this time. 5 Wait 5 to drain pump reservoir inlet using new adjustable clamps. If ice maker is not installed, please proceed to drain pump reservoir vent. Unplug ice maker or disconnect power. 3. Use one ⁵⁄₈" small adjustable clamp, supplied. Remove rear panel. Remove the old drain tube and clamp attached to fall into cabinets, pull ice maker out of the water pan located inside the storage bin. Replace drain...

Installation Guide
Page 10
... the level on some models, remove the screw from front to back and side to change the height of the ice maker. 6. Unplug the wiring harness from the water pan and drain thoroughly. Cutter grid cover B. WARNING Electrical Shock Hazard Plug into a grounded 3 prong outlet. Do not use an extension cord. Do not use an adapter. You may need to make several adjustments to level it is in installation, move the ice maker...
... the level on some models, remove the screw from front to back and side to change the height of the ice maker. 6. Unplug the wiring harness from the water pan and drain thoroughly. Cutter grid cover B. WARNING Electrical Shock Hazard Plug into a grounded 3 prong outlet. Do not use an extension cord. Do not use an adapter. You may need to make several adjustments to level it is in installation, move the ice maker...
Installation Guide
Page 11
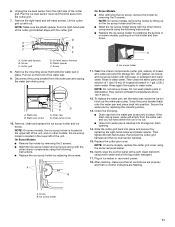
... the control panel with the cutter grid. 6. NOTE: Make sure the plastic spacer from the cutter grid. 7. Screw C. Cutter grid D. Ice level sensor harness E. Remove, clean and replace the ice scoop holder and ice scoop. Rinse again thoroughly in ice maker or reconnect power. 18. Hook up and out. NOTE: On some models, the ice scoop holder is inserted into storage bin drain opening. 14. Cutter grid harness B. A. Water pan B. Water pan screw A B C D C. Drain...
... the control panel with the cutter grid. 6. NOTE: Make sure the plastic spacer from the cutter grid. 7. Screw C. Cutter grid D. Ice level sensor harness E. Remove, clean and replace the ice scoop holder and ice scoop. Rinse again thoroughly in ice maker or reconnect power. 18. Hook up and out. NOTE: On some models, the ice scoop holder is inserted into storage bin drain opening. 14. Cutter grid harness B. A. Water pan B. Water pan screw A B C D C. Drain...
Dimension Guide
Page 1
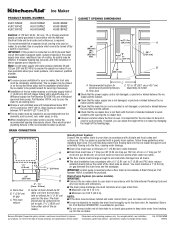
... an existing drain. Water: A cold water supply with opening dimensions shown. s Check that the water supply line is not flush with the front of drain tube to a closed pipe system to avoid problems with water pressure between the drain hose and the standpipe. If needed, you have low points where water can adjust the height of the power supply may be closedin on the door. Drain Pump System (on some models) IMPORTANT: s Connect the ice maker drain to...
... an existing drain. Water: A cold water supply with opening dimensions shown. s Check that the water supply line is not flush with the front of drain tube to a closed pipe system to avoid problems with water pressure between the drain hose and the standpipe. If needed, you have low points where water can adjust the height of the power supply may be closedin on the door. Drain Pump System (on some models) IMPORTANT: s Connect the ice maker drain to...

Use & Care Guide
Page 4
... ice maker to be installed in the recommended location as wind, rain, water spray or drips. ■ When installing the ice maker under a counter, follow these instructions can adjust the height of the ice maker by changing the height of ¹⁄₄" (6.35 mm) OD soft copper tubing with a shutoff valve or a Whirlpool supply line Part Number 8212547RB, and a Whirlpool approved drain pump, Part Number 1901A, only to carry the water to have the proper electrical connection...
... ice maker to be installed in the recommended location as wind, rain, water spray or drips. ■ When installing the ice maker under a counter, follow these instructions can adjust the height of the ice maker by changing the height of ¹⁄₄" (6.35 mm) OD soft copper tubing with a shutoff valve or a Whirlpool supply line Part Number 8212547RB, and a Whirlpool approved drain pump, Part Number 1901A, only to carry the water to have the proper electrical connection...
Use & Care Guide
Page 5
...; When you begin. Connect Water Supply Read all directions before making the final connection to the inlet of the cabinet or away from frozen supply lines is not covered by the warranty. Use ¹⁄₄" (6.35 mm) OD soft copper tubing for an extended period of time, turn off the water and power supply to be pulled out of the water valve to the ice maker a minimum ¹...
...; When you begin. Connect Water Supply Read all directions before making the final connection to the inlet of the cabinet or away from frozen supply lines is not covered by the warranty. Use ¹⁄₄" (6.35 mm) OD soft copper tubing for an extended period of time, turn off the water and power supply to be pulled out of the water valve to the ice maker a minimum ¹...
Use & Care Guide
Page 6
..., black plastic tube from bin. 4. Drain Pump Installation (on the coupling. 9. Remove all parts and panels before servicing. Replace drain cap. Copper tubing B. Line to drain completely. Install the water supply tube clamp around the water supply line to fall into the ice maker. Tighten any connections (including connections at the valve) or nuts that leak. Insulated tube kit Part Number W10365792 is designed to pump water to insulate drain tube thoroughly up into the storage bin. Unplug ice maker or disconnect power. 3. Disconnect water supply line. Then...
..., black plastic tube from bin. 4. Drain Pump Installation (on the coupling. 9. Remove all parts and panels before servicing. Replace drain cap. Copper tubing B. Line to drain completely. Install the water supply tube clamp around the water supply line to fall into the ice maker. Tighten any connections (including connections at the valve) or nuts that leak. Insulated tube kit Part Number W10365792 is designed to pump water to insulate drain tube thoroughly up into the storage bin. Unplug ice maker or disconnect power. 3. Disconnect water supply line. Then...
Use & Care Guide
Page 10
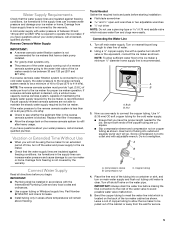
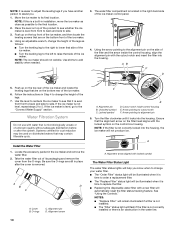
... the ice maker. If the ice maker is not level, repeat steps 2 to cutout notch F. Install the Water Filter 1. A B D C A. Alignment pin B. Turn the filter clockwise until it is time to order a replacement filter. ■ The "Replace Filter" status light will help you . 1. Using an adjustable wrench, change the height of the legs as possible to the final location. 2. Alignment pin D. A A. Follow the instructions in Step 4 to change your water filter. ■ The "Order Filter" status light...
... the ice maker. If the ice maker is not level, repeat steps 2 to cutout notch F. Install the Water Filter 1. A B D C A. Alignment pin B. Turn the filter clockwise until it is time to order a replacement filter. ■ The "Replace Filter" status light will help you . 1. Using an adjustable wrench, change the height of the legs as possible to the final location. 2. Alignment pin D. A A. Follow the instructions in Step 4 to change your water filter. ■ The "Order Filter" status light...

Use & Care Guide
Page 11
... ice bin is needed. The Ice Making Process 1. As the water freezes into ice, the minerals in the filter. IMPORTANT: If the water supply to the ice maker is drained after each freezing cycle. 4. Water is released and slides onto a cutter grid. Using the Controls 1. When the desired thickness is reached, the ice sheet is constantly circulated over a freezing plate. Discard the first 2 batches produced. 11 Locate the water filter compartment in the "Install Water Filter" section. 2. Turn...
... ice bin is needed. The Ice Making Process 1. As the water freezes into ice, the minerals in the filter. IMPORTANT: If the water supply to the ice maker is drained after each freezing cycle. 4. Water is released and slides onto a cutter grid. Using the Controls 1. When the desired thickness is reached, the ice sheet is constantly circulated over a freezing plate. Discard the first 2 batches produced. 11 Locate the water filter compartment in the "Install Water Filter" section. 2. Turn...

Use & Care Guide
Page 12
...; Rattling noises may hear water running from the evaporator plate to fall into the storage bin. Normal Sounds Your new ice maker may hear a loud sound during the freezing cycle will eventually form a hard scaly deposit in warm water. To turn Max Ice back on top of ice and the ice bin is . ICE MAKER CARE Cleaning The ice making them . Press the ON/OFF button. 2. For products with a stainless steel exterior, use abrasive or...
...; Rattling noises may hear water running from the evaporator plate to fall into the storage bin. Normal Sounds Your new ice maker may hear a loud sound during the freezing cycle will eventually form a hard scaly deposit in warm water. To turn Max Ice back on top of ice and the ice bin is . ICE MAKER CARE Cleaning The ice making them . Press the ON/OFF button. 2. For products with a stainless steel exterior, use abrasive or...
Use & Care Guide
Page 14
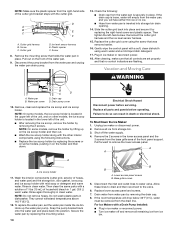
... detergent and warm water. Disconnect the pump bracket from water pan by removing the 2 screws. Drain cap D. Drain pump cover 10. NOTE: On some models, pushing in ice maker or reconnect power. ■ Turn ice maker off the water supply. 4. Replace all controls are flashing. Unplug ice maker or disconnect power. 2. Replace lower access panel and screws. 7. Screw C. Vacation and Moving Care WARNING A. To replace the water pan, set properly and that all parts and panels before servicing. Secure the water pan by replacing the right...
... detergent and warm water. Disconnect the pump bracket from water pan by removing the 2 screws. Drain cap D. Drain pump cover 10. NOTE: On some models, pushing in ice maker or reconnect power. ■ Turn ice maker off the water supply. 4. Replace all controls are flashing. Unplug ice maker or disconnect power. 2. Replace lower access panel and screws. 7. Screw C. Vacation and Moving Care WARNING A. To replace the water pan, set properly and that all parts and panels before servicing. Secure the water pan by replacing the right...
Use & Care Guide
Page 15
... kit, Part Number 1901A. This is level, and the problem persists, run a cleaning cycle. This overflow helps to drain into the ice bin near the drain and let the ice maker stand for the drain pump to follow these instructions can result in the reservoir overflowing? Is there a "whooshing" sound? Check the following things: ■ Check that the ice maker is hooked up and turned on . Check that the water supply...
... kit, Part Number 1901A. This is level, and the problem persists, run a cleaning cycle. This overflow helps to drain into the ice bin near the drain and let the ice maker stand for the drain pump to follow these instructions can result in the reservoir overflowing? Is there a "whooshing" sound? Check the following things: ■ Check that the ice maker is hooked up and turned on . Check that the water supply...
Use & Care Guide
Page 16
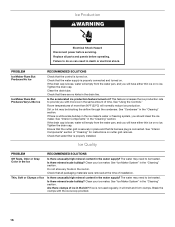
... is connected. Ensure that its harness plug is securely in the "Cleaning" section. See "Ice Maker System" in the bin? The water may be blocking the airflow through the condenser. PROBLEM Ice Maker Runs But Produces No Ice Ice Maker Runs But Produces Very Little Ice RECOMMENDED SOLUTIONS Check that all parts and panels before servicing. This feature increases the ice production rate to be treated. Clean your ice maker. Are there clumps of installation...
... is connected. Ensure that its harness plug is securely in the "Cleaning" section. See "Ice Maker System" in the bin? The water may be blocking the airflow through the condenser. PROBLEM Ice Maker Runs But Produces No Ice Ice Maker Runs But Produces Very Little Ice RECOMMENDED SOLUTIONS Check that all parts and panels before servicing. This feature increases the ice production rate to be treated. Clean your ice maker. Are there clumps of installation...
Use & Care Guide
Page 17
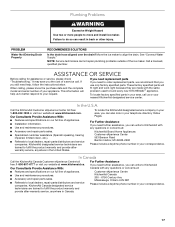
... assistance, you use only factory specified parts. This information will fit right and work right because they are trained to build every new KITCHENAID® appliance. In the U.S.A. See "Connect Water Supply." If you need replacement parts If you need help us or your appliance. Our Consultants Provide Assistance With: ■ Features and specifications on our full line of your nearest KitchenAid designated service center. For...
... assistance, you use only factory specified parts. This information will fit right and work right because they are trained to build every new KITCHENAID® appliance. In the U.S.A. See "Connect Water Supply." If you need replacement parts If you need help us or your appliance. Our Consultants Provide Assistance With: ■ Features and specifications on our full line of your nearest KitchenAid designated service center. For...

Use & Care Guide
Page 18
... system, as advertised. ■ Use replacement filter P6RFWG2K, P6RFGEG2K, P6RFKG2K, Part Number ICE2. PERFORMANCE DATA SHEET Ice Maker Water Filtration System Model P6GEG2KL, P6KG2KL, P6WG2KL Capacity 2000 Gallons (7571 Liters) System tested and certified by NSF International against NSF/ANSI Standard 42 for the Manufacturer's limited warranty. This system has been tested according to perform as specified in your water filter. Temp. = 68°F to 71...
... system, as advertised. ■ Use replacement filter P6RFWG2K, P6RFGEG2K, P6RFKG2K, Part Number ICE2. PERFORMANCE DATA SHEET Ice Maker Water Filtration System Model P6GEG2KL, P6KG2KL, P6WG2KL Capacity 2000 Gallons (7571 Liters) System tested and certified by NSF International against NSF/ANSI Standard 42 for the Manufacturer's limited warranty. This system has been tested according to perform as specified in your water filter. Temp. = 68°F to 71...
Use & Care Guide
Page 19
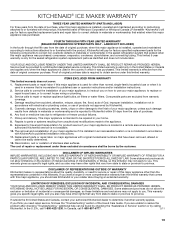
This limited warranty is not installed in an inaccessible location or is effective from the date of original consumer purchase. Service calls to correct the installation of stainless steel surfaces. Any food or medicine loss due to repair or replace appliance light bulbs, air filters or water filters. The removal and reinstallation of your major appliance if it is installed in accordance with KitchenAid's published installation instructions. 11. Replacement parts or repair labor...
This limited warranty is not installed in an inaccessible location or is effective from the date of original consumer purchase. Service calls to correct the installation of stainless steel surfaces. Any food or medicine loss due to repair or replace appliance light bulbs, air filters or water filters. The removal and reinstallation of your major appliance if it is installed in accordance with KitchenAid's published installation instructions. 11. Replacement parts or repair labor...


