Installation Guide
Page 2
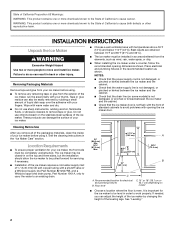
... avoid problems with opening dimensions shown. Do not use sharp instruments, rubbing alcohol, flammable fluids, or abrasive cleaners to work properly. Place electrical and plumbing fixtures in on model ■ Choose a location where the floor is important for servicing if necessary. ■ Installation of the ice maker requires a cold water supply inlet of ¹⁄₄" (6.35 mm) OD soft copper tubing with a shutoff valve or a Whirlpool supply line Part Number...
... avoid problems with opening dimensions shown. Do not use sharp instruments, rubbing alcohol, flammable fluids, or abrasive cleaners to work properly. Place electrical and plumbing fixtures in on model ■ Choose a location where the floor is important for servicing if necessary. ■ Installation of the ice maker requires a cold water supply inlet of ¹⁄₄" (6.35 mm) OD soft copper tubing with a shutoff valve or a Whirlpool supply line Part Number...
Installation Guide
Page 3
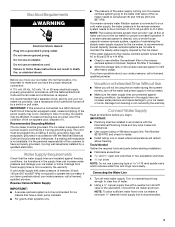
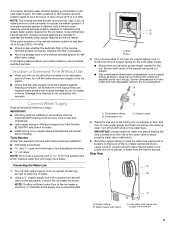
... the reverse osmosis system is connected to your ice maker or home. Turn on the reverse osmosis system to make sure you will remain above freezing. The ice maker is not covered by the ice maker. Ice formations in accordance with a power supply cord having a 3 prong grounding plug. Damage from freezing is recommended. A cold water supply with a quarter-turn off main water supply. Vacation or Extended Time Without Use ■ When you have a drain pump installed. ■...
... the reverse osmosis system is connected to your ice maker or home. Turn on the reverse osmosis system to make sure you will remain above freezing. The ice maker is not covered by the ice maker. Ice formations in accordance with a power supply cord having a 3 prong grounding plug. Damage from freezing is recommended. A cold water supply with a quarter-turn off main water supply. Vacation or Extended Time Without Use ■ When you have a drain pump installed. ■...
Installation Guide
Page 4
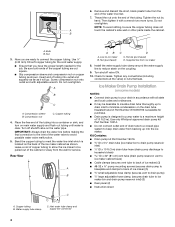
... other parts inside the cabinet. Turn shutoff valve ON. 10. Check for purchase. ■ Drain pump is designed to pump water to ice maker B. Insulated tube kit Part Number W10365792 is available for leaks. Use only Whirlpool approved drain pump kit Part Number 1901A. ■ Do not connect outlet end of the water line inlet. 7. Kit Contains: ■ Drain pump kit Part Number 1901A ID x 5¹⁄₈" drain tube (ice maker bin to drain pump reservoir inlet) ID x 10 ft (3 m) drain tube hose (drain...
... other parts inside the cabinet. Turn shutoff valve ON. 10. Check for purchase. ■ Drain pump is designed to pump water to ice maker B. Insulated tube kit Part Number W10365792 is available for leaks. Use only Whirlpool approved drain pump kit Part Number 1901A. ■ Do not connect outlet end of the water line inlet. 7. Kit Contains: ■ Drain pump kit Part Number 1901A ID x 5¹⁄₈" drain tube (ice maker bin to drain pump reservoir inlet) ID x 10 ft (3 m) drain tube hose (drain...
Installation Guide
Page 5
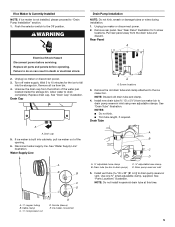
Unplug ice maker or disconnect power. 2. Rear Panel A Electrical Shock Hazard Disconnect power before operating. Turn off water supply. Remove all parts and panels before servicing. Replace drain cap. Ferrule (sleeve) E. Drain tube (ice bin to do so can result in death or electrical shock. 2. See "Parts Locations" illustration. NOTE: Do not install household drain tube at this time. 5 See "Rear Panel" illustration for the ice to the Off position. Drain cap 5. Water Supply Line A B B A. ¹⁄₄" copper tubing B. Screw locations 3. Drain Tube A B C D...
Unplug ice maker or disconnect power. 2. Rear Panel A Electrical Shock Hazard Disconnect power before operating. Turn off water supply. Remove all parts and panels before servicing. Replace drain cap. Ferrule (sleeve) E. Drain tube (ice bin to do so can result in death or electrical shock. 2. See "Parts Locations" illustration. NOTE: Do not install household drain tube at this time. 5 See "Rear Panel" illustration for the ice to the Off position. Drain cap 5. Water Supply Line A B B A. ¹⁄₄" copper tubing B. Screw locations 3. Drain Tube A B C D...

Installation Guide
Page 10
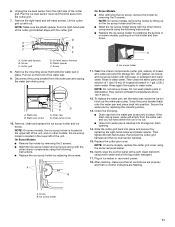
... legs. 7. Open the storage bin door and remove any ice that are on the water pan. A B A. Do not use an extension cord. 3. Push up on the top rear of the cutter grid cover until the snaps release to adjust the leveling legs if you . 1. WARNING Electrical Shock Hazard Plug into a grounded 3 prong outlet. Unplug ice maker or disconnect power. 2. Unplug the wiring harness from the water pan and drain thoroughly...
... legs. 7. Open the storage bin door and remove any ice that are on the water pan. A B A. Do not use an extension cord. 3. Push up on the top rear of the cutter grid cover until the snaps release to adjust the leveling legs if you . 1. WARNING Electrical Shock Hazard Plug into a grounded 3 prong outlet. Unplug ice maker or disconnect power. 2. Unplug the wiring harness from the water pan and drain thoroughly...
Installation Guide
Page 11
... all controls are set the water pan inside the ice bin. Water pan B. On Some Models ■ Remove the holder by replacing the screws. Ice scoop holder 11 Screw 8. Water pan screw A B C D C. Unplug the ice level sensor from the cutter grid. 7. Remove the right-hand and left-hand screws. NOTE: Make sure the plastic spacer from the water pan and unplug the water pan drain pump. Screw C. Gently wipe the control panel with the other interior components using warm water and...
... all controls are set the water pan inside the ice bin. Water pan B. On Some Models ■ Remove the holder by replacing the screws. Ice scoop holder 11 Screw 8. Water pan screw A B C D C. Unplug the ice level sensor from the cutter grid. 7. Remove the right-hand and left-hand screws. NOTE: Make sure the plastic spacer from the water pan and unplug the water pan drain pump. Screw C. Gently wipe the control panel with the other interior components using warm water and...
Dimension Guide
Page 1
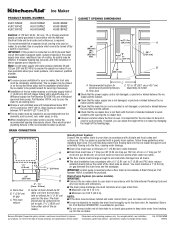
... ice maker and the cabinet. Instructions packed with a shutoff valve or a Whirlpool supply line Part Number 8212547RB, and a Whirlpool approved drain pump, Part Number 1901A, only to carry the water to 2" (5.08 cm) PVC drain reducer installed directly below 110°F (43°C). W10541636B 10/9/13 IMPORTANT: If this product is connected to keep water from either side of cooling. s Installation of the ice maker requires a cold water supply inlet of the ice maker by a switch...
... ice maker and the cabinet. Instructions packed with a shutoff valve or a Whirlpool supply line Part Number 8212547RB, and a Whirlpool approved drain pump, Part Number 1901A, only to carry the water to 2" (5.08 cm) PVC drain reducer installed directly below 110°F (43°C). W10541636B 10/9/13 IMPORTANT: If this product is connected to keep water from either side of cooling. s Installation of the ice maker requires a cold water supply inlet of the ice maker by a switch...

Warranty Information
Page 1
... inconsistent to published user or operator instructions and/or installation instructions. 2. Service calls to repair or replace appliance light bulbs, air filters or water filters. Some states and provinces do not allow limitations on the duration of implied warranties of incidental or consequential damages, so these excluded circumstances shall be provided by the customer. This limited 5-year warranty is only for the sealed refrigeration system replacement parts as identified and...
... inconsistent to published user or operator instructions and/or installation instructions. 2. Service calls to repair or replace appliance light bulbs, air filters or water filters. Some states and provinces do not allow limitations on the duration of implied warranties of incidental or consequential damages, so these excluded circumstances shall be provided by the customer. This limited 5-year warranty is only for the sealed refrigeration system replacement parts as identified and...

Use & Care Guide
Page 4
... frozen supply lines is important for the ice maker to have questions about your water pressure, call a licensed, qualified plumber. If you have a drain pump installed. ■ For gravity drain systems only. ■ The pressure of the water supply coming out of a reverse osmosis system going to the water inlet valve of the ice maker needs to be turned off by changing the height of it is required to work...
... frozen supply lines is important for the ice maker to have questions about your water pressure, call a licensed, qualified plumber. If you have a drain pump installed. ■ For gravity drain systems only. ■ The pressure of the water supply coming out of a reverse osmosis system going to the water inlet valve of the ice maker needs to be turned off by changing the height of it is required to work...
Use & Care Guide
Page 5
... length needed for the job. Connect Water Supply Read all directions before making the final connection to the inlet of the water valve to avoid possible water valve malfunction. 5. Turn on the reverse osmosis system to be pulled out of the cabinet or away from freezing is not covered by the warranty. NOTE: To allow the ice maker to refill after heavy usage. A B C A. Copper tubing 4. IMPORTANT: Always drain the water line...
... length needed for the job. Connect Water Supply Read all directions before making the final connection to the inlet of the water valve to avoid possible water valve malfunction. 5. Turn on the reverse osmosis system to be pulled out of the cabinet or away from freezing is not covered by the warranty. NOTE: To allow the ice maker to refill after heavy usage. A B C A. Copper tubing 4. IMPORTANT: Always drain the water line...

Use & Care Guide
Page 10
... corner D. Door Stop and End-Cap Reversal WARNING Electrical Shock Hazard Disconnect power before operating. D C A. Turn the top hinge upside down so that the hinge pin points down so that the hinge pin points up . Remove the 2 hex-head screws located under the stainless steel door wrap panel flange on the door wrap panel from the bottom of the opposite side of the ice maker cabinet. Bottom corner open (no...
... corner D. Door Stop and End-Cap Reversal WARNING Electrical Shock Hazard Disconnect power before operating. D C A. Turn the top hinge upside down so that the hinge pin points down so that the hinge pin points up . Remove the 2 hex-head screws located under the stainless steel door wrap panel flange on the door wrap panel from the bottom of the opposite side of the ice maker cabinet. Bottom corner open (no...
Use & Care Guide
Page 12
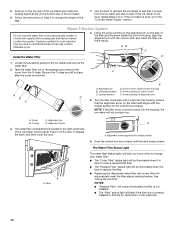
... the control box door closed . See "Using the Controls." Use the level to recheck the ice maker to see that are still in Step 4 to the "Connect Water Supply" section. Take the water filter out of unknown quality without adequate disinfection before or after the cover is level, go to change your water filter. ■ The "Order Filter" status light will be illuminated when it is located in the ice maker and remove the water filter...
... the control box door closed . See "Using the Controls." Use the level to recheck the ice maker to see that are still in Step 4 to the "Connect Water Supply" section. Take the water filter out of unknown quality without adequate disinfection before or after the cover is level, go to change your water filter. ■ The "Order Filter" status light will be illuminated when it is located in the ice maker and remove the water filter...
Use & Care Guide
Page 13
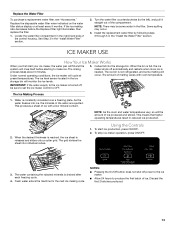
... slides onto a cutter grid. The Ice Making Process 1. Water is drained after each freezing cycle. 4. This means that higher operating temperatures result in the ice storage bin will rinse itself before the Replace Filter light illuminates, then replace the filter. 1. Using the Controls 1. To start your ice maker, the water pan will fill and the system will monitor the ice levels. 5. Locate the water filter compartment in the "Install Water Filter" section. 2. Turn the water filter counterclockwise (to produce the first...
... slides onto a cutter grid. The Ice Making Process 1. Water is drained after each freezing cycle. 4. This means that higher operating temperatures result in the ice storage bin will rinse itself before the Replace Filter light illuminates, then replace the filter. 1. Using the Controls 1. To start your ice maker, the water pan will fill and the system will monitor the ice levels. 5. Locate the water filter compartment in the "Install Water Filter" section. 2. Turn the water filter counterclockwise (to produce the first...
Use & Care Guide
Page 14
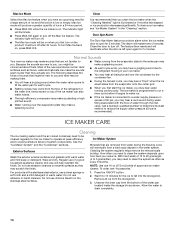
The indicator light will turn off . ■ The Max Ice mode will be making system and the air cooled condenser need to be cleaned regularly for each cycle ends, you may need to fall into the storage bin. To clean your water is. Door Ajar Alarm The Door Ajar Alarm feature sounds an alarm when the ice maker door is open again for the ice to clean the system as often as shown. The following describes...
The indicator light will turn off . ■ The Max Ice mode will be making system and the air cooled condenser need to be cleaned regularly for each cycle ends, you may need to fall into the storage bin. To clean your water is. Door Ajar Alarm The Door Ajar Alarm feature sounds an alarm when the ice maker door is open again for the ice to clean the system as often as shown. The following describes...

Use & Care Guide
Page 16
.... Gently wipe the control panel with the cutter grid. Failure to water valve. If the room temperature will have either thin ice or no control indicators are set the water pan inside the ice bin. Pull out on other interior components using warm water and a mild liquid dish detergent. 17. NOTE: Do not remove hoses. Ice level sensor harness E. Disconnect the pump bracket from the drain line. Unplug ice maker or disconnect power. 2. They cannot withstand...
.... Gently wipe the control panel with the cutter grid. Failure to water valve. If the room temperature will have either thin ice or no control indicators are set the water pan inside the ice bin. Pull out on other interior components using warm water and a mild liquid dish detergent. 17. NOTE: Do not remove hoses. Ice level sensor harness E. Disconnect the pump bracket from the drain line. Unplug ice maker or disconnect power. 2. They cannot withstand...

Use & Care Guide
Page 17
... the ice making process. If there was a large amount of water added to the ice maker, wait a few minutes for approximately 5 minutes. See "Cleaning." This will remove the remaining water from the water during water filling associated with drain pumps, check that the ice maker is connected to a water supply pressure in the bin, check to see whether the drain hose is level, and the problem persists, run a cleaning cycle. Do not use...
... the ice making process. If there was a large amount of water added to the ice maker, wait a few minutes for approximately 5 minutes. See "Cleaning." This will remove the remaining water from the water during water filling associated with drain pumps, check that the ice maker is connected to a water supply pressure in the bin, check to see whether the drain hose is level, and the problem persists, run a cleaning cycle. Do not use...
Use & Care Guide
Page 18
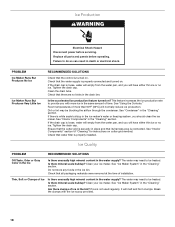
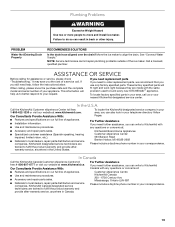
... there unusually high mineral content in place and that the water supply is turned on . Check that the control is properly connected and turned on . Thin, Soft or Clumps of "Cleaning" for instructions on ? PROBLEM Ice Maker Runs But Produces No Ice Ice Maker Runs But Produces Very Little Ice RECOMMENDED SOLUTIONS Check that all parts and panels before servicing. Is the accelerated ice production feature turned on cutter grid removal. See "Using the Controls."
... there unusually high mineral content in place and that the water supply is turned on . Check that the control is properly connected and turned on . Thin, Soft or Clumps of "Cleaning" for instructions on ? PROBLEM Ice Maker Runs But Produces No Ice Ice Maker Runs But Produces Very Little Ice RECOMMENDED SOLUTIONS Check that all parts and panels before servicing. Is the accelerated ice production feature turned on cutter grid removal. See "Using the Controls."
Use & Care Guide
Page 19
See "Connect Water Supply." NOTE: Service technicians cannot repair plumbing problems outside of your correspondence. 19 When calling, please know the purchase date and the complete model and serial number of the ice maker. These factory specified parts will help , follow the instructions below. Call the KitchenAid Customer eXperience Center toll free: 1-800-422-1230 or visit our website at www.kitchenaid.ca. KitchenAid Brand Home Appliances Customer eXperience Center...
See "Connect Water Supply." NOTE: Service technicians cannot repair plumbing problems outside of your correspondence. 19 When calling, please know the purchase date and the complete model and serial number of the ice maker. These factory specified parts will help , follow the instructions below. Call the KitchenAid Customer eXperience Center toll free: 1-800-422-1230 or visit our website at www.kitchenaid.ca. KitchenAid Brand Home Appliances Customer eXperience Center...

Use & Care Guide
Page 20
...). Rated service capacity = 2000 gallons (7571 liters). ■ It is recommended that operational, maintenance, and filter replacement requirements be carried out for the Manufacturer's limited warranty. When the water filter status display changes from "GOOD" to 22°C). When the filter indicator reads "REPLACE," it is a registered trademark of the substances listed below. Style 2 - Press FILTER to check the status of your water supply. If the filter indicator light is...
...). Rated service capacity = 2000 gallons (7571 liters). ■ It is recommended that operational, maintenance, and filter replacement requirements be carried out for the Manufacturer's limited warranty. When the water filter status display changes from "GOOD" to 22°C). When the filter indicator reads "REPLACE," it is a registered trademark of the substances listed below. Style 2 - Press FILTER to check the status of your water supply. If the filter indicator light is...

Use & Care Guide
Page 21
... found by checking the "Assistance or Service" section or by KitchenAid. 5. This limited warranty is valid only in accordance with KitchenAid's published installation instructions. 11. Consumable parts are unable to resolve the problem after checking "Troubleshooting," additional help can be provided by the customer. Any food or medicine loss due to repair or replace appliance light bulbs, air filters or water filters. Expenses for travel and transportation for...
... found by checking the "Assistance or Service" section or by KitchenAid. 5. This limited warranty is valid only in accordance with KitchenAid's published installation instructions. 11. Consumable parts are unable to resolve the problem after checking "Troubleshooting," additional help can be provided by the customer. Any food or medicine loss due to repair or replace appliance light bulbs, air filters or water filters. Expenses for travel and transportation for...


