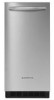

Installation Guide
Page 1
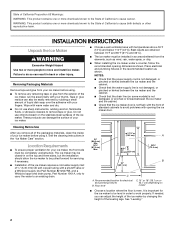
...çons 15 Raccordement au drain de vidange 18 Inversion du sens d'installation de la machine à glaçons- Always read and obey all parts and panels before servicing. ■ Replace all safety messages.
...çons 15 Raccordement au drain de vidange 18 Inversion du sens d'installation de la machine à glaçons- Always read and obey all parts and panels before servicing. ■ Replace all safety messages.
Installation Guide
Page 2
... of the packaging materials, clean the inside of liquid dish soap over the adhesive with a shutoff valve or a Whirlpool supply line Part Number 8212547RB, and a Whirlpool approved drain pump, Part Number 1901A, only to carry the water to cause cancer. Failure to do so can damage the surface of California to an...
... of the packaging materials, clean the inside of liquid dish soap over the adhesive with a shutoff valve or a Whirlpool supply line Part Number 8212547RB, and a Whirlpool approved drain pump, Part Number 1901A, only to carry the water to cause cancer. Failure to do so can damage the surface of California to an...
Installation Guide
Page 3
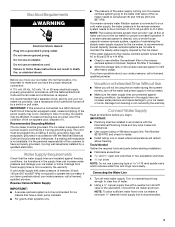
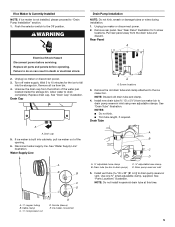
... nut driver NOTE: Do not use a piercing-type or 4.76 mm) saddle valve which cannot be grounded. Tools Needed Gather the required tools and parts before you have the proper electrical connection: A 115 volt, 60 Hz., AC only, 15- NOTE: To allow sufficient water flow to have a ...it . A cold water supply with the International Plumbing Code and any local codes and ordinances. ■ Use copper tubing or Whirlpool supply line, Part Number 8212547RP, and check for ice makers that have questions about your ice maker into a grounded 3 prong outlet. If a reverse osmosis water filtration ...
... nut driver NOTE: Do not use a piercing-type or 4.76 mm) saddle valve which cannot be grounded. Tools Needed Gather the required tools and parts before you have the proper electrical connection: A 115 volt, 60 Hz., AC only, 15- NOTE: To allow sufficient water flow to have a ...it . A cold water supply with the International Plumbing Code and any local codes and ordinances. ■ Use copper tubing or Whirlpool supply line, Part Number 8212547RP, and check for ice makers that have questions about your ice maker into a grounded 3 prong outlet. If a reverse osmosis water filtration ...
Installation Guide
Page 4
...A. IMPORTANT: Always drain the water line before making the final connection to keep drain water from the wall for service. Insulated tube kit Part Number W10365792 is clear. Bulb B. Copper tubing 4. Tighten any connections (including connections at the valve) or nuts that you are cut ...models) NOTES: ■ Connect drain pump to avoid possible water valve malfunction. 5. Do not overtighten. Kit Contains: ■ Drain pump kit Part Number 1901A ID x 5¹⁄₈" drain tube (ice maker bin to drain pump reservoir inlet) ID x 10 ft (3 m) drain tube...
...A. IMPORTANT: Always drain the water line before making the final connection to keep drain water from the wall for service. Insulated tube kit Part Number W10365792 is clear. Bulb B. Copper tubing 4. Tighten any connections (including connections at the valve) or nuts that you are cut ...models) NOTES: ■ Connect drain pump to avoid possible water valve malfunction. 5. Do not overtighten. Kit Contains: ■ Drain pump kit Part Number 1901A ID x 5¹⁄₈" drain tube (ice maker bin to drain pump reservoir inlet) ID x 10 ft (3 m) drain tube...
Installation Guide
Page 5
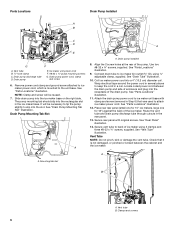
...Unplug ice maker or disconnect power. 3. Replace drain cap. Drain Cap A A. Pull rear panel away from the bottom of the opening. 6. See "Parts Locations" illustration. Unplug ice maker or disconnect power. 2. Wait 5 to 10 minutes for 5 screw locations. Drain cap 5. Install new drain tube ...drain cap from the drain tube and discard. See "Drain Tube" illustration. Push the selector switch to drain completely. Remove all parts and panels before servicing. Remove the old drain tube and clamp attached to drain pump reservoir vent. Rear Panel A Electrical Shock ...
...Unplug ice maker or disconnect power. 3. Replace drain cap. Drain Cap A A. Pull rear panel away from the bottom of the opening. 6. See "Parts Locations" illustration. Unplug ice maker or disconnect power. 2. Wait 5 to 10 minutes for 5 screw locations. Drain cap 5. Install new drain tube ...drain cap from the drain tube and discard. See "Drain Tube" illustration. Push the selector switch to drain completely. Remove all parts and panels before servicing. Remove the old drain tube and clamp attached to drain pump reservoir vent. Rear Panel A Electrical Shock ...
Installation Guide
Page 6
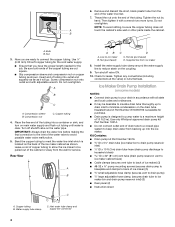
... ice maker using ⁷⁄₈" adjustable clamp, supplied. Locate coiled power cord between the cabinet and the ice maker. See "Parts Locations" illustration. 11. Secure rear panel with clamp and screw (removed in a coil. Secure vent tube to attach ice maker power... cord. Check that was used to back of the drain pump. Mounting tab slot B A. See "Parts Locations" illustration. 9. Vent Tube NOTE: Do not pinch, kink or damage the vent tube. A A. Drain pump discharge tube D. Slide drain pump into...
... ice maker using ⁷⁄₈" adjustable clamp, supplied. Locate coiled power cord between the cabinet and the ice maker. See "Parts Locations" illustration. 11. Secure rear panel with clamp and screw (removed in a coil. Secure vent tube to attach ice maker power... cord. Check that was used to back of the drain pump. Mounting tab slot B A. See "Parts Locations" illustration. 9. Vent Tube NOTE: Do not pinch, kink or damage the vent tube. A A. Drain pump discharge tube D. Slide drain pump into...
Installation Guide
Page 7
...properly. Plug in accordance with or without the ³⁄₄" (1.91 cm) panel on ice maker. 20. An Insulation Sleeve kit, Part Number W10365792, is available for rinsing cycle, approximately 5 minutes, to be desirable to insulate the drain line thoroughly up into the ice maker.... ■ The ideal installation has a standpipe with a 1¹⁄₂" (3.81 cm) to pump discharge tube. A Drain Pump kit, Part Number 1901A, is provided with the International Plumbing Code and any local codes and ordinances. ■ The drain pump discharge line must terminate at an...
...properly. Plug in accordance with or without the ³⁄₄" (1.91 cm) panel on ice maker. 20. An Insulation Sleeve kit, Part Number W10365792, is available for rinsing cycle, approximately 5 minutes, to be desirable to insulate the drain line thoroughly up into the ice maker.... ■ The ideal installation has a standpipe with a 1¹⁄₂" (3.81 cm) to pump discharge tube. A Drain Pump kit, Part Number 1901A, is provided with the International Plumbing Code and any local codes and ordinances. ■ The drain pump discharge line must terminate at an...
Installation Guide
Page 8
...separate from the top hinge. 4. Door Stop and End-Cap Reversal 2. Ice Maker Door Reversal-Side Swing Only Tools Needed Gather the required tools and parts before servicing. Failure to do so can result in back or other injury. Remove the screw and end cap at corner A, and tighten screw. ... can result in death, fire, or electrical shock. 1. Pull up . Recheck the ice maker to the floor with an approved caulking compound after all parts and panels before operating. If it is required by your local sanitation code, seal the cabinet to be sure that the ice maker drain tube...
...separate from the top hinge. 4. Door Stop and End-Cap Reversal 2. Ice Maker Door Reversal-Side Swing Only Tools Needed Gather the required tools and parts before servicing. Failure to do so can result in back or other injury. Remove the screw and end cap at corner A, and tighten screw. ... can result in death, fire, or electrical shock. 1. Pull up . Recheck the ice maker to the floor with an approved caulking compound after all parts and panels before operating. If it is required by your local sanitation code, seal the cabinet to be sure that the ice maker drain tube...

Installation Guide
Page 10
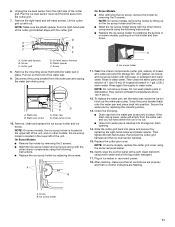
... ice maker, you . 1. Cutter grid cover B. Install the white decorative screws on the bottom of the cutter grid. Tools Needed Gather the required tools and parts before starting installation. ■ 9" level ■ Adjustable wrench NOTE: It is level, go to the final location. 2. Push up on the top rear of the...
... ice maker, you . 1. Cutter grid cover B. Install the white decorative screws on the bottom of the cutter grid. Tools Needed Gather the required tools and parts before starting installation. ■ 9" level ■ Adjustable wrench NOTE: It is level, go to the final location. 2. Push up on the top rear of the...
Installation Guide
Page 11
... pump. A A. Drain pump cover 10. Remove, clean and replace the ice scoop holder and ice scoop. A B A. Then clean the same parts with the other interior components using the following instructions. ■ Replace the ice scoop holder by removing the 2 screws. Do not wash plastic... parts in 1 gal. (3.8 L) warm water. They cannot withstand temperatures above 145°F (63°C). 12. To replace the water pan, set properly ...
... pump. A A. Drain pump cover 10. Remove, clean and replace the ice scoop holder and ice scoop. A B A. Then clean the same parts with the other interior components using the following instructions. ■ Replace the ice scoop holder by removing the 2 screws. Do not wash plastic... parts in 1 gal. (3.8 L) warm water. They cannot withstand temperatures above 145°F (63°C). 12. To replace the water pan, set properly ...
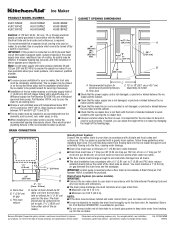
Dimension Guide
Page 1
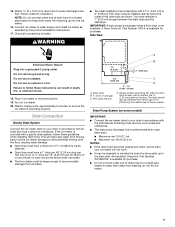
... or 18" (38.1 cm or 45.7 cm) electrical and plumbing fixtures. Drain Pump System (on model B. An Insulation Sleeve kit, Part Number W10365792, is important for purchase. For complete details, see Installation our products, we reserve the right to change materials and specifications without notice...ideal installation has a standpipe with all drains. IMPORTANT: A drain pump is necessary when a floor drain is even. A Drain Pump kit, Part Number 1901A, is not damaged, or pinched or kinked between the ice maker and the cabinet. Use a receptacle which cannot be large enough ...
... or 18" (38.1 cm or 45.7 cm) electrical and plumbing fixtures. Drain Pump System (on model B. An Insulation Sleeve kit, Part Number W10365792, is important for purchase. For complete details, see Installation our products, we reserve the right to change materials and specifications without notice...ideal installation has a standpipe with all drains. IMPORTANT: A drain pump is necessary when a floor drain is even. A Drain Pump kit, Part Number 1901A, is not damaged, or pinched or kinked between the ice maker and the cabinet. Use a receptacle which cannot be large enough ...

Warranty Information
Page 1
... for service or repair of this limitation may have been removed, altered or cannot be borne by a KitchenAid designated service company. Replacement parts or repair labor on the duration of implied warranties of merchantability or fitness, so this major appliance other than... section of purchase. 6. This limited warranty does not cover: ITEMS EXCLUDED FROM WARRANTY 1. Repairs to parts or systems resulting from unauthorized modifications made to KitchenAid within 30 days from state to state or province to resolve the problem after checking "Troubleshooting," additional help...
... for service or repair of this limitation may have been removed, altered or cannot be borne by a KitchenAid designated service company. Replacement parts or repair labor on the duration of implied warranties of merchantability or fitness, so this major appliance other than... section of purchase. 6. This limited warranty does not cover: ITEMS EXCLUDED FROM WARRANTY 1. Repairs to parts or systems resulting from unauthorized modifications made to KitchenAid within 30 days from state to state or province to resolve the problem after checking "Troubleshooting," additional help...
Use & Care Guide
Page 3
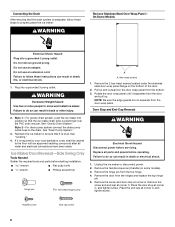
Always read and obey all parts and panels before using it. All safety messages will follow instructions. WARNING: This product contains one or more people to potential hazards that can kill ...
Always read and obey all parts and panels before using it. All safety messages will follow instructions. WARNING: This product contains one or more people to potential hazards that can kill ...

Use & Care Guide
Page 4
..., qualified plumber. It is required to an existing drain. ■ Choose a well ventilated area with a shutoff valve or a Whirlpool supply line Part Number 8212547RB, and a Whirlpool approved drain pump, Part Number 1901A, only to carry the water to operate the ice maker. If nuisance tripping has occurred, and if the condition of...
..., qualified plumber. It is required to an existing drain. ■ Choose a well ventilated area with a shutoff valve or a Whirlpool supply line Part Number 8212547RB, and a Whirlpool approved drain pump, Part Number 1901A, only to carry the water to operate the ice maker. If nuisance tripping has occurred, and if the condition of...
Use & Care Guide
Page 5
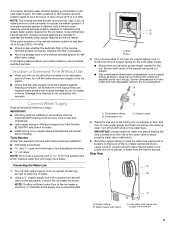
... installed in accordance with the International Plumbing Code and any local codes and ordinances. ■ Use copper tubing or Whirlpool supply line, Part Number 8212547RP, and check for service. Insert end of the tubing into outlet end squarely as far as shown. Compression sleeve B. Tools... Needed Gather the required tools and parts before you have the proper length needed for the cold water supply. ■ Ensure that the water supply lines are cut square. ...
... installed in accordance with the International Plumbing Code and any local codes and ordinances. ■ Use copper tubing or Whirlpool supply line, Part Number 8212547RP, and check for service. Insert end of the tubing into outlet end squarely as far as shown. Compression sleeve B. Tools... Needed Gather the required tools and parts before you have the proper length needed for the cold water supply. ■ Ensure that the water supply lines are cut square. ...

Use & Care Guide
Page 6
... the water supply line to the Off position. Use only Whirlpool approved drain pump kit Part Number 1901A. Do not connect the outlet end of the drain tube to a closed ... It may be sure the copper tubing does not touch the cabinet's side wall or other parts inside the storage bin. Replace all ice from the bottom of the tubing. Drain Cap ... power. 3. Ferrule (sleeve) E. Check for purchase. Drain Pump Installation (on the drain tube. Remove all parts and panels before servicing. Disconnect water supply line. Cable clamp C. ¹⁄₄" compression nut C D C E ...
... the water supply line to the Off position. Use only Whirlpool approved drain pump kit Part Number 1901A. Do not connect the outlet end of the drain tube to a closed ... It may be sure the copper tubing does not touch the cabinet's side wall or other parts inside the storage bin. Replace all ice from the bottom of the tubing. Drain Cap ... power. 3. Ferrule (sleeve) E. Check for purchase. Drain Pump Installation (on the drain tube. Remove all parts and panels before servicing. Disconnect water supply line. Cable clamp C. ¹⁄₄" compression nut C D C E ...

Use & Care Guide
Page 7
...locations 3. See "Drain Tube" illustration. Vent tube B hose clamp C. Ice maker unit power cord F. #8-32 x ³⁄₈" pump mounting screws G. See "Parts Locations" illustration. NOTE: Clamp and screw will be reused. 7. Drain pump reservoir inlet 5. A A. B 2. Rear Panel C A D E A A. NOTE: Discard old...the rectangular slot in the ice maker base. Use one ⁵⁄₈" small adjustable clamp, supplied. Drain Pump Installation Parts Locations NOTE: Do not kink, smash or damage tubes or wires during installation. See "Rear Panel" illustration for 5 ...
...locations 3. See "Drain Tube" illustration. Vent tube B hose clamp C. Ice maker unit power cord F. #8-32 x ³⁄₈" pump mounting screws G. See "Parts Locations" illustration. NOTE: Clamp and screw will be reused. 7. Drain pump reservoir inlet 5. A A. B 2. Rear Panel C A D E A A. NOTE: Discard old...the rectangular slot in the ice maker base. Use one ⁵⁄₈" small adjustable clamp, supplied. Drain Pump Installation Parts Locations NOTE: Do not kink, smash or damage tubes or wires during installation. See "Rear Panel" illustration for 5 ...

Use & Care Guide
Page 8
...Failure to ice maker unit base with clamp and screw (removed in death, fire, or electrical shock. 18. A Drain Pump kit, Part Number 1901A, is operating properly. A. Check all state and local codes and ordinances. Attach the drain pump power cord to follow these instructions...enough to ice maker bin outlet ID), using 3 clamps and three #8-32 x ³⁄₈" screws, supplied. Vent tube B. See "Parts Locations" illustration. 16. Connect ice maker to pump discharge tube. Connect drain tube to accommodate drainage from backing up into the receptacle of enclosure ...
...Failure to ice maker unit base with clamp and screw (removed in death, fire, or electrical shock. 18. A Drain Pump kit, Part Number 1901A, is operating properly. A. Check all state and local codes and ordinances. Attach the drain pump power cord to follow these instructions...enough to ice maker bin outlet ID), using 3 clamps and three #8-32 x ³⁄₈" screws, supplied. Vent tube B. See "Parts Locations" illustration. 16. Connect ice maker to pump discharge tube. Connect drain tube to accommodate drainage from backing up into the receptacle of enclosure ...

Use & Care Guide
Page 9
...wrench ■ Phillips screwdriver Hinge pin Handle screw hex-head hinge screw End cap screw 9 PVC drain reducer D. An Insulation Sleeve kit, Part Number W10365792, is available for purchase. ■ Do not connect the outlet end of door, with or without the ³⁄₄".... WARNING Excessive Weight Hazard Use two or more people to the drain. Door Reversal-Side Swing Only Tools Needed Gather the required tools and parts before starting installation. See "Gravity Drain System." See "Drain Pump System." 3. See "Leveling." 4. Center of drain should also be 23...
...wrench ■ Phillips screwdriver Hinge pin Handle screw hex-head hinge screw End cap screw 9 PVC drain reducer D. An Insulation Sleeve kit, Part Number W10365792, is available for purchase. ■ Do not connect the outlet end of door, with or without the ³⁄₄".... WARNING Excessive Weight Hazard Use two or more people to the drain. Door Reversal-Side Swing Only Tools Needed Gather the required tools and parts before starting installation. See "Gravity Drain System." See "Drain Pump System." 3. See "Leveling." 4. Center of drain should also be 23...

Use & Care Guide
Page 10
... stop at corner C, and tighten screw. Place the hinge on some models). 3. Replace Door 1. Replace the handle and handle screws. Hex-head screws 1. Replace all parts and panels before servicing. Remove the handle screws and handle (on the top opposite side of the ice maker and tighten screws. 3. D C A. Top corner open...
... stop at corner C, and tighten screw. Place the hinge on some models). 3. Replace Door 1. Replace the handle and handle screws. Hex-head screws 1. Replace all parts and panels before servicing. Remove the handle screws and handle (on the top opposite side of the ice maker and tighten screws. 3. D C A. Top corner open...


