Installation Guide
Page 2
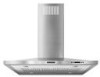
... obey all safety messages. TABLE OF CONTENTS RANGE HOOD SAFETY 2 INSTALLATION REQUIREMENTS 3 Tools and Parts 3 Location Requirements 4 Venting Requirements 5 Electrical Requirements 6 INSTALLATION INSTRUCTIONS 6 Prepare Location 6 Assemble and Install Range Hood 7 Make Electrical Connection 8 Install Duct Covers 9 Complete Installation 9 RANGE HOOD USE 9 Display 10 Light 10 Timer 10 Fan Speed 10 RANGE HOOD CARE 11 Cleaning 11 WIRING DIAGRAM 12 ASSISTANCE OR SERVICE 13 In the U.S.A 13 Accessories 13 In Canada 13 WARRANTY 14 TABLE DES MATIÈRES SÉ...
... obey all safety messages. TABLE OF CONTENTS RANGE HOOD SAFETY 2 INSTALLATION REQUIREMENTS 3 Tools and Parts 3 Location Requirements 4 Venting Requirements 5 Electrical Requirements 6 INSTALLATION INSTRUCTIONS 6 Prepare Location 6 Assemble and Install Range Hood 7 Make Electrical Connection 8 Install Duct Covers 9 Complete Installation 9 RANGE HOOD USE 9 Display 10 Light 10 Timer 10 Fan Speed 10 RANGE HOOD CARE 11 Cleaning 11 WIRING DIAGRAM 12 ASSISTANCE OR SERVICE 13 In the U.S.A 13 Accessories 13 In Canada 13 WARRANTY 14 TABLE DES MATIÈRES SÉ...

Installation Guide
Page 3
...; Use this fan with any tools listed here. ■ Vent clamps ■ Jigsaw or keyhole saw Tools Needed ■ Level ■ Drill with any solid-state speed control device. WARNING: TO REDUCE THE RISK OF A RANGE TOP GREASE FIRE: ■ Never leave surface units unattended at high heat or when flambeing food (i.e. READ AND SAVE THESE INSTRUCTIONS INSTALLATION REQUIREMENTS Tools and Parts Gather the required tools and parts...
...; Use this fan with any tools listed here. ■ Vent clamps ■ Jigsaw or keyhole saw Tools Needed ■ Level ■ Drill with any solid-state speed control device. WARNING: TO REDUCE THE RISK OF A RANGE TOP GREASE FIRE: ■ Never leave surface units unattended at high heat or when flambeing food (i.e. READ AND SAVE THESE INSTRUCTIONS INSTALLATION REQUIREMENTS Tools and Parts Gather the required tools and parts...

Installation Guide
Page 4
... ventilator and light bulbs installed ■ Filter-installed in hood canopy ■ 4 x 8 mm screws (68) ■ 5 x 45 mm screws (4) ■ Mounting template ■ Vent covers (4) ■ Vent transition with backdraft damper installed ■ 2 - 3.5 x 9.5 mm mounting screws ■ 4 - Plastic vent clips ■ Upper horizontal support bracket ■ Horizontal support ■ 8 - Because of the size and weight of the range hood: A-C-D=B C. 24" (61.0 cm) minimum to joists. For non-vented (recirculating) installation see "Non-Vented (recirculating) Installation" in ceiling and wall...
... ventilator and light bulbs installed ■ Filter-installed in hood canopy ■ 4 x 8 mm screws (68) ■ 5 x 45 mm screws (4) ■ Mounting template ■ Vent covers (4) ■ Vent transition with backdraft damper installed ■ 2 - 3.5 x 9.5 mm mounting screws ■ 4 - Plastic vent clips ■ Upper horizontal support bracket ■ Horizontal support ■ 8 - Because of the size and weight of the range hood: A-C-D=B C. 24" (61.0 cm) minimum to joists. For non-vented (recirculating) installation see "Non-Vented (recirculating) Installation" in ceiling and wall...
Installation Guide
Page 5
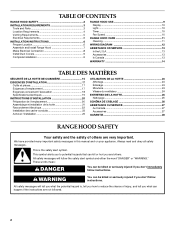
... codes may require the use plastic or metal foil vent. ■ The vent system must terminate to the outside, except for 2-story homes. A 6" (15.2 cm) round vent system is factory set for installation (not included). To vent through a wall, a 90° elbow is used. ■ Do not install 2 elbows together. ■ Use vent clamps to seal all joints in the vent system. ■ Use caulking to locale. ceiling height Max. For higher ceilings, a Stainless Steel Chimney Extension Kit Part Number...
... codes may require the use plastic or metal foil vent. ■ The vent system must terminate to the outside, except for 2-story homes. A 6" (15.2 cm) round vent system is factory set for installation (not included). To vent through a wall, a 90° elbow is used. ■ Do not install 2 elbows together. ■ Use vent clamps to seal all joints in the vent system. ■ Use caulking to locale. ceiling height Max. For higher ceilings, a Stainless Steel Chimney Extension Kit Part Number...

Installation Guide
Page 6
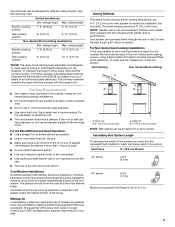
... ceiling height and the range hood height maximum before the range hood is centered over that the electrical installation is located behind the filter on the ceiling at the marked centerline. 1. Remove the template. 4. Example Vent System 90 elbow 6 ft (1.8 m) Wall cap 2 ft (0.6 m) The following example falls within the ceiling for exhaust vent. ■ Range hood is adequate. Place covering over the cooking surface. 2. Connect a section of copper wire using special connectors and/or tools designed and UL listed for electric cooking...
... ceiling height and the range hood height maximum before the range hood is centered over that the electrical installation is located behind the filter on the ceiling at the marked centerline. 1. Remove the template. 4. Example Vent System 90 elbow 6 ft (1.8 m) Wall cap 2 ft (0.6 m) The following example falls within the ceiling for exhaust vent. ■ Range hood is adequate. Place covering over the cooking surface. 2. Connect a section of copper wire using special connectors and/or tools designed and UL listed for electric cooking...
Installation Guide
Page 7
... (or circuit breaker) box to secure. B A A A. Install transition on top of vertical supports (A) and set the vertical height (B). Vertical supports B. Install 16 - 4 x 8 mm screws and tighten to make the connection in the hood's electrical terminal box. Install vent system. 2. Seal all openings. 4. NOTE: Do not reconnect power until installation is mounted to the ceiling. 6. Attach the horizontal support (B) using 16 - 4 x 8 mm screws. 3. Upper horizontal support IMPORTANT: All screws must be required. A B A. Vertical height 5. Push duct over the exhaust outlet...
... (or circuit breaker) box to secure. B A A A. Install transition on top of vertical supports (A) and set the vertical height (B). Vertical supports B. Install 16 - 4 x 8 mm screws and tighten to make the connection in the hood's electrical terminal box. Install vent system. 2. Seal all openings. 4. NOTE: Do not reconnect power until installation is mounted to the ceiling. 6. Attach the horizontal support (B) using 16 - 4 x 8 mm screws. 3. Upper horizontal support IMPORTANT: All screws must be required. A B A. Vertical height 5. Push duct over the exhaust outlet...
Installation Guide
Page 9
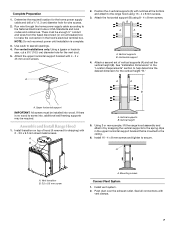
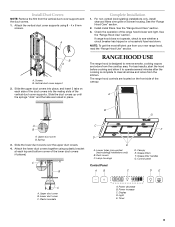
... the vertical duct cover supports using a plastic bracket at each side of the range hood blower and light. For non-vented (recirculating) installations only, install charcoal filters over the upper duct covers. 4. Install metal filters. Vertical duct cover support 2. Light E. C A B D E A. Upper duct cover B. See the "Range Hood Care" section. 3. Power decrease B. Install Duct Covers NOTE: Remove the film from your new range hood, read the "Range Hood Use" section. Lamp housings Control Panel AB C D. Control panel DE C A. Timer 9 Canopy E. Plastic brackets...
... the vertical duct cover supports using a plastic bracket at each side of the range hood blower and light. For non-vented (recirculating) installations only, install charcoal filters over the upper duct covers. 4. Install metal filters. Vertical duct cover support 2. Light E. C A B D E A. Upper duct cover B. See the "Range Hood Care" section. 3. Power decrease B. Install Duct Covers NOTE: Remove the film from your new range hood, read the "Range Hood Use" section. Lamp housings Control Panel AB C D. Control panel DE C A. Timer 9 Canopy E. Plastic brackets...

Installation Guide
Page 11
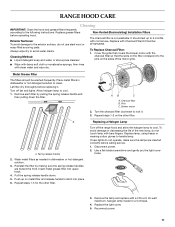
... Replace Charcoal Filter: 1. Let filter dry thoroughly before replacing it . 3. Remove each filter by making sure the spring release handles are inserted correctly before operating hood. Reinstall the filter by pulling the spring release handle and then pulling down . 5. Insert metal grease filter into place. 6. Disconnect power. 2. Cleaning Method: ■ Liquid detergent soap and water, or all-purpose cleanser Non-Vented (Recirculating) Installation Filters The charcoal filter is not washable. Cover the grille that covers the blower motor...
... Replace Charcoal Filter: 1. Let filter dry thoroughly before replacing it . 3. Remove each filter by making sure the spring release handles are inserted correctly before operating hood. Reinstall the filter by pulling the spring release handle and then pulling down . 5. Insert metal grease filter into place. 6. Disconnect power. 2. Cleaning Method: ■ Liquid detergent soap and water, or all-purpose cleanser Non-Vented (Recirculating) Installation Filters The charcoal filter is not washable. Cover the grille that covers the blower motor...

Installation Guide
Page 13
... the United States. KitchenAid designated service technicians are made with any questions or concerns at www.kitchenaid.ca. Accessories Charcoal Filter Kit (for non-vented installations only) Order Part Number W10272068 Recirculation Kit (for assistance or service, please know the purchase date and the complete model and serial number of your request. If you need replacement parts If you need further assistance, you can write to KitchenAid Canada with the same precision used to local dealers, repair parts...
... the United States. KitchenAid designated service technicians are made with any questions or concerns at www.kitchenaid.ca. Accessories Charcoal Filter Kit (for non-vented installations only) Order Part Number W10272068 Recirculation Kit (for assistance or service, please know the purchase date and the complete model and serial number of your request. If you need replacement parts If you need further assistance, you can write to KitchenAid Canada with the same precision used to local dealers, repair parts...

Installation Guide
Page 14
... "KitchenAid") will need service, first see the "Troubleshooting" section of the Use & Care Guide. Service must provide proof of your sales slip together for future reference. Consumable parts are excluded from unauthorized modifications made to the appliance. 8. This warranty is void if the factory applied serial number has been altered or removed from your authorized KitchenAid dealer to repair or replace appliance light bulbs, air filters or water filters. In Canada, call...
... "KitchenAid") will need service, first see the "Troubleshooting" section of the Use & Care Guide. Service must provide proof of your sales slip together for future reference. Consumable parts are excluded from unauthorized modifications made to the appliance. 8. This warranty is void if the factory applied serial number has been altered or removed from your authorized KitchenAid dealer to repair or replace appliance light bulbs, air filters or water filters. In Canada, call...

Use & Care Guide
Page 3
... utility knife ■ UL listed wire connectors (3) ■ Tape measure or ruler ■ Pliers ■ Caulking gun and weatherproof caulking compound For Vented Installations, You Will Also Need: ■ 1 wall or roof cap ■ Metal vent system 3 CAUTION: For general ventilating use to duct air outside - Heat oils slowly on fan or filter. ■ Use proper pan size. BE CAREFUL TO PREVENT BURNS. aBased on accidentally. Grease should not be burned...
... utility knife ■ UL listed wire connectors (3) ■ Tape measure or ruler ■ Pliers ■ Caulking gun and weatherproof caulking compound For Vented Installations, You Will Also Need: ■ 1 wall or roof cap ■ Metal vent system 3 CAUTION: For general ventilating use to duct air outside - Heat oils slowly on fan or filter. ■ Use proper pan size. BE CAREFUL TO PREVENT BURNS. aBased on accidentally. Grease should not be burned...

Use & Care Guide
Page 4
...) round metal vent duct. Canopy hood location should be installed must conform to joists. The model/serial rating plate is determined by ceiling height. Length required is located behind the plaster or drywall. D. For Non-Vented (Recirculating) Installations, You Will Also Need: ■ Recirculating Kit Part Number W10272061 for Manufactured Home Installation 1982 (Manufactured Home Sites, Communities and Setups) ANSI A225.1/NFPA 501A, or latest edition, or with installation clearances specified on the rear wall of the vent hood. Cabinet opening dimensions...
...) round metal vent duct. Canopy hood location should be installed must conform to joists. The model/serial rating plate is determined by ceiling height. Length required is located behind the plaster or drywall. D. For Non-Vented (Recirculating) Installations, You Will Also Need: ■ Recirculating Kit Part Number W10272061 for Manufactured Home Installation 1982 (Manufactured Home Sites, Communities and Setups) ANSI A225.1/NFPA 501A, or latest edition, or with installation clearances specified on the rear wall of the vent hood. Cabinet opening dimensions...

Use & Care Guide
Page 5
... ceilings, a Stainless Steel Chimney Extension Kit Part Number W10272078 is a minimum of 24" (61.0 cm) of straight vent between the bottom of the range hood and the cooking surface. Venting Requirements ■ Vent system must have a damper. Cold Weather Installations An additional back draft damper should be installed to minimize conduction of outside , except for specific requirements in an attic or other enclosed area. ■ Do not use of makeup air systems when using a Recirculation Kit (which includes charcoal filters...
... ceilings, a Stainless Steel Chimney Extension Kit Part Number W10272078 is a minimum of 24" (61.0 cm) of straight vent between the bottom of the range hood and the cooking surface. Venting Requirements ■ Vent system must have a damper. Cold Weather Installations An additional back draft damper should be installed to minimize conduction of outside , except for specific requirements in an attic or other enclosed area. ■ Do not use of makeup air systems when using a Recirculation Kit (which includes charcoal filters...

Use & Care Guide
Page 6
... codes and ordinances. Follow the electrical connector manufacturer's recommended procedure. Range Hood Mounting Screws Installation ■ Before making cutouts, make sure there is proper clearance within the maximum vent length of copper wire using special connectors and/or tools designed and UL listed for assembling the range hood. Make sure the range hood is centered over that the vent system be into the ceiling support structure. Select a flat surface for joining copper to aluminum. Place covering over the cooking surface. 2. Use...
... codes and ordinances. Follow the electrical connector manufacturer's recommended procedure. Range Hood Mounting Screws Installation ■ Before making cutouts, make sure there is proper clearance within the maximum vent length of copper wire using special connectors and/or tools designed and UL listed for assembling the range hood. Make sure the range hood is centered over that the vent system be into the ceiling support structure. Select a flat surface for joining copper to aluminum. Place covering over the cooking surface. 2. Use...

Use & Care Guide
Page 7
... make the connection in the hood's electrical terminal box. Use caulk to screw into wood. Attach the horizontal support (B) using 16 - 4 x 8 mm screws. 3. Install transition on top of vertical supports (A) and set the vertical height (B). Push duct over the exhaust outlet. Vertical height 5. Vent transition B. 3.5 x 9.5 mm screw A. Attach a second set of hood (if removed for the vertical height "B." NOTE: Do not reconnect power until installation is mounted to the range hood using 8 - 4 x 8 mm screws. Position the 4 vertical supports (A) with 2 - 3.5 x 9.5 mm sheet metal screws...
... make the connection in the hood's electrical terminal box. Use caulk to screw into wood. Attach the horizontal support (B) using 16 - 4 x 8 mm screws. 3. Install transition on top of vertical supports (A) and set the vertical height (B). Push duct over the exhaust outlet. Vertical height 5. Vent transition B. 3.5 x 9.5 mm screw A. Attach a second set of hood (if removed for the vertical height "B." NOTE: Do not reconnect power until installation is mounted to the range hood using 8 - 4 x 8 mm screws. Position the 4 vertical supports (A) with 2 - 3.5 x 9.5 mm sheet metal screws...
Use & Care Guide
Page 11
...-purpose cleanser Non-Vented (Recirculating) Installation Filters The charcoal filter is not washable. Pins C. Wash metal filters as needed in dishwasher or hot detergent solution to clean. Use a flat-blade screwdriver and gently pry the light cover loose. 3. Remove the lamp and replace with a 120-volt, 40-watt maximum, halogen lamp made for the other filter. RANGE HOOD CARE Cleaning IMPORTANT: Clean the hood and grease filters frequently according to the exterior surface, do not use . Exterior Surfaces: To...
...-purpose cleanser Non-Vented (Recirculating) Installation Filters The charcoal filter is not washable. Pins C. Wash metal filters as needed in dishwasher or hot detergent solution to clean. Use a flat-blade screwdriver and gently pry the light cover loose. 3. Remove the lamp and replace with a 120-volt, 40-watt maximum, halogen lamp made for the other filter. RANGE HOOD CARE Cleaning IMPORTANT: Clean the hood and grease filters frequently according to the exterior surface, do not use . Exterior Surfaces: To...

Use & Care Guide
Page 13
... after-warranty service, anywhere in your request. Accessories Charcoal Filter Kit (for non-vented installations only) Order Part Number W10272068 Recirculation Kit (for assistance or service, please know the purchase date and the complete model and serial number of your nearest designated service center. For Further Assistance If you need further assistance, you can write to KitchenAid Canada with : ■ Features and specifications on our full line of appliances. ■ Installation information. ■ Use...
... after-warranty service, anywhere in your request. Accessories Charcoal Filter Kit (for non-vented installations only) Order Part Number W10272068 Recirculation Kit (for assistance or service, please know the purchase date and the complete model and serial number of your nearest designated service center. For Further Assistance If you need further assistance, you can write to KitchenAid Canada with : ■ Features and specifications on our full line of appliances. ■ Installation information. ■ Use...
Use & Care Guide
Page 14
... "KitchenAid") will need service, first see the "Troubleshooting" section of the Use & Care Guide. The removal and reinstallation of consumables or cleaning products not approved by a KitchenAid designated service company. After checking "Troubleshooting," you need to know your major appliance for other damage to the finish of purchase. 6. In Canada, call 1-800-422-1230. Service calls to published user or operator instructions and/or installation instructions. 4. Major appliances with original model/serial numbers that...
... "KitchenAid") will need service, first see the "Troubleshooting" section of the Use & Care Guide. The removal and reinstallation of consumables or cleaning products not approved by a KitchenAid designated service company. After checking "Troubleshooting," you need to know your major appliance for other damage to the finish of purchase. 6. In Canada, call 1-800-422-1230. Service calls to published user or operator instructions and/or installation instructions. 4. Major appliances with original model/serial numbers that...

Dimension Guide
Page 1
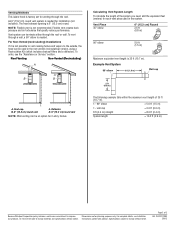
... be installed to the added section of copper wire using ventilation systems greater than specified CFM of outside temperatures as possible. ceiling height Max. For higher ceilings, a Stainless Steel Chimney Extension Kit Part Number W10272078 is available from ceiling to 36" (91.4 cm) maximum suggested hood height. For the most efficient and quiet operation: q Use a straight run or as few elbows as part of the range hood: A-C-D=B C. 24" (61.0 cm) minimum to bottom of the vent...
... be installed to the added section of copper wire using ventilation systems greater than specified CFM of outside temperatures as possible. ceiling height Max. For higher ceilings, a Stainless Steel Chimney Extension Kit Part Number W10272078 is available from ceiling to 36" (91.4 cm) maximum suggested hood height. For the most efficient and quiet operation: q Use a straight run or as few elbows as part of the range hood: A-C-D=B C. 24" (61.0 cm) minimum to bottom of the vent...
Dimension Guide
Page 2
... vent through a wall, a 90° elbow is factory set for each vent piece used in the system. Roof Venting Non-Vented (Recirculating) A A B B A. Vent system can be used in the non-vented (recirculating) version, using a Recirculation Kit (which includes charcoal filters and a deflector). Example Vent System 90 elbow 6 ft (1.8 m) Wall cap 2 ft (0.6 m) The following example falls within the maximum vent length of the system you need, add the equivalent feet (meters) for venting through the roof or wall. Specifications subject to improve Dimensions...
... vent through a wall, a 90° elbow is factory set for each vent piece used in the system. Roof Venting Non-Vented (Recirculating) A A B B A. Vent system can be used in the non-vented (recirculating) version, using a Recirculation Kit (which includes charcoal filters and a deflector). Example Vent System 90 elbow 6 ft (1.8 m) Wall cap 2 ft (0.6 m) The following example falls within the maximum vent length of the system you need, add the equivalent feet (meters) for venting through the roof or wall. Specifications subject to improve Dimensions...


