
Installation Guide
Page 2
...Parts 4 Location Requirements 4 Venting Requirements 5 Electrical Requirements 7 INSTALLATION INSTRUCTIONS 7 Prepare Location 7 Install Range Hood 9 Electrical Connection 11 Connect the Vent System 11 RANGE HOOD USE 12 Controls 12 Display 12 RANGE HOOD CARE 13 Cleaning 13 Replacing the Halogen Bulb 13 WIRING DIAGRAM 14 ASSISTANCE OR SERVICE 15 In...29 SCHÉMAS DE CÂBLAGE 30 ASSISTANCE OU SERVICE 31 Au Canada 31 Accessoires 31 GARANTIE 32 RANGE HOOD SAFETY Your safety and the safety of injury, and tell you what the potential hazard is the safety alert symbol.
...Parts 4 Location Requirements 4 Venting Requirements 5 Electrical Requirements 7 INSTALLATION INSTRUCTIONS 7 Prepare Location 7 Install Range Hood 9 Electrical Connection 11 Connect the Vent System 11 RANGE HOOD USE 12 Controls 12 Display 12 RANGE HOOD CARE 13 Cleaning 13 Replacing the Halogen Bulb 13 WIRING DIAGRAM 14 ASSISTANCE OR SERVICE 15 In...29 SCHÉMAS DE CÂBLAGE 30 ASSISTANCE OU SERVICE 31 Au Canada 31 Accessoires 31 GARANTIE 32 RANGE HOOD SAFETY Your safety and the safety of injury, and tell you what the potential hazard is the safety alert symbol.

Installation Guide
Page 3
... to duct air outside - BE CAREFUL TO PREVENT BURNS. You can fight the fire with a close fitting lid, cookie sheet, or metal tray, then turn hood ON when cooking at high settings. The fire is being switched on accidentally. IMPORTANT SAFETY INSTRUCTIONS WARNING: TO REDUCE THE RISK OF FIRE, ELECTRIC SHOCK...
... to duct air outside - BE CAREFUL TO PREVENT BURNS. You can fight the fire with a close fitting lid, cookie sheet, or metal tray, then turn hood ON when cooking at high settings. The fire is being switched on accidentally. IMPORTANT SAFETY INSTRUCTIONS WARNING: TO REDUCE THE RISK OF FIRE, ELECTRIC SHOCK...

Installation Guide
Page 4
...Setups) ANSI A225.1/NFPA 501A*, or latest edition, or with any cutouts. Have a qualified technician install the range hood. Cabinet opening dimensions that all governing codes and ordinances. For non-vented (recirculating) installations see "NonVented (recirculating)...all parts are shown must conform to order. See "Electrical Requirements" section. Read and follow the instructions provided with local codes. Range hood location should be used. Given dimensions provide minimum clearance. All openings in the "Prepare Location" section. See the "Prepare Location" ...
...Setups) ANSI A225.1/NFPA 501A*, or latest edition, or with any cutouts. Have a qualified technician install the range hood. Cabinet opening dimensions that all governing codes and ordinances. For non-vented (recirculating) installations see "NonVented (recirculating)...all parts are shown must conform to order. See "Electrical Requirements" section. Read and follow the instructions provided with local codes. Range hood location should be used. Given dimensions provide minimum clearance. All openings in the "Prepare Location" section. See the "Prepare Location" ...

Installation Guide
Page 5
... 36" (91.4 cm) - 36" (91.4 cm) model 11 28.1 cm) 1³⁄₄" (2.4 cm - 4.4 cm) trim extension 6⁷⁄₈" (17.5 cm) with the range hood. ■ Use clamps to seal exterior wall or roof opening width 24" (61 cm) min. 32" (81 cm) suggested max. If the roof or wall...
... 36" (91.4 cm) - 36" (91.4 cm) model 11 28.1 cm) 1³⁄₄" (2.4 cm - 4.4 cm) trim extension 6⁷⁄₈" (17.5 cm) with the range hood. ■ Use clamps to seal exterior wall or roof opening width 24" (61 cm) min. 32" (81 cm) suggested max. If the roof or wall...

Installation Guide
Page 6
...45° elbow 2.5 ft (0.8 m) A. Top of the thermal break. The damper should be on the cold air side of cabinet D. Vent cover C. Range hood F. Venting Methods This range hood is available from locale to where the vent system enters the heated portion of makeup air systems when using a charcoal filter. A A B B C D F ...the Soffit/Cabinet If it is not possible to vent cooking fumes and vapors to minimize conduction of outside , the range hood can be used in the system. Wall cap Calculate Vent System Length The recommended vent system is not included. To ...
...45° elbow 2.5 ft (0.8 m) A. Top of the thermal break. The damper should be on the cold air side of cabinet D. Vent cover C. Range hood F. Venting Methods This range hood is available from locale to where the vent system enters the heated portion of makeup air systems when using a charcoal filter. A A B B C D F ...the Soffit/Cabinet If it is not possible to vent cooking fumes and vapors to minimize conduction of outside , the range hood can be used in the system. Wall cap Calculate Vent System Length The recommended vent system is not included. To ...

Installation Guide
Page 7
...follow the procedure below: 1. WARNING 3" (7.6 cm) 3" (7.6 cm) Excessive Weight Hazard Use two or more people, lift range hood onto covered surface. Follow the electrical connector manufacturer's recommended procedure. INSTALLATION INSTRUCTIONS Prepare Location ■ It is recommended that the electrical ...(1.9 cm) holes as shown. Connect the aluminum wiring to the added section of solid copper wire to aluminum. Range Hood Cabinet Cutout 1. Disconnect power. 2. The model/serial plate is adequate. Measure and mark lines as specified on the underside...
...follow the procedure below: 1. WARNING 3" (7.6 cm) 3" (7.6 cm) Excessive Weight Hazard Use two or more people, lift range hood onto covered surface. Follow the electrical connector manufacturer's recommended procedure. INSTALLATION INSTRUCTIONS Prepare Location ■ It is recommended that the electrical ...(1.9 cm) holes as shown. Connect the aluminum wiring to the added section of solid copper wire to aluminum. Range Hood Cabinet Cutout 1. Disconnect power. 2. The model/serial plate is adequate. Measure and mark lines as specified on the underside...

Installation Guide
Page 8
If the cabinet bottom is recessed above a support frame, wood filler strips need to be installed on the soffit above the range hood area. Go to provide sides of clearance for the sliding screen. Complete cabinet preparation following the instructions for the vent. Centerline C. 6¼" (15.9 cm) round... inside through the top of the cabinet and the roof for your type of the vent opening for the vent. Wood filler strips 5. The range hood can be flush with or recessed 1.6 mm) to ¹⁄₈" (3.2 mm) from the top of the cabinet or wood filler strips, if used. A ...
If the cabinet bottom is recessed above a support frame, wood filler strips need to be installed on the soffit above the range hood area. Go to provide sides of clearance for the sliding screen. Complete cabinet preparation following the instructions for the vent. Centerline C. 6¼" (15.9 cm) round... inside through the top of the cabinet and the roof for your type of the vent opening for the vent. Wood filler strips 5. The range hood can be flush with or recessed 1.6 mm) to ¹⁄₈" (3.2 mm) from the top of the cabinet or wood filler strips, if used. A ...

Installation Guide
Page 9
...vent system according to 1¹⁄₂" (3.8 cm) for thinner cabinets) by turning T10 TORX® screw on each side of the range hood.) 2. If the thickness is less than ¹⁄₂" (12.7 mm) B. The mounting bracket adjusts from ³⁄₄" (1.9... bracket B. Optional wood filler strip for instructions on top of the hood. Slide-out range hood 9 A 10. Damper B. Center the range hood. Optional wood filler strip C. Use caulking to move and install range hood. Range hood screen NOTE: For some non-vented (recirculating) installations it may be...
...vent system according to 1¹⁄₂" (3.8 cm) for thinner cabinets) by turning T10 TORX® screw on each side of the range hood.) 2. If the thickness is less than ¹⁄₂" (12.7 mm) B. The mounting bracket adjusts from ³⁄₄" (1.9... bracket B. Optional wood filler strip for instructions on top of the hood. Slide-out range hood 9 A 10. Damper B. Center the range hood. Optional wood filler strip C. Use caulking to move and install range hood. Range hood screen NOTE: For some non-vented (recirculating) installations it may be...

Installation Guide
Page 10
... the grease filter by pulling the spring release handle and then pulling down the filter. Repeat this procedure on either side the hood top and check the levelness of the hood front to the cabinet bottom. Tighten the mounting screws, making sure the mounting screws are over the mounting screws. Install 2 ...- 5 x 18 mm adjusting screws. Then push the bracket toward the rear of the hood so that the large end of the range hood to back. 10. Drill 2 3 mm) pilot holes and install 2 - 4.5 x 16 mm wood screws to position the bracket slot...
... the grease filter by pulling the spring release handle and then pulling down the filter. Repeat this procedure on either side the hood top and check the levelness of the hood front to the cabinet bottom. Tighten the mounting screws, making sure the mounting screws are over the mounting screws. Install 2 ...- 5 x 18 mm adjusting screws. Then push the bracket toward the rear of the hood so that the large end of the range hood to back. 10. Drill 2 3 mm) pilot holes and install 2 - 4.5 x 16 mm wood screws to position the bracket slot...

Installation Guide
Page 11
...Disconnect power. 2. B A C D EF A. UL listed or CSA approved strain relief B. Connect the Vent System Vented Installations 1. See the "Range Hood Care" section. 4. Black wires E. Terminal box D. Connect ground wire to yellow/green wire F. Use UL listed wire connectors and connect the green (...house power supply cable through the strain relief into the terminal box. 5. Connect the vent system to the range hood vent opening . Electrical Connection WARNING WARNING Electrical Shock Hazard Disconnect power before operating. Reconnect power. 5. Connect the vent system to ...
...Disconnect power. 2. B A C D EF A. UL listed or CSA approved strain relief B. Connect the Vent System Vented Installations 1. See the "Range Hood Care" section. 4. Black wires E. Terminal box D. Connect ground wire to yellow/green wire F. Use UL listed wire connectors and connect the green (...house power supply cable through the strain relief into the terminal box. 5. Connect the vent system to the range hood vent opening . Electrical Connection WARNING WARNING Electrical Shock Hazard Disconnect power before operating. Reconnect power. 5. Connect the vent system to ...

Installation Guide
Page 12
... 5 minutes, the fan automatically switches to High. 2. To turn the lights Off, press LIGHT a third time or close the screen. See the "Range Hood Care" section. ■ To reset the charcoal filter saturation alarm, press and hold the "+" and "-"buttons at the same time for 5 minutes. "C" will... automatically turn the lights On, press LIGHT once. "F" will appear in the display for 3 seconds. NOTE: The lights will the operate the hood fan for 3 seconds. This function will shut off when the screen is active. The fan will come on in use (recirculating mode), press and...
... 5 minutes, the fan automatically switches to High. 2. To turn the lights Off, press LIGHT a third time or close the screen. See the "Range Hood Care" section. ■ To reset the charcoal filter saturation alarm, press and hold the "+" and "-"buttons at the same time for 5 minutes. "C" will... automatically turn the lights On, press LIGHT once. "F" will appear in the display for 3 seconds. NOTE: The lights will the operate the hood fan for 3 seconds. This function will shut off when the screen is active. The fan will come on in use (recirculating mode), press and...

Installation Guide
Page 13
... the spring release handle is cool before calling service. 1. Check that the halogen bulbs are inserted correctly before cleaning the range hood. Remove the brackets and remove the charcoal filter. 4. Install the cleaned or replacement filter. For Non-Vented (recirculating) Installations ...at a maximum temperature of use abrasive cleansers or steel-wool pads To Install Charcoal Filter 1. Let filter dry thoroughly before operating range hood. A A. Metal brackets B. Metal grease filter 3. Reinstall the filter assembly into the upper track. 4. Turn fan and lights off...
... the spring release handle is cool before calling service. 1. Check that the halogen bulbs are inserted correctly before cleaning the range hood. Remove the brackets and remove the charcoal filter. 4. Install the cleaned or replacement filter. For Non-Vented (recirculating) Installations ...at a maximum temperature of use abrasive cleansers or steel-wool pads To Install Charcoal Filter 1. Let filter dry thoroughly before operating range hood. A A. Metal brackets B. Metal grease filter 3. Reinstall the filter assembly into the upper track. 4. Turn fan and lights off...

Dimension Guide
Page 1
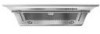
... three 90° elbows. If the roof or wall cap has a damper, do not use a 4" (10.2 cm) laundry-type wall cap. Range hood B. Instructions packed with the range hood. q Use metal vent only. A rigid metal vent is recommended. 3 ft (0.93 m) Maximum Length 1 - 90° elbow 1 - q Make ...all joints in the non-vented (recirculating) version, using a charcoal filter. 30" (76.2 cm) and 36" (91.4 cm) Slide-Out Range Hood PRODUCT MODEL NUMBERS KXU2830YSS KXU2836YSS Electrical: 120 volt, 60 Hz, AC only, 15-amp electrical supply. q The vent system must terminate to the outside...
... three 90° elbows. If the roof or wall cap has a damper, do not use a 4" (10.2 cm) laundry-type wall cap. Range hood B. Instructions packed with the range hood. q Use metal vent only. A rigid metal vent is recommended. 3 ft (0.93 m) Maximum Length 1 - 90° elbow 1 - q Make ...all joints in the non-vented (recirculating) version, using a charcoal filter. 30" (76.2 cm) and 36" (91.4 cm) Slide-Out Range Hood PRODUCT MODEL NUMBERS KXU2830YSS KXU2836YSS Electrical: 120 volt, 60 Hz, AC only, 15-amp electrical supply. q The vent system must terminate to the outside...

Dimension Guide
Page 2
.... For complete details, see "Non-Vented (recirculating) Installation Through the Soffit/Cabinet" in ceiling and wall where range hood will be installed must conform to improve Dimensions are shown must be used. Specifications subject to change without notice. It is...;₈" (17.5 cm) with product. W10342488A 3/15/12 Given dimensions provide minimum clearance. See "Electrical Requirements" section. The range hood is available from strong draft areas, such as windows, doors, and strong heating vents. Instructions packed with screen extended CABINET DIMENSIONS 15"...
.... For complete details, see "Non-Vented (recirculating) Installation Through the Soffit/Cabinet" in ceiling and wall where range hood will be installed must conform to improve Dimensions are shown must be used. Specifications subject to change without notice. It is...;₈" (17.5 cm) with product. W10342488A 3/15/12 Given dimensions provide minimum clearance. See "Electrical Requirements" section. The range hood is available from strong draft areas, such as windows, doors, and strong heating vents. Instructions packed with screen extended CABINET DIMENSIONS 15"...


