
Installation Guide
Page 3
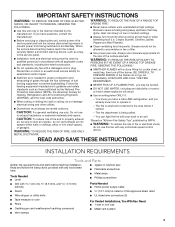
.... Always use to prevent power from being called. - BE CAREFUL TO PREVENT BURNS. If the flames do not vent exhaust air into spaces within walls or ceilings, attics or into wall or ceiling; Read and follow the instructions provided with your back to an authorized service facility for the size of fire or electrical shock, do not damage electrical wiring and other utilities. ■ Ducted fans must be...
.... Always use to prevent power from being called. - BE CAREFUL TO PREVENT BURNS. If the flames do not vent exhaust air into spaces within walls or ceilings, attics or into wall or ceiling; Read and follow the instructions provided with your back to an authorized service facility for the size of fire or electrical shock, do not damage electrical wiring and other utilities. ■ Ducted fans must be...

Installation Guide
Page 4
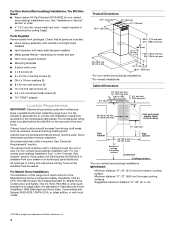
... standard is required. round metal vent duct - Have a qualified technician install the range hood. Given dimensions provide minimum clearance. Grounded electrical outlet is not applicable, the standard for venting through the roof or wall. See "Electrical Requirements" section. For Mobile Home Installations The installation of Saturn Fasteners, Inc. 4 Canopy hood location should be used. Check that are included. ■ Hood canopy assembly with ventilator and light bulbs installed ■ Vent transition with local codes. The model/serial rating plate is a registered...
... standard is required. round metal vent duct - Have a qualified technician install the range hood. Given dimensions provide minimum clearance. Grounded electrical outlet is not applicable, the standard for venting through the roof or wall. See "Electrical Requirements" section. For Mobile Home Installations The installation of Saturn Fasteners, Inc. 4 Canopy hood location should be used. Check that are included. ■ Hood canopy assembly with ventilator and light bulbs installed ■ Vent transition with local codes. The model/serial rating plate is a registered...

Installation Guide
Page 5
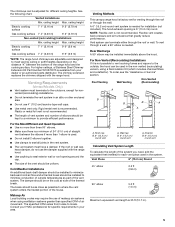
... above the hood. ceiling height Electric cooking surface 7' 1" (2.16 m) 9' 2" (2.79 m) Gas cooking surface 7' 4" (2.23 m) 9' 2" (2.79 m) Non-vented (recirculating) Installations Min. The chimney extension replaces the chimney shipped with the range hood. ■ Use caulking to provide efficient performance. The specified CFM varies from your dealer or an authorized parts distributor. NOTE: Flexible vent is 6" (15.2 cm) round. To order, see the "Assistance or Service" section. Wall cap B. 6" (15.2 cm) round vent A. Venting Requirements (Vented Models Only) ■...
... above the hood. ceiling height Electric cooking surface 7' 1" (2.16 m) 9' 2" (2.79 m) Gas cooking surface 7' 4" (2.23 m) 9' 2" (2.79 m) Non-vented (recirculating) Installations Min. The chimney extension replaces the chimney shipped with the range hood. ■ Use caulking to provide efficient performance. The specified CFM varies from your dealer or an authorized parts distributor. NOTE: Flexible vent is 6" (15.2 cm) round. To order, see the "Assistance or Service" section. Wall cap B. 6" (15.2 cm) round vent A. Venting Requirements (Vented Models Only) ■...

Installation Guide
Page 6
... 1 Batterymarch Park Quincy, MA 02169-7471 CSA International 8501 East Pleasant Valley Road Cleveland, OH 44131-5575 ■ A 120 volt, 60 Hz., AC only, 15-amp, fused electrical circuit is installed. Range Hood Mounting Screws Installation ■ Before making cutouts, make sure there is proper clearance within the maximum recommended vent length of copper wire using special connectors and/or tools designed and UL listed for assembling the range hood. Mounting height reference (hood bottom line) 6
... 1 Batterymarch Park Quincy, MA 02169-7471 CSA International 8501 East Pleasant Valley Road Cleveland, OH 44131-5575 ■ A 120 volt, 60 Hz., AC only, 15-amp, fused electrical circuit is installed. Range Hood Mounting Screws Installation ■ Before making cutouts, make sure there is proper clearance within the maximum recommended vent length of copper wire using special connectors and/or tools designed and UL listed for assembling the range hood. Mounting height reference (hood bottom line) 6

Installation Guide
Page 7
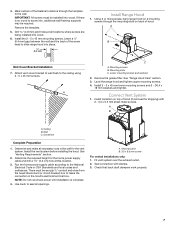
... cuts in the hood's electrical terminal box. Centerline Complete Preparation 1. Run the home power supply cable according to the ceiling using 2 - 5 x 45 mm screws. Use caulk to make all openings. See "Range Hood Care" section. 3. There must be required. Using 2 or more people, hang range hood on 2 mounting screws through the template to screw into wood. 6. Lower mounting screws and washers 2. Level the range hood and tighten upper mounting screws. 4. Seal connection with 2 - 3.5 x 9.5 mm sheet metal screws. Check that back draft dampers work...
... cuts in the hood's electrical terminal box. Centerline Complete Preparation 1. Run the home power supply cable according to the ceiling using 2 - 5 x 45 mm screws. Use caulk to make all openings. See "Range Hood Care" section. 3. There must be required. Using 2 or more people, hang range hood on 2 mounting screws through the template to screw into wood. 6. Lower mounting screws and washers 2. Level the range hood and tighten upper mounting screws. 4. Seal connection with 2 - 3.5 x 9.5 mm sheet metal screws. Check that back draft dampers work...
Installation Guide
Page 10
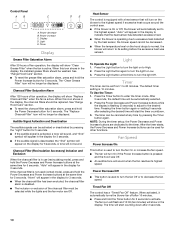
... blower speed cannot be set to Low. 3. Timer The timer can be displayed. NOTE: During the timer setup, the Power Decrease and Power Increase buttons are Off. The "Clean Grease Filter" icon will show "Clean Grease Filter" when the fan is pressed and the hood was sensed. See "Range Hood Care" section. ■ To reset the charcoal filter saturation alarm, press and hold the Power Decrease button for 5 seconds to turn the light Off. The "Replace Charcoal Filter...
... blower speed cannot be set to Low. 3. Timer The timer can be displayed. NOTE: During the timer setup, the Power Decrease and Power Increase buttons are Off. The "Clean Grease Filter" icon will show "Clean Grease Filter" when the fan is pressed and the hood was sensed. See "Range Hood Care" section. ■ To reset the charcoal filter saturation alarm, press and hold the Power Decrease button for 5 seconds to turn the light Off. The "Replace Charcoal Filter...

Installation Guide
Page 11
... not use . Replace the light cover. 5. To Replace Charcoal Filter: 1. Let filter dry thoroughly before operating hood. Remove each filter by making sure the spring release handles are inserted correctly before calling service. 1. Repeat steps 1-5 for a G-9 base. 4. Replace grease filters before replacing it . 3. Cleaning Method: ■ Liquid detergent soap and water, or all-purpose cleanser Non-Vented (Recirculating) Installation Filters The charcoal filter is not washable. Place metal filters in dishwasher or hot detergent solution. 3. Pins C. Turn the charcoal filter...
... not use . Replace the light cover. 5. To Replace Charcoal Filter: 1. Let filter dry thoroughly before operating hood. Remove each filter by making sure the spring release handles are inserted correctly before calling service. 1. Repeat steps 1-5 for a G-9 base. 4. Replace grease filters before replacing it . 3. Cleaning Method: ■ Liquid detergent soap and water, or all-purpose cleanser Non-Vented (Recirculating) Installation Filters The charcoal filter is not washable. Place metal filters in dishwasher or hot detergent solution. 3. Pins C. Turn the charcoal filter...

Installation Guide
Page 13
... service companies. KitchenAid Canada designated service technicians are made with : ■ Features and specifications on our full line of your correspondence. Factory specified parts will help us or your request. In the U.S.A. Accessories Charcoal Filter Kit (for non-vented installations only) Order Part Number W10272068 Recirculation Kit (for assistance or service, please know the purchase date and the complete model and serial number of appliances. ■ Use and maintenance procedures. ■ Accessory and repair parts...
... service companies. KitchenAid Canada designated service technicians are made with : ■ Features and specifications on our full line of your correspondence. Factory specified parts will help us or your request. In the U.S.A. Accessories Charcoal Filter Kit (for non-vented installations only) Order Part Number W10272068 Recirculation Kit (for assistance or service, please know the purchase date and the complete model and serial number of appliances. ■ Use and maintenance procedures. ■ Accessory and repair parts...
Installation Guide
Page 14
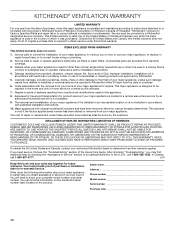
... installation, installation not in a remote area where service by KitchenAid. 5. KITCHENAID® VENTILATION WARRANTY LIMITED WARRANTY For one year from the date of purchase, when this major appliance is operated and maintained according to instructions attached to or furnished with the product, KitchenAid brand of Whirlpool Corporation or Whirlpool Canada LP (hereafter "KitchenAid") will need to know your complete model number and serial number. Costs associated with electrical or plumbing codes, or use...
... installation, installation not in a remote area where service by KitchenAid. 5. KITCHENAID® VENTILATION WARRANTY LIMITED WARRANTY For one year from the date of purchase, when this major appliance is operated and maintained according to instructions attached to or furnished with the product, KitchenAid brand of Whirlpool Corporation or Whirlpool Canada LP (hereafter "KitchenAid") will need to know your complete model number and serial number. Costs associated with electrical or plumbing codes, or use...
Dimension Guide
Page 1
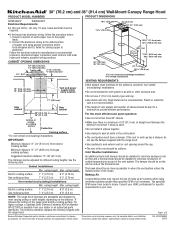
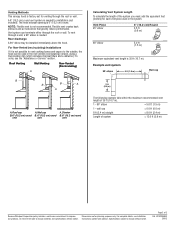
.... Rigid metal vent is not recommended. ceiling height Electric cooking surface Gas cooking surface 7' 1" (2.16 m) 7' 4" (2.23 m) 9' 6" (2.9 m) 9' 6" (2.9 m) q The length of vent system and number of make up air systems when using special connectors and/or tools designed and UL listed for joining copper to improve Dimensions are adjustable and designed to change materials and specifications without notice. If the roof or wall cap has a damper, do not use of elbows should be adjusted for specific requirements in an attic...
.... Rigid metal vent is not recommended. ceiling height Electric cooking surface Gas cooking surface 7' 1" (2.16 m) 7' 4" (2.23 m) 9' 6" (2.9 m) 9' 6" (2.9 m) q The length of vent system and number of make up air systems when using special connectors and/or tools designed and UL listed for joining copper to improve Dimensions are adjustable and designed to change materials and specifications without notice. If the roof or wall cap has a damper, do not use of elbows should be adjusted for specific requirements in an attic...
Dimension Guide
Page 2
...to change materials and specifications without notice. Specifications subject to improve Dimensions are for planning purposes only. Rear discharge A 90° elbow may be used in the non-vented (recirculating) version, using a Recirculation Kit (which includes charcoal filters and a deflector). wall cap = 0.0 ft (0.0 m) 8 ft (2.4 m) straight = 8.0 ft (2.4 m) Length of 35 ft (10.7 m). 1 - 90° elbow = 5.0 ft (1.5 m) 1 - To vent through a wall, a 90° elbow is needed for installation (not included). Roof Venting Wall Venting Non-Vented (Recirculating...
...to change materials and specifications without notice. Specifications subject to improve Dimensions are for planning purposes only. Rear discharge A 90° elbow may be used in the non-vented (recirculating) version, using a Recirculation Kit (which includes charcoal filters and a deflector). wall cap = 0.0 ft (0.0 m) 8 ft (2.4 m) straight = 8.0 ft (2.4 m) Length of 35 ft (10.7 m). 1 - 90° elbow = 5.0 ft (1.5 m) 1 - To vent through a wall, a 90° elbow is needed for installation (not included). Roof Venting Wall Venting Non-Vented (Recirculating...

Warranty Information
Page 1
... published installation instructions. 10. IMPLIED WARRANTIES, INCLUDING WARRANTIES OF MERCHANTABILITY OR FITNESS FOR A PARTICULAR PURPOSE, ARE LIMITED TO ONE YEAR OR THE SHORTEST PERIOD ALLOWED BY LAW. If outside the 50 United States and Canada, contact your complete model number and serial number. If you may find this limited warranty. After checking "Troubleshooting," you need to know your authorized KitchenAid dealer to repair or replace appliance light bulbs, air filters or water filters. In...
... published installation instructions. 10. IMPLIED WARRANTIES, INCLUDING WARRANTIES OF MERCHANTABILITY OR FITNESS FOR A PARTICULAR PURPOSE, ARE LIMITED TO ONE YEAR OR THE SHORTEST PERIOD ALLOWED BY LAW. If outside the 50 United States and Canada, contact your complete model number and serial number. If you may find this limited warranty. After checking "Troubleshooting," you need to know your authorized KitchenAid dealer to repair or replace appliance light bulbs, air filters or water filters. In...
Use & Care Guide
Page 3
...; Clean ventilating fans frequently. you may ignite. aBased on fan or filter. ■ Use proper pan size. Boilovers cause smoking and greasy spillovers that may be vented outdoors. If the flames do not vent exhaust air into spaces within walls or ceilings, attics or into wall or ceiling; If you have a class ABC extinguisher, and you have questions, contact the manufacturer. ■ Before servicing or cleaning the unit, switch power...
...; Clean ventilating fans frequently. you may ignite. aBased on fan or filter. ■ Use proper pan size. Boilovers cause smoking and greasy spillovers that may be vented outdoors. If the flames do not vent exhaust air into spaces within walls or ceilings, attics or into wall or ceiling; If you have a class ABC extinguisher, and you have questions, contact the manufacturer. ■ Before servicing or cleaning the unit, switch power...
Use & Care Guide
Page 4
....0 cm) max. Parts Supplied Remove parts from gas cooking surfaces. See "Electrical Requirements" section. Minimum distance "X": 27" (68.6 cm) from packages. Grounded electrical outlet is determined by ceiling height. The canopy hood is a registered trademarks of canopy to order. ■ 6" (15.2 cm) dia. Recirculation Kit Part Number W10344022 is located behind the left filter on the model/serial rating plate. Vent and power supply cable entry location 17" (43.2 cm)* Side cabinet Side cabinet 30" (76.2 cm...
....0 cm) max. Parts Supplied Remove parts from gas cooking surfaces. See "Electrical Requirements" section. Minimum distance "X": 27" (68.6 cm) from packages. Grounded electrical outlet is determined by ceiling height. The canopy hood is a registered trademarks of canopy to order. ■ 6" (15.2 cm) dia. Recirculation Kit Part Number W10344022 is located behind the left filter on the model/serial rating plate. Vent and power supply cable entry location 17" (43.2 cm)* Side cabinet Side cabinet 30" (76.2 cm...
Use & Care Guide
Page 5
....2 cm) round vent A. Vent Piece 6" (15.2 cm) Round 45° elbow 2.5 ft (0.8 m) 90° elbow 5.0 ft (1.5 m) Maximum equivalent vent length is recommended. ceiling height Electric cooking surface 7' 1" (2.16 m) 9' 6" (2.9 m) Gas cooking surface 7' 4" (2.23 m) 9' 6" (2.9 m) *NOTE: The range hood chimneys are adjustable and designed to provide efficient performance. Wall cap B. 6" (15.2 cm) round vent A. For higher ceilings, a Stainless Steel Chimney Extension Kit Part Number W10272075 is not recommended. ■ The length of vent system and number of air movement...
....2 cm) round vent A. Vent Piece 6" (15.2 cm) Round 45° elbow 2.5 ft (0.8 m) 90° elbow 5.0 ft (1.5 m) Maximum equivalent vent length is recommended. ceiling height Electric cooking surface 7' 1" (2.16 m) 9' 6" (2.9 m) Gas cooking surface 7' 4" (2.23 m) 9' 6" (2.9 m) *NOTE: The range hood chimneys are adjustable and designed to provide efficient performance. Wall cap B. 6" (15.2 cm) round vent A. For higher ceilings, a Stainless Steel Chimney Extension Kit Part Number W10272075 is not recommended. ■ The length of vent system and number of air movement...

Use & Care Guide
Page 6
... the wall where the canopy hood will be installed before you select your ceiling height and the hood height maximum before hood is installed. If codes permit and a separate ground wire is used, it is proper clearance within the maximum recommended vent length of template with hood bottom line and with the rating of copper wire using special connectors and/or tools designed and UL listed for exhaust vent. ■ Check your hood. 1. Centerline B. Range Hood Mounting Screws Installation ■ Before making cutouts, make sure...
... the wall where the canopy hood will be installed before you select your ceiling height and the hood height maximum before hood is installed. If codes permit and a separate ground wire is used, it is proper clearance within the maximum recommended vent length of template with hood bottom line and with the rating of copper wire using special connectors and/or tools designed and UL listed for exhaust vent. ■ Check your hood. 1. Centerline B. Range Hood Mounting Screws Installation ■ Before making cutouts, make sure...
Use & Care Guide
Page 7
...from the fused disconnect (or circuit breaker) box to the wall. Install the 2 - 5 x 45 mm mounting screws. See "Range Hood Care" section. 3. Connect Vent System 1. There must be required. Using 2 or more people, hang range hood on 2 mounting screws through the template to make all necessary cuts in the hood's electrical terminal box. Use caulk to screw into, additional wall framing supports may be installed into place. ¹⁄₄" (6.4 mm) Install Range Hood 1. Seal connection with 2 - 3.5 x 9.5 mm sheet metal screws. Level the range hood and tighten...
...from the fused disconnect (or circuit breaker) box to the wall. Install the 2 - 5 x 45 mm mounting screws. See "Range Hood Care" section. 3. Connect Vent System 1. There must be required. Using 2 or more people, hang range hood on 2 mounting screws through the template to make all necessary cuts in the hood's electrical terminal box. Use caulk to screw into, additional wall framing supports may be installed into place. ¹⁄₄" (6.4 mm) Install Range Hood 1. Seal connection with 2 - 3.5 x 9.5 mm sheet metal screws. Level the range hood and tighten...

Use & Care Guide
Page 11
.... Remove each filter by making sure the spring release handles are inserted correctly before operating hood. A A. Spring release handle 2. Wash metal filters as needed in dishwasher or hot detergent solution to cool. 1. Remove the lamp and replace with bare fingers. Replace grease filters before calling service. 1. Pins C. Blower motor 2. Pull the spring release handle down the filter. Replacing a Halogen Lamp Turn off fan and lights. Reconnect power. 11 Insert metal grease filter into place. 6. Disconnect power. 2. To Replace Charcoal Filter: 1. Cover the...
.... Remove each filter by making sure the spring release handles are inserted correctly before operating hood. A A. Spring release handle 2. Wash metal filters as needed in dishwasher or hot detergent solution to cool. 1. Remove the lamp and replace with bare fingers. Replace grease filters before calling service. 1. Pins C. Blower motor 2. Pull the spring release handle down the filter. Replacing a Halogen Lamp Turn off fan and lights. Reconnect power. 11 Insert metal grease filter into place. 6. Disconnect power. 2. To Replace Charcoal Filter: 1. Cover the...
Use & Care Guide
Page 13
... write to KitchenAid with : ■ Features and specifications on our full line of appliances. ■ Use and maintenance procedures. ■ Accessory and repair parts sales. ■ Referrals to order replacement parts, we recommend that you can also look in Canada. Accessories Charcoal Filter Kit (for non-vented installations only) Order Part Number W10272068 Recirculation Kit (for assistance or service, please know the purchase date and the complete model and serial number of appliances...
... write to KitchenAid with : ■ Features and specifications on our full line of appliances. ■ Use and maintenance procedures. ■ Accessory and repair parts sales. ■ Referrals to order replacement parts, we recommend that you can also look in Canada. Accessories Charcoal Filter Kit (for non-vented installations only) Order Part Number W10272068 Recirculation Kit (for assistance or service, please know the purchase date and the complete model and serial number of appliances...

Use & Care Guide
Page 14
... complete model number and serial number. If you on the product. Service calls to correct the installation of your major appliance, to instruct you need to know your major appliance if it . This major appliance is designed to be borne by the customer. The cost of repair or replacement under this limited warranty. Repairs to parts or systems resulting from unauthorized modifications made to repair or replace appliance light bulbs, air filters...
... complete model number and serial number. If you on the product. Service calls to correct the installation of your major appliance, to instruct you need to know your major appliance if it . This major appliance is designed to be borne by the customer. The cost of repair or replacement under this limited warranty. Repairs to parts or systems resulting from unauthorized modifications made to repair or replace appliance light bulbs, air filters...


