
Use & Care Guide
Page 1
...MOUNT CANOPY RANGE HOOD Installation Instructions and Use & Care Guide For questions about features, operation/performance, parts, accessories or service, call: 1-800-422-1230 or visit our website at www.kitchenaid.com In Canada, for assistance, installation and service, call: 1-800-807-6777 or visit our website... d'entretien Au Canada, pour assistance, installation ou service composez le 1-800-807-6777 ou visitez notre site web à www.kitchenaid.ca Table of Contents/Table des matières 2 IMPORTANT: READ AND SAVE THESE INSTRUCTIONS. POUR UTILISATION RÉSIDENTIELLE UNIQUEMENT.
...MOUNT CANOPY RANGE HOOD Installation Instructions and Use & Care Guide For questions about features, operation/performance, parts, accessories or service, call: 1-800-422-1230 or visit our website at www.kitchenaid.com In Canada, for assistance, installation and service, call: 1-800-807-6777 or visit our website... d'entretien Au Canada, pour assistance, installation ou service composez le 1-800-807-6777 ou visitez notre site web à www.kitchenaid.ca Table of Contents/Table des matières 2 IMPORTANT: READ AND SAVE THESE INSTRUCTIONS. POUR UTILISATION RÉSIDENTIELLE UNIQUEMENT.

Use & Care Guide
Page 2
... "WARNING." We have provided many important safety messages in this manual and on your appliance. TABLE OF CONTENTS RANGE HOOD SAFETY 2 INSTALLATION REQUIREMENTS 3 Tools and Parts 3 Location Requirements 4 Venting Requirements 5 Electrical Requirements 6 INSTALLATION INSTRUCTIONS 7 Prepare Location 7 Install Range Hood 8 Install Range Hood Internal Blower Motor 8 Install Range Hood In-Line (External...
... "WARNING." We have provided many important safety messages in this manual and on your appliance. TABLE OF CONTENTS RANGE HOOD SAFETY 2 INSTALLATION REQUIREMENTS 3 Tools and Parts 3 Location Requirements 4 Venting Requirements 5 Electrical Requirements 6 INSTALLATION INSTRUCTIONS 7 Prepare Location 7 Install Range Hood 8 Install Range Hood Internal Blower Motor 8 Install Range Hood In-Line (External...

Use & Care Guide
Page 3
... or towels a violent steam explosion will result. ■ Use an extinguisher ONLY if: - READ AND SAVE THESE INSTRUCTIONS INSTALLATION REQUIREMENTS Tools and Parts Gather the required tools and parts before starting installation. Follow the heating equipment manufacturer's guideline and safety standards such as a tag, to an exit. Do not use cookware appropriate...
... or towels a violent steam explosion will result. ■ Use an extinguisher ONLY if: - READ AND SAVE THESE INSTRUCTIONS INSTALLATION REQUIREMENTS Tools and Parts Gather the required tools and parts before starting installation. Follow the heating equipment manufacturer's guideline and safety standards such as a tag, to an exit. Do not use cookware appropriate...

Use & Care Guide
Page 4
... and wall where canopy range hood will be used. All openings in the "Accessories" section.) Parts supplied Remove parts from strong draft areas, such as windows, doors and strong heating vents. Parts needed ■ Home power supply cable ■ 1 - ½" (12.7 mm) UL...- D5.3 x 20 mm washers ■ 2 - 10 x 50 mm wall anchors ■ T-20 TORX®† adapter Location Requirements IMPORTANT: Observe all parts are shown must be installed must conform to comply with local codes. Bottom of hood C. Cabinet opening dimensions that all governing codes and ordinances. For...
... and wall where canopy range hood will be used. All openings in the "Accessories" section.) Parts supplied Remove parts from strong draft areas, such as windows, doors and strong heating vents. Parts needed ■ Home power supply cable ■ 1 - ½" (12.7 mm) UL...- D5.3 x 20 mm washers ■ 2 - 10 x 50 mm wall anchors ■ T-20 TORX®† adapter Location Requirements IMPORTANT: Observe all parts are shown must be installed must conform to comply with local codes. Bottom of hood C. Cabinet opening dimensions that all governing codes and ordinances. For...
Use & Care Guide
Page 5
....9 cm) cabinet opening width (If installed between the elbows if more than specified CFM of the thermal break. The break should be as close as part of makeup air systems when using ventilation systems greater than 1 elbow is needed for specific requirements in an attic or other enclosed area. ■ Do...
....9 cm) cabinet opening width (If installed between the elbows if more than specified CFM of the thermal break. The break should be as close as part of makeup air systems when using ventilation systems greater than 1 elbow is needed for specific requirements in an attic or other enclosed area. ■ Do...

Use & Care Guide
Page 6
...■ Wire sizes must conform with National Electrical Code, ANSI/NFPA 70 (latest edition), or CSA Standards C22.1-94, Canadian Electrical Code, Part 1 and C22.2 No. 0-M91 (latest edition) and all governing codes and ordinances. Wall cap Calculating Vent System Length To calculate the...is used in conformance with the rating of the National Electrical Code, ANSI/NFPA 70 (latest edition), or CSA Standards C22. 1-94, Canadian Electrical Code, Part 1 and C22.2 No. 0-M91 (latest edition) and all local codes and ordinances. Vent Piece Equivalent Length 45° elbow 2.5 ft (0.8 m) 90...
...■ Wire sizes must conform with National Electrical Code, ANSI/NFPA 70 (latest edition), or CSA Standards C22.1-94, Canadian Electrical Code, Part 1 and C22.2 No. 0-M91 (latest edition) and all governing codes and ordinances. Wall cap Calculating Vent System Length To calculate the...is used in conformance with the rating of the National Electrical Code, ANSI/NFPA 70 (latest edition), or CSA Standards C22. 1-94, Canadian Electrical Code, Part 1 and C22.2 No. 0-M91 (latest edition) and all local codes and ordinances. Vent Piece Equivalent Length 45° elbow 2.5 ft (0.8 m) 90...

Use & Care Guide
Page 7
... least 2 vertical studs. ■ If you are installing the optional backsplash, follow the instructions included with that product. ■ Before making cutouts, make all installation parts have been removed from the inside. C A. It must be installed. 2. Dimension "X" = range hood mounting height NOTE: The screws provided for top venting or be installed...
... least 2 vertical studs. ■ If you are installing the optional backsplash, follow the instructions included with that product. ■ Before making cutouts, make all installation parts have been removed from the inside. C A. It must be installed. 2. Dimension "X" = range hood mounting height NOTE: The screws provided for top venting or be installed...

Use & Care Guide
Page 8
... the lower mounting anchors and tighten. 4. Remove grease filters from the back of mounting holes for motor spring clip C. If holes are blower motor mounting parts in the panel and secure with the screws. Tighten the strain relief screws. Motor spring clip (dual motor assembly location) 8 NOTE: If your installation uses...
... the lower mounting anchors and tighten. 4. Remove grease filters from the back of mounting holes for motor spring clip C. If holes are blower motor mounting parts in the panel and secure with the screws. Tighten the strain relief screws. Motor spring clip (dual motor assembly location) 8 NOTE: If your installation uses...

Use & Care Guide
Page 12
... green (or yellow/green) ground wire to do so can result in death or electrical shock. 8. I . Red wires F. Tighten the strain relief screws. 5. Replace all parts and panels before servicing. With the range hood mounted (see "Complete Preparation" in the terminal box using UL listed wire connectors. 9. Use UL listed wire...
... green (or yellow/green) ground wire to do so can result in death or electrical shock. 8. I . Red wires F. Tighten the strain relief screws. 5. Replace all parts and panels before servicing. With the range hood mounted (see "Complete Preparation" in the terminal box using UL listed wire connectors. 9. Use UL listed wire...

Use & Care Guide
Page 13
... canopy back into terminal box 13 Connect green (or bare) ground wire from the home power supply using UL listed wire connectors. Check that all parts and panels before servicing. Reconnect power.
... canopy back into terminal box 13 Connect green (or bare) ground wire from the home power supply using UL listed wire connectors. Check that all parts and panels before servicing. Reconnect power.

Use & Care Guide
Page 17
... W10285449 for 48" (121.9 cm) model Backsplash Kit (with any questions or concerns at : Customer eXperience Centre KitchenAid Canada 200 - 6750 Century Ave. For further assistance If you need to order replacement parts, we recommend that you can write to fulfill the product warranty and provide after-warranty service, anywhere in the...
... W10285449 for 48" (121.9 cm) model Backsplash Kit (with any questions or concerns at : Customer eXperience Centre KitchenAid Canada 200 - 6750 Century Ave. For further assistance If you need to order replacement parts, we recommend that you can write to fulfill the product warranty and provide after-warranty service, anywhere in the...

Use & Care Guide
Page 18
... if you may find this book and your major appliance, to instruct you need to know your authorized KitchenAid dealer to the appliance. 8. Consumable parts are excluded from unauthorized modifications made to determine if another warranty applies. Major appliances with electrical or plumbing ...with the removal from your major appliance for Factory Specified Parts and repair labor to the finish of your major appliance, unless such damage results from the date of your home of purchase. 6. KITCHENAID® VENTILATION WARRANTY LIMITED WARRANTY For one year from ...
... if you may find this book and your major appliance, to instruct you need to know your authorized KitchenAid dealer to the appliance. 8. Consumable parts are excluded from unauthorized modifications made to determine if another warranty applies. Major appliances with electrical or plumbing ...with the removal from your major appliance for Factory Specified Parts and repair labor to the finish of your major appliance, unless such damage results from the date of your home of purchase. 6. KITCHENAID® VENTILATION WARRANTY LIMITED WARRANTY For one year from ...

Installation Guide
Page 1
...WALL-MOUNT CANOPY RANGE HOOD Installation Instructions and Use & Care Guide For questions about features, operation/performance, parts, accessories or service, call: 1-800-422-1230 or visit our website at www.kitchenaid.com In Canada, for assistance, installation and service, call: 1-800-807-6777 or visit our website at...utilisation et d'entretien Au Canada, pour assistance, installation ou service composez le 1-800-807-6777 ou visitez notre site web à www.kitchenaid.ca Table of Contents/Table des matières 2 IMPORTANT: READ AND SAVE THESE INSTRUCTIONS. FOR RESIDENTIAL USE ONLY.
...WALL-MOUNT CANOPY RANGE HOOD Installation Instructions and Use & Care Guide For questions about features, operation/performance, parts, accessories or service, call: 1-800-422-1230 or visit our website at www.kitchenaid.com In Canada, for assistance, installation and service, call: 1-800-807-6777 or visit our website at...utilisation et d'entretien Au Canada, pour assistance, installation ou service composez le 1-800-807-6777 ou visitez notre site web à www.kitchenaid.ca Table of Contents/Table des matières 2 IMPORTANT: READ AND SAVE THESE INSTRUCTIONS. FOR RESIDENTIAL USE ONLY.

Installation Guide
Page 2
...." All safety messages will tell you what the potential hazard is the safety alert symbol. TABLE OF CONTENTS RANGE HOOD SAFETY 2 INSTALLATION REQUIREMENTS 3 Tools and Parts 3 Location Requirements 4 Venting Requirements 5 Electrical Requirements 6 INSTALLATION INSTRUCTIONS 7 Prepare Location 7 Install Range Hood 8 Install Range Hood Internal Blower Motor 8 Install Range Hood In-Line (External...
...." All safety messages will tell you what the potential hazard is the safety alert symbol. TABLE OF CONTENTS RANGE HOOD SAFETY 2 INSTALLATION REQUIREMENTS 3 Tools and Parts 3 Location Requirements 4 Venting Requirements 5 Electrical Requirements 6 INSTALLATION INSTRUCTIONS 7 Prepare Location 7 Install Range Hood 8 Install Range Hood Internal Blower Motor 8 Install Range Hood In-Line (External...

Installation Guide
Page 3
...; Sufficient air is being switched on "Kitchen Fire Safety Tips" published by the manufacturer. READ AND SAVE THESE INSTRUCTIONS INSTALLATION REQUIREMENTS Tools and Parts Gather the required tools and parts before starting installation. If you have a class ABC extinguisher, and you have questions, contact the manufacturer. ■ Before servicing or cleaning the...
...; Sufficient air is being switched on "Kitchen Fire Safety Tips" published by the manufacturer. READ AND SAVE THESE INSTRUCTIONS INSTALLATION REQUIREMENTS Tools and Parts Gather the required tools and parts before starting installation. If you have a class ABC extinguisher, and you have questions, contact the manufacturer. ■ Before servicing or cleaning the...

Installation Guide
Page 4
...91.4 cm) models 3 metal grease filters for venting through the roof or through the wall. All openings in the "Accessories" section.) Parts supplied Remove parts from strong draft areas, such as windows, doors and strong heating vents. Range hood †®TORX is factory set for 48" ... 20 mm washers ■ 2 - 10 x 50 mm wall anchors ■ T-20 TORX®† adapter Location Requirements IMPORTANT: Observe all parts are shown must be sealed. Parts needed ■ Home power supply cable ■ 1 - ½" (12.7 mm) UL listed or CSA approved strain relief ■ 3 ...
...91.4 cm) models 3 metal grease filters for venting through the roof or through the wall. All openings in the "Accessories" section.) Parts supplied Remove parts from strong draft areas, such as windows, doors and strong heating vents. Range hood †®TORX is factory set for 48" ... 20 mm washers ■ 2 - 10 x 50 mm wall anchors ■ T-20 TORX®† adapter Location Requirements IMPORTANT: Observe all parts are shown must be sealed. Parts needed ■ Home power supply cable ■ 1 - ½" (12.7 mm) UL listed or CSA approved strain relief ■ 3 ...

Installation Guide
Page 5
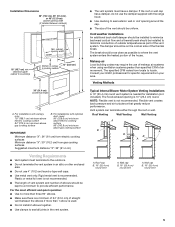
... and number of elbows should be kept to a minimum to locale. Venting Methods 36" (91.4 cm) countertop height A. The break should be as close as part of the thermal break.
... and number of elbows should be kept to a minimum to locale. Venting Methods 36" (91.4 cm) countertop height A. The break should be as close as part of the thermal break.

Installation Guide
Page 6
...is used in conformance with National Electrical Code, ANSI/NFPA 70 (latest edition), or CSA Standards C22.1-94, Canadian Electrical Code, Part 1 and C22.2 No. 0-M91 (latest edition) and all local codes and ordinances. Roof caps D. Mount from : National Fire... Vent System Length To calculate the length of the National Electrical Code, ANSI/NFPA 70 (latest edition), or CSA Standards C22. 1-94, Canadian Electrical Code, Part 1 and C22.2 No. 0-M91 (latest edition) and all governing codes and ordinances. H. Typical In-line Blower Motor System Venting Installations C A E D A B A...
...is used in conformance with National Electrical Code, ANSI/NFPA 70 (latest edition), or CSA Standards C22.1-94, Canadian Electrical Code, Part 1 and C22.2 No. 0-M91 (latest edition) and all local codes and ordinances. Roof caps D. Mount from : National Fire... Vent System Length To calculate the length of the National Electrical Code, ANSI/NFPA 70 (latest edition), or CSA Standards C22. 1-94, Canadian Electrical Code, Part 1 and C22.2 No. 0-M91 (latest edition) and all governing codes and ordinances. H. Typical In-line Blower Motor System Venting Installations C A E D A B A...

Installation Guide
Page 7
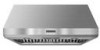
... exhaust vent. ■ Check that all necessary cuts in back or other injury. 4. Place "X" B covering over that product. ■ Before making cutouts, make all installation parts have been removed from gas cooking surfaces, and a suggested maximum of 36" (91.4 cm), above the marked horizontal line and centered on the rear panel...
... exhaust vent. ■ Check that all necessary cuts in back or other injury. 4. Place "X" B covering over that product. ■ Before making cutouts, make all installation parts have been removed from gas cooking surfaces, and a suggested maximum of 36" (91.4 cm), above the marked horizontal line and centered on the rear panel...

Installation Guide
Page 8
... type or an in the panel and secure with the screws. For rear venting, the mounting bracket and spring clip that are blower motor mounting parts in the range hood back over the 2 screws mounted to the wood support mounted to the top of the range hood and install a UL listed...
... type or an in the panel and secure with the screws. For rear venting, the mounting bracket and spring clip that are blower motor mounting parts in the range hood back over the 2 screws mounted to the wood support mounted to the top of the range hood and install a UL listed...