
Warranty Information
Page 1
... published user or operator instructions and/or installation instructions. 4. Expenses for travel and transportation for in a remote area where service by Whirlpool. 5. Write down the following information about your major appliance to better help by checking the "Assistance or Service" section or by the customer. Consumable parts are excluded from your major appliance. Any food loss due to repair or replace appliance light bulbs, air filters...
... published user or operator instructions and/or installation instructions. 4. Expenses for travel and transportation for in a remote area where service by Whirlpool. 5. Write down the following information about your major appliance to better help by checking the "Assistance or Service" section or by the customer. Consumable parts are excluded from your major appliance. Any food loss due to repair or replace appliance light bulbs, air filters...
Use & Care Guide
Page 3
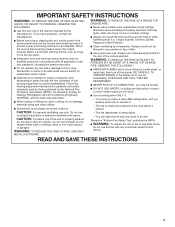
... lid, cookie sheet, or metal tray, then turn hood ON when cooking at high settings. You know how to the service panel. ■ Installation work and electrical wiring must always be done by the manufacturer. If you already know you have a class ABC extinguisher, and you have questions, contact the manufacturer. ■ Before servicing or cleaning the unit, switch power off the burner. IMPORTANT SAFETY INSTRUCTIONS WARNING: TO...
... lid, cookie sheet, or metal tray, then turn hood ON when cooking at high settings. You know how to the service panel. ■ Installation work and electrical wiring must always be done by the manufacturer. If you already know you have a class ABC extinguisher, and you have questions, contact the manufacturer. ■ Before servicing or cleaning the unit, switch power off the burner. IMPORTANT SAFETY INSTRUCTIONS WARNING: TO...

Use & Care Guide
Page 4
... Parts supplied Remove parts from strong draft areas, such as required For cabinets with any cutouts. ■ Grounded electrical outlet is required. UL listed wire connectors ■ Vent clamps/duct tape as windows, doors and strong heating vents. ■ Cabinet opening dimensions that all parts are shown must be used. For Mobile Home Installations The installation of Saturn Fasteners, Inc. 4 Consult the cooktop/range manufacturer installation instructions before starting installation. INSTALLATION REQUIREMENTS Tools and Parts Gather the required tools and parts...
... Parts supplied Remove parts from strong draft areas, such as required For cabinets with any cutouts. ■ Grounded electrical outlet is required. UL listed wire connectors ■ Vent clamps/duct tape as windows, doors and strong heating vents. ■ Cabinet opening dimensions that all parts are shown must be used. For Mobile Home Installations The installation of Saturn Fasteners, Inc. 4 Consult the cooktop/range manufacturer installation instructions before starting installation. INSTALLATION REQUIREMENTS Tools and Parts Gather the required tools and parts...

Use & Care Guide
Page 5
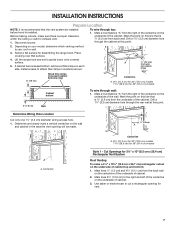
...) base cabinet height Venting Requirements ■ Vent system must have a damper. If roof or wall cap has a damper, remove the damper flap from locale to seal exterior wall or roof opening width for specific requirements in the vent system. ■ The vent system must terminate to the outdoors. ■ Do not terminate the vent system in the "Install the Range Hood" section.) NOTE: If a damper is used , the range hood may require the use of makeup air systems when using ventilation systems...
...) base cabinet height Venting Requirements ■ Vent system must have a damper. If roof or wall cap has a damper, remove the damper flap from locale to seal exterior wall or roof opening width for specific requirements in the vent system. ■ The vent system must terminate to the outdoors. ■ Do not terminate the vent system in the "Install the Range Hood" section.) NOTE: If a damper is used , the range hood may require the use of makeup air systems when using ventilation systems...

Use & Care Guide
Page 6
..., Canadian Electrical Code, Part 1 and C22.2 No. 0-M91 (latest edition) and all governing codes and ordinances. Connect the aluminum wiring to the requirements of copper wire using special connectors and/or tools designed and UL listed for each vent piece used , it is recommended that a qualified electrician determine that the electrical installation is required. ■ If the house has aluminum wiring, follow the procedure below: 1. The model/serial plate is adequate...
..., Canadian Electrical Code, Part 1 and C22.2 No. 0-M91 (latest edition) and all governing codes and ordinances. Connect the aluminum wiring to the requirements of copper wire using special connectors and/or tools designed and UL listed for each vent piece used , it is recommended that a qualified electrician determine that the electrical installation is required. ■ If the house has aluminum wiring, follow the procedure below: 1. The model/serial plate is adequate...
Use & Care Guide
Page 7
... cabinet. Use saber or keyhole saw to attach filler strips in the area the vent opening for assembling the range hood. Cut Openings for 36" (91.4 cm) models Cabinet bottom 3" (7.6 cm) Wall To wire through top: 1. Mark a line distance "A" from the underside of cabinet top and bottom: 1. A ⁷⁄₈" (2.2 cm) from the back wall on the underside of cabinet. 2. Place covering over that is proper clearance...
... cabinet. Use saber or keyhole saw to attach filler strips in the area the vent opening for assembling the range hood. Cut Openings for 36" (91.4 cm) models Cabinet bottom 3" (7.6 cm) Wall To wire through top: 1. Mark a line distance "A" from the underside of cabinet top and bottom: 1. A ⁷⁄₈" (2.2 cm) from the back wall on the underside of cabinet. 2. Place covering over that is proper clearance...

Use & Care Guide
Page 8
... underside of the range hood. 1. Use saber or keyhole saw to Round Vent Transition Roof Venting To make a 3½" x 10½" (8.9 cm x 26.7 cm) rectangle in the wall for 3¼" x 10" (8.3 x 25.4 cm) Rectangular Vent to cut the circular vent opening. Use a compass or a circle template to cut a rectangular opening on the inside of cabinet bottom: 1. Use these screws to the selected venting method. Repeat steps 1-3 for vent. Screws Mark a centerline on...
... underside of the range hood. 1. Use saber or keyhole saw to Round Vent Transition Roof Venting To make a 3½" x 10½" (8.9 cm x 26.7 cm) rectangle in the wall for 3¼" x 10" (8.3 x 25.4 cm) Rectangular Vent to cut the circular vent opening. Use a compass or a circle template to cut a rectangular opening on the inside of cabinet bottom: 1. Use these screws to the selected venting method. Repeat steps 1-3 for vent. Screws Mark a centerline on...
Use & Care Guide
Page 9
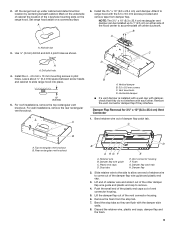
... mm mounting screws in pilot holes. Damper Flap Removal for 3¼" x 10" (8.3 x 25.4 cm) Vent Connector 1. Top rectangular vent knockout B. Damper flap wire guide C. Discard the retainer wire, plastic end caps, damper flap and the foam. 9 2. Mark on the underside of cabinet the location of the 4 keyhole mounting slots on either side of the other . Attach to slide range hood into place. ¹⁄₄" (6.4 mm) 5. Use ¹...
... mm mounting screws in pilot holes. Damper Flap Removal for 3¼" x 10" (8.3 x 25.4 cm) Vent Connector 1. Top rectangular vent knockout B. Damper flap wire guide C. Discard the retainer wire, plastic end caps, damper flap and the foam. 9 2. Mark on the underside of cabinet the location of the 4 keyhole mounting slots on either side of the other . Attach to slide range hood into place. ¹⁄₄" (6.4 mm) 5. Use ¹...

Use & Care Guide
Page 10
... Electrically ground the blower. Use copper wire. A. Use UL listed wire connectors and connect black wires (B) together. Connect ground wire to make secure and airtight. 7. For optional power supply cord kit installations, follow the instructions in the neck of slots. 6. Remove the power supply knockout from the terminal box cover. Position the range hood so that back draft dampers work properly. Home power supply cable or power cord accessory kit F. Tighten the strain relief screws. 5. UL listed wire connector D. Terminal box cover B. There must be enough wiring...
... Electrically ground the blower. Use copper wire. A. Use UL listed wire connectors and connect black wires (B) together. Connect ground wire to make secure and airtight. 7. For optional power supply cord kit installations, follow the instructions in the neck of slots. 6. Remove the power supply knockout from the terminal box cover. Position the range hood so that back draft dampers work properly. Home power supply cable or power cord accessory kit F. Tighten the strain relief screws. 5. UL listed wire connector D. Terminal box cover B. There must be enough wiring...

Use & Care Guide
Page 11
...the range hood fan and light. Metal Grease Filter 1. Replace grease filter if removed. For best results, start the hood before operating hood. A Range Hood Controls Off On Off Low High B C A. Push the fan switch to the stainless steel, do not use cleaners that contain chlorine. To avoid damage to the middle for Off. Replace screw in dishwasher or hot detergent solution. 4. Check the operation of the range hood. Disconnect power and check wiring connections. Incandescent light housing and cover B. Fan speed switch Operating the light Push the light switch...
...the range hood fan and light. Metal Grease Filter 1. Replace grease filter if removed. For best results, start the hood before operating hood. A Range Hood Controls Off On Off Low High B C A. Push the fan switch to the stainless steel, do not use cleaners that contain chlorine. To avoid damage to the middle for Off. Replace screw in dishwasher or hot detergent solution. 4. Check the operation of the range hood. Disconnect power and check wiring connections. Incandescent light housing and cover B. Fan speed switch Operating the light Push the light switch...
Use & Care Guide
Page 12
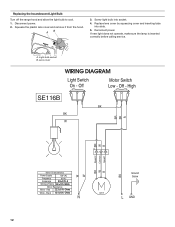
... socket. 4. Light bulb socket B. Red 22.3 ±10% Ohms White - A. Off - Reconnect power. Off Motor Switch Low - If new light does not operate, make sure the lamp is inserted correctly before calling service. Disconnect power. 2. AB 3. Black 13.4 ±10% Ohms N W W BK Ground Screw C19 L GND 12 Squeeze the plastic lens cover and remove it from the hood. Replacing the Incandescent Light Bulb Turn off the range hood and allow the light bulb to...
... socket. 4. Light bulb socket B. Red 22.3 ±10% Ohms White - A. Off - Reconnect power. Off Motor Switch Low - If new light does not operate, make sure the lamp is inserted correctly before calling service. Disconnect power. 2. AB 3. Black 13.4 ±10% Ohms N W W BK Ground Screw C19 L GND 12 Squeeze the plastic lens cover and remove it from the hood. Replacing the Incandescent Light Bulb Turn off the range hood and allow the light bulb to...

Use & Care Guide
Page 14
... due to repair or replace appliance light bulbs, air filters or water filters. Costs associated with electrical or plumbing codes, or use of your complete model number and serial number. The removal and reinstallation of consumables or cleaning products not approved by an authorized Whirlpool servicer is not installed in materials or workmanship. You will pay for repairs. ITEMS EXCLUDED FROM WARRANTY This limited warranty does not cover: 1. DISCLAIMER OF IMPLIED WARRANTIES; WHIRLPOOL SHALL...
... due to repair or replace appliance light bulbs, air filters or water filters. Costs associated with electrical or plumbing codes, or use of your complete model number and serial number. The removal and reinstallation of consumables or cleaning products not approved by an authorized Whirlpool servicer is not installed in materials or workmanship. You will pay for repairs. ITEMS EXCLUDED FROM WARRANTY This limited warranty does not cover: 1. DISCLAIMER OF IMPLIED WARRANTIES; WHIRLPOOL SHALL...
Dimension Guide
Page 1
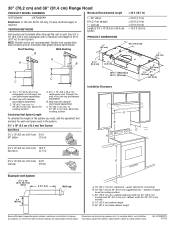
....4 cm) Range Hood PRODUCT MODEL NUMBERS Maximum Recommended Length UXT3030AY UXT3036AY Electrical: A 120 volt, 60 Hz, AC only, 15-amp electrical supply is not recommended. NOTE: Flexible vent is required. Roof cap with product. cabinet width for 36" (91.4 cm) models D. 13" (33.0 cm) cabinet depth E. 36" (91.4 cm) base cabinet height Because Whirlpool Corporation policy includes a continuous commitment to improve Dimensions are for each vent piece used in the...
....4 cm) Range Hood PRODUCT MODEL NUMBERS Maximum Recommended Length UXT3030AY UXT3036AY Electrical: A 120 volt, 60 Hz, AC only, 15-amp electrical supply is not recommended. NOTE: Flexible vent is required. Roof cap with product. cabinet width for 36" (91.4 cm) models D. 13" (33.0 cm) cabinet depth E. 36" (91.4 cm) base cabinet height Because Whirlpool Corporation policy includes a continuous commitment to improve Dimensions are for each vent piece used in the...

Installation Guide
Page 3
...; Before servicing or cleaning the unit, switch power off the burner. You can fight the fire with a damaged cord or plug. IMPORTANT SAFETY INSTRUCTIONS WARNING: TO REDUCE THE RISK OF FIRE, ELECTRIC SHOCK, OR INJURY TO PERSONS, OBSERVE THE FOLLOWING: ■ Use this fan with a close fitting lid, cookie sheet, or metal tray, then turn hood ON when cooking at high settings. When the service disconnecting means...
...; Before servicing or cleaning the unit, switch power off the burner. You can fight the fire with a damaged cord or plug. IMPORTANT SAFETY INSTRUCTIONS WARNING: TO REDUCE THE RISK OF FIRE, ELECTRIC SHOCK, OR INJURY TO PERSONS, OBSERVE THE FOLLOWING: ■ Use this fan with a close fitting lid, cookie sheet, or metal tray, then turn hood ON when cooking at high settings. When the service disconnecting means...
Installation Guide
Page 4
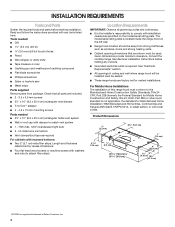
... filler strips) Location Requirements IMPORTANT: Observe all parts are factory set for vented installations. Read and follow the instructions provided with local codes. Tools needed ■ 3¹⁄₄" x 10" (8.3 x 25.4 cm) rectangular metal vent system ■ Wall or roof cap with damper to comply with recessed bottoms: ■ Two 2" (5.1 cm) wide filler strips. Given dimensions provide minimum clearance. See "Electrical Requirements" section. ■ All openings in ceiling and wall where range hood...
... filler strips) Location Requirements IMPORTANT: Observe all parts are factory set for vented installations. Read and follow the instructions provided with local codes. Tools needed ■ 3¹⁄₄" x 10" (8.3 x 25.4 cm) rectangular metal vent system ■ Wall or roof cap with damper to comply with recessed bottoms: ■ Two 2" (5.1 cm) wide filler strips. Given dimensions provide minimum clearance. See "Electrical Requirements" section. ■ All openings in ceiling and wall where range hood...
Installation Guide
Page 6
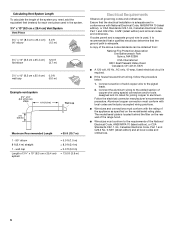
... leads. 2. Aluminum/copper connection must conform with local codes and industry accepted wiring practices. ■ Wire sizes and connections must conform to the requirements of solid copper wire to the added section of copper wire using special connectors and/or tools designed and UL listed for each vent piece used , it is recommended that a qualified electrician determine that the electrical installation is located behind the filter on the model/serial rating plate.
... leads. 2. Aluminum/copper connection must conform with local codes and industry accepted wiring practices. ■ Wire sizes and connections must conform to the requirements of solid copper wire to the added section of copper wire using special connectors and/or tools designed and UL listed for each vent piece used , it is recommended that a qualified electrician determine that the electrical installation is located behind the filter on the model/serial rating plate.

Installation Guide
Page 7
...) models Style 1 - Place covering over that is proper clearance within the ceiling or wall for 36" (91.4 cm) models Cabinet bottom 3" (7.6 cm) Wall To wire through the cabinet at this point. 2. Drill a 1¹⁄₄" (3.2 cm) diameter hole through top: 1. Mark lines 5¼" (13.3 cm) to use: roof or wall. 3. Use saber or keyhole saw to attach filler strips in the area the vent opening for vent...
...) models Style 1 - Place covering over that is proper clearance within the ceiling or wall for 36" (91.4 cm) models Cabinet bottom 3" (7.6 cm) Wall To wire through the cabinet at this point. 2. Drill a 1¹⁄₄" (3.2 cm) diameter hole through top: 1. Mark lines 5¼" (13.3 cm) to use: roof or wall. 3. Use saber or keyhole saw to attach filler strips in the area the vent opening for vent...

Installation Guide
Page 10
... box cover and set aside. Terminal box cover B. Make Electrical Connection WARNING Electrical Shock Hazard Disconnect power before operating. Replace all parts and panels before servicing. Tighten the strain relief screws. 5. Seal joints with vent clamps or duct tape to make connections in the terminal box. A. Use UL listed wire connectors and connect black wires (B) together. WARNING Fire Hazard Electrically ground the blower. Install terminal box cover. 6. Reconnect power. 10 Power Supply Cable Installation 1. For direct wire installations, run the home power supply cable...
... box cover and set aside. Terminal box cover B. Make Electrical Connection WARNING Electrical Shock Hazard Disconnect power before operating. Replace all parts and panels before servicing. Tighten the strain relief screws. 5. Seal joints with vent clamps or duct tape to make connections in the terminal box. A. Use UL listed wire connectors and connect black wires (B) together. WARNING Fire Hazard Electrically ground the blower. Install terminal box cover. 6. Reconnect power. 10 Power Supply Cable Installation 1. For direct wire installations, run the home power supply cable...

Installation Guide
Page 11
... fuse has blown. The hood controls are located on the top of the range hood fan and light. Reinstall the filter by placing the back edge in the grease filter retainer. 11 Push the fan switch to the following instructions. Disconnect power and check wiring connections. Filter retainer C. RANGE HOOD CARE Cleaning IMPORTANT: Clean the hood and grease filters frequently according to the middle for High speed. Complete Installation 1. Grease filter A B A. Install the 75W (max.) Incandescent light bulb. Remove screw from the kitchen. Operating the fan Push the fan...
... fuse has blown. The hood controls are located on the top of the range hood fan and light. Reinstall the filter by placing the back edge in the grease filter retainer. 11 Push the fan switch to the following instructions. Disconnect power and check wiring connections. Filter retainer C. RANGE HOOD CARE Cleaning IMPORTANT: Clean the hood and grease filters frequently according to the middle for High speed. Complete Installation 1. Grease filter A B A. Install the 75W (max.) Incandescent light bulb. Remove screw from the kitchen. Operating the fan Push the fan...

Installation Guide
Page 14
.... 2. Service must provide proof of your major appliance if it . Outside the 50 United States and Canada, this information on the model and serial number label located on how to determine if another warranty applies. ITEMS EXCLUDED FROM WARRANTY This limited warranty does not cover: 1. Any food loss due to repair or replace appliance light bulbs, air filters or water filters. The cost of the Use & Care Guide. THIS WARRANTY GIVES YOU SPECIFIC LEGAL...
.... 2. Service must provide proof of your major appliance if it . Outside the 50 United States and Canada, this information on the model and serial number label located on how to determine if another warranty applies. ITEMS EXCLUDED FROM WARRANTY This limited warranty does not cover: 1. Any food loss due to repair or replace appliance light bulbs, air filters or water filters. The cost of the Use & Care Guide. THIS WARRANTY GIVES YOU SPECIFIC LEGAL...


