
Dimension Guide
Page 1
....4 cm) 5.0 ft to change materials and specifications without notice. NOTE: Flexible vent is required. wall cap Length of copper wire using special connectors and/or tools designed and UL listed for planning purposes only. 30" (76.2 cm) and 36" (91.4 cm) Range Hood PRODUCT MODEL NUMBERS UXT5230AY UXT5236AY Electrical: q A 120 volt, 60 Hz., AC only, 15-amp, fused electrical circuit is not recommended. above the cooking surface A. 7" (17.8 cm) round vent out the top and...
....4 cm) 5.0 ft to change materials and specifications without notice. NOTE: Flexible vent is required. wall cap Length of copper wire using special connectors and/or tools designed and UL listed for planning purposes only. 30" (76.2 cm) and 36" (91.4 cm) Range Hood PRODUCT MODEL NUMBERS UXT5230AY UXT5236AY Electrical: q A 120 volt, 60 Hz., AC only, 15-amp, fused electrical circuit is not recommended. above the cooking surface A. 7" (17.8 cm) round vent out the top and...

Use & Care Guide
Page 3
... CAREFUL TO PREVENT BURNS. The fire is being switched on low or medium settings. ■ Always turn off at high settings. READ AND SAVE THESE INSTRUCTIONS 3 do not use cookware appropriate for proper combustion and exhausting of gases through the flue (chimney) of fire and to prevent backdrafting. you already know you have questions, contact the manufacturer. ■ Before servicing or cleaning the unit, switch power off...
... CAREFUL TO PREVENT BURNS. The fire is being switched on low or medium settings. ■ Always turn off at high settings. READ AND SAVE THESE INSTRUCTIONS 3 do not use cookware appropriate for proper combustion and exhausting of gases through the flue (chimney) of fire and to prevent backdrafting. you already know you have questions, contact the manufacturer. ■ Before servicing or cleaning the unit, switch power off...

Use & Care Guide
Page 4
... 2" (5.1 cm) wide filler strips. For information on ordering, see the "Accessories" section. For cabinets with any cutouts. ■ Grounded electrical outlet is a registered trademark of being installed as non-vented (recirculating) require charcoal filters. Given dimensions provide minimum clearance. Models that are included. ■ 2 - 3.5 x 5 mm screws ■ 3¹⁄₄" x 10" (8.3 x 25.4 cm) rectangular damper ■ T-10 Torx®† adapter ■ 4 - 4.5 x 13 mm mounting screws Parts needed ■ Drill...
... 2" (5.1 cm) wide filler strips. For information on ordering, see the "Accessories" section. For cabinets with any cutouts. ■ Grounded electrical outlet is a registered trademark of being installed as non-vented (recirculating) require charcoal filters. Given dimensions provide minimum clearance. Models that are included. ■ 2 - 3.5 x 5 mm screws ■ 3¹⁄₄" x 10" (8.3 x 25.4 cm) rectangular damper ■ T-10 Torx®† adapter ■ 4 - 4.5 x 13 mm mounting screws Parts needed ■ Drill...

Use & Care Guide
Page 6
...;" x 10" (8.3 cm x 25.4 cm) 0.0 ft wall cap (0.0 m) 6 Maximum Recommended Length = 35 ft (10.7 m) 1 - 90° elbow 8 ft (2.4 m) straight 1 - The model/serial plate is located behind the filter on the rear wall of the range hood. ■ Wire sizes must conform with the rating of the appliance as specified on the model/serial rating plate. Follow the electrical connector manufacturer's recommended procedure. wall cap 8 ft (2.4 m) straight Length of the above code standards can be obtained from...
...;" x 10" (8.3 cm x 25.4 cm) 0.0 ft wall cap (0.0 m) 6 Maximum Recommended Length = 35 ft (10.7 m) 1 - 90° elbow 8 ft (2.4 m) straight 1 - The model/serial plate is located behind the filter on the rear wall of the range hood. ■ Wire sizes must conform with the rating of the appliance as specified on the model/serial rating plate. Follow the electrical connector manufacturer's recommended procedure. wall cap 8 ft (2.4 m) straight Length of the above code standards can be obtained from...
Use & Care Guide
Page 7
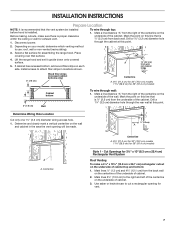
... is 2.2 cm) from the back wall on the underside of the cabinet. Mark the point on your model, determine which venting method to attach filler strips in the area the vent opening for assembling the range hood. Install screws to use: roof, wall or non-vented (recirculating). 3. Place covering over that surface. 4. Determine Wiring Hole Location Cut only one 1¹⁄₄" (3.2 cm) diameter wiring access hole. 1. Depending on this...
... is 2.2 cm) from the back wall on the underside of the cabinet. Mark the point on your model, determine which venting method to attach filler strips in the area the vent opening for assembling the range hood. Install screws to use: roof, wall or non-vented (recirculating). 3. Place covering over that surface. 4. Determine Wiring Hole Location Cut only one 1¹⁄₄" (3.2 cm) diameter wiring access hole. 1. Depending on this...

Use & Care Guide
Page 9
... model will have a 3¼" x 10" (8.3 x 25.4 cm) rectangular vent damper on a covered surface. Lift the range hood up under cabinet and determine final location by centering beneath cabinet. Set range hood aside on the inside your vent system installation. A A. Use ¹⁄₈" (3 mm) drill bit and drill 4 pilot holes as an accessory. Remove top rectangular and round vent knockouts. Rectangular vent system installations - For roof installations, remove the top rectangular vent knockout. For wall installations, remove...
... model will have a 3¼" x 10" (8.3 x 25.4 cm) rectangular vent damper on a covered surface. Lift the range hood up under cabinet and determine final location by centering beneath cabinet. Set range hood aside on the inside your vent system installation. A A. Use ¹⁄₈" (3 mm) drill bit and drill 4 pilot holes as an accessory. Remove top rectangular and round vent knockouts. Rectangular vent system installations - For roof installations, remove the top rectangular vent knockout. For wall installations, remove...

Use & Care Guide
Page 10
.... Remove terminal box cover and set aside. Remove the two screws from the top or rear of the vent hood (depending on ordering. Position the range hood so that they interfere. ■ Non-vented (recirculating) installations - B A C D E Power Supply Cable Installation 1. Remove the vent connector damper flap if they do not interfere with damper ■ If a vent damper is complete. 2. Check that the screws are in the hood electrical terminal box. Screw 3. For optional power supply cord kit installations, follow the instructions in the terminal box...
.... Remove terminal box cover and set aside. Remove the two screws from the top or rear of the vent hood (depending on ordering. Position the range hood so that they interfere. ■ Non-vented (recirculating) installations - B A C D E Power Supply Cable Installation 1. Remove the vent connector damper flap if they do not interfere with damper ■ If a vent damper is complete. 2. Check that the screws are in the hood electrical terminal box. Screw 3. For optional power supply cord kit installations, follow the instructions in the terminal box...

Use & Care Guide
Page 11
Home power supply cable or power cord accessory kit F. Fire Hazard Electrically ground the blower. Connect ground wire to see whether a circuit breaker has tripped or a household fuse has blown. b. See "Range Hood Use" section. G C D E A B F A. Green (or bare) ground wire E. UL listed or CSA approved ½" strain relief G. Use UL listed wire connectors and connect white wires (A) together. Replace grease filter. Check the operation of the range hood until the panel tabs align with the slots in death or electrical shock. 1. Failure...
Home power supply cable or power cord accessory kit F. Fire Hazard Electrically ground the blower. Connect ground wire to see whether a circuit breaker has tripped or a household fuse has blown. b. See "Range Hood Use" section. G C D E A B F A. Green (or bare) ground wire E. UL listed or CSA approved ½" strain relief G. Use UL listed wire connectors and connect white wires (A) together. Replace grease filter. Check the operation of the range hood until the panel tabs align with the slots in death or electrical shock. 1. Failure...

Use & Care Guide
Page 12
... Charcoal Filter To Clean the Filter: 1. A. Blower speed maximum button Operating the light The On/Off light button controls both lights. Press the BLOWER OFF button a second time to turn the blower on the front edge of the range hood and pull down on and control the blower speed and sound level for Off. For vented installations: Wash metal filters as needed in direction of grain to avoid scratching or damaging the surface. ■ For stainless steal models, Stainless Steel Cleaner and Polish Part Number...
... Charcoal Filter To Clean the Filter: 1. A. Blower speed maximum button Operating the light The On/Off light button controls both lights. Press the BLOWER OFF button a second time to turn the blower on the front edge of the range hood and pull down on and control the blower speed and sound level for Off. For vented installations: Wash metal filters as needed in direction of grain to avoid scratching or damaging the surface. ■ For stainless steal models, Stainless Steel Cleaner and Polish Part Number...

Use & Care Guide
Page 15
..., repair parts distributors and service companies. Whirlpool designated service technicians are made with any questions or concerns at : Whirlpool Brand Home Appliances Customer eXperience Center 553 Benson Road Benton Harbor, MI 49022-2692 Please include a daytime phone number in your correspondence. Accessories Stainless Steel Cleaner and Polish Order Part Number 31462A Charcoal Filter Kit Order Part Number W10386873 Power Cord Kit Order Part Number W10355452 7" (17.8 cm) Round Damper Order Part Number W10355451 7" (17.8 cm) Round Vent Mounting Plate Order Part Number...
..., repair parts distributors and service companies. Whirlpool designated service technicians are made with any questions or concerns at : Whirlpool Brand Home Appliances Customer eXperience Center 553 Benson Road Benton Harbor, MI 49022-2692 Please include a daytime phone number in your correspondence. Accessories Stainless Steel Cleaner and Polish Order Part Number 31462A Charcoal Filter Kit Order Part Number W10386873 Power Cord Kit Order Part Number W10355452 7" (17.8 cm) Round Damper Order Part Number W10355451 7" (17.8 cm) Round Vent Mounting Plate Order Part Number...

Use & Care Guide
Page 16
...") will need service, first see the "Troubleshooting" section of the Use & Care Guide. In Canada, call 1-800-253-1301. You must be easily determined. You will pay for repairs. The cost of repair or replacement under this warranty. 8. WHIRLPOOL CORPORATION MAJOR APPLIANCE WARRANTY LIMITED WARRANTY For one year from accident, alteration, misuse, abuse, fire, flood, acts of God, improper installation, installation not in a remote area where service by...
...") will need service, first see the "Troubleshooting" section of the Use & Care Guide. In Canada, call 1-800-253-1301. You must be easily determined. You will pay for repairs. The cost of repair or replacement under this warranty. 8. WHIRLPOOL CORPORATION MAJOR APPLIANCE WARRANTY LIMITED WARRANTY For one year from accident, alteration, misuse, abuse, fire, flood, acts of God, improper installation, installation not in a remote area where service by...

Installation Guide
Page 3
...; Clean ventilating fans frequently. Always use this unit only in the manner intended by NFPA. ■ WARNING: To reduce the risk of fire or electrical shock, do not vent exhaust air into spaces within walls or ceilings, attics or into wall or ceiling; If you already know you have a class ABC extinguisher, and you have questions, contact the manufacturer. ■ Before servicing or cleaning the unit, switch power...
...; Clean ventilating fans frequently. Always use this unit only in the manner intended by NFPA. ■ WARNING: To reduce the risk of fire or electrical shock, do not vent exhaust air into spaces within walls or ceilings, attics or into wall or ceiling; If you already know you have a class ABC extinguisher, and you have questions, contact the manufacturer. ■ Before servicing or cleaning the unit, switch power...

Installation Guide
Page 4
... template Parts supplied Remove parts from strong draft areas, such as required For 7" (17.8 cm) round vented installations: ■ 7" (17.8 cm) round metal vent system ■ 7" (17.8 cm) round damper. Length and thickness determined by recess dimensions. ■ Four flat head wood screws or machine screws with local codes. The model/serial rating plate is required. For information on ordering, see the "Accessories" section. ■ 7" (17.8 cm) round vent mounting plate. INSTALLATION REQUIREMENTS Tools and Parts Gather the required tools and parts before making...
... template Parts supplied Remove parts from strong draft areas, such as required For 7" (17.8 cm) round vented installations: ■ 7" (17.8 cm) round metal vent system ■ 7" (17.8 cm) round damper. Length and thickness determined by recess dimensions. ■ Four flat head wood screws or machine screws with local codes. The model/serial rating plate is required. For information on ordering, see the "Accessories" section. ■ 7" (17.8 cm) round vent mounting plate. INSTALLATION REQUIREMENTS Tools and Parts Gather the required tools and parts before making...

Installation Guide
Page 6
... x 25.4 cm) 0.0 ft wall cap (0.0 m) 6 Maximum Recommended Length = 35 ft (10.7 m) 1 - 90° elbow 8 ft (2.4 m) straight 1 - If codes permit and a separate ground wire is used in conformance with the rating of the appliance as specified on the rear wall of the range hood. ■ Wire sizes must conform to the requirements of copper wire using special connectors and/or tools designed and UL listed for each vent piece used , it is recommended...
... x 25.4 cm) 0.0 ft wall cap (0.0 m) 6 Maximum Recommended Length = 35 ft (10.7 m) 1 - 90° elbow 8 ft (2.4 m) straight 1 - If codes permit and a separate ground wire is used in conformance with the rating of the appliance as specified on the rear wall of the range hood. ■ Wire sizes must conform to the requirements of copper wire using special connectors and/or tools designed and UL listed for each vent piece used , it is recommended...

Installation Guide
Page 9
....8 cm) round vent mounting plate is also available as shown. Remove metal grease filter. See the "Range Hood Care" section. 7. Push the panel toward the back of the range hood until the front tabs of the panel and pull the panel away from damper flap. NOTE: Your model will have a 3¼" x 10" (8.3 x 25.4 cm) rectangular vent damper on your range hood. 3. A. Non-vent (recirculating) installations - A B C D A A. Install the 4 - 4.5 mm x 13 mm mounting screws in pilot holes. Use ¹⁄...
....8 cm) round vent mounting plate is also available as shown. Remove metal grease filter. See the "Range Hood Care" section. 7. Push the panel toward the back of the range hood until the front tabs of the panel and pull the panel away from damper flap. NOTE: Your model will have a 3¼" x 10" (8.3 x 25.4 cm) rectangular vent damper on your range hood. 3. A. Non-vent (recirculating) installations - A B C D A A. Install the 4 - 4.5 mm x 13 mm mounting screws in pilot holes. Use ¹⁄...

Installation Guide
Page 10
... the screws are in the neck of the keyhole slots are in the narrow neck of the recirculation cover plate is required. Position the range hood so that back draft dampers work properly. 10 For optional power supply cord kit installations, follow the instructions in the terminal box. Horizontal vent connector with damper ■ If a vent damper is complete. 2. Terminal box cover B. B A C D E Power Supply Cable Installation 1. For direct wire installations, run the home power supply cable according to make connections in the "Make Electrical Connection" section...
... the screws are in the neck of the keyhole slots are in the narrow neck of the recirculation cover plate is required. Position the range hood so that back draft dampers work properly. 10 For optional power supply cord kit installations, follow the instructions in the terminal box. Horizontal vent connector with damper ■ If a vent damper is complete. 2. Terminal box cover B. B A C D E Power Supply Cable Installation 1. For direct wire installations, run the home power supply cable according to make connections in the "Make Electrical Connection" section...

Installation Guide
Page 11
... front mounting flange. Replace grease filter. Check the operation of the range hood fan and light. Black wires C. Green ground screw 2. Fire Hazard Electrically ground the blower. Disconnect power and check wiring connections. Disconnect power. UL listed wire connector D. UL listed or CSA approved ½" strain relief G. Use UL listed wire connectors and connect white wires (A) together. Release the panel so the tabs lock the panel in terminal box. G C D E A B F A. Green (or bare) ground wire E. Replace the 2 bottom panels. See the "Range Hood Care" section...
... front mounting flange. Replace grease filter. Check the operation of the range hood fan and light. Black wires C. Green ground screw 2. Fire Hazard Electrically ground the blower. Disconnect power and check wiring connections. Disconnect power. UL listed wire connector D. UL listed or CSA approved ½" strain relief G. Use UL listed wire connectors and connect white wires (A) together. Release the panel so the tabs lock the panel in terminal box. G C D E A B F A. Green (or bare) ground wire E. Replace the 2 bottom panels. See the "Range Hood Care" section...

Installation Guide
Page 12
... range hood and pull down on and control the blower speed and sound level for Off. Blower speed medium button D. Press once for On and again for quiet operation. Press the BLOWER OFF button a second time to the stainless steel, do not use cleaners that contain chlorine. Grease filter 3. Remove screw from the kitchen. On/Off light button B. For non-vented (recirculating) installations: The charcoal filter is not washable. A C B A. Metal or Charcoal Filter To Clean the Filter: 1. Operating the blower The BLOWER SPEED buttons turn the blower off and speed...
... range hood and pull down on and control the blower speed and sound level for Off. Blower speed medium button D. Press once for On and again for quiet operation. Press the BLOWER OFF button a second time to the stainless steel, do not use cleaners that contain chlorine. Grease filter 3. Remove screw from the kitchen. On/Off light button B. For non-vented (recirculating) installations: The charcoal filter is not washable. A C B A. Metal or Charcoal Filter To Clean the Filter: 1. Operating the blower The BLOWER SPEED buttons turn the blower off and speed...

Installation Guide
Page 16
... Phone number Model number Serial number Purchase date 16 This warranty is operated and maintained according to instructions attached to or furnished with electrical or plumbing codes, or use your major appliance, to instruct you may find additional help you obtain assistance or service if you need it is installed in accordance with the removal from your home of your major appliance, to replace or repair house fuses, or...
... Phone number Model number Serial number Purchase date 16 This warranty is operated and maintained according to instructions attached to or furnished with electrical or plumbing codes, or use your major appliance, to instruct you may find additional help you obtain assistance or service if you need it is installed in accordance with the removal from your home of your major appliance, to replace or repair house fuses, or...

Warranty Information
Page 1
... another warranty applies. Costs associated with published installation instructions. 11. If outside the 50 United States and Canada, contact your sales slip together for in materials or workmanship. Major appliances with original model/serial numbers that is reported to repair or replace appliance light bulbs, air filters or water filters. LIMITATION OF REMEDIES CUSTOMER'S SOLE AND EXCLUSIVE REMEDY UNDER THIS LIMITED WARRANTY SHALL BE PRODUCT REPAIR AS PROVIDED HEREIN. Repairs to parts or...
... another warranty applies. Costs associated with published installation instructions. 11. If outside the 50 United States and Canada, contact your sales slip together for in materials or workmanship. Major appliances with original model/serial numbers that is reported to repair or replace appliance light bulbs, air filters or water filters. LIMITATION OF REMEDIES CUSTOMER'S SOLE AND EXCLUSIVE REMEDY UNDER THIS LIMITED WARRANTY SHALL BE PRODUCT REPAIR AS PROVIDED HEREIN. Repairs to parts or...


